Note
Access to this page requires authorization. You can try signing in or changing directories.
Access to this page requires authorization. You can try changing directories.
This page walks you through creating a Databricks SQL alert end-to-end. It covers the alert editor, the create-alert tutorial, how to review evaluation details, and the advanced settings and notification templates you can configure.
Explore the alert editor
The steps in this section walk you through how to create the alert shown in the following image. Use the labels and explanations to understand each component.
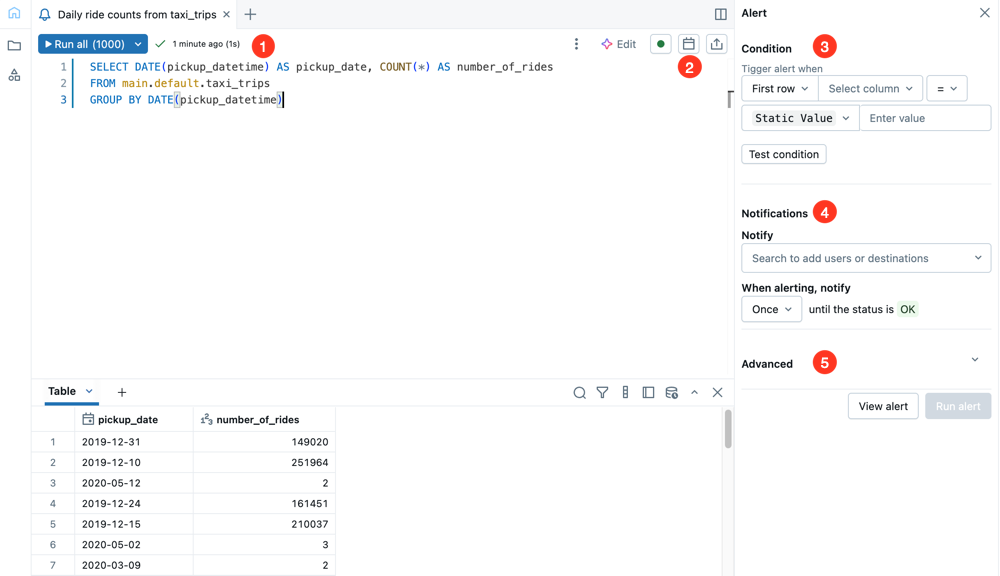
- Query editor: Write and test the query that you want to alert on.
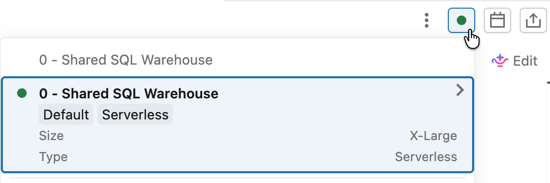
- Compute: Choose the SQL warehouse that runs the alert query. The status indicator shows whether the selected warehouse is running. For warehouse sizing recommendations and behavior at scheduled run time, see Choose a SQL warehouse for an alert.
- Schedule: Set a periodic schedule for the alert to run.
- Share: Set permissions that define how others in your workspace can work with your alert.
- Condition: Select the value threshold that should trigger an alert notification. You can run the query to test the condition from this section.
- Notifications: Indicate which users or notification destinations should be alerted when the threshold value falls outside of the expected range. Optionally, set a notification frequency to repeat notifications until the alert returns to
OK. - Advanced: Use advanced settings to alert on special values and conditions.
Important
Alerts do not support queries with parameters.
Create an alert
Use the following steps to create an alert:
Click
 Alerts in the sidebar and click Create Alert.
Copy and paste the following query in the query editor. Click Run all (1000). To learn more about working with the SQL editor, see Write queries and explore data in the new SQL editor.
SELECT
  to_date(tpep_pickup_datetime) as date,
  SUM(fare_amount) as amount
FROM
  `samples`.`nyctaxi`.`trips`
GROUP BY
  ALL
ORDER BY
  1 DESC
Click the compute selector, and then click a warehouse from the list to specify which compute resource runs the alert.
In the Condition field, set the conditions that should trigger the alert.
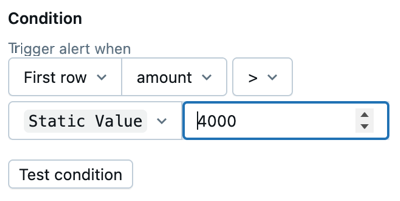
Apply the following settings as shown:
- Select Sum as the data value to check. You can set an alert condition on the first value of a column in the query result, or you can select to set an aggregation across all rows of a single column, such as SUM or AVERAGE.
- Select amount as the column to check.
- Select > (greater than) as the logical operator to apply.
- Set the threshold value to
Static value4000. Static value is selected by default. Enter 4000 into the value field.
Click Test condition to preview the alert and test whether the alert would trigger with the current data. The provided settings should trigger the alert. You can change the threshold value to test further.
In the Notifications section, search for your username and click it when it appears.
Click
 the calendar icon to open the Edit schedule dialog. Use the drop-down menus to set the alert so that it runs Every 5 minutes from 0 minutes past the hour. Click Save.
Optionally, select the Show cron syntax checkbox to edit the schedule in Quartz Cron Syntax.
the calendar icon to open the Edit schedule dialog. Use the drop-down menus to set the alert so that it runs Every 5 minutes from 0 minutes past the hour. Click Save.
Optionally, select the Show cron syntax checkbox to edit the schedule in Quartz Cron Syntax.Click View alert.
Your alert is saved and runs on the schedule you provided. The data used in this example is static, so if your Test condition returned as Triggered, it triggers again the next time it runs. You receive an email notification as an alert. If the Test condition returned OK, no notification is sent.
Review alert details
A page opens to show your alert details. The page also shows an alert history with evaluation details. Click the Run now button to run the alert query immediately and return the result on this page.
Click Edit in the upper right corner of the page to continue editing the alert.
Advanced settings
Click Advanced settings to apply the following settings:
- Notify on OK: Send a notification when the alert returns as
OK. - Empty result state: Set a special status to return when the query returns no results.
- Template: Configure the notification template. See Notification templates.
Workspace admins can set up new notification destinations. See Manage notification destinations.
Notification templates
Notifications use the default template unless you customize them. To customize the subject and body, select Customize template. Two editors are available: the standard editor and the Markdown editor. Click the tabs below to compare them.
Standard editor
In the standard editor, reference variables in the subject and body with {{VARIABLE_NAME}}. The following variables are supported:
ALERT_STATUS: The evaluated alert status (string).ALERT_CONDITION: The alert condition operator (string).ALERT_THRESHOLD: The alert threshold (string or number).ALERT_COLUMN: The alert column name (string).ALERT_NAME: The alert name (string).ALERT_URL: The alert page URL (string).QUERY_RESULT_TABLE: The query result HTML table (string). Results are limited to the first 100 rows. Only email notification destinations can render HTML.QUERY_RESULT_VALUE: The query result value (string or number).QUERY_RESULT_ROWS: The query result rows (value array).QUERY_RESULT_COLS: The query result columns (string array).
For example: Alert "{{ALERT_NAME}}" changed status to {{ALERT_STATUS}}.
The standard editor also supports HTML for formatting. Only email notification destinations can render HTML. The following HTML tags are allowed: <a>, <b>, <blockquote>, <br>, <code>, <del>, <div>, <em>, <h1>, <h2>, <h3>, <h4>, <h5>, <h6>, <hr>, <i>, <img>, <li>, <ol>, <p>, <pre>, <span>, <table>, <thead>, <tbody>, <td>, <th>, <tr>, <u>, <ul>.
The following attributes are allowed on the listed tags:
| Attribute | Supported tags |
|---|---|
href |
<a> |
title |
<img> |
target |
<a> |
alt |
<img> |
src |
<img> |
start |
<b>, <blockquote>, <code>, <del>, <em>, <hr>, <i>, <pre>, <u> |
Click the Preview toggle button to preview the rendered result.
Important
The preview is useful for verifying that template variables are rendered correctly. It is not an accurate representation of the eventual notification content, because each notification destination can display notifications differently.
Markdown editor
Turn Markdown Editor on to write the body using Markdown. The Markdown editor has a formatting toolbar and a rendered preview.
In the Markdown editor, reference variables with @VARIABLE_NAME. Type @ in the body to open the variable picker. The Markdown editor supports ALERT_NAME, ALERT_STATUS, ALERT_CONDITION, ALERT_THRESHOLD, ALERT_COLUMN, ALERT_URL, and QUERY_RESULT_TABLE.