Navigate in Visual Studio Team Explorer
Azure DevOps Services | Azure DevOps Server 2022 - Azure DevOps Server 2019
Visual Studio 2019 | Visual Studio 2022
You use Team Explorer to coordinate your code efforts with other team members to develop a software project. In addition, you can manage work and that is assigned to you, your team, or your projects. Team Explorer is a plug-in that installs with Visual Studio. Developers can effectively collaborate using Team Explorer connected to projects hosted on Azure DevOps Services or an on-premises Azure DevOps Server.
Tip
You can install the latest version of Visual Studio clients from the Visual Studio downloads page.
Additional options for connecting to Azure DevOps Services or TFS include:
For information about compatibility among client and server versions, see Requirements and compatibility.
If you don't need Visual Studio, but want to connect to a project in Azure DevOps, you can install the free Visual Studio Community.
Prerequisites
| Category | Requirements |
|---|---|
| Project access | Project member. |
Connect to a project or repository
Team Explorer connects Visual Studio to projects in Azure DevOps. You can manage source code, work items, and builds. The operations available to you depend on which source control option—Git or Team Foundation version control (TFVC)—was selected to manage source code when the project was created.
Tip
If you open Visual Studio and the Team Explorer pane doesn't appear, choose the View>Team Explorer menu option from the tool bar.
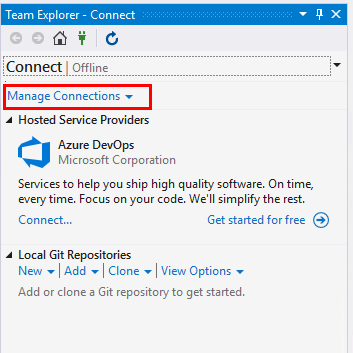
From the Connect page, you can select the projects you want to connect to and quickly switch connection to a different project and or repository. For details, see Connect to a project.

The Git and TFVC repos support different pages and functions. For a comparison of the two version control systems, see Choosing the right version control for your project.
Git version control and repository
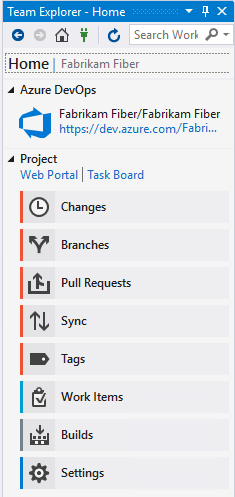
The following image shows the pages available when you connect to a Git repository from Visual Studio Team Explorer.
Note
Visual Studio 2019 version 16.8 and later versions provide a new Git menu for managing the Git workflow with less context switching than Team Explorer. Procedures provided in this article under the Visual Studio tab provide information for using the Git experience as well as Team Explorer. For more information, see Side-by-side comparison of Git and Team Explorer.

For more information about each page, see the following articles.
Home and Builds
Git version control
Work items
Home
Builds
- Create a new repo
- Clone an existing repo
- Changes: Save work with commits
- Branches: Create work in branches
- Pull Requests: Review code with pull requests"
- Sync: Update code with fetch and pull
- Tags: Work with Git tags
- Git preferences
- Git command reference
Default experience (Visual Studio 2019 and later versions)
Legacy experience (All Visual Studio versions)
Team Foundation version control
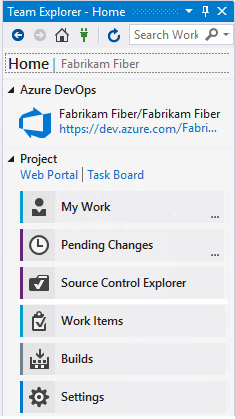
The following image shows the pages available when you connect to a TFVC repository from Visual Studio Team Explorer.

For more information about each page, see the following articles.
Home and Builds
TFVC
Work items
Home
Builds
- Configure workspace
- Suspend/resume work, Code review
- Pending Changes: Manage pending changes, Find shelvesets, Resolve conflicts
- Source Control Explorer: Add/view files and folders
- Add Check-In Policies
- Version control commands
Default experience (Visual Studio 2019 and later versions)
Legacy experience (All Visual Studio versions)
Reports
Note
Some pages, such as Reports, only appear when an on-premises TFS is configured with the required resources, such as SQL Server Reporting Services.
The Reports page opens the Reporting Services report site. This page appears only when your project is configured with SQL Server Analysis Services and Reporting Services. Also, the option to Create Report in Microsoft Excel appears only when reporting is configured for the project.
If your project is missing one or more pages, try to add functionality to your on-premises TFS deployment.
Settings
From the Settings page, you can configure administrative features for either a project or project collection. For more information about each page, see the following articles. Most of the links open to a web portal administration page. Not all settings are available from the Team Explorer plug-in for Eclipse.
Project
Project Collection
For more information, see About team, project, and organizational-level settings.
Refresh Team Explorer
If data doesn't appear as expected, the first thing to try is to refresh your client. Refreshing your client updates the local cache with changes that were made in another client or in Azure DevOps. To refresh Team Explorer, do one of the following actions:
- To refresh a page that you're currently viewing, choose
 Refresh in the menu bar (or choose F5).
 - To refresh the project you selected, choose
 Home, and then choose
  Refresh (or choose F5).
 - To refresh the set of teams defined for the project that you selected, choose Connect, and then choose
 Refresh (or enter F5).
To avoid potential errors, you should refresh your client application under the following circumstances:
- Process changes are made.
- Work item type definitions are added, removed, renamed, or updated.
- Area or iteration paths are added, removed, renamed, or updated.
- Users are added to or removed from security groups, or permissions are updated.
- A team member adds a new shared query or changes the name of a shared query.
- A build pipeline is added or deleted.
- A team or project is added or deleted.
Resolve images that don't display in Team Explorer
If an inline image isn't displayed in a work item form that you view in Visual Studio Team Explorer, but the image is displayed in the web portal, your credentials might have expired. You can resolve this by completing the following steps:
- In Visual Studio, select View > Other Windows > Web Browser (or use the shortcut Ctrl+Alt+R).
- In the web browser, locate your organization.
- Sign in with your credentials.
- Refresh your work item in Team Explorer.