Xamarin.Forms Local Database Tutorial
Before attempting this tutorial, you should have successfully completed the:
- Build your first Xamarin.Forms app quickstart.
- StackLayout tutorial.
- Button tutorial.
- Entry tutorial.
- CollectionView tutorial.
In this tutorial, you learn how to:
- Use the NuGet Package Manager to add SQLite.NET to a Xamarin.Forms project.
- Create the data access classes.
- Consume the data access classes.
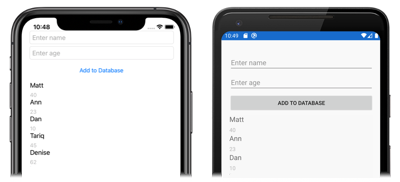
You will use Visual Studio 2019, or Visual Studio for Mac, to create a simple application that demonstrates how to store data in a local SQLite.NET database. The following screenshots show the final application:
Add SQLite.NET
To complete this tutorial you should have Visual Studio 2019 (latest release), with the Mobile development with .NET workload installed. In addition, you will require a paired Mac to build the tutorial application on iOS. For information about installing the Xamarin platform, see Installing Xamarin. For information about connecting Visual Studio 2019 to a Mac build host, see Pair to Mac for Xamarin.iOS development.
Launch Visual Studio, and create a new blank Xamarin.Forms app named LocalDatabaseTutorial.
Important
The C# and XAML snippets in this tutorial requires that the solution is named LocalDatabaseTutorial. Using a different name will result in build errors when you copy code from this tutorial into the solution.
For more information about the .NET Standard library that gets created, see Anatomy of a Xamarin.Forms application in the Xamarin.Forms Quickstart Deep Dive.
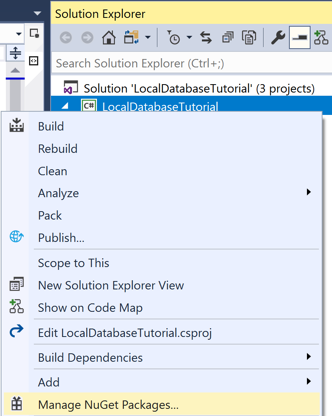
In Solution Explorer, select the LocalDatabaseTutorial project, right-click and select Manage NuGet Packages...:

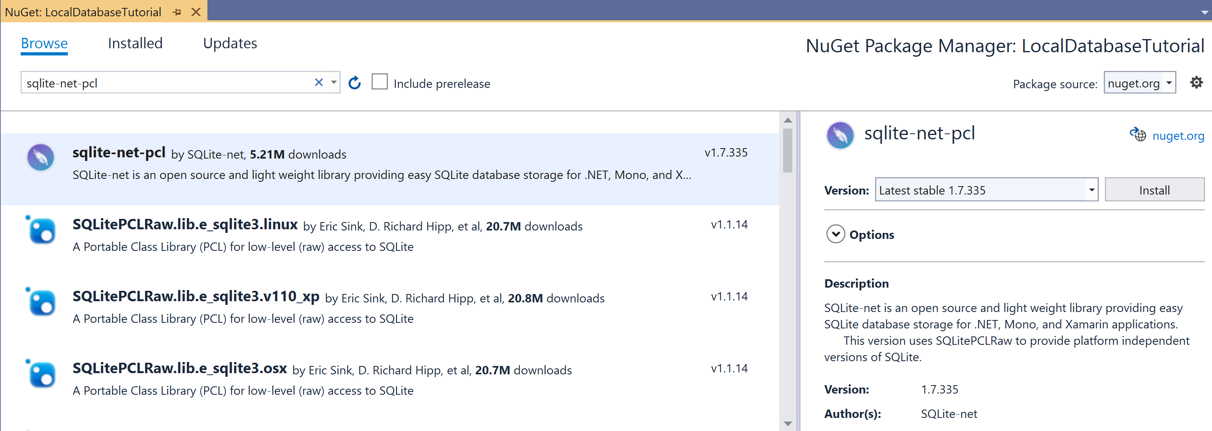
In the NuGet Package Manager, select the Browse tab, search for the sqlite-net-pcl NuGet package, select it, and click the Install button to add it to the project:

Note
There are many NuGet packages with similar names. The correct package has these attributes:
- Authors: SQLite-net
- NuGet link: sqlite-net-pcl
Despite the package name, this NuGet package can be used in .NET Standard projects.
This package will be used to incorporate database operations into the application.
Important
SQLite.NET is a third-party library that's supported from the praeclarum/sqlite-net repo.
Build the solution to ensure there are no errors.
Create data access classes
In this exercise you will add data access classes to the LocalDatabaseTutorial project, which will be used to persist data about people to the database.
In Solution Explorer, in the LocalDatabaseTutorial project, add a new class named
Personto the project. Then, in Person.cs, remove all of the template code and replace it with the following code:using SQLite; namespace LocalDatabaseTutorial { public class Person { [PrimaryKey, AutoIncrement] public int ID { get; set; } public string Name { get; set; } public int Age { get; set; } } }This code defines a
Personclass that will store data about each person in the application. TheIDproperty is marked withPrimaryKeyandAutoIncrementattributes to ensure that eachPersoninstance in the database will have a unique id provided by SQLite.NET.In Solution Explorer, in the LocalDatabaseTutorial project, add a new class named
Databaseto the project. Then, in Database.cs, remove all of the template code and replace it with the following code:using System.Collections.Generic; using System.Threading.Tasks; using SQLite; namespace LocalDatabaseTutorial { public class Database { readonly SQLiteAsyncConnection _database; public Database(string dbPath) { _database = new SQLiteAsyncConnection(dbPath); _database.CreateTableAsync<Person>().Wait(); } public Task<List<Person>> GetPeopleAsync() { return _database.Table<Person>().ToListAsync(); } public Task<int> SavePersonAsync(Person person) { return _database.InsertAsync(person); } } }This class contains code to create the database, read data from it, and write data to it. The code uses asynchronous SQLite.NET APIs that move database operations to background threads. In addition, the
Databaseconstructor takes the path of the database file as an argument. This path will be provided by theAppclass in the next exercise.In Solution Explorer, in the LocalDatabaseTutorial project, expand App.xaml and double-click App.xaml.cs to open it. Then, in App.xaml.cs, remove all of the template code and replace it with the following code:
using System;
using System.IO;
using Xamarin.Forms;

namespace LocalDatabaseTutorial
{
    public partial class App : Application
    {
        static Database database;

        public static Database Database
        {
            get
            {
                if (database == null)
                {
                    database = new Database(Path.Combine(Environment.GetFolderPath(Environment.SpecialFolder.LocalApplicationData), "people.db3"));
                }
                return database;
            }
        }

        public App()
        {
            InitializeComponent();

            MainPage = new MainPage();
        }

        protected override void OnStart()
        {
            // Handle when your app starts
        }

        protected override void OnSleep()
        {
            // Handle when your app sleeps
        }

        protected override void OnResume()
        {
            // Handle when your app resumes
        }
    }
}
This code defines a
Databaseproperty that creates a newDatabaseinstance as a singleton. A local file path and filename, which represents where to store the database, are passed as the argument to theDatabaseclass constructor.Important
The advantage of exposing the database as a singleton is that a single database connection is created that's kept open while the application runs, therefore avoiding the expense of opening and closing the database file each time a database operation is performed.
Build the solution to ensure there are no errors.
Consume data access classes
In this exercise you will create a user interface to consume the previously created data access classes.
In Solution Explorer, in the LocalDatabaseTutorial project, double-click MainPage.xaml to open it. Then, in MainPage.xaml, remove all of the template code and replace it with the following code:
<?xml version="1.0" encoding="utf-8"?>
<ContentPage xmlns="http://xamarin.com/schemas/2014/forms"
             xmlns:x="http://schemas.microsoft.com/winfx/2009/xaml"
             x:Class="LocalDatabaseTutorial.MainPage">
    <StackLayout Margin="20,35,20,20">
        <Entry x:Name="nameEntry"
               Placeholder="Enter name" />
        <Entry x:Name="ageEntry"
               Placeholder="Enter age" />
        <Button Text="Add to Database"
                Clicked="OnButtonClicked" />
        <CollectionView x:Name="collectionView">
            <CollectionView.ItemTemplate>
                <DataTemplate>
                    <StackLayout>
                        <Label Text="{Binding Name}"
                               FontSize="Medium" />
                        <Label Text="{Binding Age}"
                               TextColor="Silver"
                               FontSize="Small" />
                    </StackLayout>
                </DataTemplate>
            </CollectionView.ItemTemplate>
        </CollectionView>
    </StackLayout>
</ContentPage>
This code declaratively defines the user interface for the page, which consists of two
Entryinstances, aButton, and aCollectionViewin aStackLayout. EachEntryhas itsPlaceholderproperty set, which specifies the placeholder text that's shown prior to user input. TheButtonsets itsClickedevent to an event handler namedOnButtonClickedthat will be created in the next step. TheCollectionViewsets itsItemTemplateproperty to aDataTemplate, which uses aStackLayoutand twoLabelobjects to define the appearance of each row in theCollectionView. TheLabelobjects bind theirTextproperties to theNameandAgeproperties of eachPersonobject, respectively.In addition, the
Entryinstances andCollectionViewhave names specified with thex:Nameattribute. This enables the code-behind file to access these objects using the assigned names.In Solution Explorer, in the LocalDatabaseTutorial project, expand MainPage.xaml and double-click MainPage.xaml.cs to open it. Then, in MainPage.xaml.cs, add the
OnAppearingoverride andOnButtonClickedevent handler to the class:protected override async void OnAppearing() { base.OnAppearing(); collectionView.ItemsSource = await App.Database.GetPeopleAsync(); } async void OnButtonClicked(object sender, EventArgs e) { if (!string.IsNullOrWhiteSpace(nameEntry.Text) && !string.IsNullOrWhiteSpace(ageEntry.Text)) { await App.Database.SavePersonAsync(new Person { Name = nameEntry.Text, Age = int.Parse(ageEntry.Text) }); nameEntry.Text = ageEntry.Text = string.Empty; collectionView.ItemsSource = await App.Database.GetPeopleAsync(); } }The
OnAppearingmethod populates theCollectionViewwith any data stored in the database. TheOnButtonClickedmethod, which is executed when theButtonis tapped, saves the entered data into the database before clearing bothEntryinstances, and refreshing the data in theCollectionView.Note
The
OnAppearingmethod override is executed after theContentPageis laid out, but just before it becomes visible. Therefore, this is a good place to set the content of Xamarin.Forms views.In the Visual Studio toolbar, press the Start button (the triangular button that resembles a Play button) to launch the application inside your chosen remote iOS simulator or Android emulator.
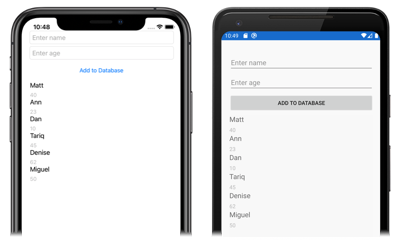
Enter several items of data, tapping the
Buttonfor each item of data. This will save the data to the database, and repopulate theCollectionViewwith all of the database data:In Visual Studio, stop the application.
For more information local databases in Xamarin.Forms, see Xamarin.Forms Local Databases (guide)
Congratulations!
Congratulations on completing this tutorial, where you learned how to:
- Use the NuGet Package Manager to add SQLite.NET to a Xamarin.Forms project.
- Create the data access classes.
- Consume the data access classes.
Next steps
To learn more about the basics of creating mobile applications with Xamarin.Forms, continue to the Web Services tutorial.
Related links
Have an issue with this section? If so, please give us some feedback so we can improve this section.


