Export a Content search report
Important
This article applies only to the classic eDiscovery experience. The classic eDiscovery experience will be retired in August 2025 and won't be available as an experience option in the Microsoft Purview portal after retirement.
We recommend that you start planning for this transition early and start using the new eDiscovery experience in the Microsoft Purview portal. To learn more about using the most current eDiscovery capabilities and features, see Learn about eDiscovery.
Instead of exporting the full set of search results from a Content search in the Microsoft Purview portal (or from a search that's associated with a Microsoft Purview eDiscovery (Standard) case), you can export the same reports that are generated when you export the actual search results.
When you export a report, the report files are downloaded to a folder on your local computer that has the same name as the Content Search, but that's appended with _ReportsOnly. For example, if the Content Search is named ContosoCase0815, then the report is downloaded to a folder named ContosoCase0815_ReportsOnly. For a list of documents that are included in the report, see What's included in the report.
Tip
If you're not an E5 customer, use the 90-day Microsoft Purview solutions trial to explore how additional Purview capabilities can help your organization manage data security and compliance needs. Start now at the Microsoft Purview trials hub. Learn details about signing up and trial terms.
Before you export a search report
To export a search report, you have to be assigned the Compliance Search management role in Purview portal. This role is assigned by default to the built-in eDiscovery Manager and Organization Management role groups. For more information, see Assign eDiscovery permissions.
When you export a report, the data is temporarily stored in an Azure Storage location in the Microsoft cloud before it's downloaded to your local computer. Be sure that your organization can connect to the endpoint in Azure, which is *.blob.core.windows.net (the wildcard represents a unique identifier for your export). The search results data is deleted from the Azure Storage location two weeks after it's created.
The computer you use to export the search report has to meet the following system requirements:
- Latest version of Windows (32-bit or 64-bit)
- Microsoft .NET Framework 4.7 or higher
You have to use Microsoft Edge1 to run the eDiscovery Export Tool. Using Internet Explorer 11 to export search results is no longer supported2.
Note
1 As a result of recent changes to Microsoft Edge, SelectOnce support is no longer enabled by default. For instructions on enabling SelectOnce support in Edge, see Use the eDiscovery Export Tool in Microsoft Edge. Also, Microsoft doesn't manufacture third-party extensions or add-ons for SelectOnce applications. Exporting search results using an unsupported browser with third-party extensions or add-ons isn't supported.
2 Beginning August 2021, Microsoft 365 apps and services will no longer support Internet Explorer 11 (IE11) and users may have a degraded experience or be unable to connect to those apps and services. These apps and services will phase out over the upcoming weeks and months to ensure a smooth end of support. Each app and service are being phased out on independent schedules. For more information, see this blog post.
If the estimated total size of the results returned by search exceeds 2 TB, exporting the reports fails. To successfully export the reports, try to narrow the scope, and rerun the search so the estimated size of the results is less than 2 TB.
If the results of a search are older than 7 days and you submit an export report job, an error message is displayed prompting you to rerun the search to update the search results. If this happens, cancel the export, rerun the search, and then start the export again.
Exporting search reports counts against the maximum number of exports running at the same time and the maximum number of exports that a single user can run. For more information about export limits, see Export Content search results.
Step 1: Generate the report for export
Note
For a limited time, the classic eDiscovery experience is available in the new Microsoft Purview portal. Enable Purview portal classic eDiscovery experience in eDiscovery experience settings to display the classic experience in the new Microsoft Purview portal.
The first step is to prepare the report for downloading to your computer exporting. When you export the report, the report documents are uploaded to an Azure Storage area in the Microsoft cloud.
In the Purview portal, select the Content search that you want to export the report from.
On the Actions menu at the bottom of the search flyout page, select Export report.

The Export report flyout page is displayed. The export report options available to export information about the search depend on whether search results are located in mailboxes or sites or a combination of both.
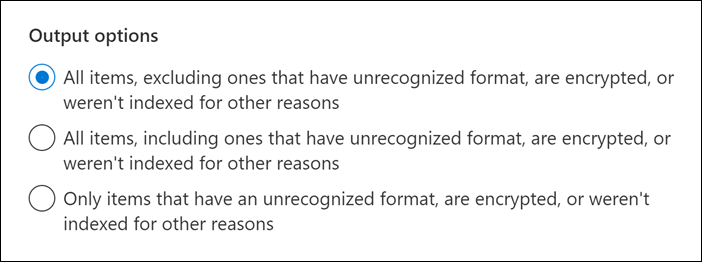
Under Output options, choose one of the following options:

All items, excluding ones that have unrecognized format, are encrypted, or weren't indexed for other reasons. This option only exports information about indexed items.
All items, including ones that have unrecognized format, are encrypted, or weren't indexed for other reasons. This option exports information about indexed and unindexed items.
Only items that have an unrecognized format, are encrypted, or weren't indexed for other reasons. This option only exports information about unindexed items.
Configure the Enable de-duplication for Exchange content option.
If you select this option, the count of duplicate messages (before de-duplication and after de-duplication) is included in the export summary report. Also, only one copy of a message will be included in the manifest.xml file. But the export results report will contain a row for every copy of a duplicate message so that you can identify the mailboxes that contain a copy of the duplicate message. For more information about the exported reports, see What's included in the report.
If you don't select this option, the export reports will contain information about all messages returned by the search, including duplicates.
For more information about de-duplication and how duplicate items are identified, see De-duplication in eDiscovery search results.
Select Generate report.
The search reports are prepared for downloading, which means the report documents are uploaded to an Azure Storage location in the Microsoft cloud. This may take several minutes.
See the next section for instructions to download the exported search reports.
Step 2: Download the report
Note
For a limited time, the classic eDiscovery experience is available in the new Microsoft Purview portal. Enable Purview portal classic eDiscovery experience in eDiscovery experience settings to display the classic experience in the new Microsoft Purview portal.
The next step is to download the report from the Azure Storage area to your local computer.
Note
The exported search report must be downloaded within 14 days after you generated the report in Step 1.
On the Content search page in the Purview portal, select the Exports tab
You may have to select Refresh to update the list of export jobs so that it shows the export job you created. Export report jobs have the same name as the corresponding search with _ReportsOnly appended to the search name.
Select the export job that you created in Step 1.
On the Export report flyout page under Export key, select Copy to clipboard. You use this key in step 6 to download the search results.
Important
Because anyone can install and start the eDiscovery Export tool, and then use this key to download the search report, be sure to take precautions to protect this key just like you would protect passwords or other security-related information.
At the top of the flyout page, select Download results.
If you're prompted to install the eDiscovery Export Tool, select Install.
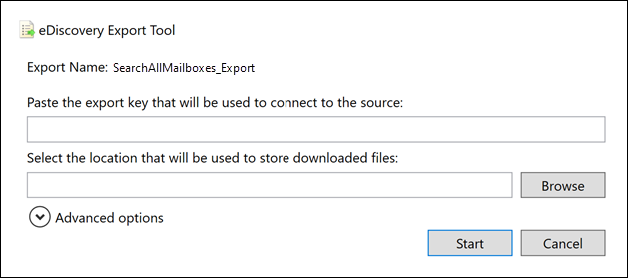
In the eDiscovery Export Tool, do the following:

Paste the export key that you copied in step 3 in the appropriate box.
Select Browse to specify the location where you want to download the search report files.
Select Start to download the search results to your computer.
The eDiscovery Export Tool displays status information about the export process, including an estimate of the number (and size) of the remaining items to be downloaded. When the export process is complete, you can access the files in the location where they were downloaded.
What's included in the report
When you generate and export a report about the results of a Content search, the following documents are downloaded:
Export summary: An Excel document that contains a summary of the export. This includes information such as the number of content sources that were searched, the number of search results from each content location, the estimated number of items, the actual number of items that would be exported, and the estimated and actual size of items that would be exported.
If you include unindexed items when exporting the report, the number of unindexed items are included in the total number of estimated search results and in the total number of downloaded search results (if you were to export the search results) that are listed in the export summary report. In other words, the total number of items that would be downloaded is equal to the total number of estimated results and the total number of unindexed items.
Manifest: A manifest file (in XML format) that contains information about each item included in the search results. If you enabled the de-duplication option, duplicate messages aren't included in the manifest file.
Results: An Excel document that contains a row with information about each indexed item that would be exported with the search results. For email, the result log contains information about each message, including:
- The location of the message in the source mailbox (including whether the message is in the primary or archive mailbox).
- The date the message was sent or received.
- The Subject line from the message.
- The sender and recipients of the message.
For documents from SharePoint and OneDrive for Business sites, the results log contains information about each document, including:
- The URL for the document.
- The URL for the site collection where the document is located.
- The date that the document was last modified.
- The name of the document (which is located in the Subject column in the result log).
Note
The number of rows in the Results report should be equal to the total number of search results minus the total number of items listed in the Unindexed Items report.
Trace.log: A trace log that contains detailed logging information about the export process and can help uncover issues during export. If you open a ticket with Microsoft Support about an issue related to exporting search reports, you may be asked to provide this trace log.
Unindexed items: An Excel document that contains information about any unindexed items included in the search results. If you don't include unindexed items when you generate the search results report, this report will still be downloaded, but will be empty.