About Git in Visual Studio
Visual Studio provides a user interface for Git, a widely used modern version control system. Whether your source code is hosted in a GitHub repository, Azure DevOps, or another Git provider, you can do all the common version control tasks within the Visual Studio IDE. Or, you can work locally with no provider at all, with the option to back up your source later when you're ready to connect to a provider.
The source code you work with doesn't have to have been created with Visual Studio. You can work with any source folder in any Git repo, whether there's a Visual Studio project file or not.
To get started using Git with Visual Studio:
If you have a Git repo hosted on a Git provider like GitHub, clone the repository to your local machine.
Otherwise, easily create a new Git repository and add your code. If you don't have a Git provider yet, we recommend you start with GitHub since the Git experience in Visual Studio is optimized for this provider. GitHub offers free and secured cloud code storage where you can store your code and access it from any device, anywhere.
Not only can you add both GitHub and GitHub Enterprise accounts to your keychain, but you can also leverage them just as you do with Microsoft accounts. If you don’t have a GitHub account, follow these steps to create a GitHub account to use with Visual Studio now. Also, with Visual Studio 17.12 and later, you can add multiple GitHub accounts, and switch between them as needed. See Add GitHub accounts to your Visual Studio keychain.
If you want to use git commands at the command line, you should also install Git for Windows (not a Microsoft product).
When you clone a repository or open a local repository, Visual Studio switches to the Git context. Solution Explorer loads the folder at the root of the Git repository, and scans the directory tree for any viewable files like CMakeLists.txt or those with the .sln file extension. For more information, see View files in Solution Explorer.
You can use branches to keep related changes separated from unrelated changes you're also working on. The recommended Git workflow uses a new branch for every feature or fix that you work on. Learn how to create a branch from Visual Studio.
Once you create a new branch and switch to it, you can start working by changing existing files or by adding new ones and then committing your work to the repository. To learn more about making a commit in Visual Studio and to better understand file states in Git, refer to the Make a commit page.
Git is a distributed version control system, meaning that all the changes made so far are local-only changes. To contribute these changes to a remote repository, you must push those local commit(s) to a remote.
If you are working in a team, or if you are using different machines, you might often need to fetch and pull new changes on the remote repository. To learn more about managing Git network operations in Visual Studio, refer to the Fetch, pull, push, and sync page.

However, there are times when it makes more sense to focus on your Git repository. For example, you might need to get a good picture of what your team has been working on, or copy a commit from a different branch, or just clean-up your outgoing commits. Visual Studio includes powerful repository browsing and collaboration features that eliminate the need to use other tools.
To help you focus on your Git repository, Visual Studio has a Git Repository window, which is a consolidated view of all the details in your repository, including local and remote branches and commit history. You can access this window directly from either Git or View on the menu bar, or from the status bar.
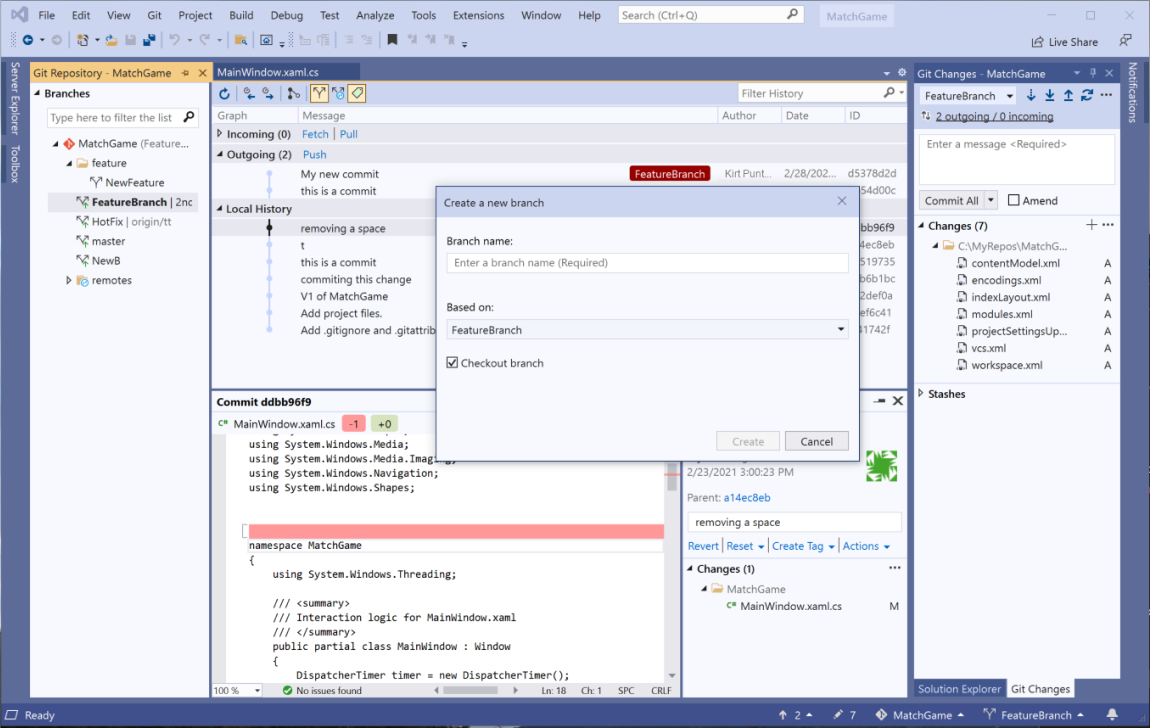
To learn more about how you can use the Git Repository window in Visual Studio to browse and manage your Git repository, refer to the following pages:
Conflicts can occur during a merge if two developers modify the same lines in a file and Git doesn’t automatically know which one is correct. Git halts the merge and informs you that you are in a conflicted state. Learn more in the Resolve merge conflicts page.
To personalize your Git settings at a repository level as well as at a global level:
Go to either Git > Settings on the menu bar or Tools > Options > Source Control > Git Global Settings
Choose the options you want.
In Visual Studio 2022 version 17.12, you can select any section of code, and then right-click, expand the Git submenu, and choose Copy GitHub Permalink (or Copy AzureDevOps Permalink) to generate a GitHub Permalink or Azure DevOps Permalink and copy it to the clipboard. From there, you can paste it anywhere a link might be used, in the browser, or share it over email, chat sessions, and documents. You can also do the same within the embedded commit details view in the Git Repository window. This feature allows you to reference specific code from previous commits without switching branches. You must be signed in to Visual Studio with an account with the Git hosting provider, GitHub or Azure DevOps.
In Visual Studio 2022 version 17.6, you can search for and link to GitHub Issues and Azure DevOps work items. See the Git Features to Enhance Productivity blog post.
Git is now the default version control experience in Visual Studio 2019. Since version 16.6, we've worked on building out the feature set and iterating on it based on your feedback. In version 16.8, it became the default version control experience for everyone.
Бележка
We continue to build out and iterate on the Git feature set in Visual Studio 2022, too. To learn more about a recent feature update, see the Multi-repo support in Visual Studio blog post.
Git is the most widely used modern version control system, so whether you're a professional developer or if you’re learning how to code, Git can be very useful to you. If you're new to Git, the https://git-scm.com/ website is a good place to start. There, you'll find cheat sheets, a popular online book, and Git Basics videos.
We'll walk you through how to use the new Git experience in Visual Studio, but if you'd like to take a quick tour first, check out the following video:
Video length: 5.27 minutes
There are three ways to start using Git with Visual Studio to be more productive:
- Create a new Git repository. If you already have code that's not associated with Git, you can start by creating a new Git repository.
- Clone an existing Git repository. If the code that you'd like to work on isn't on your machine, you can clone any existing remote repositories.
- Open an existing Git repository. If your code is already on your machine, you can open it by using File > Open > Project/Solution (or Folder) and Visual Studio automatically detects if it has an initialized Git repository.
Бележка
Starting with Visual Studio 2019 version 16.8, we include a fully integrated GitHub account experience. You can now add both GitHub and GitHub Enterprise accounts to your keychain. You can add and leverage them just as you do with Microsoft accounts, which means that you'll have an easier time accessing your GitHub resources across Visual Studio. For more information, see the Work with GitHub accounts in Visual Studio page.
Съвет
If you don’t have a GitHub account, you can start by following the steps outlined in the Create a GitHub account to use with Visual Studio page.
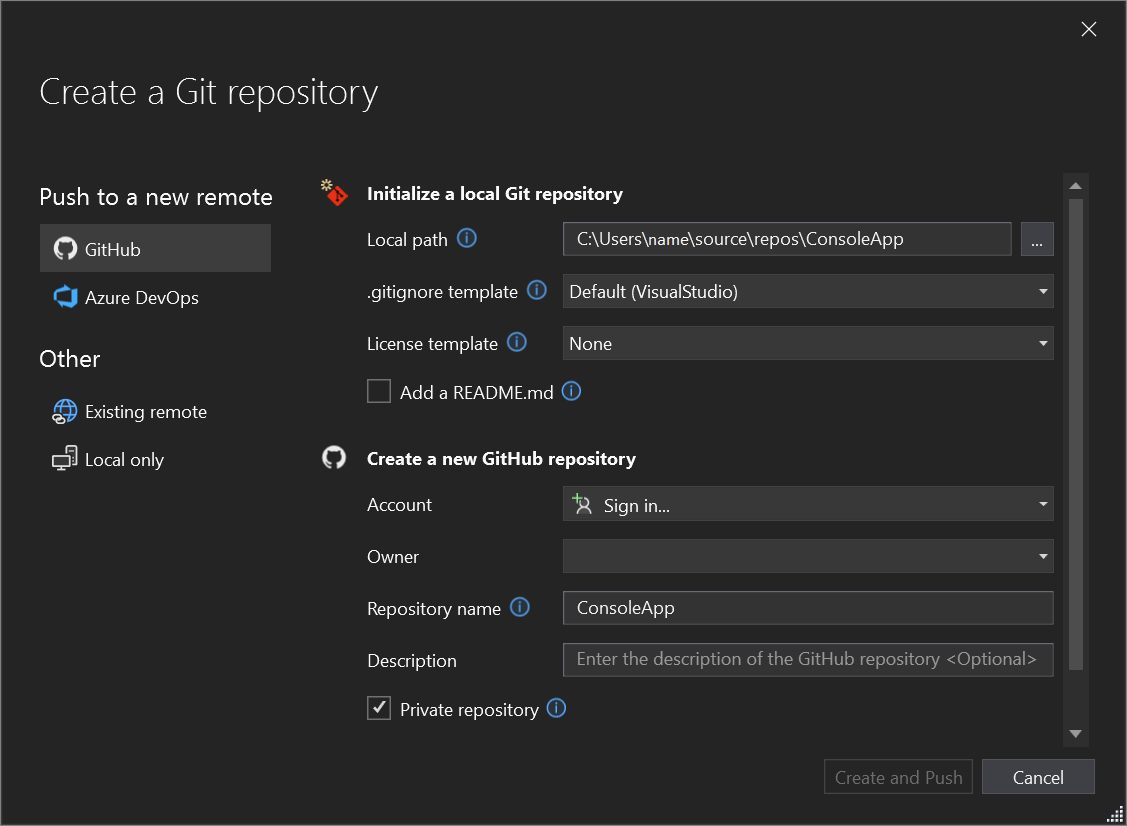
If your code is not associated with Git, you can start by creating a new Git repository. To do so, select Git > Create Git Repository from the menu bar. Then, in the Create a Git repository dialog box, enter your information.
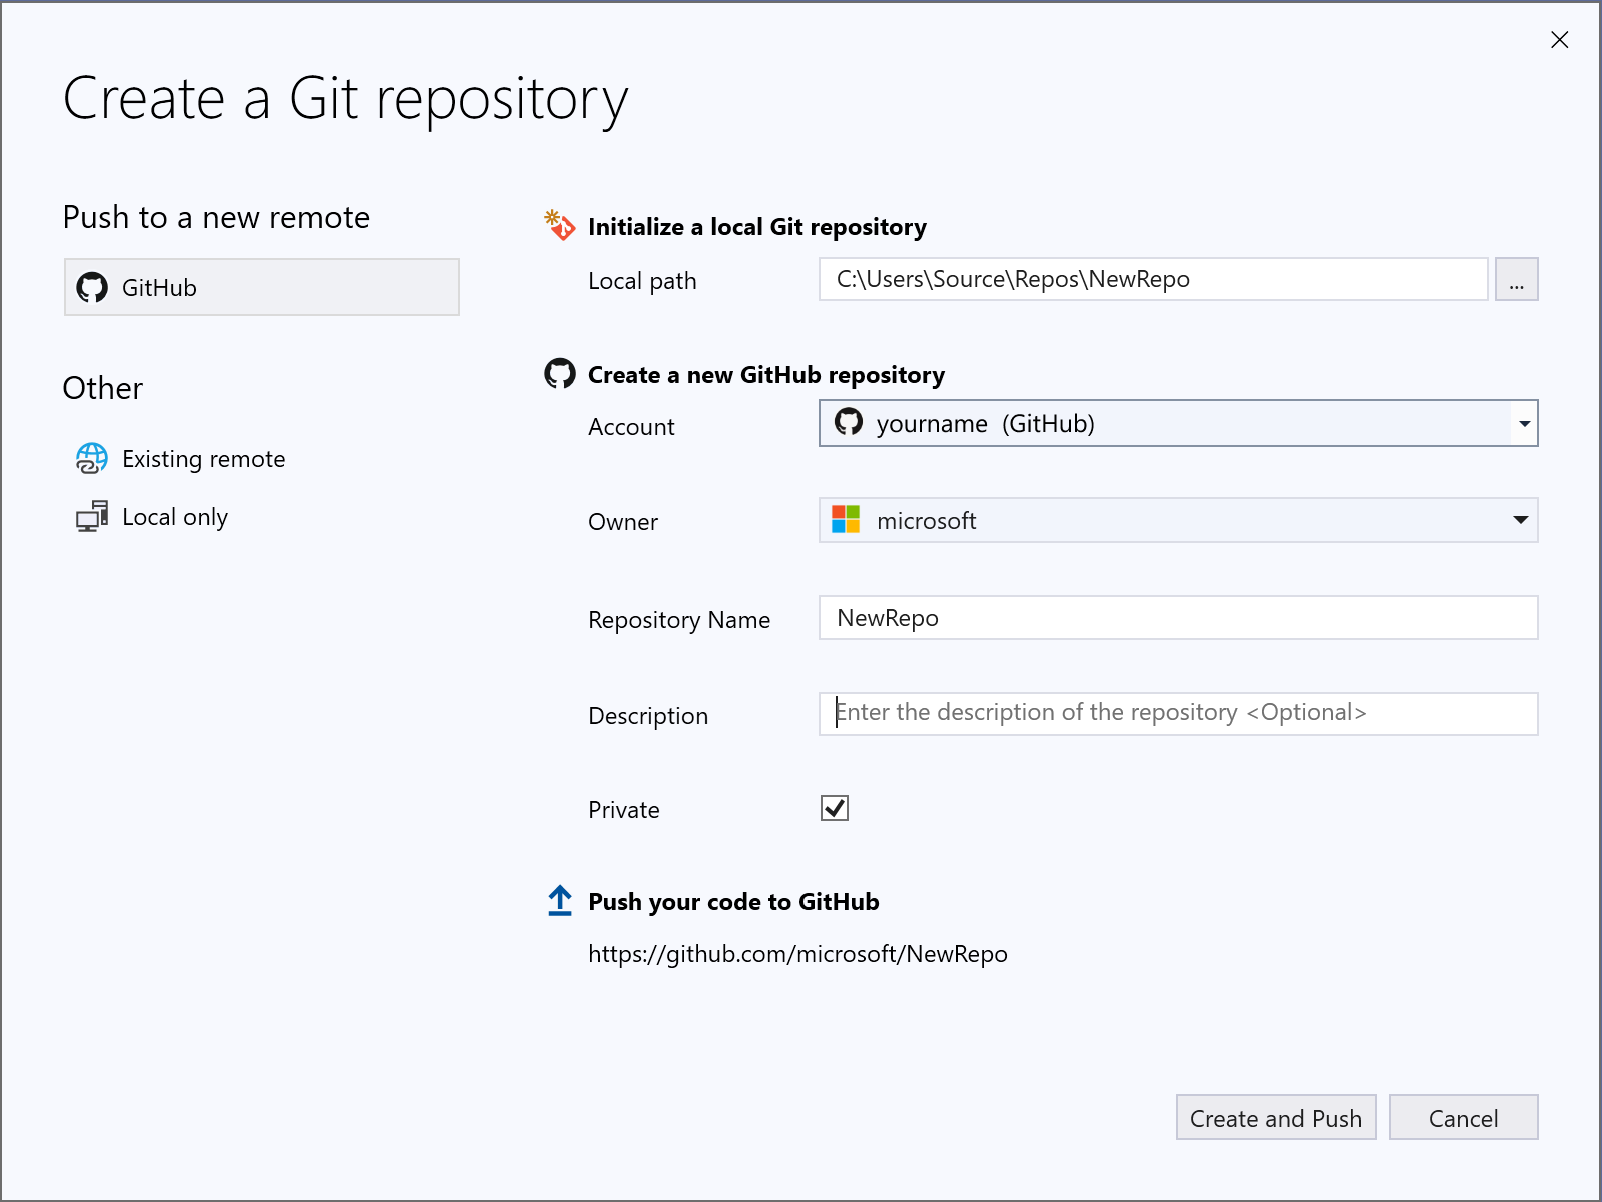
The Create a Git repository dialog box makes it easy to push your new repository to GitHub. By default, your new repository is private, which means that you are the only one who can access it. If you uncheck the box, your repository will be public, which means that anyone on GitHub can view it.
Съвет
Whether your repository is public or private, it's best to have a remote backup of your code stored securely on GitHub even if you are not working with a team. This also makes your code available to you no matter what computer you're using.
You can choose to create a local-only Git repository by using the Local only option. Or, you can link your local project with an existing empty remote repository on Azure DevOps or any other Git provider by using the Existing Remote option.
Visual Studio includes a straightforward clone experience. If you know the URL of the repository that you would like to clone, you can paste the URL in the Repository location section and then choose the disk location you would like Visual Studio to clone to.
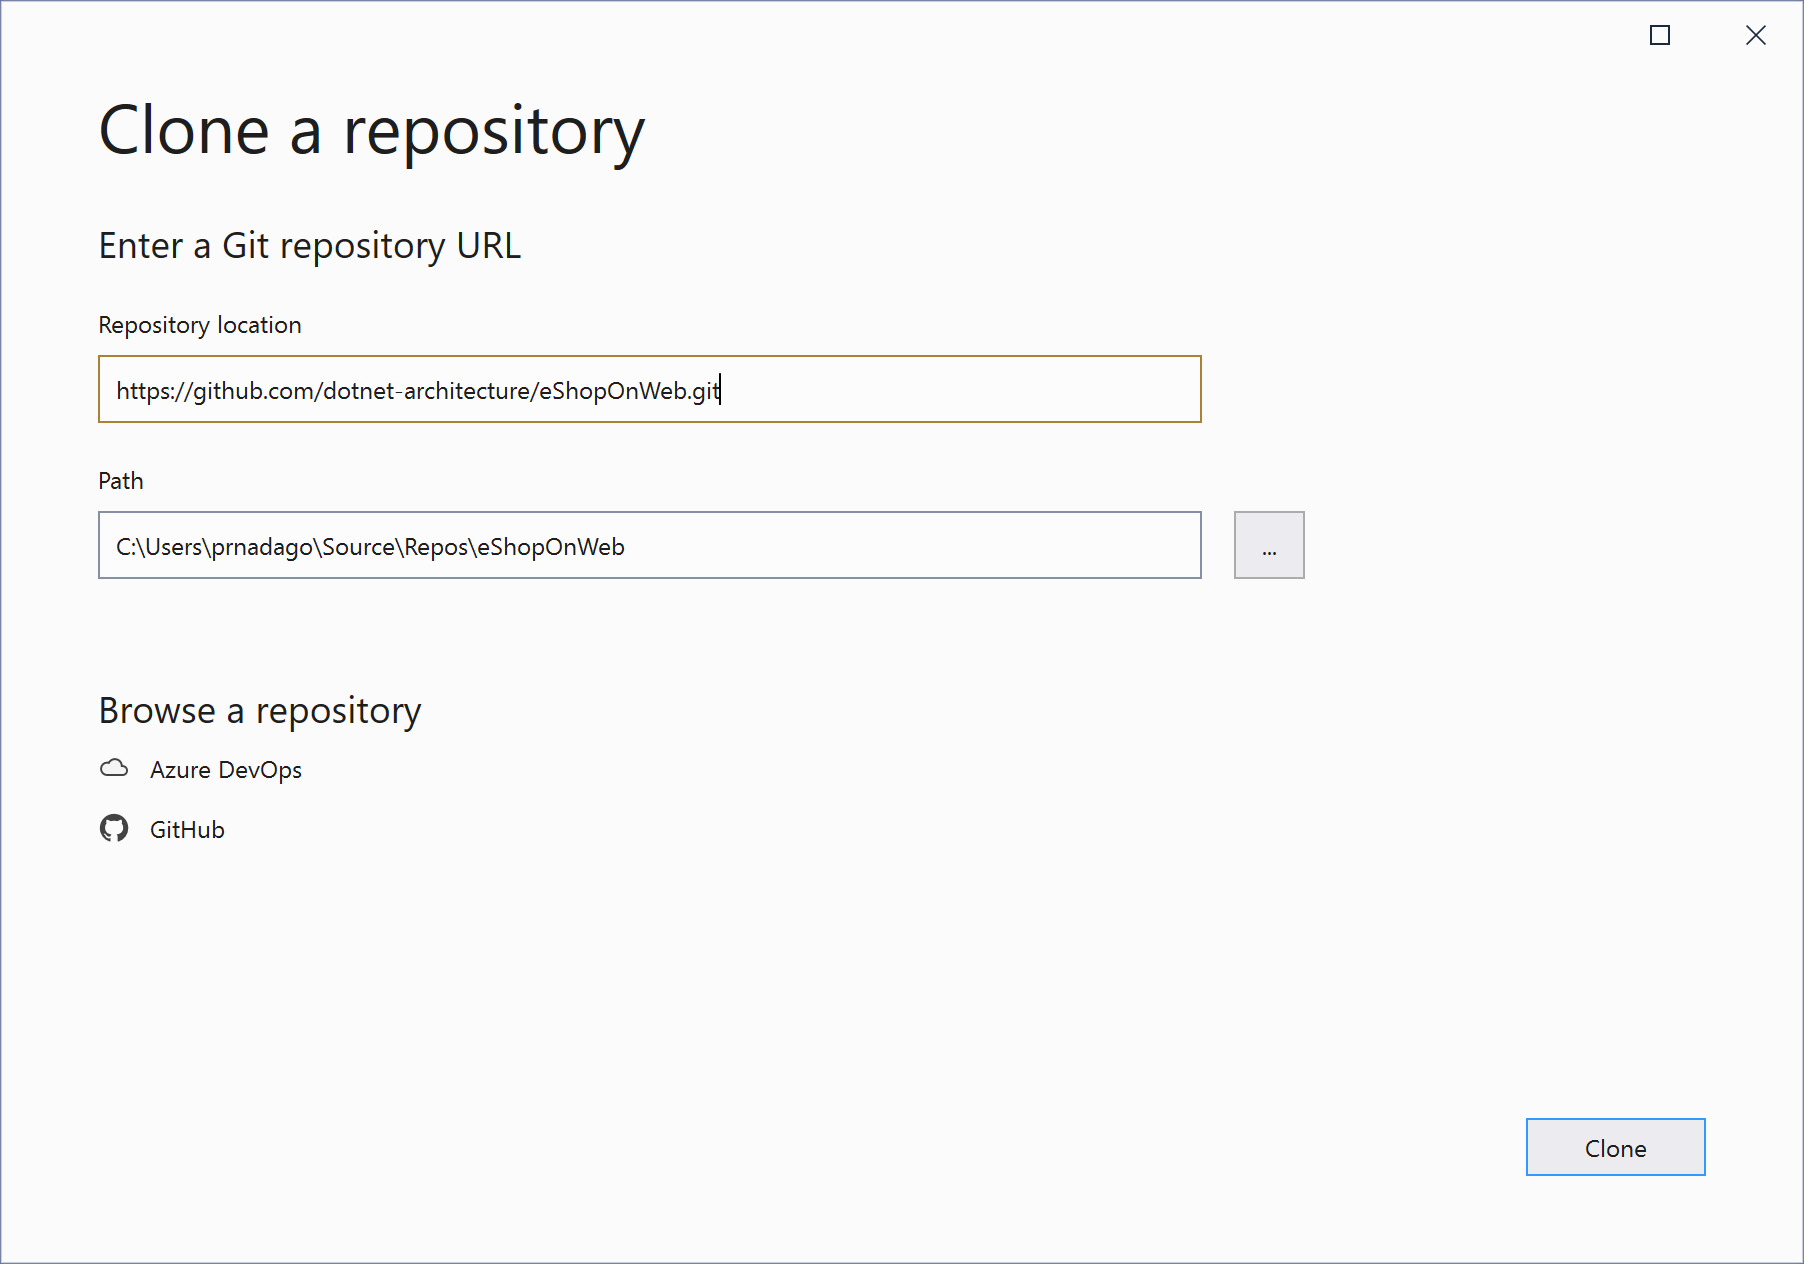
If you don’t know the repository URL, Visual Studio makes it easy to browse to and then clone your existing GitHub or Azure DevOps repository.
After you’ve cloned a repository or created one, Visual Studio detects the Git repository and adds it to your list of Local Repositories in the Git menu.
From here, you can quickly access and switch between your Git repositories.
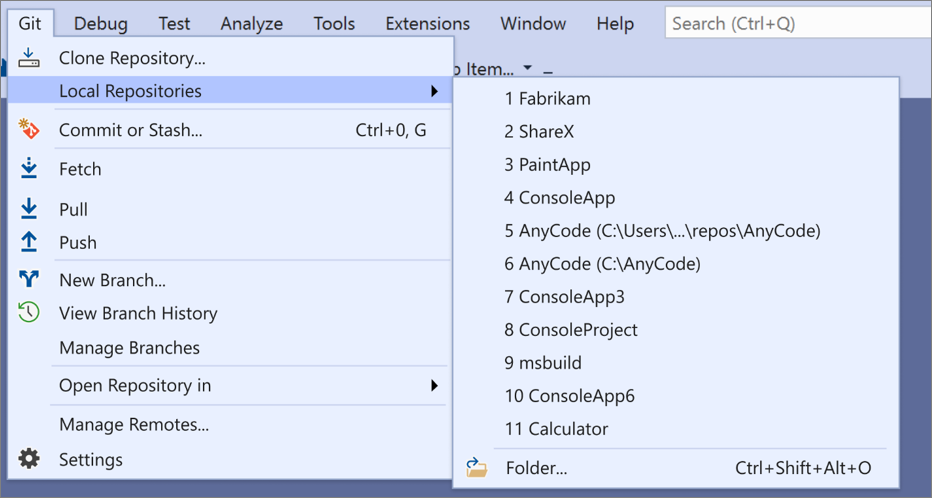
When you clone a repository or open a local repository, Visual Studio switches you into that Git context by saving and closing any previously open solutions and projects. Solution Explorer loads the folder at the root of the Git repository and scans the directory tree for any viewable files. These include files such as CMakeLists.txt or those with the .sln file extension.
Visual Studio adjusts its View based on which file you load in Solution Explorer:
- If you clone a repository that contains a single
.slnfile, then Solution Explorer directly loads that solution for you. - If Solution Explorer doesn’t detect any
.slnfiles in your repository, then by default it loads Folder View. - If your repository has more than one
.slnfile, then Solution Explorer shows you the list of available Views for you to choose from.
You can toggle between the currently open View and the list of Views by using the Switch Views button in the Solution Explorer toolbar.
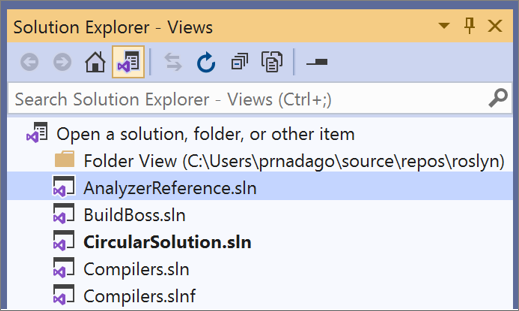
For more information, see the View files in Solution Explorer section of the Open a project from a repo tutorial.
Git tracks file changes in your repo as you work, and separates the files in your repo into three categories. These changes are equivalent to what you would see when you enter the git status command in the command line:
- Unmodified files: These files haven't changed since your last commit.
- Modified files: These files have changes since your last commit, but you haven't yet staged them for the next commit.
- Staged files: These files have changes that will be added to the next commit.
As you do your work, Visual Studio keeps track of the file changes to your project in the Changes section of the Git Changes window.
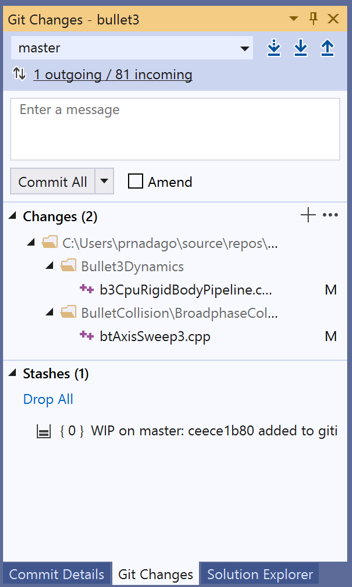
When you are ready to stage changes, click the + (plus) button on each file you want to stage, or right-click a file and then select Stage. You can also stage all your modified files with one click by using the stage all + (plus) button at the top of the Changes section.
When you stage a change, Visual Studio creates a Staged Changes section. Only changes in the Staged Changes section are added to the next commit, which you can do by selecting Commit Staged. The equivalent command for this action is git commit -m "Your commit message". Changes can also be unstaged by clicking the – (minus) button. The equivalent command for this action is git reset <file_path> to unstage a single file or git reset <directory_path> to unstage all the files in a directory.
You can also choose not to stage your modified files by skipping the staging area. In this case, Visual Studio allows you to commit your changes directly without having to stage them. Just enter your commit message and then select Commit All. The equivalent command for this action is git commit -a.
Visual Studio also makes it easy to commit and sync with one click by using the Commit All and Push and Commit All and Sync shortcuts. When you double-click any file in the Changes and the Staged changes sections, you can see a line-by-line comparison with the unmodified version of the file.
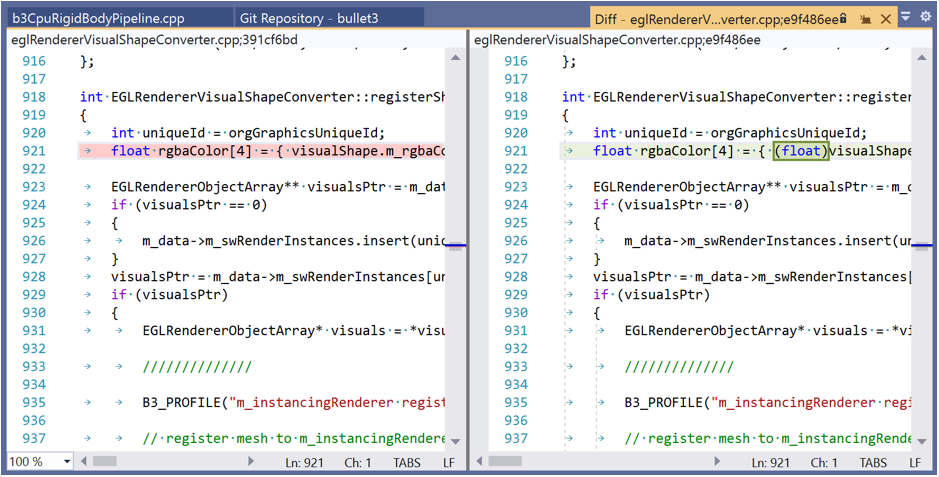
Съвет
You can associate an Azure DevOps work item with a commit by using the "#" character if you are connected to the Azure DevOps repository. You can connect your Azure DevOps repository through Team Explorer > Manage Connections.
Visual Studio displays the current branch in the selector at the top of the Git Changes window.
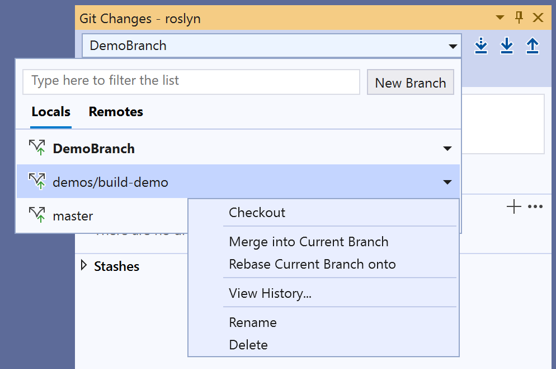
The current branch is also available in the status bar on the bottom-right corner of the Visual Studio IDE.
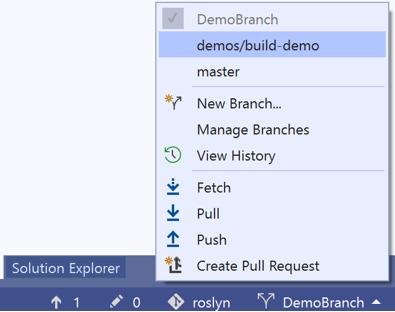
From both locations, you can switch between existing branches.
You can also create a new branch. The equivalent command for this action is git checkout -b <branchname>.
Creating a new branch is as simple as entering the branch name and basing it off an existing branch.
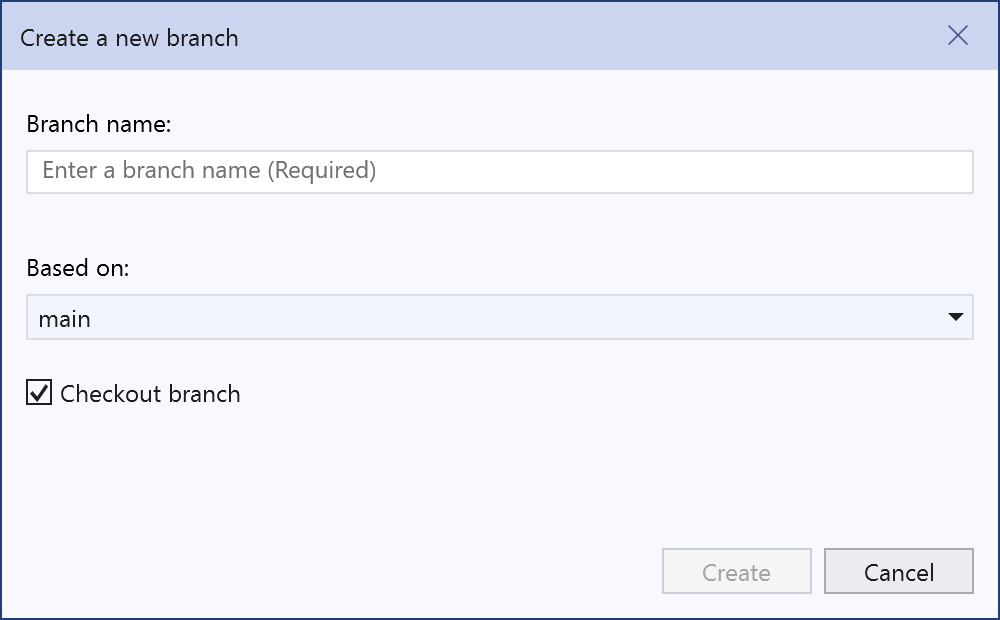
You can choose an existing local or remote branch as the base. The Checkout branch checkbox automatically switches you to the newly created branch. The equivalent command for this action is git checkout -b <new-branch><existing-branch>.
Visual Studio has a new Git Repository window, which is a consolidated view of all the details in your repository, including all of the branches, remotes, and commit histories. You can access this window directly from either Git or View on the menu bar or from the status bar.
When you select Manage Branches from the Git menu, you’ll see the branches tree-view in the Git Repository window. From the left pane, you can use the right-click context menu to checkout branches, create new branches, merge, rebase, cherry-pick, and more. When you click the branch, you can see a preview of its commit history in the right pane.
When you fetch a branch, the Git Changes window has an indicator under the branch drop-down, which displays the number of unpulled commits from the remote branch. This indicator also shows you the number of unpushed local commits.
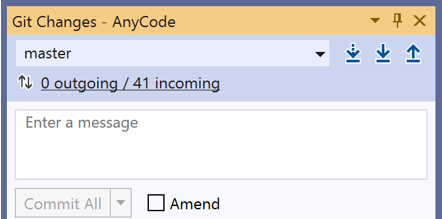
The indicator also functions as a link to take you to the commit history of that branch in the Git Repository window. The top of the history now displays the details of these incoming and outgoing commits. From here, you can also decide to Pull or Push the commits.

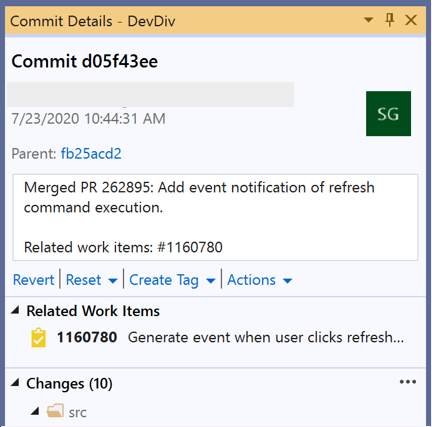
When you double-click a Commit, Visual Studio opens its details in a separate tool window. From here you can revert the commit, reset the commit, amend the commit message, or create a tag on the commit. When you click a changed file in the commit, Visual Studio opens the side-by-side Diff view of the commit and its parent.
Conflicts can occur during a merge if two developers modify the same lines in a file and Git doesn’t automatically know which is correct. Git halts the merge and informs you that you are in a conflicted state.
Visual Studio makes it easy to identify and resolve a merge conflict. First, the Git Repository window shows a gold info bar at the top of the window.

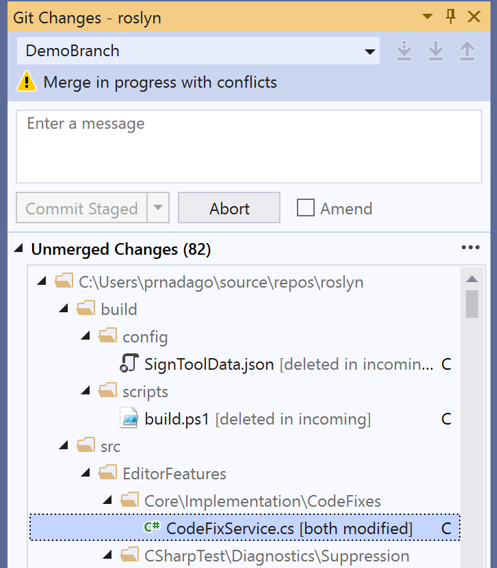
The Git Changes window also displays a ‘Merge is in progress with conflicts’ message, with the unmerged files in their separate section below it.
But if you have neither of these windows open, and instead you go to the file that has merge conflicts, you won’t have to search for the following text:
    <<<<<<< HEAD
    =======
    >>>>>>> main
Instead, Visual Studio displays a gold info bar on the top of the page that indicates that the opened file has conflicts. Then, you can click the link to open the Merge Editor.

The Merge Editor in Visual Studio is a three-way merge tool that displays the incoming changes, your current changes, and the result of the merge. You can use the tool bar at the top level of the Merge Editor to navigate between conflicts and auto-merged differences in the file.
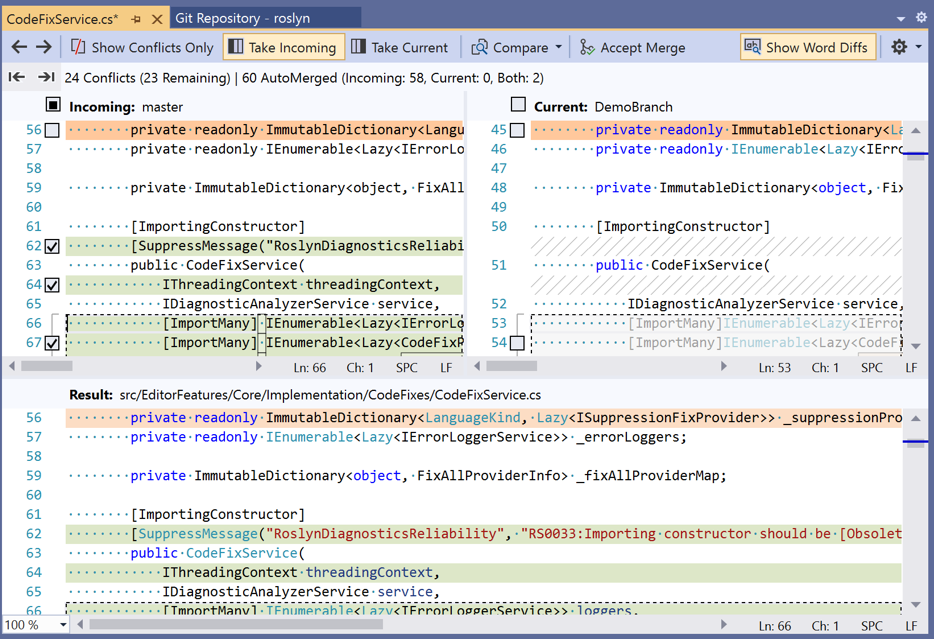
You can also use the toggles to show/hide differences, show/hide word differences, and customize the layout. There are checkboxes on the top of each side that you can use to take all the changes from one side or the other. But to take individual changes, you can click the checkboxes to the left of the conflicting lines on either side. Finally, when you finish resolving the conflicts, you can select the Accept Merge button in the Merge Editor. You then write a commit message and commit the changes to complete the resolution.
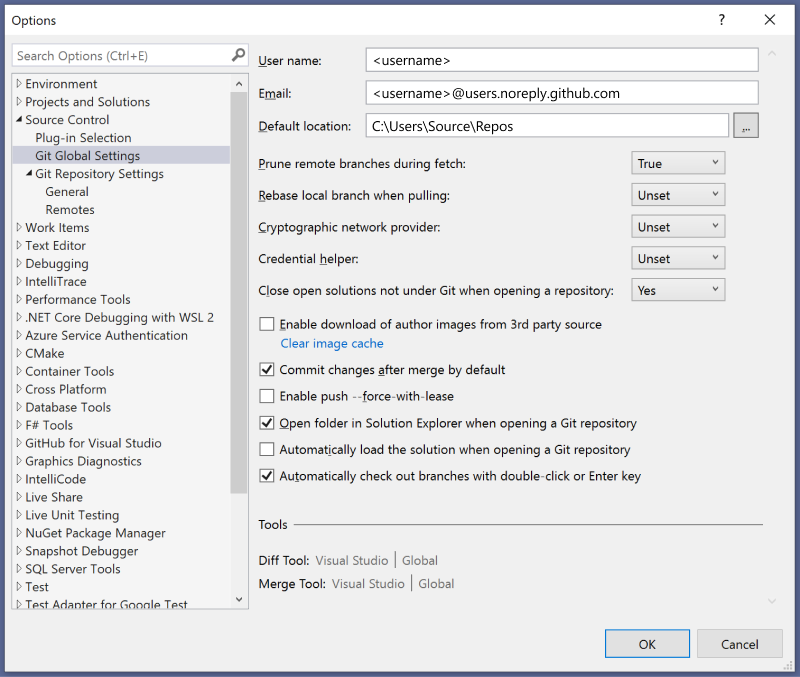
To personalize and customize your Git settings at a repository level as well as at a global level, go to either Git > Settings on the menu bar, or to Tools > Options > Source Control on the menu bar. Then, choose the options you want.
The new Git experience is the default version control system in Visual Studio 2019 from version 16.8 onwards. However, if you want to turn it off, you can. Go to Tools > Options > Environment > Preview Features and then toggle the New Git user experience checkbox, which will switch you back to Team Explorer for Git.

Съвет
To learn about using Git and GitHub in Visual Studio, sign up for the Git learning series.
