Using a user-assigned managed identity for an Azure Automation account
This article shows you how to add a user-assigned managed identity for an Azure Automation account and how to use it to access other resources. For more information on how managed identities work with Azure Automation, see Managed identities.
Note
It is not possible to use a User Assigned Managed Identity on a Hybrid Runbook Worker when a Managed Identity (either System or User assigned) has been created for the Automation Account. If Managed Identity has not been assigned to the Automation Account, then it is possible to use the VM’s System or User Assigned Managed Identity on a Hybrid Runbook Worker that is an Azure VM with the assigned managed identities.
If you don't have an Azure subscription, create a free account before you begin.
Prerequisites
An Azure Automation account. For instructions, see Create an Azure Automation account.
The user-assigned managed identity and the target Azure resources that your runbook manages using that identity can be in different Azure subscriptions.
The latest version of Azure Account modules. Currently this is 2.2.8. (See Az.Accounts for details about this version.)
An Azure resource that you want to access from your Automation runbook. This resource needs to have a role defined for the user-assigned managed identity, which helps the Automation runbook authenticate access to the resource. To add roles, you need to be an owner for the resource in the corresponding Microsoft Entra tenant.
To assign an Azure role, you must have
Microsoft.Authorization/roleAssignments/writepermissions, such as User Access Administrator or Owner.
Add user-assigned managed identity for Azure Automation account
You can add a user-assigned managed identity for an Azure Automation account using the Azure portal, PowerShell, the Azure REST API, or ARM template. For the examples involving PowerShell, first sign in to Azure interactively using the Connect-AzAccount cmdlet and follow the instructions.
# Sign in to your Azure subscription
$sub = Get-AzSubscription -ErrorAction SilentlyContinue
if(-not($sub))
{
    Connect-AzAccount
}

# If you have multiple subscriptions, set the one to use
# Select-AzSubscription -SubscriptionId "<SUBSCRIPTIONID>"
Then initialize a set of variables that will be used throughout the examples. Revise the values below and then execute"
$subscriptionID = "subscriptionID"
$resourceGroup = "resourceGroupName"
$automationAccount = "automationAccountName"
$userAssignedOne = "userAssignedIdentityOne"
$userAssignedTwo = "userAssignedIdentityTwo"
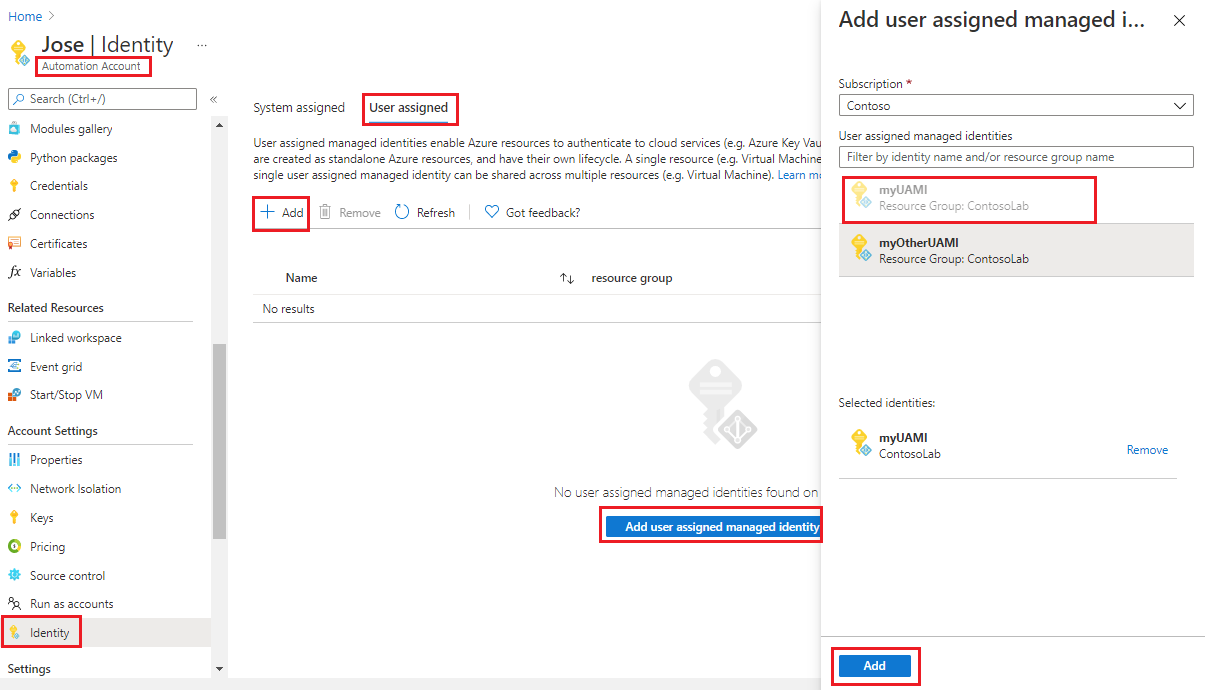
Add using the Azure portal
Perform the following steps:
Sign in to the Azure portal.
In the Azure portal, navigate to your Automation account.
Under Account Settings, select Identity.
Select the User assigned tab, and then select Add.
Select your existing user-assigned managed identity and then select Add. You'll then be returned to the User assigned tab.
Add using PowerShell
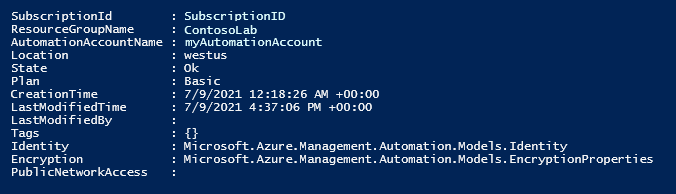
Use PowerShell cmdlet Set-AzAutomationAccount to add the user-assigned managed identities. You must first consider whether there's an existing system-assigned managed identity. The example below adds two existing user-assigned managed identities to an existing Automation account, and will disable a system-assigned managed identity if one exists.
$output = Set-AzAutomationAccount `
    -ResourceGroupName $resourceGroup `
    -Name $automationAccount `
    -AssignUserIdentity "/subscriptions/$subscriptionID/resourcegroups/$resourceGroup/providers/Microsoft.ManagedIdentity/userAssignedIdentities/$userAssignedOne", `
        "/subscriptions/$subscriptionID/resourcegroups/$resourceGroup/providers/Microsoft.ManagedIdentity/userAssignedIdentities/$userAssignedTwo"

$output
To keep an existing system-assigned managed identity, use the following:
$output = Set-AzAutomationAccount `
    -ResourceGroupName $resourceGroup `
    -Name $automationAccount `
    -AssignUserIdentity "/subscriptions/$subscriptionID/resourcegroups/$resourceGroup/providers/Microsoft.ManagedIdentity/userAssignedIdentities/$userAssignedOne", `
        "/subscriptions/$subscriptionID/resourcegroups/$resourceGroup/providers/Microsoft.ManagedIdentity/userAssignedIdentities/$userAssignedTwo" `
    -AssignSystemIdentity

$output
The output should look similar to the following:
For additional output, execute: $output.identity | ConvertTo-Json.
Add using a REST API
Syntax and example steps are provided below.
Syntax
The sample body syntax below enables a system-assigned managed identity if not already enabled and assigns two existing user-assigned managed identities to the existing Automation account.
PATCH
{
  "identity": {
    "type": "SystemAssigned, UserAssigned",
    "userAssignedIdentities": {
      "/subscriptions/00000000-0000-0000-0000-000000000000/resourceGroups/resource-group-name/providers/Microsoft.ManagedIdentity/userAssignedIdentities/firstIdentity": {},
      "/subscriptions/00000000-0000-0000-0000-000000000000/resourceGroups/resource-group-name/providers/Microsoft.ManagedIdentity/userAssignedIdentities/secondIdentity": {}
    }
  }
}
The syntax of the API is as follows:
https://management.azure.com/subscriptions/00000000-0000-0000-0000-000000000000/resourceGroups/resource-group-name/providers/Microsoft.Automation/automationAccounts/automation-account-name?api-version=2020-01-13-preview
Example
Perform the following steps.
Revise the syntax of the body above into a file named
body_ua.json. Save the file on your local machine or in an Azure storage account.Revise the variable value below and then execute.
$file = "path\body_ua.json"This example uses the PowerShell cmdlet Invoke-RestMethod to send the PATCH request to your Automation account.
# build URI
$URI = "https://management.azure.com/subscriptions/$subscriptionID/resourceGroups/$resourceGroup/providers/Microsoft.Automation/automationAccounts/$automationAccount`?api-version=2020-01-13-preview"

# build body
$body = Get-Content $file

# obtain access token
$azContext = Get-AzContext
$azProfile = [Microsoft.Azure.Commands.Common.Authentication.Abstractions.AzureRmProfileProvider]::Instance.Profile
$profileClient = New-Object -TypeName Microsoft.Azure.Commands.ResourceManager.Common.RMProfileClient -ArgumentList ($azProfile)
$token = $profileClient.AcquireAccessToken($azContext.Subscription.TenantId)
$authHeader = @{
    'Content-Type'='application/json'
    'Authorization'='Bearer ' + $token.AccessToken
}

# Invoke the REST API
$response = Invoke-RestMethod -Uri $URI -Method PATCH -Headers $authHeader -Body $body

# Review output
$response.identity | ConvertTo-Json
The output should look similar to the following:
{
"type": "SystemAssigned, UserAssigned",
"principalId": "00000000-0000-0000-0000-000000000000",
"tenantId": "00000000-0000-0000-0000-000000000000",
"userAssignedIdentities":  {
    "/subscriptions/ContosoID/resourcegroups/ContosoLab/providers/Microsoft.ManagedIdentity/userAssignedIdentities/ContosoUAMI1":  {
            "PrincipalId":  "00000000-0000-0000-0000-000000000000",
            "ClientId":  "00000000-0000-0000-0000-000000000000"
                },
    "/subscriptions/ContosoID/resourcegroups/ContosoLab/providers/Microsoft.ManagedIdentity/userAssignedIdentities/ContosoUAMI2":  {
            "PrincipalId":  "00000000-0000-0000-0000-000000000000",
            "ClientId":  "00000000-0000-0000-0000-000000000000"
                }
    }
}
Add using an ARM template
Syntax and example steps are provided below.
Template syntax
The sample template syntax below enables a system-assigned managed identity if not already enabled and assigns two existing user-assigned managed identities to the existing Automation account.
{
  "$schema": "https://schema.management.azure.com/schemas/2019-04-01/deploymentTemplate.json#",
  "contentVersion": "1.0.0.0",
  "parameters": {
    "automationAccountName": {
     "defaultValue": "YourAutomationAccount",
      "type": "String",
      "metadata": {
        "description": "Automation account name"
      }
    },
    "userAssignedOne": {
     "defaultValue": "userAssignedOne",
      "type": "String",
      "metadata": {
        "description": "User-assigned managed identity"
      }
	  },
    "userAssignedTwo": {
     "defaultValue": "userAssignedTwo",
      "type": "String",
      "metadata": {
        "description": "User-assigned managed identity"
      }
	  }
   },
  "resources": [
    {
      "type": "Microsoft.Automation/automationAccounts",
      "apiVersion": "2020-01-13-preview",
      "name": "[parameters('automationAccountName')]",
      "location": "[resourceGroup().location]",
      "identity": {
        "type": "SystemAssigned, UserAssigned",
        "userAssignedIdentities": {
          "[resourceID('Microsoft.ManagedIdentity/userAssignedIdentities/',parameters('userAssignedOne'))]": {},
          "[resourceID('Microsoft.ManagedIdentity/userAssignedIdentities/',parameters('userAssignedTwo'))]": {}
        }
      },
      "properties": {
        "sku": {
          "name": "Basic"
        },
        "encryption": {
          "keySource": "Microsoft.Automation",
          "identity": {}
        }
      }
    }
  ]
}
Example
Perform the following steps.
Copy and paste the template into a file named
template_ua.json. Save the file on your local machine or in an Azure storage account.Revise the variable value below and then execute.
$templateFile = "path\template_ua.json"Use PowerShell cmdlet New-AzResourceGroupDeployment to deploy the template.
New-AzResourceGroupDeployment `
    -Name "UserAssignedDeployment" `
    -ResourceGroupName $resourceGroup `
    -TemplateFile $templateFile `
    -automationAccountName $automationAccount `
    -userAssignedOne $userAssignedOne `
    -userAssignedTwo $userAssignedTwo
The command won't produce an output; however, you can use the code below to verify:
(Get-AzAutomationAccount `
-ResourceGroupName $resourceGroup `
-Name $automationAccount).Identity | ConvertTo-Json
The output will look similar to the output shown for the REST API example, above.
Assign a role to a user-assigned managed identity
An Automation account can use its user-assigned managed identity to obtain tokens to access other resources protected by Microsoft Entra ID, such as Azure Key Vault. These tokens don't represent any specific user of the application. Instead, they represent the application that is accessing the resource. In this case, for example, the token represents an Automation account.
Before you can use your user-assigned managed identity for authentication, set up access for that identity on the Azure resource where you plan to use the identity. To complete this task, assign the appropriate role to that identity on the target Azure resource.
Follow the principal of least privilege and carefully assign permissions only required to execute your runbook. For example, if the Automation account is only required to start or stop an Azure VM, then the permissions assigned to the Run As account or managed identity needs to be only for starting or stopping the VM. Similarly, if a runbook is reading from blob storage, then assign read only permissions.
This example uses Azure PowerShell to show how to assign the Contributor role in the subscription to the target Azure resource. The Contributor role is used as an example and may or may not be required in your case. Alternatively, you can also assign the role to the target Azure resource in the Azure portal.
New-AzRoleAssignment `
    -ObjectId <automation-Identity-object-id> `
    -Scope "/subscriptions/<subscription-id>" `
    -RoleDefinitionName "Contributor"
Verify role assignment to a user-managed identity
To verify a role to a user-assigned managed identity of the Automation account, follow these steps:
Sign in to the Azure portal.
Go to your Automation account.
Under Account Settings, select Identity, User assigned.
Click User assigned identity name.
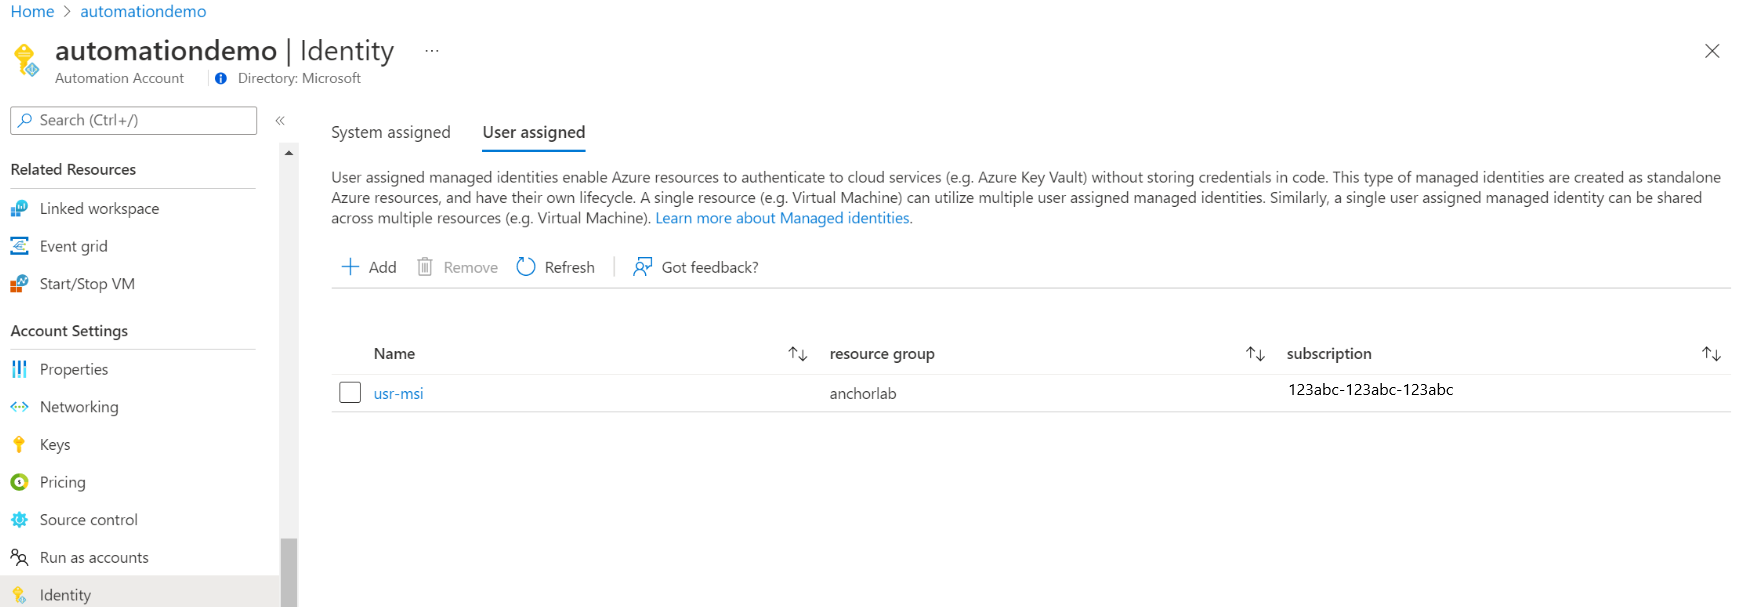
If the roles are already assigned to the selected user-assigned managed identity, you can see a list of role assignments. This list includes all the role-assignments you have permission to read.
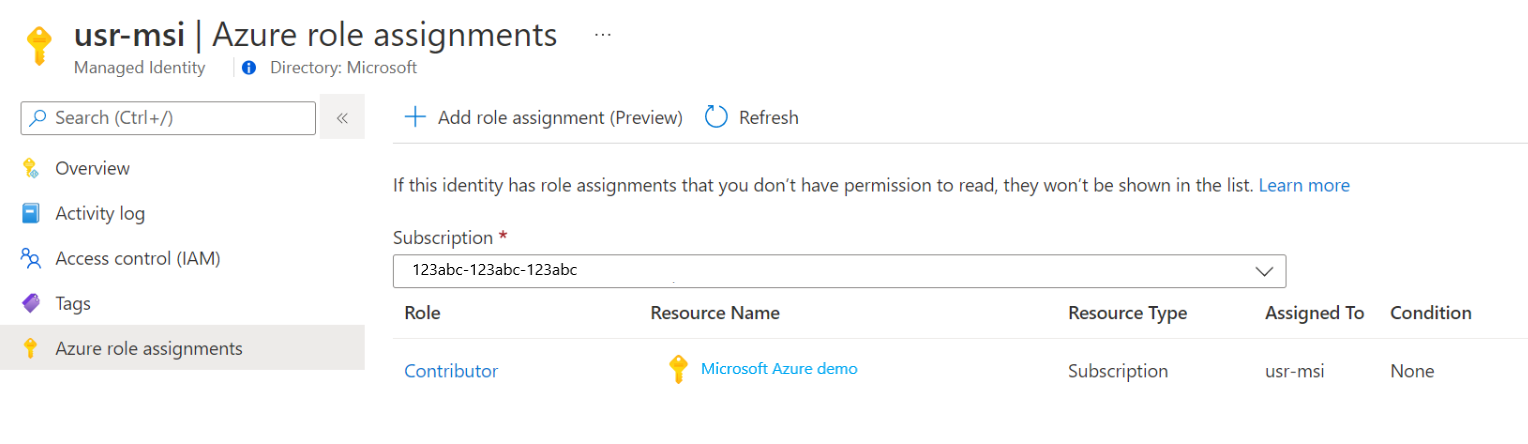
To change the subscription, click the Subscription drop-down list and select the appropriate subscription.
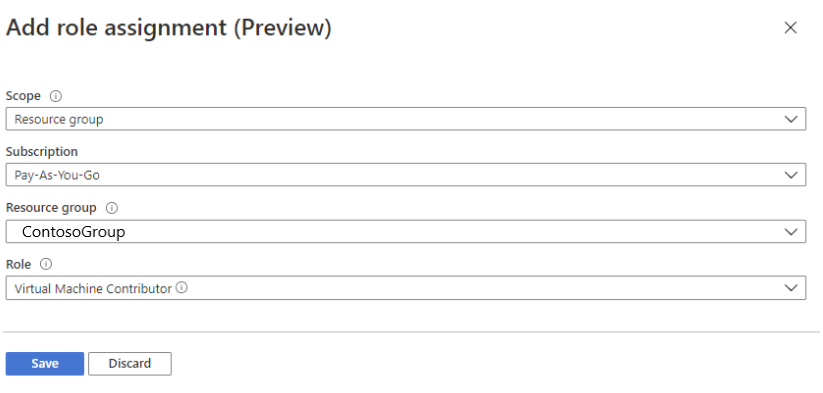
Click Add role assignment (Preview)
In the drop-down list, select the set of resources that the role assignment applies - Subscription, Resource group, Role, and Scope.
If you don't have the role assignment, you can view the write permissions for the selected scope as an inline message.In the Role drop-down list, select a role as Virtual Machine Contributor.
Click Save.


After a few minutes, the managed identity is assigned the role at the selected scope.
Authenticate access with user-assigned managed identity
After you enable the user-assigned managed identity for your Automation account and give an identity access to the target resource, you can specify that identity in runbooks against resources that support managed identity. For identity support, use the Az cmdlet Connect-AzAccount.
# Ensures you do not inherit an AzContext in your runbook
Disable-AzContextAutosave -Scope Process

# Connect to Azure with user-assigned managed identity
$AzureContext = (Connect-AzAccount -Identity -AccountId <user-assigned-identity-ClientId>).context

# set and store context
$AzureContext = Set-AzContext -SubscriptionName $AzureContext.Subscription -DefaultProfile $AzureContext
Generate an access token without using Azure cmdlets
For HTTP Endpoints make sure of the following.
- The metadata header must be present and should be set to "true".
- A resource must be passed along with the request, as a query parameter for a GET request and as form data for a POST request.
- Set the value of the environment variable IDENTITY_HEADER to X-IDENTITY-HEADER.
- Content Type for the Post request must be
application/x-www-form-urlencoded.
Get Access token for user-assigned managed identity using HTTP Get
$resource= "?resource=https://management.azure.com/"
$client_id="&client_id=<ClientId of USI>"
$url = $env:IDENTITY_ENDPOINT + $resource + $client_id
$Headers = New-Object "System.Collections.Generic.Dictionary[[String],[String]]"
$Headers.Add("Metadata", "True")
$headers.Add("X-IDENTITY-HEADER", $env:IDENTITY_HEADER)
$accessToken = Invoke-RestMethod -Uri $url -Method 'GET' -Headers $Headers
Write-Output $accessToken.access_token
Get Access token for user-assigned managed identity using HTTP Post
$url = $env:IDENTITY_ENDPOINT
$headers = New-Object "System.Collections.Generic.Dictionary[[String],[String]]"
$headers.Add("Metadata", "True")
$headers.Add("X-IDENTITY-HEADER", $env:IDENTITY_HEADER)
$body = @{'resource'='https://management.azure.com/'
'client_id'='<ClientId of USI>'}
$accessToken = Invoke-RestMethod $url -Method 'POST' -Headers $headers -ContentType 'application/x-www-form-urlencoded' -Body $body
Write-Output $accessToken.access_token
Using user-assigned managed identity in Azure PowerShell
Write-Output "Connecting to azure via  Connect-AzAccount -Identity -AccountId <ClientId of USI>"
Connect-AzAccount -Identity -AccountId <ClientId of USI>
Write-Output "Successfully connected with Automation account's Managed Identity"
Write-Output "Trying to fetch value from key vault using User Assigned Managed identity. Make sure you have given correct access to Managed Identity"
$secret = Get-AzKeyVaultSecret -VaultName '<KVname>' -Name '<KeyName>'
$ssPtr = [System.Runtime.InteropServices.Marshal]::SecureStringToBSTR($secret.SecretValue)
try {
  $secretValueText = [System.Runtime.InteropServices.Marshal]::PtrToStringBSTR($ssPtr)
    Write-Output $secretValueText
} finally {
    [System.Runtime.InteropServices.Marshal]::ZeroFreeBSTR($ssPtr)
}
Using user-assigned managed identity in Python Runbook
#!/usr/bin/env python3
import os
import requests

resource = "?resource=https://management.azure.com/"
client_id = "&client_id=<ClientId of USI>"
endPoint = os.getenv('IDENTITY_ENDPOINT')+ resource +client_id
identityHeader = os.getenv('IDENTITY_HEADER')
payload={}
headers = {
  'X-IDENTITY-HEADER': identityHeader,
  'Metadata': 'True'
}
response = requests.request("GET", endPoint, headers=headers, data=payload)
print(response.text)
Next steps
If your runbooks aren't completing successfully, review Troubleshoot Azure Automation managed identity issues.
If you need to disable a managed identity, see Disable your Azure Automation account managed identity.
For an overview of Azure Automation account security, see Automation account authentication overview.
Povratne informacije
Uskoro: tokom 2024. postepeno ćemo ukidati probleme s uslugom GitHub kao mehanizam povratnih informacija za sadržaj i zamijeniti ga novim sistemom povratnih informacija. Za više informacija, pogledajte https://aka.ms/ContentUserFeedback.
Pošalјite i prikažite povratne informacije za