Export to a BACPAC file - Azure SQL Database and Azure SQL Managed Instance
Applies to: ![]() Azure SQL Database
Azure SQL Database ![]() Azure SQL Managed Instance
Azure SQL Managed Instance
When you need to export a database for archiving or for moving to another platform, you can export the database schema and data to a BACPAC file. A BACPAC file is a ZIP file with an extension of BACPAC containing the metadata and data from the database. A BACPAC file can be stored in Azure Blob storage or in local storage in an on-premises location and later imported back into Azure SQL Database, Azure SQL Managed Instance, or a SQL Server instance.
Considerations
For an export to be transactionally consistent, you must ensure either that no write activity is occurring during the export, or that you're exporting from a transactionally consistent copy of your database.
If you're exporting to blob storage, the maximum size of a BACPAC file is 200 GB. To archive a larger BACPAC file, export to local storage with SqlPackage.
The Azure Storage file name can't end with
.and can't contain special characters like a space character or<,>,*,%,&,:,\,/,?. The file name should be fewer than 128 characters long.If the export operation exceeds 20 hours, it might be canceled. To increase performance during export, you can:
- Temporarily increase your compute size.
- Cease all read and write activity during the export.
- Use a clustered index with non-null values on all large tables. Without clustered indexes, an export might fail if it takes longer than 6-12 hours. This is because the export service needs to complete a table scan to try to export entire table. A good way to determine if your tables are optimized for export is to run
DBCC SHOW_STATISTICSand make sure that the RANGE_HI_KEY isn't null and its value has good distribution. For details, see DBCC SHOW_STATISTICS.
For larger databases, BACPAC export/import might take a long time, and might fail for various reasons.
Note
BACPACs are not intended to be used for backup and restore operations. Azure automatically creates backups for every user database. For details, see business continuity overview and Automated backups in Azure SQL Database or Automated backups in Azure SQL Managed Instance.
Note
Import and Export using Private Link is in preview.
The Azure portal
Exporting a BACPAC of a database from Azure SQL Managed Instance using the Azure portal isn't currently supported. See Considerations.
Note
Machines processing import/export requests submitted through the Azure portal or PowerShell need to store the BACPAC file as well as temporary files generated by the Data-Tier Application Framework (DacFX). The disk space required varies significantly among databases with the same size and can require disk space up to three times the size of the database. Machines running the import/export request only have 450GB local disk space. As a result, some requests might fail with the error There is not enough space on the disk. In this case, the workaround is to run SqlPackage on a machine with enough local disk space. We encourage using SQLPackage to import/export databases larger than 150GB to avoid this issue.
To export a database using the Azure portal, open the page for your database and select Export on the toolbar.

Specify the BACPAC filename, select an existing Azure storage account and container for the export, and then provide the appropriate credentials for access to the source database. A SQL Server admin login is needed here even if you're the Azure admin, as being an Azure admin doesn't equate to having admin permissions in Azure SQL Database or Azure SQL Managed Instance.
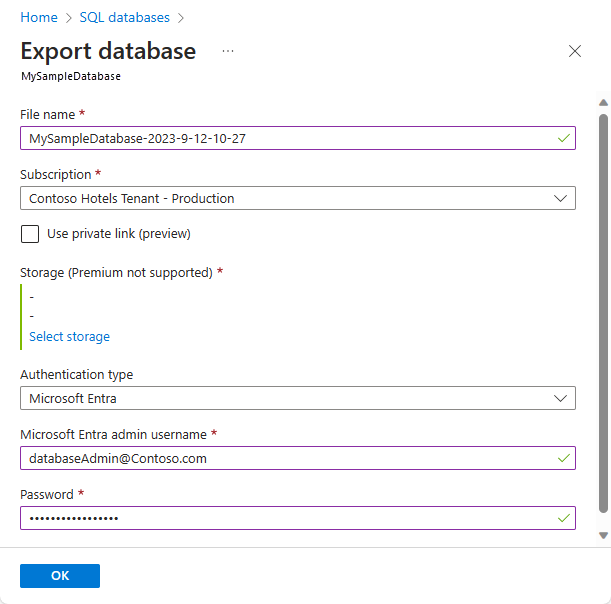
Select OK.
To monitor the progress of the export operation, open the page for the server containing the database being exported. Under Data management, select Import/Export history.

SQLPackage utility
We recommend the use of the SQLPackage utility for scale and performance in most production environments. You can run multiple SqlPackage commands in parallel for subsets of tables to speed up import/export operations.
To export a database in SQL Database using the SQLPackage command-line utility, see Export parameters and properties. The SQLPackage utility is available for Windows, macOS, and Linux.
This example shows how to export a database using SqlPackage with Active Directory Universal Authentication:
SqlPackage /a:Export /tf:testExport.BACPAC /scs:"Data Source=apptestserver.database.windows.net;Initial Catalog=MyDB;" /ua:True /tid:"apptest.onmicrosoft.com"
Azure Data Studio
Azure Data Studio is a free, open-source tool and is available for Windows, Mac, and Linux. The "SQL Server dacpac" extension provides a wizard interface to SqlPackage operations including export and import. For more information on installing and using the extension, see SQL Server dacpac extension.
SQL Server Management Studio (SSMS)
SQL Server Management Studio provides a wizard to export a database in Azure SQL Database or a SQL Managed Instance database to a BACPAC file. See the Export a Data-tier Application.
PowerShell
Exporting a BACPAC of a database from Azure SQL Managed Instance using PowerShell isn't supported. See Considerations.
Use the New-AzSqlDatabaseExport cmdlet to submit an export database request to the Azure SQL Database service. Depending on the size of your database, the export operation might take some time to complete.
$exportRequest = New-AzSqlDatabaseExport -ResourceGroupName $ResourceGroupName -ServerName $ServerName `
  -DatabaseName $DatabaseName -StorageKeytype $StorageKeytype -StorageKey $StorageKey -StorageUri $BacpacUri `
  -AdministratorLogin $creds.UserName -AdministratorLoginPassword $creds.Password
To check the status of the export request, use the Get-AzSqlDatabaseImportExportStatus cmdlet. Running this cmdlet immediately after the request usually returns Status: InProgress. When you see Status: Succeeded the export is complete.
$exportStatus = Get-AzSqlDatabaseImportExportStatus -OperationStatusLink $exportRequest.OperationStatusLink
[Console]::Write("Exporting")
while ($exportStatus.Status -eq "InProgress")
{
    Start-Sleep -s 10
    $exportStatus = Get-AzSqlDatabaseImportExportStatus -OperationStatusLink $exportRequest.OperationStatusLink
    [Console]::Write(".")
}
[Console]::WriteLine("")
$exportStatus
Cancel the export request
Use the Database Operations - Cancel API or the PowerShell Stop-AzSqlDatabaseActivity command to cancel an export request. Here's an example PowerShell command:
Stop-AzSqlDatabaseActivity -ResourceGroupName $ResourceGroupName -ServerName $ServerName -DatabaseName $DatabaseName -OperationId $Operation.OperationId
Note
To cancel export operation you will need to have one of the following roles:
- The SQL DB Contributor role or
- A custom Azure RBAC role with
Microsoft.Sql/servers/databases/operationspermission
Limitations
- Exporting a BACPAC file to Azure premium storage using the methods discussed in this article isn't supported.
- Storage behind a firewall is currently not supported.
- Immutable storage is currently not supported.
- Azure SQL Managed Instance doesn't currently support exporting a database to a BACPAC file using the Azure portal or Azure PowerShell. To export a managed instance into a BACPAC file, use SQL Server Management Studio (SSMS) or SQLPackage.
- Currently, the Import/Export service does not support Microsoft Entra ID authentication when MFA is required.
- Import\Export services only support SQL authentication and Microsoft Entra ID. Import\Export is not compatible with Microsoft Identity application registration.
Related content
- To learn about long-term backup retention of a single database and pooled databases as an alternative to exporting a database for archive purposes, see Long-term backup retention. You can use SQL Agent jobs to schedule copy-only database backups as an alternative to long-term backup retention.
- To learn about importing a BACPAC to a SQL Server database, see Import a BACPAC to a SQL Server database.
- To learn about exporting a BACPAC from a SQL Server database, see Export a Data-tier Application
- To learn about using the Data Migration Service to migrate a database, see Migrate from SQL Server to Azure SQL Database offline using DMS.
- If you're exporting from SQL Server as a prelude to migration to Azure SQL Database, see Migrate a SQL Server database to Azure SQL Database.
- To learn how to manage and share storage keys and shared access signatures securely, see Security recommendations for Blob storage.
Povratne informacije
Uskoro: tokom 2024. postepeno ćemo ukidati probleme s uslugom GitHub kao mehanizam povratnih informacija za sadržaj i zamijeniti ga novim sistemom povratnih informacija. Za više informacija, pogledajte https://aka.ms/ContentUserFeedback.
Pošalјite i prikažite povratne informacije za