Roles and requirements for Azure Data Share
This article describes roles and permissions required to share and receive data using Azure Data Share service.
Roles and requirements
With Azure Data Share service, you can share data without exchanging credentials between data provider and consumer. For snapshot-based sharing, Azure Data Share service uses Managed Identities (previously known as MSIs) to authenticate to Azure data store.
To create shares in Azure Data share, a user will need these permissions:
- Data share account permissions: Contributor
- Storage resource group: Reader (Read permissions on the resource group where your storage accounts or databases live you permission to browse for them in the portal.)
- Source permissions, depending on the source:
Storage and data lake sharing
| Data store type | Action | Role on source data store | Role on target data store | Note |
|---|---|---|---|---|
| Azure Blob Storage | Share data | Storage Account Contributor** | **Instead, you could create a custom role with the necessary storage actions | |
| Receive Data | Storage Account Contributor** | **Instead, you could create a custom role with the necessary storage actions | ||
| Automatically assign MI permissions to share | A role with Microsoft.Authorization/role assignments/write* | Optional. Instead, you could assign the MI permissions manually. | ||
| Automatically assign MI permissions to receive | A role with Microsoft.Authorization/role assignments/write* | Optional. Instead, you could assign the MI permissions manually. | ||
| Azure Data Lake Gen 1 | Share data | Access and write permissions on the files you want to share. | ||
| Receive Data | Not Supported | |||
| Automatically assign MI permissions to share | A role with Microsoft.Authorization/role assignments/write* | Optional. Instead, you could assign the MI permissions manually. | ||
| Automatically assign MI permissions to receive | Not supported. | |||
| Azure Data Lake Gen 2 | Share data | Storage Account Contributor** | **Instead, you could create a custom role with the necessary storage actions | |
| Receive Data | Storage Account Contributor** | **Instead, you could create a custom role with the necessary storage actions | ||
| Automatically assign MI permissions to share | A role with Microsoft.Authorization/role assignments/write* | Optional. Instead, you could assign the MI permissions manually. | ||
| Automatically assign MI permissions to receive | A role with Microsoft.Authorization/role assignments/write* | Optional. Instead, you could assign the MI permissions manually. |
* This permission exists in the Owner role.
For more information about sharing to and from Azure storage, see the article to share and receive data from Azure Blob Storage and Azure Data Lake Storage.
SQL database sharing
To share data from SQL, you can use either:
To receive data into SQL, you'll need to assign permissions to receive data.
Microsoft Entra authentication to share
These prerequisites cover the authentication you'll need so Azure Data Share can connect with your Azure SQL Database:
- You'll need permission to write to the databases on SQL server: Microsoft.Sql/servers/databases/write. This permission exists in the Contributor role.
- SQL Server Microsoft Entra Admin permissions.
- SQL Server Firewall access:
- In the Azure portal, navigate to your SQL server. Select Firewalls and virtual networks from left navigation.
- Select Yes for Allow Azure services and resources to access this server.
- Select +Add client IP. Client IP address can change, so you might need to add your client IP again next time you share data from the portal.
- Select Save.
SQL authentication to share
You can follow the step by step demo video to configure authentication, or complete each of these prerequisites:
Permission to write to the databases on SQL server: Microsoft.Sql/servers/databases/write. This permission exists in the Contributor role.
Permission for the Azure Data Share resource's managed identity to access the database:
In the Azure portal, navigate to the SQL server and set yourself as the Microsoft Entra Admin.
Connect to the Azure SQL Database/Data Warehouse using the Query Editor or SQL Server Management Studio with Microsoft Entra authentication.
Execute the following script to add the Data Share resource-Managed Identity as a db_datareader. Connect using Active Directory and not SQL Server authentication.
create user "<share_acct_name>" from external provider;
exec sp_addrolemember db_datareader, "<share_acct_name>";
Note
The <share_acc_name> is the name of your Data Share resource.
An Azure SQL Database User with 'db_datareader' access to navigate and select the tables or views you wish to share.
SQL Server Firewall access:
- In the Azure portal, navigate to SQL server. Select Firewalls and virtual networks from left navigation.
- Select Yes for Allow Azure services and resources to access this server.
- Select +Add client IP. Client IP address can change, so you might need to add your client IP again next time you share data from the portal.
- Select Save.
Authentication to receive in SQL
For a SQL server where you're the Microsoft Entra admin of the SQL server, complete these prerequisites before accepting a data share:
- An Azure SQL Database or Azure Synapse Analytics (formerly Azure SQL DW).
- Permission to write to the databases on SQL server: Microsoft.Sql/servers/databases/write. This permission exists in the Contributor role.
- SQL Server Firewall access:
- In the Azure portal, navigate to your SQL server. Select Firewalls and virtual networks from left navigation.
- Select Yes for Allow Azure services and resources to access this server.
- Select +Add client IP. Client IP address can change, so you might need to add your client IP again next time you share data from the portal.
- Select Save.
For a SQL server where you're not the Microsoft Entra admin, complete these prerequisites before accepting a data share:
You can follow the step by step demo video, or the steps below to configure prerequisites.
An Azure SQL Database or Azure Synapse Analytics (formerly Azure SQL DW).
Permission to write to databases on the SQL server: Microsoft.Sql/servers/databases/write. This permission exists in the Contributor role.
Permission for the Data Share resource's managed identity to access the Azure SQL Database or Azure Synapse Analytics:
In the Azure portal, navigate to the SQL server and set yourself as the Microsoft Entra Admin.
Connect to the Azure SQL Database/Data Warehouse using the Query Editor or SQL Server Management Studio with Microsoft Entra authentication.
Execute the following script to add the Data Share Managed Identity as a 'db_datareader, db_datawriter, db_ddladmin'.
create user "<share_acc_name>" from external provider;
exec sp_addrolemember db_datareader, "<share_acc_name>";
exec sp_addrolemember db_datawriter, "<share_acc_name>";
exec sp_addrolemember db_ddladmin, "<share_acc_name>";
Note
The <share_acc_name> is the name of your Data Share resource.
SQL Server Firewall access:
- In the Azure portal, navigate to the SQL server and select Firewalls and virtual networks.
- Select Yes for Allow Azure services and resources to access this server.
- Select +Add client IP. Client IP address can change, so you might need to add your client IP again next time you share data from the portal.
- Select Save.
For more information about sharing to and from Azure SQL, see the article to share and receive data from Azure SQL Database.
Azure synapse analytics sharing
Share
Permission to write to the SQL pool in Synapse workspace: Microsoft.Synapse/workspaces/sqlPools/write. This permission exists in the Contributor role.
Permission for the Data Share resource's managed identity to access Synapse workspace SQL pool:
In the Azure portal, navigate to your Synapse workspace. Select SQL Active Directory admin from left navigation and set yourself as the Microsoft Entra admin.
Open the Synapse Studio, select Manage from the left navigation. Select Access control under Security. Assign yourself the SQL admin or Workspace admin role.
Select Develop from the left navigation in the Synapse Studio. Execute the following script in SQL pool to add the Data Share resource-Managed Identity as a db_datareader.
create user "<share_acct_name>" from external provider;
exec sp_addrolemember db_datareader, "<share_acct_name>";
Note
The <share_acc_name> is the name of your Data Share resource.
Synapse workspace Firewall access:
- In the Azure portal, navigate to Synapse workspace. Select Firewalls from left navigation.
- Select ON for Allow Azure services and resources to access this workspace.
- Select +Add client IP. Client IP address can change, so you might need to add your client IP again next time you share data from the portal.
- Select Save.
Receive
An Azure Synapse Analytics (workspace) dedicated SQL pool. Receiving data into serverless SQL pool isn't currently supported.
Permission to write to the SQL pool in Synapse workspace: Microsoft.Synapse/workspaces/sqlPools/write. This permission exists in the Contributor role.
Permission for the Data Share resource's managed identity to access the Synapse workspace SQL pool:
In the Azure portal, navigate to Synapse workspace.
Select SQL Active Directory admin from left navigation and set yourself as the Microsoft Entra admin.
Open Synapse Studio, select Manage from the left navigation. Select Access control under Security. Assign yourself the SQL admin or Workspace admin role.
In Synapse Studio, select Develop from the left navigation. Execute the following script in SQL pool to add the Data Share resource-Managed Identity as a 'db_datareader, db_datawriter, db_ddladmin'.
create user "<share_acc_name>" from external provider;
exec sp_addrolemember db_datareader, "<share_acc_name>";
exec sp_addrolemember db_datawriter, "<share_acc_name>";
exec sp_addrolemember db_ddladmin, "<share_acc_name>";
Note
The <share_acc_name> is the name of your Data Share resource.
Synapse workspace Firewall access:
- In the Azure portal, navigate to Synapse workspace. Select Firewalls from left navigation.
- Select ON for Allow Azure services and resources to access this workspace.
- Select +Add client IP. Client IP address is subject to change. This process might need to be repeated the next time you're sharing SQL data from Azure portal.
- Select Save.
For more information about sharing to and from Azure Synapse analytics, see the article to share and receive data from Azure Synapse Analytics.
Assign MI permissions manually
If a user has Microsoft.Authorization/role assignments/write permissions on a source or target data store, it will automatically assign Azure Data Share's Managed identity the permissions it needs to authenticate with the data store. You can also assign managed identity permissions manually.
If you choose to assign permissions manually, assign these permissions to your Azure Data Share resource's managed identity based on source and action:
| Data Store Type | Data Provider Source Data Store | Data Consumer Target Data Store |
|---|---|---|
| Azure Blob Storage | Storage Blob Data Reader | Storage Blob Data Contributor |
| Azure Data Lake Gen1 | Owner | Not Supported |
| Azure Data Lake Gen2 | Storage Blob Data Reader | Storage Blob Data Contributor |
| Azure SQL Database | db_datareader | db_datareader, db_datawriter, db_ddladmin |
| Azure Synapse Analytics | db_datareader | db_datareader, db_datawriter, db_ddladmin |
Data provider example
When you share data from a storage account, the data share resource's managed identity is granted the Storage Blob Data Reader role.
This is done automatically by the Azure Data Share service when user is adding dataset via Azure portal and the user is an owner of the Azure data store, or is a member of a custom role that has the Microsoft.Authorization/role assignments/write permission assigned.
Alternatively, user can have the owner of the Azure data store add the data share resource's managed identity to the Azure data store manually. This action only needs to be performed once per data share resource.
To create a role assignment for the data share resource's managed identity manually, use the following steps:
Navigate to the Azure data store.
Select Access control (IAM).
Select Add > Add role assignment.
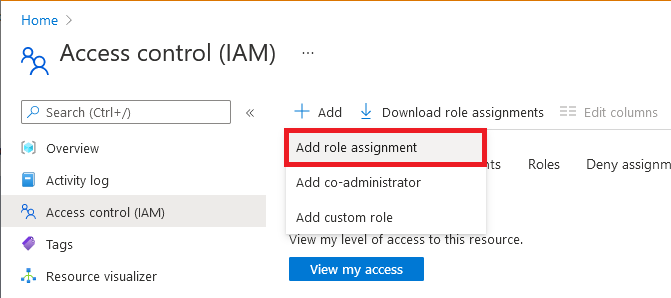
On the Role tab, select one of the roles listed in the role assignment table in the previous section.
On the Members tab, select Managed identity, and then select Select members.
Select your Azure subscription.
Select System-assigned managed identity, search for your Azure Data Share resource, and then select it.
On the Review + assign tab, select Review + assign to assign the role.
To learn more about role assignments, see Assign Azure roles using the Azure portal. If you're sharing data using REST APIs, you can create role assignment using API by referencing Assign Azure roles using the REST API.
For SQL snapshot-based sharing, a SQL user needs to be created from an external provider in SQL Database with the same name as the Azure Data Share resource while connecting to SQL database using Microsoft Entra authentication. This user needs to be granted db_datareader permission. A sample script along with other prerequisites for SQL-based sharing can be found in the Share from Azure SQL Database or Azure Synapse Analytics tutorial.
Data consumer example
To receive data into storage account, consumer data share resource's managed identity needs to be granted access to the target storage account. The data share resource's managed identity needs to be granted the Storage Blob Data Contributor role. This is done automatically by the Azure Data Share service if the user specifies a target storage account via Azure portal and the user has proper permission. For example, user is an owner of the storage account, or is a member of a custom role that has the Microsoft.Authorization/role assignments/write permission assigned.
Alternatively, user can have owner of the storage account add the data share resource's managed identity to the storage account manually. This action only needs to be performed once per data share resource. To create a role assignment for the data share resource's managed identity manually, follow the below steps.
Navigate to the Azure data store.
Select Access control (IAM).
Select Add > Add role assignment.
On the Role tab, select one of the roles listed in the role assignment table in the previous section. For example, for a storage account, select Storage Blob Data Reader.
On the Members tab, select Managed identity, and then select Select members.
Select your Azure subscription.
Select System-assigned managed identity, search for your Azure Data Share resource, and then select it.
On the Review + assign tab, select Review + assign to assign the role.
To learn more about role assignments, see Assign Azure roles using the Azure portal. If you're receiving data using REST APIs, you can create role assignment using API by referencing Assign Azure roles using the REST API.
For SQL-based target, a SQL user needs to be created from an external provider in SQL Database with the same name as the Azure Data Share resource while connecting to SQL database using Microsoft Entra authentication. This user needs to be granted db_datareader, db_datawriter, db_ddladmin permission. A sample script along with other prerequisites for SQL-based sharing can be found in the Share from Azure SQL Database or Azure Synapse Analytics tutorial.
Resource provider registration
You might need to manually register the Microsoft.DataShare resource provider into your Azure subscription in the following scenarios:
- View Azure Data Share invitation for the first time in your Azure tenant
- Share data from an Azure data store in a different Azure subscription from your Azure Data Share resource
- Receive data into an Azure data store in a different Azure subscription from your Azure Data Share resource
Follow these steps to register the Microsoft.DataShare resource provider into your Azure Subscription. You need Contributor access to the Azure subscription to register resource provider.
- In the Azure portal, navigate to Subscriptions.
- Select the subscription that you're using for Azure Data Share.
- Select on Resource Providers.
- Search for Microsoft.DataShare.
- Select Register.
To learn more about resource provider, refer to Azure resource providers and types.
Custom roles for Data Share
This section describes custom roles and permissions required within the custom roles for sharing and receiving data, specific to a Storage account. There are also prerequisites that are independent of custom role or Azure Data Share role.
Prerequisites for Data Share, in addition to custom role
- For storage and data lake snapshot-based sharing, to add a dataset in Azure Data Share, the provider data share resource's managed identity needs to be granted access to the source Azure data store. For example, if using a storage account, the data share resource's managed identity is granted the Storage Blob Data Reader role.
- To receive data into a storage account, the consumer data share resource's managed identity needs to be granted access to the target storage account. The data share resource's managed identity needs to be granted the Storage Blob Data Contributor role.
- You might also need to manually register the Microsoft.DataShare resource provider into your Azure subscription for some scenarios. See in Resource provider registration section of this article for specific details.
Create custom roles and required permissions
Custom roles can be created in a subscription or resource group for sharing and receiving data. Users and groups can then be assigned the custom role.
- For creating a custom role, there are actions required for Storage, Data Share, Resources group, and Authorization. See the Azure resource provider operations document for Data Share to understand the different levels of permissions and choose the ones relevant for your custom role.
- Alternately, you can use the Azure portal to navigate to IAM, Custom role, Add permissions, Search, search for Microsoft.DataShare permissions to see the list of actions available.
- To learn more about custom role assignment, refer to Azure custom roles. Once you have your custom role, test it to verify that it works as you expect.
The following shows an example of how the required actions will be listed in JSON view for a custom role to share and receive data.
{
"Actions": [

"Microsoft.Storage/storageAccounts/read",

"Microsoft.Storage/storageAccounts/write",

"Microsoft.Storage/storageAccounts/blobServices/containers/read",

"Microsoft.Storage/storageAccounts/blobServices/generateUserDelegationKey/action",

"Microsoft.Storage/storageAccounts/listkeys/action",

"Microsoft.DataShare/accounts/read",

"Microsoft.DataShare/accounts/providers/Microsoft.Insights/metricDefinitions/read",

"Microsoft.DataShare/accounts/shares/listSynchronizations/action",

"Microsoft.DataShare/accounts/shares/synchronizationSettings/read",

"Microsoft.DataShare/accounts/shares/synchronizationSettings/write",

"Microsoft.DataShare/accounts/shares/synchronizationSettings/delete",

"Microsoft.DataShare/accounts/shareSubscriptions/*",

"Microsoft.DataShare/listInvitations/read",

"Microsoft.DataShare/locations/rejectInvitation/action",

"Microsoft.DataShare/locations/consumerInvitations/read",

"Microsoft.DataShare/locations/operationResults/read",

"Microsoft.Resources/subscriptions/resourceGroups/read",

"Microsoft.Resources/subscriptions/resourcegroups/resources/read",

"Microsoft.Authorization/roleAssignments/read",
 ]
}
Next steps
- Learn more about roles in Azure - Understand Azure role definitions