Bilješka
Pristup ovoj stranici zahtijeva provjeru vjerodostojnosti. Možete pokušati da se prijavite ili promijenite direktorije.
Pristup ovoj stranici zahtijeva provjeru vjerodostojnosti. Možete pokušati promijeniti direktorije.
This article describes how to set up agentless dependency analysis using Azure Migrate: Discovery and assessment tool. Dependency analysis helps you to identify and understand dependencies across servers for assessment and migration to Azure.
Note
In this article, you'll explore the new experience with agentless dependency analysis. You should continue only if you've upgraded to the new experience by following these prerequisites.
Current limitations
- In the dependency analysis view, currently you can't add or remove a server from a group.
- A dependency map for a group of servers isn't currently available.
What's New?
- Dependency analysis is automatically enabled on 1,000 servers discovered by each Azure Migrate appliance that has passed the prerequisite checks. You no longer need to enable the dependency analysis on servers manually as before.
- The enhanced dependency visualization helps you review additional information about the servers, connections, and processes. You can filter the view by process type to analyze key dependencies in the visualization.
- In the new visualization, after identifying key dependencies, you can group servers into an application by tagging them.
Before you start
The existing users can follow steps provided here
The new users need to follow the below steps:
- Ensure that you've created a project with the Azure Migrate: Discovery and assessment tool added to it.
- Review the requirements based on your environment and the appliance you're setting up to perform agentless dependency analysis:
| Environment | Requirements |
|---|---|
| Servers running in VMware environment | Review VMware requirements Review appliance requirements Review port access requirements Review agentless dependency analysis requirements |
| Servers running in Hyper-V environment | Review Hyper-V host requirements Review appliance requirements Review port access requirements Review agentless dependency analysis requirements |
| Physical servers or servers running on other clouds | Review server requirements Review appliance requirements Review port access requirements Review agentless dependency analysis requirements |
- Review the Azure URLs that the appliance needs to access in the public and government clouds.
Deploy and configure the Azure Migrate appliance
- Deploy the Azure Migrate appliance to start discovery. To deploy the appliance, you can use the deployment method as per your environment. After deploying the appliance, you need to register it with the project and configure it to initiate the discovery.
- While configuring the appliance, you need to specify the following in the appliance configuration manager:
- The details of the source environment (vCenter Server(s)/Hyper-V host(s) or cluster(s)/physical servers) which you want to discover.
- Server credentials, which can be domain/ Windows (nondomain)/ Linux (nondomain) credentials. Learn more about how to provide credentials and how the appliance handles them.
- Verify the permissions required to perform agentless dependency analysis. For Windows servers, you need to provide domain or nondomain (local) account with administrative permissions. For Linux servers, provide a sudo user account with permissions to execute ls and netstat commands or create a user account that has the CAP_DAC_READ_SEARCH and CAP_SYS_PTRACE permissions on /bin/netstat and /bin/ls files. If you're providing a sudo user account, ensure that NOPASSWD is enabled for the account so commands can run without prompting for a password each time.
Add credentials and initiate discovery
Open the appliance configuration manager, complete the prerequisite checks and registration of the appliance.
Navigate to the Manage credentials and discovery sources panel.
In Step 1: Provide credentials for discovery source, select on Add credentials to provide credentials for the discovery source that the appliance uses to discover servers running in your environment.
In Step 2: Provide discovery source details, select Add discovery source to select the friendly name for credentials from the drop-down, specify the IP address/FQDN of the discovery source.
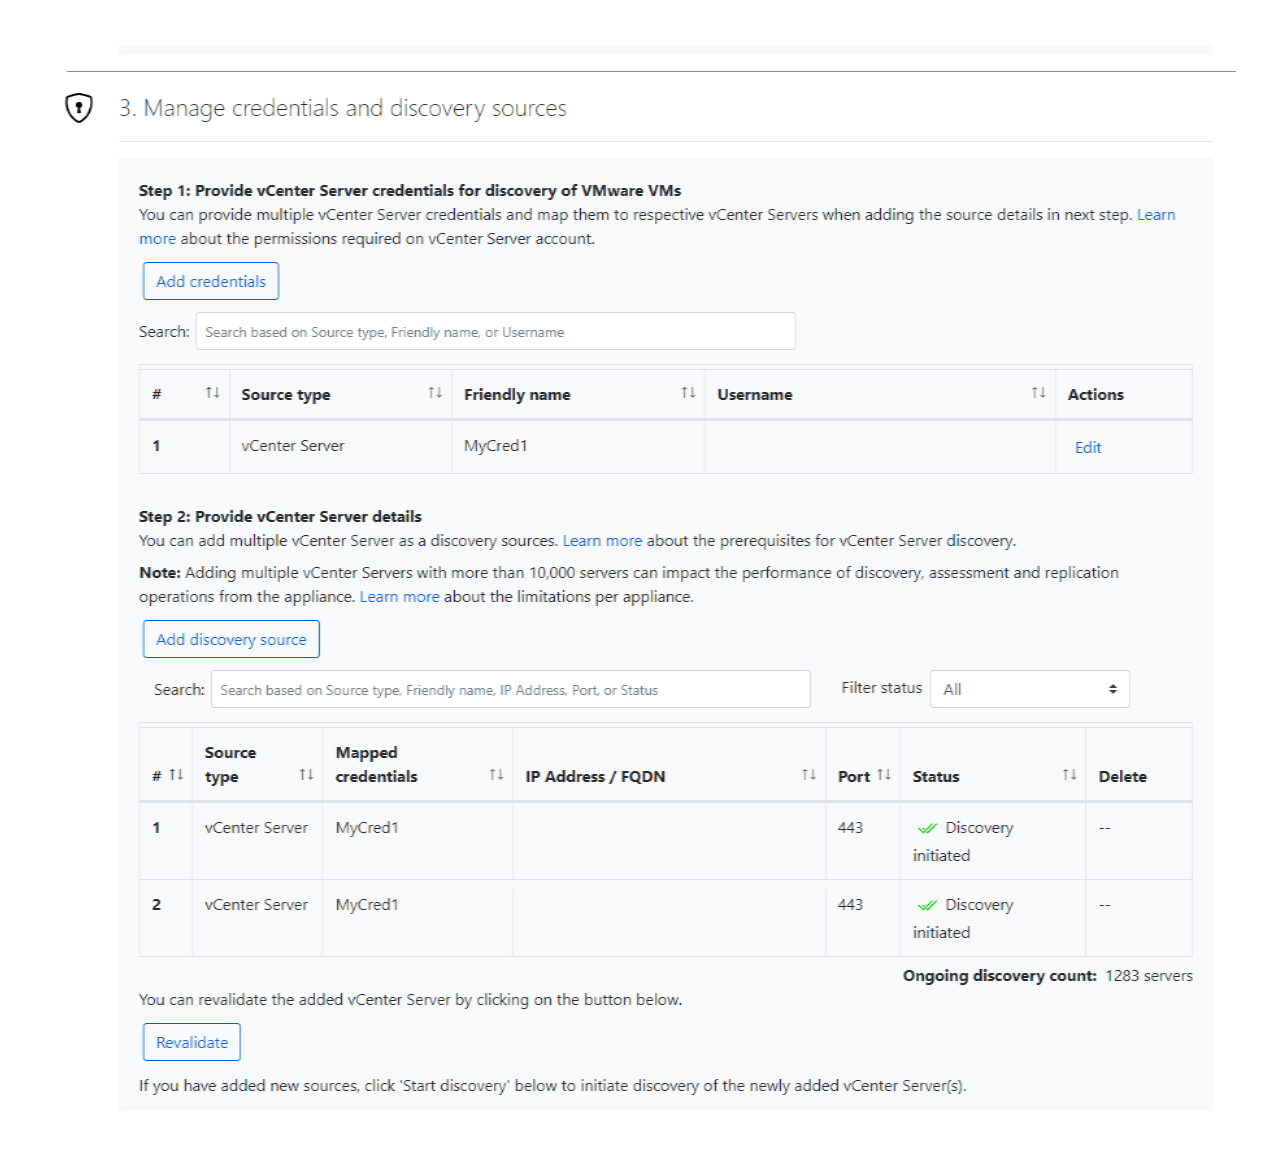
In Step 3: Provide server credentials to perform software inventory and agentless dependency analysis, select Add credentials to provide multiple server credentials to perform guest-based discovery like software inventory, agentless dependency analysis, and discovery of databases and web applications.
Select on Start discovery, to initiate discovery.

After the server discovery is complete, appliance initiates the discovery of installed applications, roles, and features (software inventory) on the servers. During software inventory, the discovered servers are validated to check if they meet the prerequisites and can be enabled for agentless dependency analysis.
Note
Agentless dependency analysis feature is automatically enabled for the discovered servers when the prerequisite checks are successful. Unlike before, you no longer need to manually enable this feature on servers.
After servers are enabled for agentless dependency analysis, appliance collects dependency data from the server every 5 mins. It then sends a combined data point every six hours. You can review the data collected by appliance during analysis.
After servers are automatically enabled for agentless dependency analysis, appliance collects dependency data from the server every 5 mins. It then sends a combined data point every six hours. You can review the data collected by appliance during analysis.
Review dependency status
After initiating discovery from the appliance, you can come to Migrate project on the Azure portal and review the dependency data. We recommend that you wait for atleast 24 hours to allow for enough dependendency data to be gathered for your servers and show in a visualization.
In the project, you can review dependencies for each server either through the All inventory or Infrastructure inventory view.
On reviewing the Dependencies column for any server, you see one of the following status:
- Credentials not available: when no server credentials provided on the appliance configuration manager can be used to perform dependency analysis
- Validation in progress: when the prerequisite validation checks have still not been completed on the server
- Validation failed: when the validation checks on the server have failed. You can select the status to review error message which would mostly be related to missing prerequisites like insufficient credential permissions or invalid credentials etc.
After the validation succeeds, dependency analysis are auto-enabled and you see one of the following status:
- View dependencies: when validation checks have passed and the dependency analysis has been enabled. You can select this to go to the new visualization and review dependencies for this server.
- Not initiated: when dependency analysis couldn't be enabled as Azure Migrate has reached the scale limit of 1,000 servers per appliance for auto-enablement. If you want to perform dependency analysis on the specific servers, you can manually disable it on the other auto-enabled servers and enable for the ones you need by using the PowerShell module.
- Disabled: when dependency analysis has been manually disabled by you on this server using the PowerShell module. You can re-enable it any-time using the same PowerShell module.
Visualize dependencies
In Azure Migrate: Discovery and assessment, select Discovered servers.
Choose the Appliance name whose discovery you want to review.
Search for the server whose dependencies, you want to review.
Under the Dependencies (agentless) column, select View dependencies
Change the time period for which you want to view the map using the Time duration dropdown.
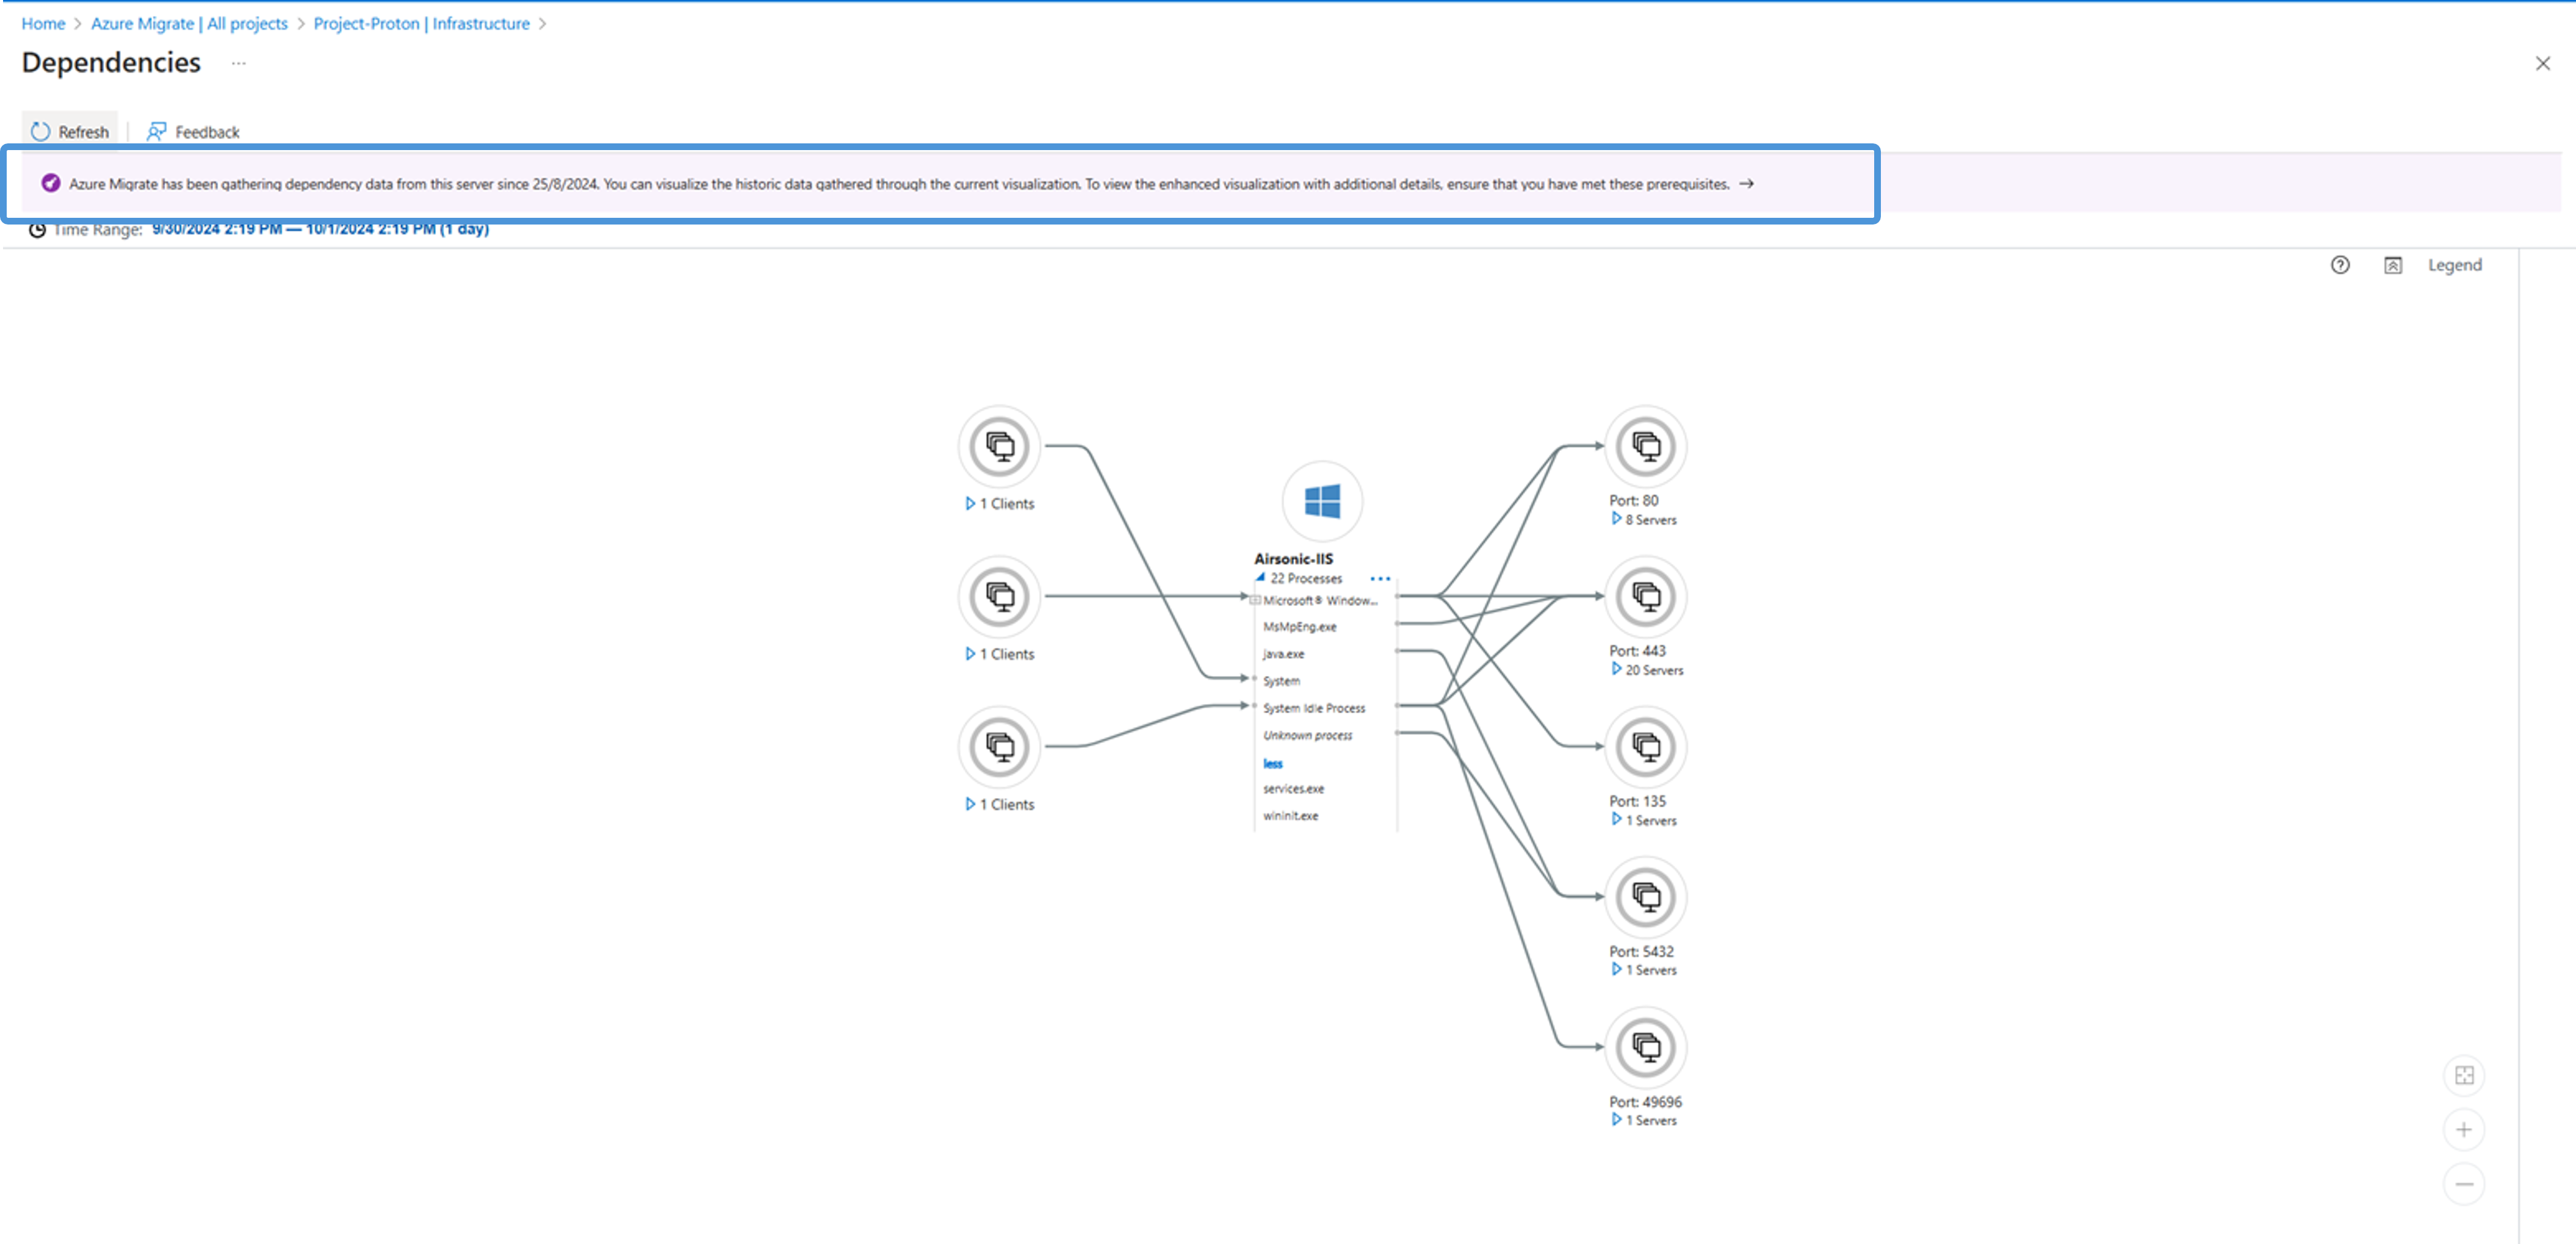
Expand the Client group to list the servers with a dependency on the selected server.
Expand the Port group to list the servers that have a dependency from the selected server.
To navigate to the map view of any of the dependent servers, select the server name > Load server map
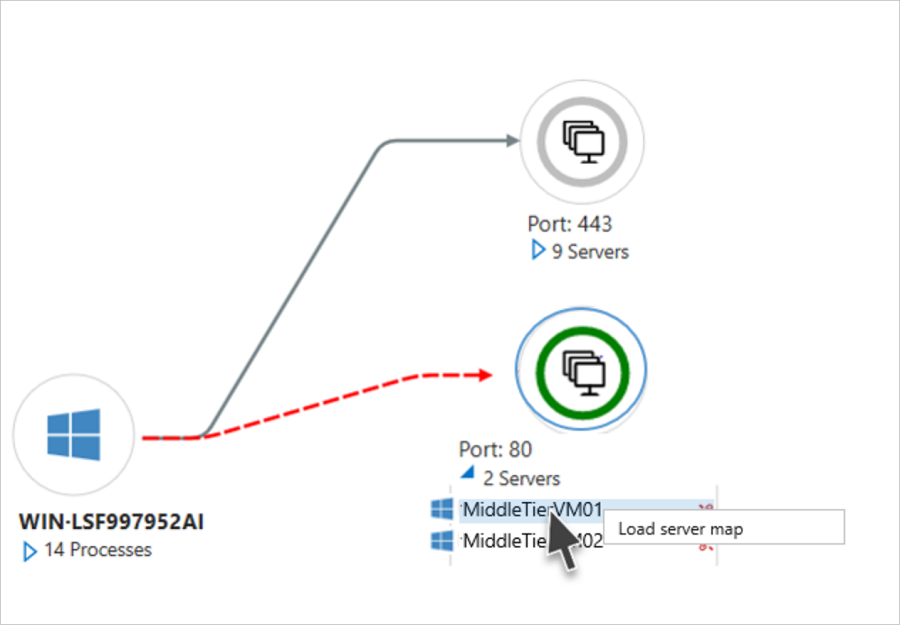
Expand the selected server to view process-level details for each dependency.
In the new experience, go to project overview. Select the workloads count in All inventory to review the discovered workloads. In the view, you can see Dependencies column with status values as covered in section above.
Search for the server whose dependencies, you want to review. If dependency analysis was successfully performed on that server, you can select on View dependencies to go to the dependency visualization.
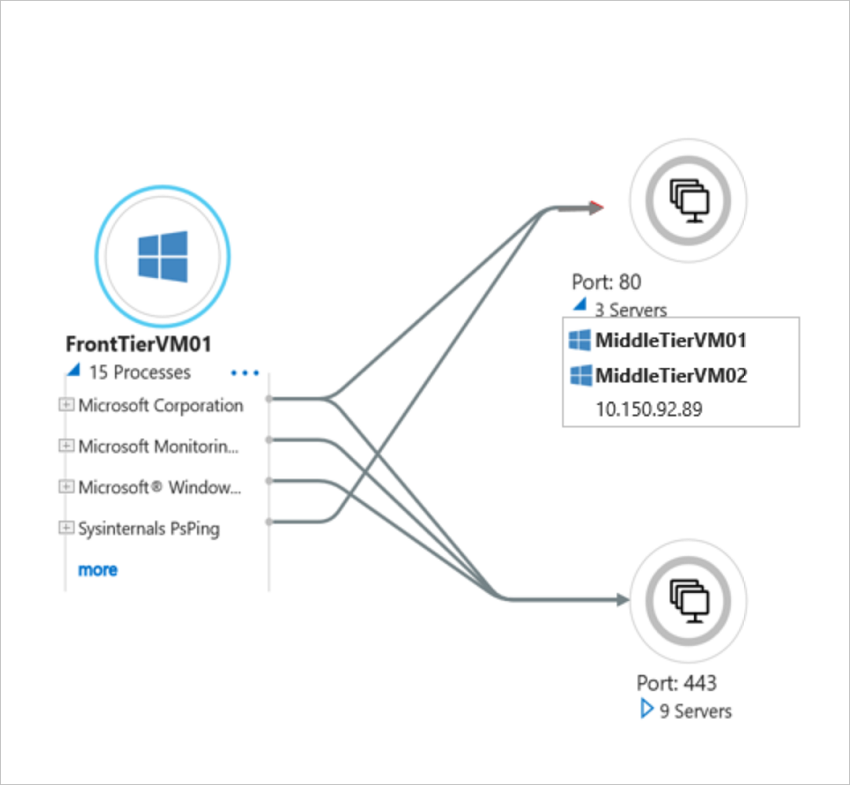
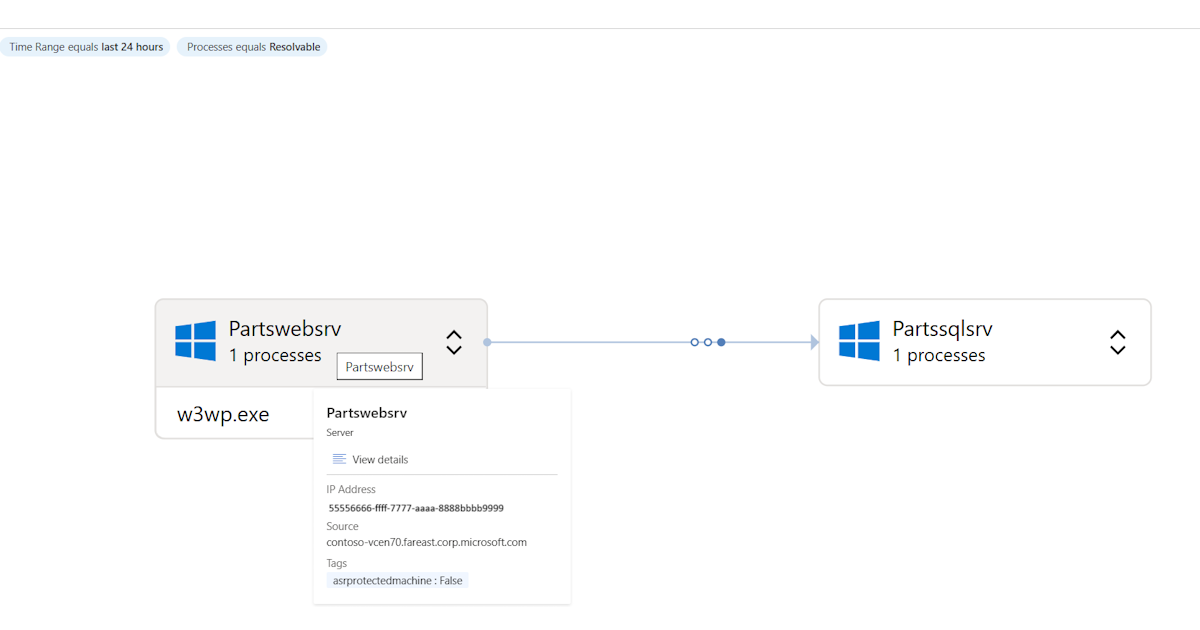
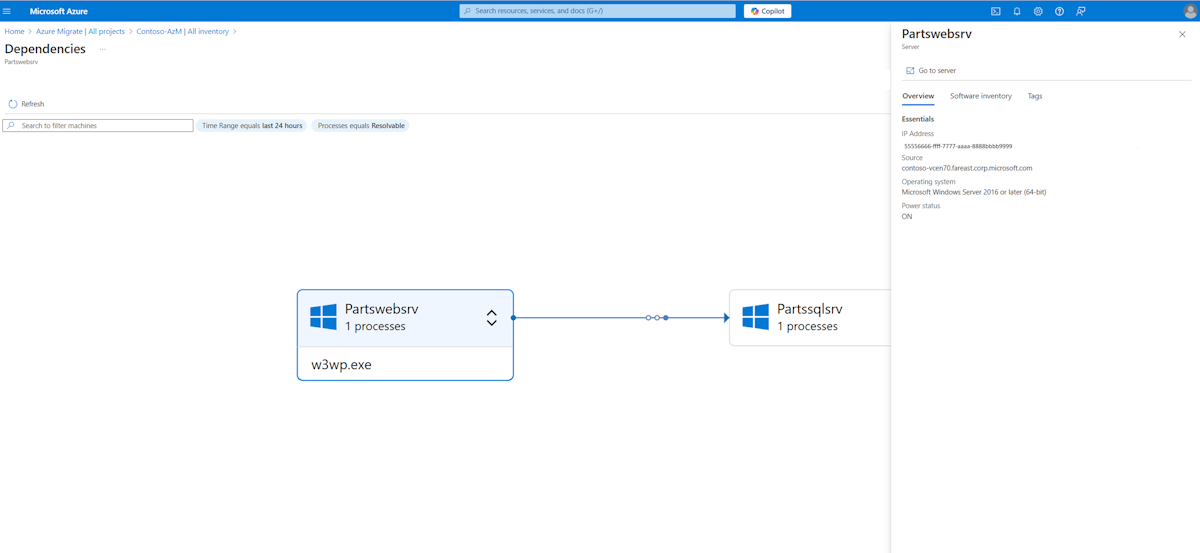
The dependency visualization shows all incoming and outgoing dependencies for that server in a network diagram.

The view is filtered for default time period of Last 24 hours and process type as Resolvable.
The view is filtered for default time period of Last 24 hours and process type as Resolvable.
Change the time period for which you want to view the map using the Time range filter. You can choose between Last 7 days/Last 30 days or select a Custom range.
You can choose to change the process type from any of the following:
Process Type Resolvable (Default) To filter by processes having resolvable connections Essentials To filter by non-redundant key processes All to filter by all processes including those with unresolved connections In the view, you find the servers and connections represented as follows:
Representation Details Windows symbol Representing a Windows server in the view Linux symbol Representing a Linux server in the view Connection symbol Representing the direction of dependency between servers with strength of the connection represented by grading of dots on the connection Process count Representing the count of processes as per the process type filter You can hover on the Server name to see essential information about the server like IP address, Source, and Tags.
Similarly you can also hover on the connection to see essential information like strength and frequency of connections in the selected time range.
You can select the Server name to see more details like Operating system, Power Status, Software inventory discovered from the server and associated Tags.
Similarly you can also select the connection to see more details like which source and destination processes have the dependency over which destination port no.
You can expand the Server to see the list of processes basis the selected process type filter.
From the expanded list of processes, you can select on a Process name to see its incoming and outgoing dependencies with processes on other servers in the view. The process to process dependency also indicates the destination port no on the connection.


Note
Process information for a dependency isn't always available. If it's not available, the dependency is depicted with the process marked as "Unknown process".
Export dependency data
- In All inventory or Infrastructure inventory view, select the Dependency analysis drop-down.
- Select Export application dependencies.
- In the Export application dependencies page, choose the appliance name that is discovering the desired servers.
- Select the start time and end time. You can download the data only for the last 30 days.
- Select Export dependency.
The dependency data is exported and downloaded in a CSV format. The downloaded file contains the dependency data across all servers enabled for dependency analysis.

Dependency information
Each row in the exported CSV corresponds to a dependency observed in the specified time slot.
The following table summarizes the fields in the exported CSV. Server name, application, and process fields are populated only for servers that have agentless dependency analysis enabled.
| Field name | Details |
|---|---|
| Timeslot | The timeslot during which the dependency was observed. Dependency data is captured over six hour slots currently. |
| Source server name | Name of the source server |
| Source application | Name of the application on the source server |
| Source process | Name of the process on the source server |
| Destination server name | Name of the destination server |
| Destination IP | IP address of the destination server |
| Destination application | Name of the application on the destination server |
| Destination process | Name of the process on the destination server |
| Destination port | Port number on the destination server |
Switch to new visualization
If you're an existing user who has already set up an Azure Migrate project, performed discovery and manually enabled dependency analysis on some servers, you need to perform following steps to get the new enhanced visualization:
Go to the inventory view and search for a server, for which you want to review dependencies.
Select on View dependencies and you see the old visualization showing dependencies of that server.
On the dependency view, you see an information box prompting you to complete some prerequisites for switching to the new visualization.
As a prerequisite, you need to ensure that the discovery agent on the appliances registered with the project has been upgraded to version or above.
Select proceed to create a new resource in the same Resource Group as the project. Ensure that you've atleast Contributor role on the Resource Group else this step isn't complete.

Note
Even if the new resource creation goes through, you might not see the new visualization if the discovery agent version on the Azure Migrate appliance isn't up to date. Ensure that auto-update service on the appliance is enabled. Learn more
After you have performed the required steps to upgrade to the new dependency visualization, there are two ways in which you can see server dependencies in the new visualization.
Option 1
- Go to the existing inventory view in your project and switch to the new inventory view as using the prompt.
- Select View dependencies for the desired server in the new inventory view to get to the new visualization directly.
Option 2
- Go to the old inventory view, select View dependencies on a server.
- In the old dependency view, select the prompt to get to the new enhanced visualization.
Note
It's recommended to use Option 1 above to switch to the new inventory view as you're able to filter servers where dependency analysis was auto-enabled and then directly review the dependency visualization. Old inventory view only provides option to visualize dependencies for servers where you had manually enabled the feature.
Disable auto-enabled dependency analysis using PowerShell
Dependency analysis is auto-enabled on all discovered servers which have passed the validation checks. You may need to disable one or more of these servers in the following scenarios:
- Dependency analysis has been auto-enabled on all discovered in your project but you want to disable it on a few servers where you don't want to gather dependency data.
- Dependency analysis has been auto-enabled on 1,000 servers concurrently in your project but you have more servers where you want to enable it, then you can disable dependency analysis one or more servers from the set of 1,000 and enable others as needed.
Note
Currently, it isn't possible to disable dependendency analysis on servers from portal so you need to install the PowerShell module to disable for servers that you don't want.
Log in to Azure
Log in to your Azure subscription using the Connect-AzAccount cmdlet.
Connect-AzAccountIf using Azure Government, use the following command.
Connect-AzAccount -EnvironmentName AzureUSGovernmentSelect the subscription in which you've created the project
select-azsubscription -subscription "Contoso Demo Subscription"Install the AzMig.Dependencies PowerShell module
Install-Module .\AzMig.Dependencies
Disable dependency data collection
Get the list of discovered servers in your project using the following commands. In the example below, the project name is ContosoDemoProject, and the resource group it belongs to be ContosoDemoRG. The list of servers are saved in ContosoDemo_VMs.csv
Get-AzMigDiscoveredVMwareVMs -ResourceGroupName "ContosoDemoRG" -ProjectName "ContosoDemoProject" -OutputCsvFile "ContosoDemo_VMs.csv" [-AutoEnabledDepMap]You can also add a filter to export the relevant servers using the command:
Get-AzMigDiscoveredVMwareVMs -ResourceGroupName "ContosoDemoRG" -ProjectName "ContosoDemoProject" -Filter @{"Dependencies"="Enabled"} -OutputCsvFile "ContosoDemo_VMs.csv" [-AutoEnabledDepMap]
The different filters available for use in the command above are:
| Field name | Details |
|---|---|
| ServerName | Provide name you want to filter with |
| Source | Appliance/ Import-based |
| Dependencies | Enabled/Disabled |
| PowerStatus | On/Off |
Some of the other fields are IP Address, osType, osName, osArchitecture, osVersion
You can find discovered servers for a specific appliance by using the command:
Get-AzMigDiscoveredVMwareVMs -ResourceGroupName "ContosoDemoRG" -ProjectName "ContosoDemoProject" -Filter @{"Dependencies"="Enabled"} -ApplianceName "ContosoApp" -OutputCsvFile "ContosoDemo_VMs.csv" [-AutoEnabledDepMap]
In the file, you can see the server display name, current status of dependency collection and the ARM ID of all discovered servers.
To disable dependencies, create an input CSV file from the output file you exported in the last step. The file is required to have a column with header "ARM ID". Any other headers in the CSV file are ignored. The input file should contain the list of servers where you want to disable dependency analysis.
In the following example, dependency analysis is being disabled on the list of servers in the input file ContosoDemo_VMs_Disable.csv.
Set-AzMigDependencyMappingAgentless -Disable -InputCsvFile .\ContosoDemo_VMs_Disable.csv [-AutoEnabledDepMap]
Enable dependency data collection
You may need to enable dependency analysis on one or more servers to restart dependency data collection from servers that you disabled using PowerShell module previously.
You need to follow the same steps to export the discovered servers as mentioned above and then import the list of servers you want to enable.
In the following example, dependency analysis is being enabled on the list of servers in the input file ContosoDemo_VMs_Enable.csv.
Set-AzMigDependencyMappingAgentless -Enable -InputCsvFile .\ContosoDemo_VMs_Enable.csv [-AutoEnabledDepMap]
Visualize network connections in Power BI
Azure Migrate offers a Power BI template that you can use to visualize network connections of many servers at once, and filter by process and server. To visualize, load the Power BI with dependency data as per the below instructions.
Log in to Azure
Log in to your Azure subscription using the Connect-AzAccount cmdlet.
Connect-AzAccountIf using Azure Government, use the following command.
Connect-AzAccount -EnvironmentName AzureUSGovernmentSelect the subscription in which you've created the project
select-azsubscription -subscription "Contoso Demo Subscription"Install the AzMig.Dependencies PowerShell module
Install-Module .\AzMig.DependenciesRun the following command. This command downloads the dependencies data in a CSV and processes it to generate a list of unique dependencies that can be used for visualization in Power BI. In the example below the project name is ContosoDemoProject, and the resource group it belongs to be ContosoDemoRG. The dependencies are downloaded for servers discovered by ContosoApp. The unique dependencies are saved in ContosoDemo_Dependencies.csv
Get-AzMigDependenciesAgentless -ResourceGroup ContosoDemoRG -Appliance ContosoApp -ProjectName ContosoDemoProject -OutputCsvFile "ContosoDemo_Dependencies.csv" [-AutoEnabledDepMap]Open the downloaded Power BI template
Load the downloaded dependency data in Power BI.
- Open the template in Power BI.
- Select Get Data on the tool bar.
- Choose Text/CSV from Common data sources.
- Choose the dependencies file downloaded.
- Select Load.
- You see a table is imported with the name of the CSV file. You can see the table in the fields bar on the right. Rename it to AzMig_Dependencies
- Select refresh from the tool bar.
The Network Connections chart and the Source server name, Destination server name, Source process name, Destination process name slicers should light up with the imported data.
Visualize the map of network connections filtering by servers and processes. Save your file.
Next steps
Group servers for assessment.