Get started with Azure PowerShell
Warning
The AzureRM PowerShell module has been officially deprecated as of February 29, 2024. Users are advised to migrate from AzureRM to the Az PowerShell module to ensure continued support and updates.
Although the AzureRM module may still function, it's no longer maintained or supported, placing any continued use at the user's discretion and risk. Please refer to our migration resources for guidance on transitioning to the Az module.
Azure PowerShell is designed for managing and administering Azure resources from the command line, and for building automation scripts that work against the Azure Resource Manager. You can use it in your browser with Azure Cloud Shell or you install it on your local machine. This article helps get you started with Azure PowerShell and teaches the core concepts behind it.
Install Azure PowerShell
The first step is to make sure you have the latest version of the Azure PowerShell installed. For information about the latest release, see the release notes.
To verify the installation was successful, run
Get-InstalledModule -Name AzureRM -AllVersionsfrom PowerShell.
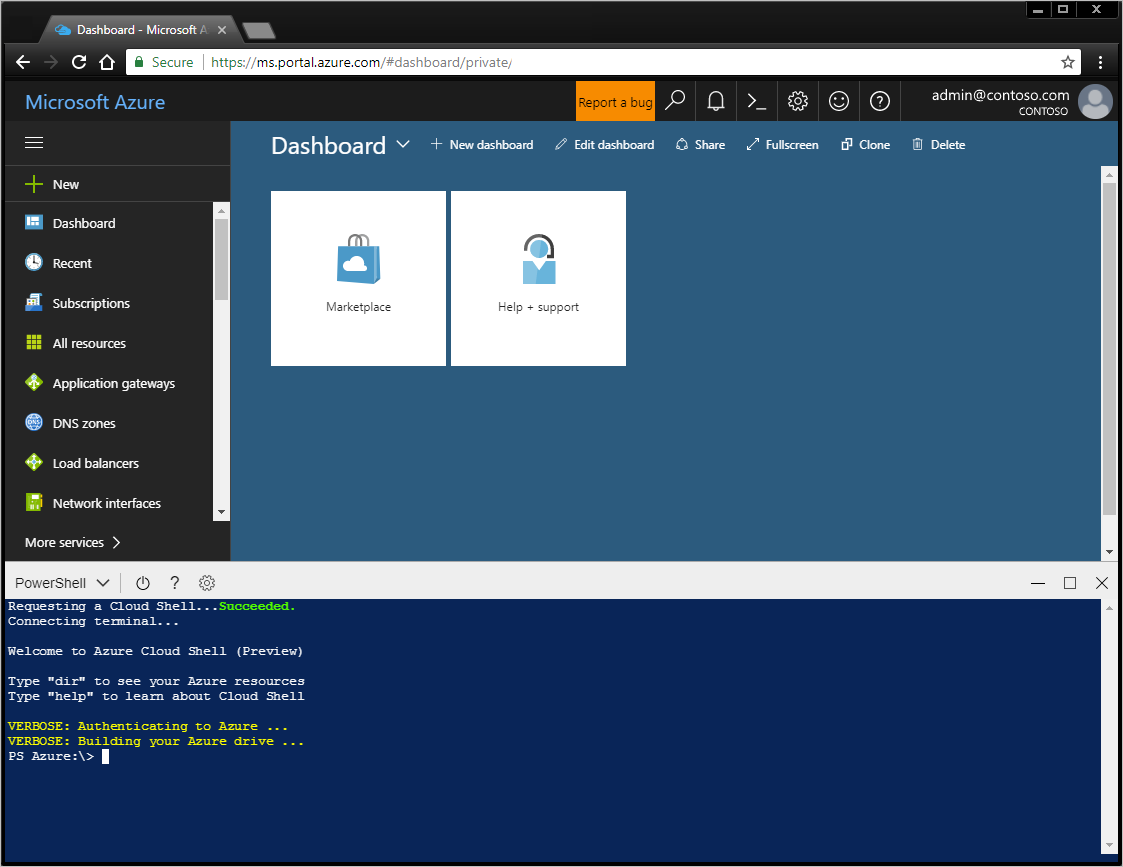
Azure Cloud Shell
The simplest way to get started is to launch Cloud Shell.
Launch Cloud Shell from the top navigation of the Azure portal.

Choose the subscription you want to use and create a storage account.

Once your storage has been created, the Cloud Shell will open a PowerShell session in the browser.
You can also install Azure PowerShell and use it locally in a PowerShell session.
Sign in to Azure
Sign on interactively:
Type
Connect-AzureRmAccount. You'll get a dialog box asking for your Azure credentials. Option '-Environment' can let you authenticate for Azure China or Azure Germany.for example, Connect-AzureRmAccount -Environment AzureChinaCloud
Type the email address and password associated with your account. Azure authenticates and saves the credential information, and then closes the window.
Once you have signed in to an Azure account, you can use the Azure PowerShell cmdlets to access and manage the resources in your subscription.
Create a Windows virtual machine using simple defaults
The New-AzureRmVM cmdlet provides a simplified syntax making it easy to create a new virtual
machine. There are only two parameter values you must provide: the name of the VM and a set of
credentials for the local administrator account on the VM.
First, create the credential object.
$cred = Get-Credential -Message 'Enter a username and password for the virtual machine.'
Windows PowerShell credential request.
Enter a username and password for the virtual machine.
User: localAdmin
Password for user localAdmin: *********
Next, create the VM.
New-AzureRmVM -Name SampleVM -Credential $cred
ResourceGroupName        : SampleVM
Id                       : /subscriptions/XXXXXXXX-XXXX-XXXX-XXXX-XXXXXXXXXXXX/resourceGroups/SampleVM/providers/Microsoft.Compute/virtualMachines/SampleVM
VmId                     : 43f6275d-ce50-49c8-a831-5d5974006e63
Name                     : SampleVM
Type                     : Microsoft.Compute/virtualMachines
Location                 : eastus
Tags                     : {}
HardwareProfile          : {VmSize}
NetworkProfile           : {NetworkInterfaces}
OSProfile                : {ComputerName, AdminUsername, WindowsConfiguration, Secrets}
ProvisioningState        : Succeeded
StorageProfile           : {ImageReference, OsDisk, DataDisks}
FullyQualifiedDomainName : samplevm-2c0867.eastus.cloudapp.azure.com
You may wonder what else is created and how is the VM configured. First, let's look at our resource groups.
Get-AzureRmResourceGroup |
  Select-Object -Property ResourceGroupName, Location
ResourceGroupName          Location
-----------------          --------
cloud-shell-storage-westus westus
SampleVM                   eastus
The cloud-shell-storage-westus resource group is created the first time you use the Cloud
Shell. The SampleVM resource group was created by the New-AzureRmVM cmdlet.
Now, what other resources were created in this new resource group?
Get-AzureRmResource |
  Where ResourceGroupName -eq SampleVM |
    Select-Object -Property ResourceGroupName, Location, ResourceType, Name
ResourceGroupName          Location ResourceType                            Name
-----------------          -------- ------------                            ----
SAMPLEVM                   eastus   Microsoft.Compute/disks                 SampleVM_OsDisk_1_9b286c54b168457fa1f8c47...
SampleVM                   eastus   Microsoft.Compute/virtualMachines       SampleVM
SampleVM                   eastus   Microsoft.Network/networkInterfaces     SampleVM
SampleVM                   eastus   Microsoft.Network/networkSecurityGroups SampleVM
SampleVM                   eastus   Microsoft.Network/publicIPAddresses     SampleVM
SampleVM                   eastus   Microsoft.Network/virtualNetworks       SampleVM
Let's get some more details about the VM. This example shows how to retrieve information about the OS Image used to create the VM.
Get-AzureRmVM -Name SampleVM -ResourceGroupName SampleVM |
  Select-Object -ExpandProperty StorageProfile |
    Select-Object -ExpandProperty ImageReference
Publisher : MicrosoftWindowsServer
Offer     : WindowsServer
Sku       : 2016-Datacenter
Version   : latest
Id        :
Create a fully configured Linux Virtual Machine
The previous example used the simplified syntax and default parameter values to create a Windows virtual machine. In this example, we provide values for all options of the virtual machine.
Create a resource group
In this example, we want to create a Resource Group. Resource Groups in Azure provide a way to manage multiple resources that you want to logically group together. For example, you might create a Resource Group for an application or project and add a virtual machine, a database and a CDN service within it.
Let's create a resource group named "MyResourceGroup" in the westeurope region of Azure. To do so type the following command:
New-AzureRmResourceGroup -Name 'myResourceGroup' -Location 'westeurope'
ResourceGroupName : myResourceGroup
Location          : westeurope
ProvisioningState : Succeeded
Tags              :
ResourceId        : /subscriptions/XXXXXXXX-XXXX-XXXX-XXXX-XXXXXXXXXXXX/resourceGroups/myResourceGroup
This new resource group will be used to contain all of the resources needed for the new VM we
create. To create a new Linux VM, we must first create the other required resources and assign them
to a configuration. Then we can use that configuration to create the VM. Also, you will need to
have an SSH public key named id_rsa.pub in the .ssh directory of your user profile.
Create the required network resources
First we need to create a subnet configuration to be used with the virtual network creation process. We also create a public IP address so that we can connect to this VM. We create a network security group to secure access to the public address. Finally we create the virtual NIC using all of the previous resources.
# Variables for common values
$resourceGroup = 'myResourceGroup'
$location = 'westeurope'
$vmName = 'myLinuxVM'

# Definer user name and blank password
$securePassword = ConvertTo-SecureString 'azurepassword' -AsPlainText -Force
$cred = New-Object -TypeName System.Management.Automation.PSCredential ('azureuser', $securePassword)

# Create a subnet configuration
$subnetConfig = New-AzureRmVirtualNetworkSubnetConfig -Name mySubnet2 -AddressPrefix 192.168.2.0/24

# Create a virtual network
$vnet = New-AzureRmVirtualNetwork -ResourceGroupName $resourceGroup -Location $location `
  -Name MYvNET2 -AddressPrefix 192.168.0.0/16 -Subnet $subnetConfig

# Create a public IP address and specify a DNS name
$publicIp = New-AzureRmPublicIpAddress -ResourceGroupName $resourceGroup -Location $location `
  -Name "mypublicdns$(Get-Random)" -AllocationMethod Static -IdleTimeoutInMinutes 4
$publicIp | Select-Object Name,IpAddress

# Create an inbound network security group rule for port 22
$nsgRuleSSH = New-AzureRmNetworkSecurityRuleConfig -Name myNetworkSecurityGroupRuleSSH  -Protocol Tcp `
  -Direction Inbound -Priority 1000 -SourceAddressPrefix * -SourcePortRange * -DestinationAddressPrefix * `
  -DestinationPortRange 22 -Access Allow

# Create a network security group
$nsg = New-AzureRmNetworkSecurityGroup -ResourceGroupName $resourceGroup -Location $location `
  -Name myNetworkSecurityGroup2 -SecurityRules $nsgRuleSSH

# Create a virtual network card and associate with public IP address and NSG
$nic = New-AzureRmNetworkInterface -Name myNic2 -ResourceGroupName $resourceGroup -Location $location `
  -SubnetId $vnet.Subnets[0].Id -PublicIpAddressId $publicIp.Id -NetworkSecurityGroupId $nsg.Id
Create the VM configuration
Now that we have the required resources we can create the VM configuration object.
# Create a virtual machine configuration
$vmConfig = New-AzureRmVMConfig -VMName $vmName -VMSize Standard_D1 |
  Set-AzureRmVMOperatingSystem -Linux -ComputerName $vmName -Credential $cred -DisablePasswordAuthentication |
  Set-AzureRmVMSourceImage -PublisherName Canonical -Offer UbuntuServer -Skus 14.04.2-LTS -Version latest |
  Add-AzureRmVMNetworkInterface -Id $nic.Id

# Configure SSH Keys
$sshPublicKey = Get-Content -Raw "$env:USERPROFILE\.ssh\id_rsa.pub"
Add-AzureRmVMSshPublicKey -VM $vmConfig -KeyData $sshPublicKey -Path '/home/azureuser/.ssh/authorized_keys'
Create the virtual machine
Now we can create the VM using the VM configuration object.
New-AzureRmVM -ResourceGroupName $resourceGroup -Location $location -VM $vmConfig
Now that the VM has been created, you can sign in to your new Linux VM using SSH with the public IP address of the VM you created:
ssh xx.xxx.xxx.xxx
Welcome to Ubuntu 14.04.4 LTS (GNU/Linux 3.19.0-65-generic x86_64)

 * Documentation:  https://help.ubuntu.com/

  System information as of Sun Feb 19 00:32:28 UTC 2017

  System load: 0.31              Memory usage: 3%   Processes:       89
  Usage of /:  39.6% of 1.94GB   Swap usage:   0%   Users logged in: 0

  Graph this data and manage this system at:
    https://landscape.canonical.com/

  Get cloud support with Ubuntu Advantage Cloud Guest:
    http://www.ubuntu.com/business/services/cloud

0 packages can be updated.
0 updates are security updates.


The programs included with the Ubuntu system are free software;
the exact distribution terms for each program are described in the
individual files in /usr/share/doc/*/copyright.

Ubuntu comes with ABSOLUTELY NO WARRANTY, to the extent permitted by
applicable law.

my-login@MyLinuxVM:../../..$
Creating other resources in Azure
We've now walked through how to create a Resource Group, a Linux VM, and a Windows Server VM. You can create many other types of Azure resources as well.
For example, to create an Azure Network Load Balancer that we could then associate with our newly created VMs, we can use the following create command:
New-AzureRmLoadBalancer -Name MyLoadBalancer -ResourceGroupName myResourceGroup -Location westeurope
We could also create a new private Virtual Network (commonly referred to as a "VNet" within Azure) for our infrastructure using the following command:
$subnetConfig = New-AzureRmVirtualNetworkSubnetConfig -Name mySubnet2 -AddressPrefix 10.0.0.0/16
$vnet = New-AzureRmVirtualNetwork -ResourceGroupName myResourceGroup -Location westeurope `
  -Name MYvNET3 -AddressPrefix 10.0.0.0/16 -Subnet $subnetConfig
What makes Azure and the Azure PowerShell powerful is that we can use it not just to get cloud-based infrastructure but also to create managed platform services. The managed platform services can also be combined with infrastructure to build even more powerful solutions.
For example, you can use the Azure PowerShell to create an Azure AppService. Azure AppService is a managed platform service that provides a great way to host web apps without having to worry about infrastructure. After creating the Azure AppService, you can create two new Azure Web Apps within the AppService using the following commands:
# Create an Azure AppService that we can host any number of web apps within
New-AzureRmAppServicePlan -Name MyAppServicePlan -Tier Basic -NumberofWorkers 2 -WorkerSize Small -ResourceGroupName myResourceGroup -Location westeurope

# Create Two Web Apps within the AppService (note: name param must be a unique DNS entry)
New-AzureRmWebApp -Name MyWebApp43432 -AppServicePlan MyAppServicePlan -ResourceGroupName myResourceGroup -Location westeurope
New-AzureRmWebApp -Name MyWebApp43433 -AppServicePlan MyAppServicePlan -ResourceGroupName myResourceGroup -Location westeurope
Listing deployed resources
You can use the Get-AzureRmResource cmdlet to list the resources running in Azure. The following
example shows the resources we created in the new resource group.
Get-AzureRmResource |
  Where-Object ResourceGroupName -eq myResourceGroup |
    Select-Object Name,Location,ResourceType
Name                                                  Location   ResourceType
----                                                  --------   ------------
myLinuxVM_OsDisk_1_36ca038791f642ba91270879088c249a   westeurope Microsoft.Compute/disks
myWindowsVM_OsDisk_1_f627e6e2bb454c72897d72e9632adf9a westeurope Microsoft.Compute/disks
myLinuxVM                                             westeurope Microsoft.Compute/virtualMachines
myWindowsVM                                           westeurope Microsoft.Compute/virtualMachines
myWindowsVM/BGInfo                                    westeurope Microsoft.Compute/virtualMachines/extensions
myNic1                                                westeurope Microsoft.Network/networkInterfaces
myNic2                                                westeurope Microsoft.Network/networkInterfaces
myNetworkSecurityGroup1                               westeurope Microsoft.Network/networkSecurityGroups
myNetworkSecurityGroup2                               westeurope Microsoft.Network/networkSecurityGroups
mypublicdns245369171                                  westeurope Microsoft.Network/publicIPAddresses
mypublicdns779537141                                  westeurope Microsoft.Network/publicIPAddresses
MYvNET1                                               westeurope Microsoft.Network/virtualNetworks
MYvNET2                                               westeurope Microsoft.Network/virtualNetworks
micromyresomywi032907510                              westeurope Microsoft.Storage/storageAccounts
Deleting resources
To clean up your Azure account, you want to remove the resources we created in this example. You
can use the Remove-AzureRm* cmdlets to delete the resources you no longer need. To remove the
Windows VM we created, using the following command:
Remove-AzureRmVM -Name myWindowsVM -ResourceGroupName myResourceGroup
You'll be prompted to confirm that you want to remove the resource.
Confirm
Are you sure you want to remove resource group 'myResourceGroup'
[Y] Yes  [N] No  [S] Suspend  [?] Help (default is "Y"): Y
You can also delete many resources at once. For example, the following command deletes the resource group "MyResourceGroup" that we've used for all the samples so far. All resources in the group are also deleted.
Remove-AzureRmResourceGroup -Name myResourceGroup
Confirm
Are you sure you want to remove resource group 'myResourceGroup'
[Y] Yes  [N] No  [S] Suspend  [?] Help (default is "Y"): Y
The task can take several minutes to complete, depending on the number and type of resources.
Get samples
To learn more about ways to use the Azure PowerShell, check out our most common scripts for Linux VMs, Windows VMs, Web Apps, and SQL Databases.
Next steps
- Sign in with Azure PowerShell
- Manage Azure subscriptions with Azure PowerShell
- Create service principals in Azure using Azure PowerShell
- Read the Release notes about migrating from an older release.
- Get help from the community: