How to set up a basic working Appium test environment
Appium is a test framework targeting devices; although it is very handy and powerful, it is not so straightforward and easy to install. Furthermore, the documentation (IMHO) does not provide a good tutorial to get things working as fast as possible. In this post, I am going to provide all that needs to set up Appium for running a basic test scenario written in C#.
What is Appium?
Appium is used to automate tests on devices with the main objective of allowing users to write tests once, and run them on different platforms and devices with no further effort. The main idea behind Appium can be easily grasped by looking at the following figure.
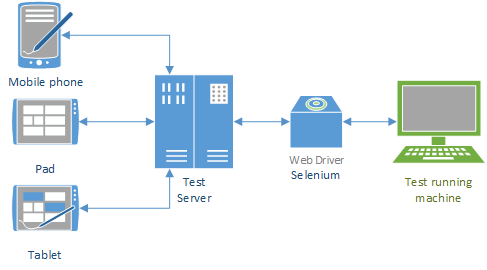
The basic workflow to test with Appium is the following:
- Tests are written using different languages (Appium supports many of them: Ruby, C# and Java to list some).
- A server running Appium (the test server) is configured and made available on a certain network location.
- Devices, or their corresponding simulators, are connected to the test server.
- Tests are run from the test machine.
Please note that in the last point I said: "tests are run from..."; this is our point of entry to understand how Appium works. The client/server pattern helps Appium achieve multi-platform testability, once a test is written it is executed in the client/test station. Thanks to Google's JSON [seleniumwebdriver], Appium is able to have tests send commands to devices through the test server.
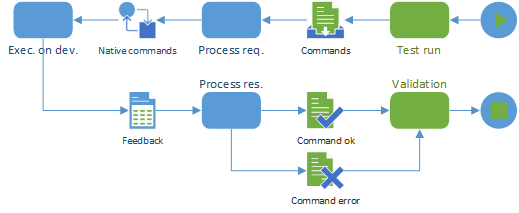
When writing Appium tests, the code will simply perform HTTP calls to the server which will translate those meta-commands into device-specific actions sent to the device to test. Commands are essentially user interactions with the app like clicking an interface component, swiping on the screen, scrolling onto a particular area or performing a specific gesture. Appium also supports execution both on real devices and simulators.
A little problem with naming
So if somebody asked us: "Where does my test run on?" we would probably find some uneasiness when replying. In fact we launch our tests from a client machine, but they actually run on our devices (or their simulators). So how to put things in order? The solution is in how we describe the process. The following statement can help:
Tests are actually run from a test client and they are executed on a device or its simulator via the test server.
Writing your first test in C#
In Appium's philosophy, a test for an app should be written only once, then it is supposed to run on different platforms with no further work.
The first thing we take care of is locating all configuration settings needed to pass to the server in order to run our tests. Appium's API consists of some important classes, one of these is DesiredCapabilities. This class defines the most important parameters to have the server run tests in the correct testing environment; in order to keep track of these settings, let's create a wrapper that we can reuse.
 public sealed class TestCapabilities {
  /// Tracking platforms
  public enum DevicePlatform {
    Undefined,
    Windows,
    IOS,
    Android
  }

  public string BrowserName      { get; set; }
  public string FwkVersion       { get; set; }
  public DevicePlatform Platform { get; set; }
  public string PlatformVersion  { get; set; }
  public string DeviceName       { get; set; }
  public string App              { get; set; }
  public bool   AutoWebView      { get; set; }
  public string AutomationName   { get; set; }

  public TestCapabilities() {
    this.BrowserName     = String.Empty;
    this.FwkVersion      = String.Empty;
    this.Platform        = DevicePlatform.Undefined;
    this.PlatformVersion = String.Empty;
    this.DeviceName      = String.Empty;
    this.App             = String.Empty;
    this.AutoWebView     = false;
    this.AutomationName  = String.Empty;
  }

  public void AssignAppiumCapabilities(ref DesiredCapabilities appiumCapabilities) {
    appiumCapabilities.SetCapability("browserName",     this.BrowserName);
    appiumCapabilities.SetCapability("appium-version",  this.FwkVersion);
    appiumCapabilities.SetCapability("platformName",    this.Platform2String(this.Platform));
    appiumCapabilities.SetCapability("platformVersion", this.PlatformVersion);
    appiumCapabilities.SetCapability("deviceName",      this.DeviceName);
    appiumCapabilities.SetCapability("autoWebview",     this.AutoWebView);

    // App push (will be covered later)
    if (this.App != String.Empty)
      appiumCapabilities.SetCapability("app", this.App);
  }

  /// Converting to string the platform (for Appium)
  private string Platform2String(DevicePlatform value) {
    switch (value) {
    case DevicePlatform.Windows:
      return "win"; /* TODO: Need to write your own extension of Appium for this */
    case DevicePlatform.IOS:
      return "iOS";
    case DevicePlatform.Android:
      return "Android";
    default:
      return "";
    }
  }
}
In the most simplistic scenario, you will run your tests against the same server. However in a more enterprise-level context, you might need to deploy more test servers depending on the tests you have. It is good practice to keep track of your servers.
 public static class TestServers {
  public static string Server1 { get { return "https://192.168.2.23:3445/wd/hub"; } }
  public static string Server2 { get { return "https://192.168.2.24:3446/wd/hub"; } }
  public static string Server3 { get { return "https://192.168.2.36:3432/wd/hub"; } }
  public static string Server4 { get { return "https://192.168.2.36:3436/wd/hub"; } }
  public static string Server5 { get { return "https://192.168.2.38:3445/wd/hub"; } }
  public static string Server6 { get { return "https://192.168.2.39:3445/wd/hub"; } }
}
First step done!
Your first test suite and all dependencies you need
Our final test is ready to be crafted now. Before writing it, however, we need to download the Selenium WebDriver for C# so that we can send commands to the Appium server using C#.
- Go to Selenium WebDriver download page and download the driver for C#.
- Unzip the folder and show its content.
- Locate the .NET version you need and copy that folder into your test project's dependency directory.
- Reference all assemblies in your project.
One more thing we need is the Appium Dot Net Driver in order to get some more tools.
- Go to Appium Dot Net Drive's page on GitHub and download it in your test client (where your test solution is located).
- Unzip the content and navigate to the "appium-net-driver" project folder.
- Open the project in Visual Studio and build it.
- Locate output assemblies (a "bin" folder should be created) and copy them into your test's project.
- Add references to these assemblies in your test solution.
Now we can get to the test suite. The code below provides a basic template to have an Appium test ready to run. Here I am not providing a specific unit test implementation, read Appium's API in order to learn how to use automation tools for that.
 namespace AppiumTests
{
  using System;
  using Microsoft.VisualStudio.TestTools.UnitTesting; /* We use .NET UnitTest Fwk, but any unit test fwk can be used */
  using AppiumTests.Helpers;
  using AppiumTest.Framework;
  using OpenQA.Selenium; /* Appium is based on Selenium, we need to include it */
  using OpenQA.Selenium.Appium; /* This is Appium */
  using OpenQA.Selenium.Appium.Interfaces; /* Not needed for commands shown here. It might be needed in single tests for automation */
  using OpenQA.Selenium.Appium.MultiTouch; /* Not needed for commands shown here. It might be needed in single tests for automation */
  using OpenQA.Selenium.Interactions; /* Not needed for commands shown here. It might be needed in single tests for automation */
  using OpenQA.Selenium.Remote;

  [TestClass]
  public class AppiumTestSuite
  {
    private AppiumDriver driver;

    private static Uri testServerAddress = new Uri(TestServers.Server1);
    private static TimeSpan INIT_TIMEOUT_SEC = TimeSpan.FromSeconds(180); /* Change this to a more reasonable value */
    private static TimeSpan IMPLICIT_TIMEOUT_SEC = TimeSpan.FromSeconds(10); /* Change this to a more reasonable value */

    [TestInitialize]
    public void BeforeAll()
    {
      DesiredCapabilities capabilities = new DesiredCapabilities();
      TestCapabilities testCapabilities = new TestCapabilities();

      testCapabilities.App = "";
      testCapabilities.AutoWebView = true;
      testCapabilities.AutomationName = "";
      testCapabilities.BrowserName = String.Empty; // Leave empty otherwise you test on browsers
      testCapabilities.DeviceName = "Needed if testing on IOS on a specific device. This will be the UDID";
      testCapabilities.FwkVersion = "1.0"; // Not really needed
      testCapabilities.Platform = TestCapabilities.DevicePlatform.Android; // Or IOS
      testCapabilities.PlatformVersion = String.Empty; // Not really needed

      testCapabilities.AssignAppiumCapabilities(ref capabilities);
      driver = new AppiumDriver(testServerAddress, capabilities, INIT_TIMEOUT_SEC);
      driver.Manage().Timeouts().ImplicitlyWait(IMPLICIT_TIMEOUT_SEC);
    }

    [TestCleanup]
    public void AfterAll()
    {
      driver.Quit(); // Always quit, if you don't, next test session will fail
    }

    ///
    /// Just a simple test to heck out Appium environment.
    ///
    [TestMethod]
    public void CheckTestEnvironment()
    {
      var context = driver.GetContext();
      Assert.IsNotNull(context);
    }
  }
}
Done! The test suite is ready to be run. As you can see I am using NUnit as unit test framework, however you can use whatever test framework you like; Appium is not affected by this and will work as expected.
Setting up an Appium test server
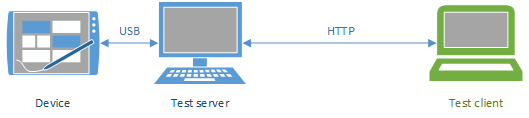
In the first part of this article I described the client/server nature of Appium; however this does not mean that you need two computers for testing your app, a standalone deployment is possible and consists of having the Appium test server installed and running on the same machine where tests will run from. Since I want to cover a generic scenario, this tutorial will consider the following architecture:
- A Windows test client.
- A Mac test server.
- One Android and one Apple tablet.
The network configuration is depicted by the following figure.
The first thing we need to do is installing the Appium server, then we will take care of devices.
Installing the Appium server
Our scenario covers Appium server on Mac, but the installation process is quite the same for Windows and Unix as well. However please take care of one important thing: the server needs to be connected to devices or run their simulators, for all platforms (Windows, iOS and Android) vendors provide different SDKs; however not all SDKs are available for all OSs, so your testing options will be limited as per the following matrix.
| Appium srv deployed on | Windows SDK(*) | iOS SDK | Android SDK |
|---|---|---|---|
| Windows | Yes | No | Yes |
| Mac OS | No | Yes | Yes |
| Unix/Linux | No | No | Yes |
(*) Appium still does not support tests on Windows: it means that tests cannot be run on Windows simulator and on Windows mobile devices; just reporting for future possible extensions.
As it is possible to see, a single server will never be able to allow tests on all possible device platforms. Another important thing to know about Appium is that it can be installed on all OSs reported in the matrix above.
To install Appium, follow these steps:
- Go to the Appium website.
- Download the latest version of the software according to your OS.
- Run the installer and complete all steps (almost no configuration).
- Once done, launch Appium and click on the gear icon on the top-left side of the screen.
- Make sure that the "Server Address" field is set to the local address "0.0.0.0" and the "Port" field next to it is st to "4723" (or set it to another valid non-used port).
And done! There is no further configuration to perform. Next step is configuring devices or their simulators. Here as well it is important to understand an important concept: either you are going to test on a real device or on its simulator, you will need that device SDK. Appium will take advantage of the SDK to connect to the simulator or the real device connected via USB. Also please be aware that I will not enter in detail for installing SDKs (off topic in this article).
Testing on iOS
Since you will run on the iOS simulator, you need to have it running before running your tests (it is not always necessary though).
- Launch XCode from your machine and open your app's project.
- Navigate to XCode -> Open Developer Tool -> iOS Simulator and bring up the simulator.
To run tests on the iOS simulator, follow these steps in the Appium server:
- On the top-left corner, click on the radio button below the Apple icon to activate Appium for Apple devices.
- Click on the Apple icon (top-left) and bring up the "iOS Settings" window.
- Check "App Path" if unchecked and enable the textbox next to it.
- Locate field "App Path" and type the absolute path to the .app file of your app. Everytime you compile your XCode project, in the "build" folder, a file called <project-name>.app is generated; you need to get that file's path.
- Be sure that field "BundleID" is unchecked.
- Since we are testing on a tablet, be sure to select "iPad" in field "Force Device". If you want to test on a different device, choose the most appropriate one for your needs.
- Be sure field "UDID" is unchecked.
You did it! The server is ready to accept incoming requests from your tests. Run your server by clicking on the top-right button "Launch". After that, switch to your test client and run your tests; as soon as they execute you will see, on the server, the iOS simulator coming up and perform all tasks.
Testing on real device
To test on a real Apple device (iPad or iPhone), do not touch the configuration you used to test on the simulator and do the following on the test server:
- Connect your device to the server machine via USB.
- Be sure to set up correct provisioning profiles for your devices. Follow Apple's documentation about provisioning profiles.
- On your app's XCode project, navigate to Windows -> Organizer and bring up the "Organizer" window.
- On the left side, locate your device under "Devices" group and select it.
- Your device details are shown. Locate field "Identifier" and copy & paste it on a note file, you will need it later.
- On the left pane, expand your device to show more options. Locate "Applications" and click on it.
- In the "Applications" window for your device, locate your app and copy & paste its BundleID for later. The BundleID is the name reported below (small font) your app's name.
- On Appium, stop the server if it's still running and click on the Apple icon (top-left) and bring up the "iOS Settings" window.
- Check the "BundleID" field and paste there the text you just saved in step 7.
- Check the "UDID" field and paste there the 160bit hex value you saved on step 5.
You're ready to go! Start the server and run you tests; this time you will see your app being deployed and running on the device.
Testing on Android
The Android SDK has a very strict virtual environment for simulating; the user must correctly install all needed libraries according to the API level and the Android system version on which the app is supposed to run. The latter is very important in those cases where your apps have a minimum requirement in terms of OS support; thus be sure, in such scenarios, to choose the correct version. Follow these steps to correctly set your AVD (Android Virtual Device):
- Open your Eclipse environment on your project.
- Refer to the Android documentation to set up you AVDs.
To run tests on the Android simulator, follow these steps on the Appium server:
- On the top-left corner, click on the radio button below the Android icon to activate Appium for Android devices.
- Click on the Android icon (top-left) and bring up the "Android Settings" window.
- Check "App Path" if unchecked and enable the textbox next to it.
- Locate field "App Path" and type the absolute path to the .apk file of your app. Everytime you compile your Eclipse project, in the "bin" folder, a file called <project-name>.apk is generated; you need to get that file's path.
- Be sure that fields "Package", "Use Browser" and "Device Name" are unchecked.
- Select the correct version for field "Platform Version" according to your Android API version.
You're done! Run the server by clicking on the top-right button "Launch". After that, switch to your test client and run your tests; as soon as they execute you will see, on the server, the Android simulator coming up and perform all tasks.
Testing on real device
To test on a real Android device, leave your configuration as it was when you set up Appium to work with the simulator and proceed as follows:
- Connect your device to the server machine via USB.
- Click on the top-left button displaying the Android icon and bring up the "Android Settings" window.
- Uncheck field "Launch AVD".
- Check field "Device Name".
- Close the Android simulator if it is still running.
This is it! When you run your tests, you will now see your app being deployed and running on your Android device.
App push from the test client
One concept is important to understand about Appium when it is configured as we did so far:
A test is bound to a single app per each server.
It means that it is not possible to set up an Appium server for testing two different apps. So: "Where is the problem?", some of you might ask; actually the problem is when we want to create a real infrastructure for testing apps in the context of real enterprise. In such a context it would be nice to set up a server for testing more than one app, however we cannot do this if we need to set the app to test at server side. Appium, however, allows developers to set the app to test from tests; it means that we can transmit the path (on the server) to the app file that should be used to deploy the app itself; only one more capability is needed: "app".
- Get back to the test suite we just wrote before, locate method GetCapabilities.
- Add one more capability as shown below.
 private DesiredCapabilities GetCapabilities() {
  // Other settings...
  capabilities.App = "<absolute-path-to-app>"; /* App-Push */

  return capabilities;
}
- Switch to the server and stop it.
- Open your device configuration (click on the top-left Apple or Android icon).
- Uncheck field "App Path".
- Start the server again.
With this simple but powerful capability, we are now able to write tests covering common base functionalities across different versions of the same app. It is also possible to use the same server to run different tests for different apps. Remember that you need to pass the absolute path to your app file (the file type changes according to the device platform) in your test server machine's filesystem, not the client.
App push + upload
I know some of you think that it would be also nice to have tests physically send the app file to the server. Appium does not support this, however nothing can stop you from using SSH or other remote connection tool to upload your app file to the server machine before running tests.
The views and opinions expressed in this blog are those of the authors and do not necessarily reflect the official policy or position of any other agency, organization, employer or company.
https://onedrive.live.com/redir?resid=28F0C4E5A0596D8%2143506
Comments
- Anonymous
January 01, 2003
The comment has been removed - Anonymous
January 01, 2003
@Vladimir: I am happy I could be helpful :) - Anonymous
January 01, 2003
@Alvaro: From your comment I can see that probably the Ruby driver tends to process commands slower. It would be nice to describe better this problem here:https://github.com/appium/ruby_lib. - Anonymous
January 01, 2003
@Gourav: I will try to write one for Java but at the moment I am focusing on other posts for Appium. The general idea is that every driver implements the same set of feature. A test will always perform the same steps: the driver must be created, a set of desired capabilities must be provided and a session must be requested and hopefully granted by the Appium server. Then you use the driver to request commands (that should be the same in my example) and perform automation.
I will try to get back here with something about Java Gourav; but for now I cannot assure you I will come with a working example in Java here anytime soon :( - Anonymous
January 01, 2003
@Valentin: Thank you very much. If you want you can rate it :) - Anonymous
January 01, 2003
@Vladimir: Try with this address: "http://127.0.0.1:4723/wd/hub". Usually Appium and Selenium create processes listening for that URL. Your request reaches the endpoint, but the server does not grant a session because it is not issued for the hub! - Anonymous
January 01, 2003
@Nasir: Sure thing Nasir, thank you for your feedback, glad you liked it. - Anonymous
January 01, 2003
Thank you for reading, I hope you will give it a try, you might want to check my new post which is just about this! - Anonymous
January 01, 2003
@Newuser: I was going to post the code. Give me a couple of days I need to polish the code. Sorry you encountered mistakes, will you let know what errors you had? - Anonymous
January 01, 2003
@Newuser: Thank you for your feedback, very appreciated :) The problem you are having is a problem caused by me. i am sorry but the code has some methods does actually are part of a bigger scope and that I forgot to remove when posting the code here. So here's the deal, give me a couple of days as I asked you, in the meanwhile I will fix the code and also attach the whole Visual Studio C# solution so that, in the end, you will have to do nothing more but running the project! Stay tuned I will create a comment when I am done :) - Anonymous
January 01, 2003
The comment has been removed - Anonymous
January 01, 2003
Amazing post, thanks - Anonymous
January 01, 2003
@Hongyun Bi: Thank you very much :) I can speak Japanese but not Chinese unfortunately (though some kanjis I can recognize). I will add pictures and shortly I will also attach a full VS solution with a test. Hope this will improve this post! Again, thanks for your feedback, really appreciated. - Anonymous
January 01, 2003
@Ritika: Will try to find time, at the moment I am very busy but will try... at least keep that in the todo list :) - Anonymous
January 01, 2003
@Jaime Flores: Thank you for the feedback :) About your request, well I will produce an example with apps for mobile, but it does not change much. What I do not understand is when you say that in such case an appfile won't be needed. I think you won't need Appium but Selenium then.
Remember: Appium is used to automate hybrid apps on simulators or real devices. But it must be an app, not a web application that you run on a browser. If you need to automate a mobile browser, Selenium does it already, you do not need Appium for that :) - Anonymous
January 01, 2003
Just updated the code fixing syntax errors. Also linked an uploaded solution you all can use as a starting point for your tests. Enjoy :) - Anonymous
January 01, 2003
@Aniekan: I am very happy to hear that! I am going to come with more articles btw about Appium and Selenium. Stay tuned :) - Anonymous
November 24, 2014
Thanks for the info....it is actually an eye opener and will try it out - Anonymous
December 02, 2014
I saw a script running using the Java driver and ran pretty fast, I have the ruby one and it is very slow, is there a difference between the webdriver for java or ruby or should they run at the same speed? - Anonymous
December 04, 2014
Thanks for the response.
What is slow is the speed the script is executed against the IOS simulator.
For example when I use the send_keys command it takes like 1 second per click on the keyboard.
also when a command is send to look for an object in the simulator it takes a while to return the value, for some cases it takes like 18 seconds to return a value. - Anonymous
December 10, 2014
The best explanation on the net. Many thanks ! - Anonymous
December 11, 2014
Thanks Andrea Tino,information which you have provided is brilliant. keep posting similar informative blogs. - Anonymous
December 18, 2014
Writing your first test in java and webdriver (just open a browser in device or emulator). Can you also explain it. - Anonymous
December 18, 2014
Excellent explanation, much appreciated you taking the time to publish this!
However, this is my first day trying to use Appium, so I'm super lost, haha!
I'm trying to use the Genymotion emulator, and when I run my C# script - it crashes with the "Unexpected error. That URL did not map to a valid JSONWP resource" error. My URI is set to "http://127.0.0.1:4723", but I'm trying to test an app that is hosted on our intranet. The Appium console displays: "> info: [debug] Responding to client that we did not find a valid resource". I feel I'm getting close, but I can't quite figure out what I'm doing wrong! - Anonymous
December 30, 2014
Cool. Works fine with some syntax errors. Started working after few other changes. Thanks for the post. I was using Microsoft UnitTest Framework. - Anonymous
January 02, 2015
Brilliant explanation @Andrea Tino kudos for that, I have no problems running tests on ios simulator however while testing an Android app I could'nt get uielements hierarchy using Appium inspector. Alternatively I tried using uiautomatorviewer to inspect Android apk running on an emulator but ended up getting "Could not find adb. Check if adb is installed properly" message. Could you please help me resolving this issue or possibly directing me on how to identify uielements for an Android app. Many Thanks - Anonymous
January 05, 2015
Andrea, thank you again for taking the time to respond, that exactly what my problem was! Much appreciated! - Anonymous
January 06, 2015
Each step has been explained in a perfect manner. Nice post. - Anonymous
January 07, 2015
Best explanation so far for Appium .. Thanks, - Anonymous
January 12, 2015
Hello Andrea,
Do you have the source for this? You seem to have a significant amount of errors in the code which will confuse readers. Thanks! - Anonymous
January 13, 2015
The comment has been removed - Anonymous
January 13, 2015
The comment has been removed - Anonymous
January 21, 2015
这个真的对我帮助很大,非常有用,也非常感谢!
it really useful for me , and it helps me , much thanks ! - Anonymous
January 21, 2015
如果你能加上正常运行的效果图,就很完美了。还有就是appium的安装,毕竟basic是为新人准备的。来自中国的感谢!
if you could add pictures when it runs , that was perfect, and i think since it is a basic for new , you could add some environment we need . Much thanks ! From china . - Anonymous
January 24, 2015
Andrea, this an excellent article. Thank you!
I wonder if you have a similar writing to explain how to test web applications on mobile devices. In such a case, there wouldn't be an .app file available, since most likely we would be running Safari or Chrome (or another browser) to test the web application. - Anonymous
February 26, 2015
A very simple and to the point explanation. Really appreciated.
Keep posting more stuff like this. - Anonymous
March 02, 2015
Hi Andrea , i want to know What's the difference between when run on Device and simulator , bucase sometimes i run on simulator cases failed , leader told me to run on device and said device is stable.and he told me to add a method if failed need make a call, i have no idea . - Anonymous
March 17, 2015
Can you write same script using java. - Anonymous
April 24, 2015
I am actually very new to using Appium. So Can i write the test code on my Windows machine and have it run on a Mac ? Have anyone faced element identification issues in this area ? - Anonymous
May 20, 2015
Thanks a lot Andrea. I really enjoyed this article as it was easy to understand. This article has been very useful to me. - Anonymous
June 23, 2015
Hi Andrea....Nice explanation...Waiting for your post on Java.. Hope we will get the same soon. - Anonymous
June 28, 2015
For more compelling use of Appium, check this out: http://www.smashingmagazine.com/2015/01/14/basic-test-automation-for-apps-games-and-mobile-web/ - Anonymous
July 08, 2015
Hi Kartik,
I hope you might have found an answer for your question by now, but in case if you have not....then the answer is YES. You can have Appium server run on your Mac machine and scripts created and executed from your windows machine. but this is recommended to test iOS devices only. - Anonymous
August 17, 2015
Nice Article.
For more appium related articles, please visit http://blog.rightqa.com - Anonymous
August 27, 2015
i want start appium automatically through cmd prompt in windows
please tell me command for it - Anonymous
September 09, 2015
@Vishal, @Kartik: Sorry for my late answer. But yes! Appium server is written in Node, this means it can run on both Win and MacOS. Problem is what you need to test on. Running your server on MacOS is the best as you can get tests testing against both Android and iOS! Identification issues might occur if you use an old version of Appium where getting elements by tag name is no more allowed for example. Other than that had never encountered any issue with that! - Anonymous
September 27, 2015
Can anyone help me to validate toast message throug appium. I am using appium and java. - Anonymous
October 08, 2015
Really helpful blog.Thanks for your elaborate explanation. - Anonymous
October 08, 2015
Great tutorial! - Anonymous
February 19, 2016
Good tutorial.. I have an issue similar to Vladmir. Im getting : "That URL did not map to a valid JSONWP resource" wherein im using linkhttp://127.0.0.1:4723/wb/hub/. Not sure where I'm going wrong. Please help - Anonymous
February 22, 2016
Thanks for sharing this information.It was very nice blog to learn about Appium.
http://thecreatingexperts.com/appium-training-in-chennai/