Windows Communication Foundation (WCF) - Transport, Message Security and Mutual Authentication using Certificates
At a high level the steps required to use self signed certificates for Transport & Message Security for securing the messages sent between a client and service, and also how to use certificates to perform Mutual Authentication between client and service layer are as follow:
1. Create Self signed certificates for Client and Server.
2. Export Client Certificate for Installation on Client machine.
3. Export Server Certificate for Installation on Server machine.
4. Install the Client Certificate on the Client machines.
5. Add the Client Certificate to the Trusted Root Certification Authorities on the client machines.
6. Install the Server Certificate on the Server machine.
7. Add the Server Certificate to the Trusted Root Certification Authorities on the Server machine.
8. Export the Server’s Public key of the Server Certificate.
9. Establish Trust for the Server’s Public key on the Client Machine.
10. Export the Client’s Public key of the Client Certificate.
11. Establish Trust for the Client’s Public key on the Server Machine.
12. Enable Transport Layer security on the Web Site in Microsoft Internet Information Server (IIS).
13. Service Layer configuration for enabling the certificates for Mutual Authentication, Transport & Message level security.
14. Client side configuration for enabling the certificates for Mutual Authentication, Transport & Message level security.
Detailed procedure to be followed for configuring certificate based Mutual Authentication, Transport and Message Security between Client and WCF based services:
1. Create Self signed certificates for Client and Server:
To establish the identity of the Server and Clients, we require 2 certificates. First certificate will represent the identity of the Server, where as the second certificate will be used to represent all the clients that can connect to the Server (Once the Mutual Authentication is successful).
There are different utilities available for generating Self Signed Certificates viz.:
a. MakeCert utility
(Refer https://msdn.microsoft.com/en-us/library/bfsktky3(VS.80).aspx for more details)
b. Use Microsoft Internet Information Server (Refer the steps below)
c. Use Certificate Server
The following steps are required to be followed in order to create Self Signed certificates using Microsoft Internet Information Server (IIS):
a. Run Microsoft Internet Information Server
b. Click on the Server Name (e.g. ASHISH-ME) as shown in the above figure.
c. Click on Server Certificates
d. Click on “Create Self-Signed Certificate”, which will open a Certificate Generation Wizard. Provide a Friendly Name for the Certificate and click “OK”, as shown below:
e. The new certificate would get created and added to the list of Server Certificates, as shown below:
f. Repeat steps (d) and (e) to create a certificate that would be used by clients to prove their identity to the server. As shown in the figure below a new certificate with Friendly Name as “ClientCertificate” is added to the list of available certificates.
2. Export Client Certificate for Installation on Client machine:
The Client Certificate needs to be exported with the Private Key and installed on the Client Machine from which the Services would be called. To achieve the same the following steps are required to be followed:
a. Select the Client Certificate, right Click and select “Export”
b. In the Export Dialog, enter the path where the Certificate would get generated; make sure that the .pfx extension is selected as even Private Key of the certificate needs to be exported. Enter the Password to protect the certificate as it contains the Private Key.
3. Export Server Certificate for Installation on Server machine:
Follow the same steps as mentioned for the export of the Client Certificate.
4. Install the Client Certificate on the Client machines:
The Client Certificate needs to be installed and configured on the client machine. The below steps describes the procedure for the same.
a. Go to Start -> Run and execute MMC.exe.
b. On the MMC select File menu and select Add/Remove Snap In.
c. Select “Certificates” and click “Add” button.
d. Select “Computer Account” on the “Certificates snap-in” dialog box.
The above selection should be based upon the usage of the certificate and for who the certificate is being installed is intended for. Follow the guidance below for selecting the certificate store:
1. Select “My user account” if the certificate needs to be associated with the logged in user. If chosen so, only the logged in user would be able to get access to the installed certificate. This certificate would not be available to any other user who can Log-in to the same computer.
2. Select “Service Account” if the certificate needs to be associated with the Service Account. The applications running under the Service Account would only be able to access the certificate.
3. Select “Computer Account” if the certificate needs to be associated with the Computer. The certificates installed here can be accessed by any user / Service Account who can Login to the Computer.
e. Select “Local Computer” in the “Select Computer” dialog.
f. Press “OK” on the “Add or Remove Snap-in” dialog.
g. On the MMC console, select the Certificates (Local Computer) -> Personal -> Certificates
h. Right Click on Certificates, select “All Tasks -> Import”
i. Follow the “Import Certificate Wizard” and select the path where ClientCertificate.pfx was exported or is copied.
j. Since the certificate was “Password Protected”, the wizard would prompt you to enter the password.
Note: Select “Mark this key as exportable” only if the private key needs to be marked as exportable.
k. Select “Place all the certificates in the following store”, and make sure that the certificate store is selected as “Personal”
l. Complete the “Certificate Import Wizard” the certificate would appear under the “Certificates” in Personal store.
5. Add the Client Certificate to the Trusted Root Certification Authorities on the client machines:
As this being a Self Signed Certificate the Certificate Issuer needs to be added to the list of Trusted Root Certification Authorities.
a. On the MMC console, select the Certificates (Local Computer) -> Trusted Root Certification Authorities -> Certificates
b. Right Click on Certificates, select “All Tasks -> Import”
c. Follow the “Import Certificate Wizard” and select the path where ClientCertificate.pfx was exported or is copied.
d. Since the certificate was “Password Protected”, the wizard would prompt you to enter the password.
Note: Select “Mark this key as exportable” only if the private key needs to be marked as exportable.
e. Select “Place all the certificates in the following store”, and make sure that the certificate store is selected as “Trusted Root Certification Authorities”
f. Complete the “Certificate Import Wizard” the certificate would appear under the “Certificates” in Trusted Root Certification Authorities store.
6. Install the Server Certificate on the Server machine:
Follow the procedure mentioned in step 4 on the Server Machine to install the certificate on the Server. The “ServerCertificate.pfx” needs to be selected.
7. Add the Server Certificate to the Trusted Root Certification Authorities on the Server machine:
Follow the procedure mentioned in step 5 on the Server Machine to add the Server Certificate to Trusted Root Certification Authorities. The “ServerCertificate.pfx” needs to be selected.
8. Export the Server’s Public key of the ServerCertificate using the MMC.exe on the Server machine:
The Server’s Public Key needs to be exported, for establishing a Trust for the Server’s certificate on the Client’s machines.
a. Run MMC.exe on the Server’s machine and add Certificates snap-in for the Computer Account. (The steps for the same have already been described under step 4 (a - f)).
b. Select the “ServerCertificate” under “Certificates (Local Computer) -> Personal -> Certificates”
c. Right click and select “Export”
d. On the Certificate Export Wizard select “No, do not export the private key”
e. On the Certificate Export Wizard select the file format for exported certificate as “Base-64 encoded X.509 (.CER) ”
f. Provide the path where the file with Certificate Public key would be generated.
9. Establish Trust for the Server’s Public key on the Client Machine:
The Client needs to Trust the Server’s certificate based upon the ServerCertificate public key, the below step details the procedure for the same:
a. Execute the MMC.exe on the Client Machine and add Certificates snap-in for the Computer Account. (The steps for the same have already been described under step 4 (a - f)).
b. Select “Certificates (Local Computer) -> Trusted People -> Certificates”
c. Right click and select “Import”
d. In the Certificate Import Wizard provide the path of the Server’s certificate (ServerCertificate.cer) that was exported as part of the step 8 and only has the Public Key.
e. Select “Place all the certificates in the following store”, and make sure that the certificate store is selected as “Trusted People”
f. Complete the “Certificate Import Wizard” the certificate would appear under the “Certificates” in Trusted People store.
10. Export the Client’s Public key of the ClientCertificate using the MMC.exe on any of the Client machine:
Follow the procedure described in step 8 on any one of the Client Machine to for establishing a Trust for the Client’s certificate on the Server machine.
11. Establish Trust for the Client’s Public key on the Server Machine:
Follow the procedure described in step 9 on the Server Machine for importing the Client’s Public Key under Trusted People Store of the Server machine. The “ClientCertificate.cer” generated as part of step 10 needs to be selected.
12. Enable Transport Layer security on the WebSite in Microsoft Internet Information Server (IIS)
To enable and use the certificate created for Transport Layer security the following steps needs to be performed on IIS:
a. Start Microsoft Internet Information Server (IIS).
b. Select the Web Site on which the Transport Layer Security needs to be enabled.
c. Right Click and select “Edit Bindings”
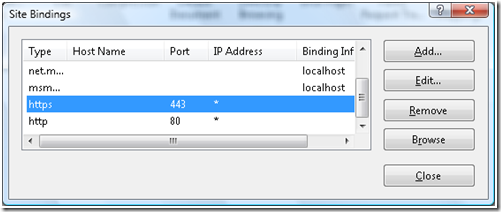
d. Under Site Bindings dialog box select the protocol type “https” and press Edit
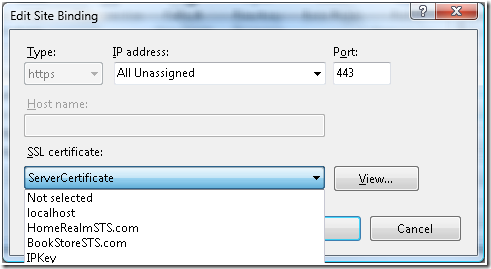
e. Under Edit Site Binding, for “SSL Certificate” select the certificate created for Server “serverCertificate” as shown in the figure below:
13. Service Layer configuration for enabling the certificates for Mutual Authentication, Transport & Message level security.
Assumptions:
a. The wsHttpBinding is being used for the exposing the endpoint to enable the client to connect and call the WCF Services.
b. Security mode to be used “TransportWithMessageCredential”
The following configuration needs to be performed on WCF Service config file:
1. Customize the Binding (in this example wsHttpBinding)
- Set the Security Mode for wsHttpBinding as “TransportWithMessageCredential”
<configuration>
<system.serviceModel>
<bindings>
<wsHttpBinding>
<binding name="wsHttp">
<security mode="TransportWithMessageCredential"/>
</binding>
</wsHttpBinding>
</bindings>
</system.serviceModel>
</configuration>
- Set the clientCredentialType as “Certificate” for both Transport and Message level security
<configuration>
<system.serviceModel>
<bindings>
<wsHttpBinding>
<binding name="wsHttp">
<security mode="TransportWithMessageCredential">
<transport clientCredentialType="Certificate"/>
<message clientCredentialType="Certificate" negotiateServiceCredential="true" />
</security>
</binding>
</wsHttpBinding>
</bindings>
</system.serviceModel>
</configuration>
2. Customize the Service Behavior
- Set the serviceCertificate details under serviceCredentials
i. Set storeName to “My”
ii. Set storeLocation to “LocalMachine”
iii. Set x509FindType to “FindByThumbprint”
iv. Set findValue to the value of Thumbprint for ServerCertificate installed. Steps to find the Thumbprint for Server Certificate are as follows:
1. Run MMC.exe on the Server and add Certificates snap in to manage certificates under “Computer Account” (refer steps 4a to 4f) for details on adding the Certificates snap in)
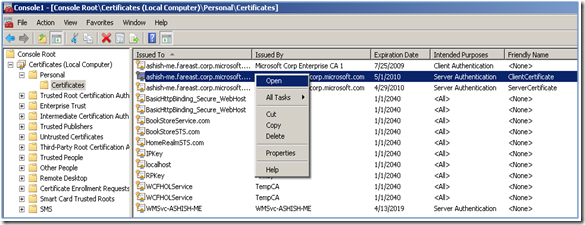
2. Traverse to “Certificates (Local Computer) -> Personal -> Certificates”
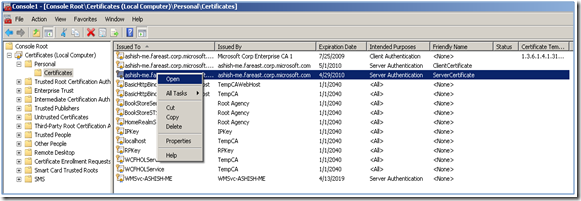
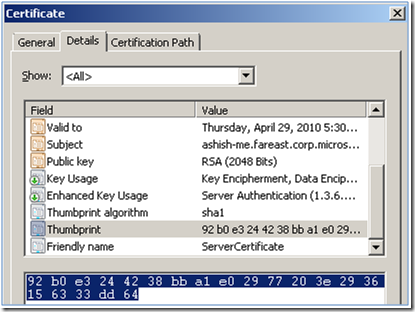
3. Select the Certificate with Friendly name as “ServerCertificate”, as shown in the figure below:
4. Right Click on the selected certificate and select Open
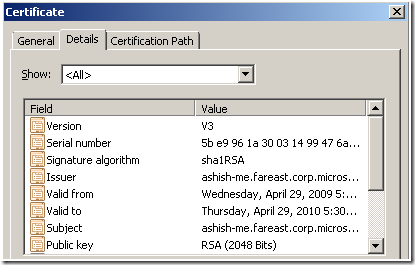
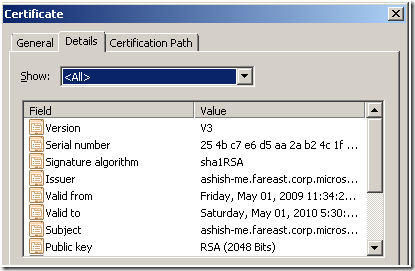
5. Traverse to the “Details” Tab on the Certificate Details dialog.
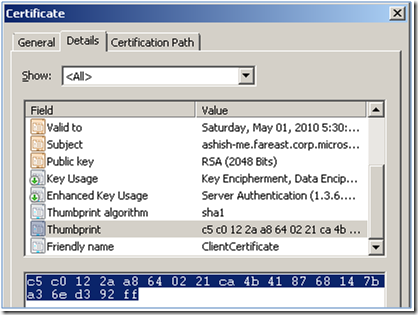
6. Select and Copy the value of the Field “Thumbprint” as shown in the figure below:
7. Set the value of the findValue in the configuration file for serviceCredentials -> serviceCertificate as the selected Thumbprint value.
v. The below is the extract from the configuration file with the serviceCredentials -> serviceCertificate values set.
<configuration><system.serviceModel><behaviors><serviceBehaviors><behavior name="serviceBehavior"><serviceCredentials><serviceCertificate findValue ="92 b0 e3 24 42 38 bb a1 e0 29 77 20 3e 29 36 15 63 33 dd 64"x509FindType="FindByThumbprint" storeLocation="LocalMachine" storeName="My"/></serviceCredentials></behavior></serviceBehaviors></behaviors></system.serviceModel></configuration>
- Set the clienteCertificate -> certificate details under serviceCredentials
i. Set storeName to “TrustedPeople”
ii. Set storeLocation to “LocalMachine”
iii. Set x509FindType to “FindByThumbprint”
iv. Set findValue to the value of Thumbprint for ClientCertificate trusted. Steps to find the Thumbprint for Server Certificate are as follows:
1. Run MMC.exe on the Server and add Certificates snap in to manage certificates under “Computer Account” (refer steps 4a to 4f) for details on adding the Certificates snap in)
2. Traverse to “Certificates (Local Computer) -> Trusted People -> Certificates”
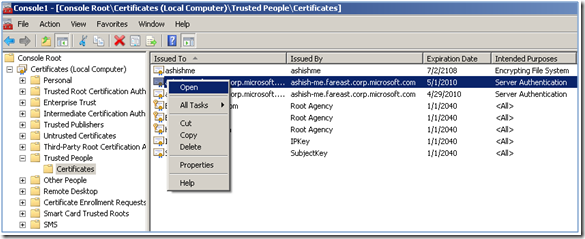
3. Select the Certificate with Issued By as the name of the Server where Client Certificate was generated , as shown in the figure below:
4. Right Click on the selected certificate and select Open
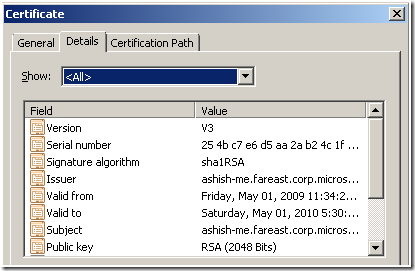
5. Traverse to the “Details” Tab on the Certificate Details dialog.
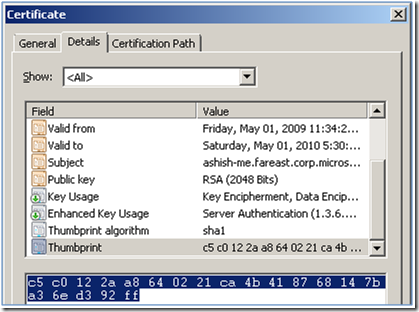
6. Select and Copy the value of the Field “Thumbprint” as shown in the figure below:
7. Set the value of the findValue in the configuration file for serviceCredentials -> clientCertificate -> certificate as the selected Thumbprint value.
v. Set the certificateValidationMode as PeerTrust for serviceCredentials -> clientCertificate -> authentication.
vi. The below is the extract from the configuration file with the serviceCredentials -> clientCertificate and authentication values set.
<configuration><system.serviceModel><behaviors><serviceBehaviors><behavior name="serviceBehavior"><serviceCredentials><serviceCertificate findValue ="92 b0 e3 24 42 38 bb a1 e0 29 77 20 3e 29 36 15 63 33 dd 64"x509FindType="FindByThumbprint" storeLocation="LocalMachine" storeName="My"/><clientCertificate><certificate findValue="c5 c0 12 2a a8 64 02 21 ca 4b 41 87 68 14 7b a3 6e d3 92 ff"x509FindType="FindByThumbprint" storeLocation="LocalMachine" storeName="TrustedPeople"/><authentication certificateValidationMode ="PeerTrust"/></clientCertificate></serviceCredentials></behavior></serviceBehaviors></behaviors></system.serviceModel></configuration>
3. Associate the Custom Binding created above with the Service Endpoint and Service Behavior created above with the Service.
<configuration>
<system.serviceModel>
<services>
<service name="HelloIndigo.HelloIndigoService" behaviorConfiguration="serviceBehavior">
<endpoint address="" binding="wsHttpBinding" contract="HelloIndigo.IHelloIndigoService" bindingConfiguration="wsHttp"/>
</service>
</services>
<behaviors>
<serviceBehaviors>
<behavior name="serviceBehavior">
<serviceCredentials>
<serviceCertificate findValue ="92 b0 e3 24 42 38 bb a1 e0 29 77 20 3e 29 36 15 63 33 dd 64"
x509FindType="FindByThumbprint" storeLocation="LocalMachine" storeName="My"/>
<clientCertificate>
<certificate findValue="c5 c0 12 2a a8 64 02 21 ca 4b 41 87 68 14 7b a3 6e d3 92 ff"
x509FindType="FindByThumbprint" storeLocation="LocalMachine" storeName="TrustedPeople"/>
<authentication certificateValidationMode ="PeerTrust"/>
</clientCertificate>
</serviceCredentials>
</behavior>
</serviceBehaviors>
</behaviors>
<bindings>
<wsHttpBinding>
<binding name="wsHttp">
<security mode="TransportWithMessageCredential">
<transport clientCredentialType="Certificate"/>
<message clientCredentialType="Certificate" negotiateServiceCredential="true" />
</security>
</binding>
</wsHttpBinding>
</bindings>
</system.serviceModel>
</configuration>
14. Client side configuration for enabling the certificates for Mutual Authentication, Transport & Message level security.
The following configuration needs to be performed on Client’s config file:
1. Update Service References on the Client project.
2. Customize the Binding (in this example wsHttpBinding)
- Set the Security Mode for wsHttpBinding as “TransportWithMessageCredential”
<configuration><system.serviceModel><bindings><wsHttpBinding><binding name="WSHttpBinding_IHelloIndigoService" closeTimeout="00:01:00"openTimeout="00:01:00" receiveTimeout="00:10:00" sendTimeout="00:01:00"bypassProxyOnLocal="false" transactionFlow="false" hostNameComparisonMode="StrongWildcard"maxBufferPoolSize="524288" maxReceivedMessageSize="65536"messageEncoding="Text" textEncoding="utf-8" useDefaultWebProxy="true"><readerQuotas maxDepth="32" maxStringContentLength="8192" maxArrayLength="16384"maxBytesPerRead="4096" maxNameTableCharCount="16384" /><reliableSession ordered="true" inactivityTimeout="00:10:00" /><security mode="TransportWithMessageCredential"></security></binding></wsHttpBinding></bindings></system.serviceModel></configuration>
- Set the clientCredentialType as “Certificate” for both Transport and Message level security
<configuration><system.serviceModel><bindings><wsHttpBinding><binding name="WSHttpBinding_IHelloIndigoService" closeTimeout="00:01:00"openTimeout="00:01:00" receiveTimeout="00:10:00" sendTimeout="00:01:00"bypassProxyOnLocal="false" transactionFlow="false" hostNameComparisonMode="StrongWildcard"maxBufferPoolSize="524288" maxReceivedMessageSize="65536"messageEncoding="Text" textEncoding="utf-8" useDefaultWebProxy="true"><readerQuotas maxDepth="32" maxStringContentLength="8192" maxArrayLength="16384"maxBytesPerRead="4096" maxNameTableCharCount="16384" /><reliableSession ordered="true" inactivityTimeout="00:10:00" /><security mode="TransportWithMessageCredential"><message clientCredentialType="Certificate" negotiateServiceCredential="true" /><transport clientCredentialType="Certificate"/></security></binding></wsHttpBinding></bindings></system.serviceModel></configuration>
3. Customize the Service Behavior
- Set the clientCertificate details under clientCredentials
i. Set storeName to “My”
ii. Set storeLocation to “LocalMachine”
iii. Set x509FindType to “FindByThumbprint”
iv. Set findValue to the value of Thumbprint for ClientCertificate installed. Steps to find the Thumbprint for Server Certificate are as follows:
1. Run MMC.exe on the Server and add Certificates snap in to manage certificates under “Computer Account” (refer steps 4a to 4f) for details on adding the Certificates snap in)
2. Traverse to “Certificates (Local Computer) -> Personal -> Certificates”
3. Select the Certificate with Friendly name as “ClientCertificate”, as shown in the figure below:
4. Right Click on the selected certificate and select Open
5. Traverse to the “Details” Tab on the Certificate Details dialog.
6. Select and Copy the value of the Field “Thumbprint” as shown in the figure below:
7. Set the value of the findValue in the configuration file for clientCredentials -> clientCertificate as the selected Thumbprint value.
v. The below is the extract from the configuration file with the clientCredentials -> clientCertificate values set.
<configuration><system.serviceModel><behaviors><endpointBehaviors><behavior name="wsHttpEndpointBehavior"><clientCredentials><clientCertificate findValue="c5 c0 12 2a a8 64 02 21 ca 4b 41 87 68 14 7b a3 6e d3 92 ff"x509FindType="FindByThumbprint" storeLocation="LocalMachine" storeName="My"/></clientCredentials></behavior></endpointBehaviors></behaviors></system.serviceModel></configuration>
- Set the serviceCertificate -> authentication details under clientCredentials
i. Set certificateValidationMode to “PeerTrust”
<configuration><system.serviceModel><behaviors><endpointBehaviors><behavior name="wsHttpEndpointBehavior"><clientCredentials><clientCertificate findValue="c5 c0 12 2a a8 64 02 21 ca 4b 41 87 68 14 7b a3 6e d3 92 ff"x509FindType="FindByThumbprint" storeLocation="LocalMachine" storeName="My"/><serviceCertificate><authentication certificateValidationMode="PeerTrust" /></serviceCertificate></clientCredentials></behavior></endpointBehaviors></behaviors></system.serviceModel></configuration>
4. Associate the Custom Binding created above with the Service Endpoint and Service Behavior created above with the Service.
<configuration><system.serviceModel><client><endpoint address="https://serverUrl" binding="wsHttpBinding"bindingConfiguration="WSHttpBinding_IHelloIndigoService"contract="WinClient.localhost.IHelloIndigoService"name="WSHttpBinding_IHelloIndigoService" behaviorConfiguration="wsHttpEndpointBehavior"></endpoint></client><bindings><wsHttpBinding><binding name="WSHttpBinding_IHelloIndigoService" closeTimeout="00:01:00"openTimeout="00:01:00" receiveTimeout="00:10:00" sendTimeout="00:01:00"bypassProxyOnLocal="false" transactionFlow="false" hostNameComparisonMode="StrongWildcard"maxBufferPoolSize="524288" maxReceivedMessageSize="65536"messageEncoding="Text" textEncoding="utf-8" useDefaultWebProxy="true"><readerQuotas maxDepth="32" maxStringContentLength="8192" maxArrayLength="16384"maxBytesPerRead="4096" maxNameTableCharCount="16384" /><reliableSession ordered="true" inactivityTimeout="00:10:00" /><security mode="TransportWithMessageCredential"><message clientCredentialType="Certificate" negotiateServiceCredential="true" /><transport clientCredentialType="Certificate"/></security></binding></wsHttpBinding></bindings><behaviors><endpointBehaviors><behavior name="wsHttpEndpointBehavior"><clientCredentials><clientCertificate findValue="c5 c0 12 2a a8 64 02 21 ca 4b 41 87 68 14 7b a3 6e d3 92 ff"x509FindType="FindByThumbprint" storeLocation="LocalMachine" storeName="My"/><serviceCertificate><authentication certificateValidationMode="PeerTrust"/></serviceCertificate></clientCredentials></behavior></endpointBehaviors></behaviors></system.serviceModel></configuration>
Comments
- Anonymous
May 06, 2009
PingBack from http://microsoft-sharepoint.simplynetdev.com/windows-communication-foundation-transport-message-security-and-mutual-authentication/ - Anonymous
May 30, 2011
Hi ThereThanks for the post. It's really good. I have 100 client machines that access the WCF service hosted on the server. Does it matter if the clients are of different platforms (i.e 10 of them are running on windows 7 and the rest are windows xp). Please suggestThanks - Anonymous
April 29, 2012
Really nice explanation.. Thanks.. - Anonymous
February 23, 2014
Well done! - Anonymous
April 29, 2014
The best description I've found - Anonymous
September 30, 2014
It works perfectly fine. But if I delete public key of "ServiceCertifcate" from Trusted People on client machine, it still works. It should fail because certificate presented by server to the client is not available under Trusted People on client machine. Authentication should fail in this case. - Anonymous
July 02, 2015
I second that. It does not work to set certificateValidationMode="PeerTrust" on the client. The service seems to ignore this setting when using TransportWithMessageCredential.


