Automatically apply classifications on assets in Microsoft Purview
After data sources are registered in the Microsoft Purview Data Map, the next step is to scan the data sources. The scanning process establishes a connection to the data source, captures technical metadata, and can automatically classify data using either the supported system classifications or rules for your custom classifications. For example, if you have a file named multiple.docx and it has a National ID number in its content, during the scanning process Microsoft Purview adds the classification EU National Identification Number to the file asset's detail page.
These classifications help you and your team identify the kinds of data you have across your data estate. For example: if files or tables contain credit card numbers, or addresses. Then you can more easily search for certain kinds of information, like customer IDs, or prioritize security for sensitive data types.
Classifications can be automatically applied on file and column assets during scanning.
In this article we'll discuss:
How Microsoft Purview classifies assets
When a data source is scanned, Microsoft Purview compares data in the asset to a list of possible classifications called a scan rule set.
There are system scan rule sets already available for each data source that contains every currently available system classification for that data source. Or, you can create a custom scan rule set to make a list of classifications tailored to your data set.
Making a custom rule sets for your data can be a good idea if your data is limited to specific kinds of information, or regions, as comparing your data to fewer classification types will speed up the scanning process. For example, if your dataset only contains European data, you could create a custom scan rule set that excludes identification for other regions.
You might also make a custom rule set if you've created custom classifications and classification rules, so that your custom classifications can be automatically applied during scanning.
For more information about the available system classifications and how your data is classified, see the system classifications page.
Automatically apply classifications
Note
Table assets are not automatically assigned classifications, because the classifications are assigned to their columns, but you can manually apply classifications to table assets.
After data sources are registered, you can automatically classify data in that source's data assets by running a scan.
Check the Scan section of the source article for your data source to confirm any prerequisites or authentication are set up and ready for a scan.
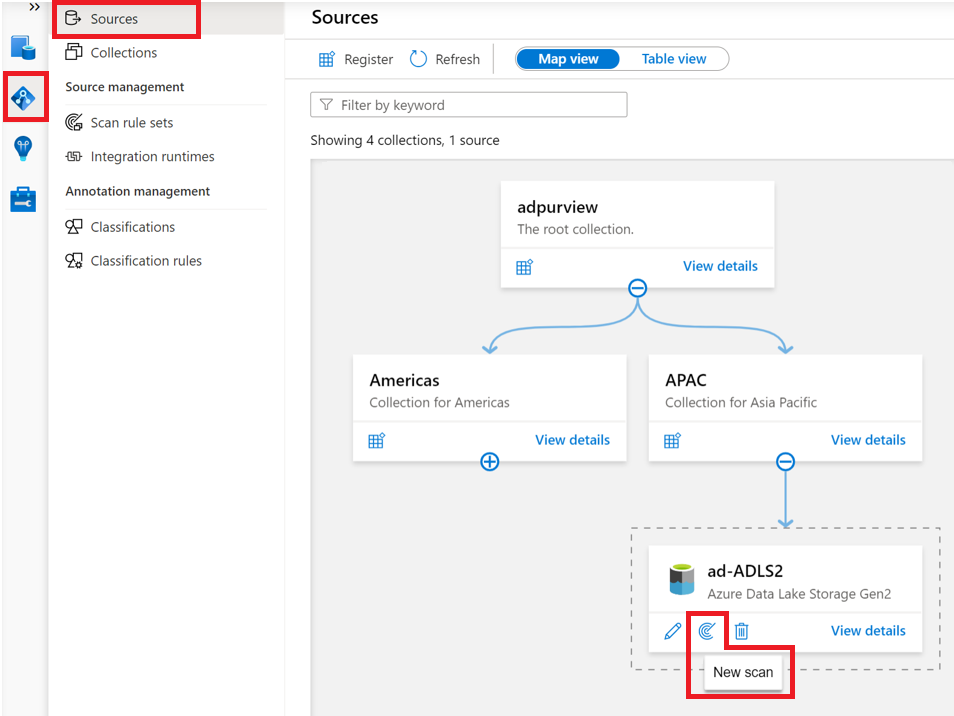
Search the Microsoft Purview Data Map the registered source that has the data assets (files and columns), you want to classify.
Select the New Scan icon under the resource.
Tip
If you don't see the New Scan button, you may not have correct permissions. To run a scan, you'll need at least data source administrator permissions on the collection where the source is registered.
Select your credential and authenticate with your source. (For more information about authenticating with your source, see the prerequisite and scan sections of your specific source source article.) Select Continue.
If necessary, select the assets in the source you want to scan. You can scan all assets, or a subset of folders, files, or tables depending on the source.
Select your scan rule set. You'll see a list of available scan rule sets and can select one, or you can choose to create a new scan rule set using the New scan rule set button at the top. The scan rule set will determine which classifications will be compared and applied to your data. For more information, see how Microsoft Purview classifies assets.

Tip
For more information about the options available when creating a scan rule set, start at step 4 of these steps to create a scan rule set.
Schedule your scan.
Save and run your scan. Applicable classifications in your scan rule set will be automatically applied to the assets you scan. You'll be able to view and manage them once the scan is complete.
View classification details
Microsoft Purview captures important details like who applied a classification and when it was applied. To view the details, hover over the classification to revel the Classification details card. The classification details card shows the following information:
- Classification name - Name of the classification applied on the asset or column.
- Applied by - Who applied the classification. Possible values are scan and user name.
- Applied time - Local timestamp when the classification was applied via scan or manually.
- Classification type - System or custom.
Users with Data Curator role will see more details for classifications that were applied automatically via scan. These details will include sample count that the scanner read to classify the data and distinct data count in the sample that the scanner found.

Impact of rescanning on existing classifications
Classification tags are automatically applied the first time based on sampling your data and matching those samples against predefined RegEx patterns or dictionaries. Subsequent rescans can preserve, remove or incrementally add classification tags depending on several factors:
- A scan run does not remove classification tags that were manually applied.
- A scan run does not reapply classification tags that were manually removed.
- A later run of a scan that continues to use the same scan rule can update the classification tags.
- A scan run does not remove the classification tags that were applied by another scan run if the latter is based on a different scan rule.
Next steps
- To learn how to create a custom classification, see create a custom classification.
- To learn about how to manually apply classifications, see manually apply classifications.
Váš názor
Připravujeme: V průběhu roku 2024 budeme postupně vyřazovat problémy z GitHub coby mechanismus zpětné vazby pro obsah a nahrazovat ho novým systémem zpětné vazby. Další informace naleznete v tématu: https://aka.ms/ContentUserFeedback.
Odeslat a zobrazit názory pro