Customer electronic invoices in Germany
To comply with European Union (EU) Directive 2014/55/EU, the Germany-specific xRechnung format has been implemented. This article explains how to set up and process customer electronic invoices in xRechnung format.
Prerequisites
Before you complete the procedures in this article, the following prerequisites must be met:
The primary address of the legal entity must be in Germany.
To enable the generation of electronic invoices in xRechnung format version 3 and later, import the specified or later versions of the following Electronic reporting (ER) format configurations. For more information, see Import Electronic reporting (ER) configurations.
- Sales Invoice DE (version 288.9.16.11)
- Project Invoice DE (version 288.8.22.12)
- Invoice model mapping (version 288.293)
Note
The Sales Invoice DE and Project Invoice DE format configurations are based on the corresponding Peppol format configurations. Those format configurations are based on the UBL format configurations that use the Invoice model configuration and the Invoice model mapping configuration. All remaining additional configurations are automatically imported.
Configure parameters
Reference the imported ER format configurations
Go to Accounts receivable > Setup > Accounts receivable parameters.
On the Electronic documents tab, on the Electronic reporting FastTab, select the imported formats for electronic documents:
- Sales and Free text invoice: Sales Invoice DE
- Sales and Free text credit note: Sales Invoice DE
- Project invoice: Project Invoice DE
- Project credit note: Project Invoice DE
Configure legal entity data
Go to Organization administration > Organizations > Legal entities, and select a legal entity.
On the Addresses FastTab, add a valid primary address for the legal entity.
On the Foreign trade and logistics FastTab, in the VAT exempt number export field, enter a valid tax registration number for the legal entity.
On the Bank account information FastTab, in the Routing number field, enter a valid number for the legal entity.
In the Bank account field, enter the reference to the legal entity bank account.
Note
Make sure that a valid International Bank Account Number (IBAN) is defined for the selected bank account.
Configure customer data
Go to Accounts receivable > Customers > All customers, and select a customer.
On the Addresses FastTab, add a valid address for the customer.
On the Invoice and delivery FastTab, in the Tax exempt number field, enter a valid tax registration number for the customer.
Set the eInvoice option to Yes to enable electronic invoices to be generated.
Set the eInvoice attachment option to Yes to attach a PDF copy of the printable invoice to the electronic invoice, if an attachment is necessary.
On the Sales demographics FastTab, in the Primary contact field, select the person who is considered the buyer's contact.
Note
All available contact persons must already be defined for the selected customer.
On the Sales demographics FastTab, in the Employee responsible field, select the person who is considered the seller's contact.
Configure units of measure
Go to Organization administration > Setup > Units > Units.
Select a unit ID, and then select External codes.
On the External codes page, in the Overview section, in the Code column, enter a code that corresponds to the selected unit ID.
In the Standard code column, select the checkbox.
In the Value section, in the Value field, enter the external code to use as the units of measure code for international trade.
Note
For scenarios where no specific units of measure are assumed, the default value EA (each) is used.
Configure sales tax codes
- Go to Tax > Indirect taxes > Sales tax > Sales tax codes.
- Select a sales tax code, and then, on the Action Pane, on the Sales tax code tab, in the Sales tax code group, select External codes.
- In the Overview section, create a line for the selected unit. In the External code field, enter the sales tax code that you selected in step 2.
- In the Value section, in the Value field, enter an external code to use for the selected sales tax code, according to the required codification.
Enter customer requisitions
When you register free text invoices, invoices that are based on sales orders, or project invoices, you must enter a customer requisition. You can also add an optional customer reference.
Enter a customer requisition for a free text invoice
- Go to Accounts receivable > Invoices > All free text invoices.
- Create a new invoice, or select an existing invoice.
- In the Header view, on the Customer FastTab, in the References section, enter values in the Customer requisition and Customer reference fields.
Enter a customer requisition for a sales order
- Go to Accounts receivable > Orders > All sales orders.
- Create a new sales order, or select an existing sales order.
- In the Header view, on the General FastTab, in the References section, enter values in the Customer requisition and Customer reference fields.
Enter a customer requisition for a project invoice
- Go to Project management and accounting > Projects > Project contracts.
- Create a new project contract, or select an existing project contract.
- On the Funding sources FastTab, create or select a funding source of the Customer type, and then select Details.
- On the Funding source details page, on the Other FastTab, in the References section, in the Customer requisition and Customer reference fields, enter default values for the contract.
Export customer electronic invoices
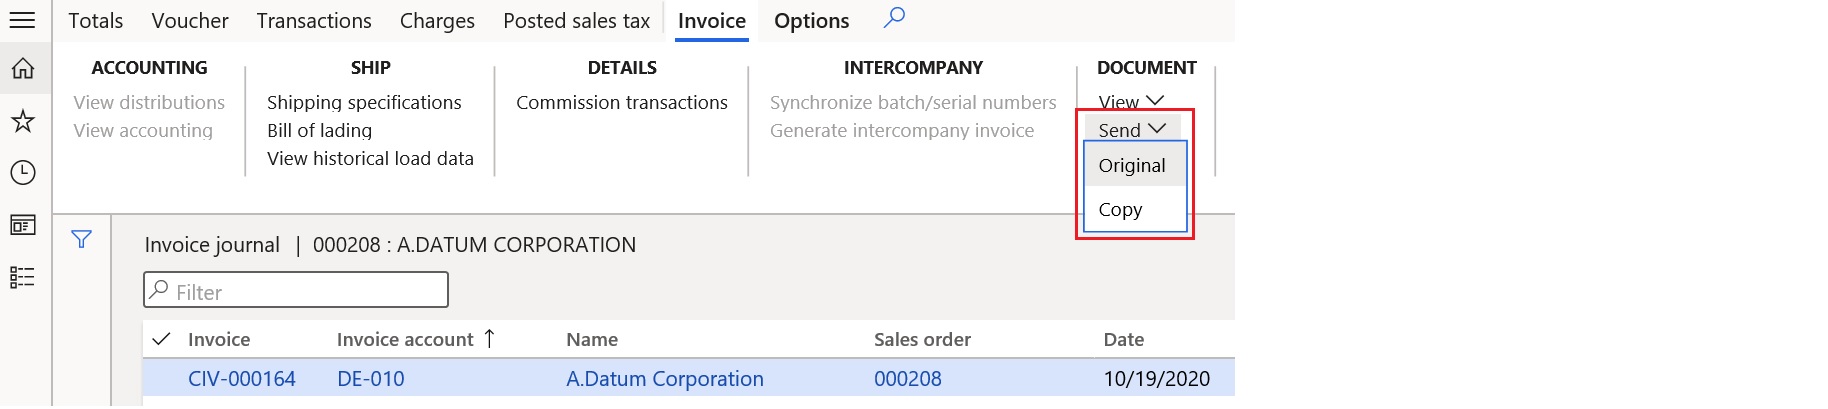
Generate e-invoices
When an invoice is posted, you can generate an electronic invoice from any invoice journal. Select the invoice, and then, on the Action Pane, on the Invoice tab, in the Document group, select Send > Original.
View e-invoices
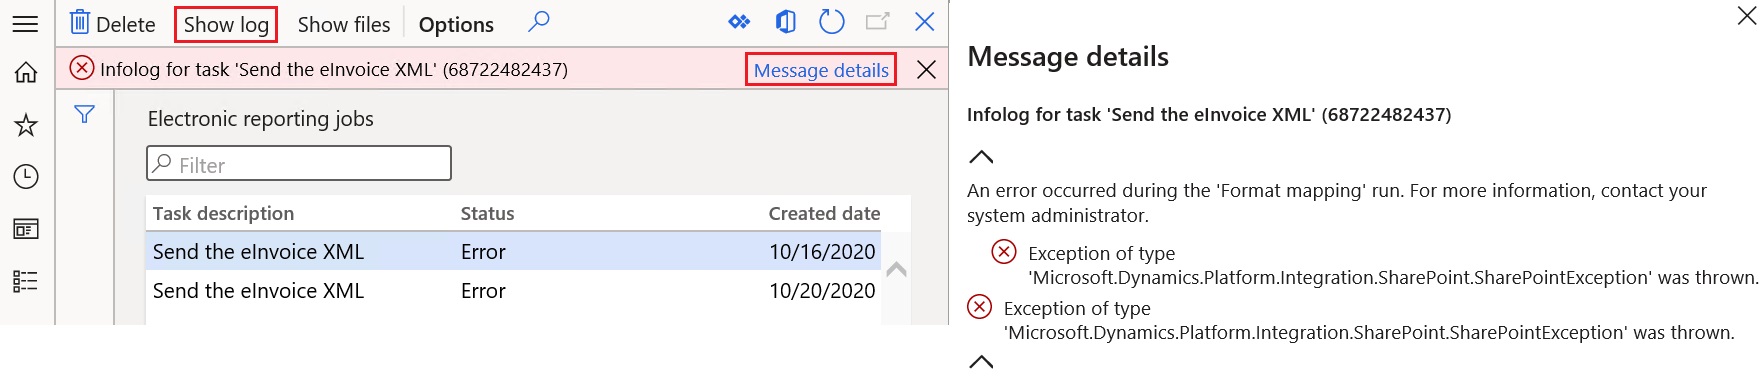
To inquire about the XML files of electronic invoices that have been generated, follow these steps.
Go to Organization administration > Electronic reporting > Electronic reporting jobs.
Select a job, and then select Show files.

Select Open to download the file that contains the electronic invoice.
If generation of the electronic invoices fails because of errors, select Show log > Message details to view more details about the error.
Send e-invoices to ER destinations
You can set up ER destinations for electronic invoice formats. In this case, output XML files that contain electronic invoices are automatically sent to the defined destinations immediately after the invoices are posted. When you post the invoices, you must turn on the Print invoice parameter.
For more information about ER destinations, see Electronic reporting destinations.
More resources
Váš názor
Připravujeme: V průběhu roku 2024 budeme postupně vyřazovat problémy z GitHub coby mechanismus zpětné vazby pro obsah a nahrazovat ho novým systémem zpětné vazby. Další informace naleznete v tématu: https://aka.ms/ContentUserFeedback.
Odeslat a zobrazit názory pro