Use voice commands in Dynamics 365 Guides as a substitute for hand gestures or gaze
You can use voice commands in Microsoft Dynamics 365 Guides as a substitute for touch or gaze. Voice commands save you time and keep you in the flow of your work, because you don't have to gaze at buttons or touch them to take actions.
For increased accuracy, most voice commands are contextual. In other words, they work only when the appropriate page is open.
Prerequisites
Speech must be enabled on the device.
You must give Dynamics 365 Guides permission to use your microphone during the first run of the app. Alternatively, go to Settings > Privacy > Microphone, and set the Dynamics 365 Guides option to On.

Note
Voice commands are supported for all languages that Dynamics 365 Guides supports except Swedish, Norwegian, Brazilian Portuguese, and Korean. The language is based on the Windows display language, not the keyboard language. You can verify the Windows display language by going to Settings > Time and Language > Language.
Use voice commands
The sections below show Dynamics 365 Guides pages and the voice commands that you can use for each of them.
Tip
Regardless of where you are in the app, the Select voice command works like an air tap.
Sign-in

| Number in screenshot | Say this | To do this |
|---|---|---|
| 1 | "Sign in" | Start the sign-in process. |
| 2 | "Try a guide" | Open the Dynamics 365 Guides demo. |
Environment selection

| Number in screenshot | Say this | To do this |
|---|---|---|
| 1 | "Scroll up" | Scroll up the list. |
| 2 | "Scroll down" | Scroll down the list. |
Main menu

| Number in screenshot | Say this | To do this |
|---|---|---|
| Not shown | "Show Main menu" | Open the Main menu or bring it to you. |
| 1 | "Show Work" | Open the Work activity screen to see your guides and folders. |
| 2 | "Show Teams" | Open the Teams activity screen to start collaborating. |
| 3 | "Show Files" | Open the OneDrive screen. |
| 4 | "Show Profile" | Open the Profile/Settings screen. |
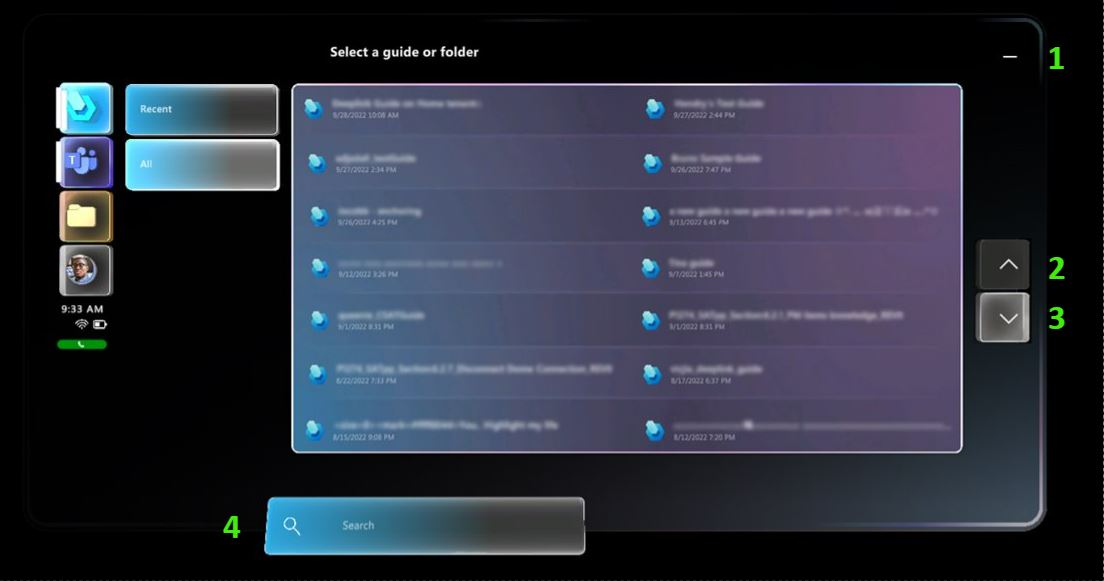
Work activity

| Number in screenshot | Say this | To do this |
|---|---|---|
| 1 | "Minimize" | Hide the content panel and the Main menu. |
| 2 | "Scroll up" | Scroll up the list. |
| 3 | "Scroll down" | Scroll down the list. |
| 4 | "Start search" | Activate the search and open the holographic keyboard. |
| Not shown | "Clear search" | Delete the text in the Search box. |
| Not shown | "Previous folder" | Go back to the previous folder. |
Teams (collaboration) activity

| Number in screenshot | Say this | To do this |
|---|---|---|
| 1 | "Minimize" | Minimize the Teams activity screen and the Main menu. |
| 2 | "Scroll up" | Scroll up the list. |
| 3 | "Scroll down" | Scroll down the list. |
| 4 | "Start search" | Trigger search and open the holographic keyboard. |
| Not shown | "Clear search" | Delete the search string currently in the search box. |
Call confirmation

| Number in screenshot | Say this | To do this |
|---|---|---|
| 1 | "Video on" or "Video off" | Turn video on or off. |
| 2 | "Start call" | Call the selected contact. |
| 3 | "Back" | Go back to the contact list and cancel the call. |
Active call

| Number in screenshot | Say this | To do this |
|---|---|---|
| 1 | "Video on" or "Video off" | Turn video on or off. |
| 2 | "Mic on" or "Mic off" | Turn audio on or off. |
| 3 | "Record call" or "Stop recording" | Start recording the call or stop recording the call. |
| 4 | "End call" | End the call and minimize the Main menu. |
| 5 | "Open participants" or "Close participants" | Display or hide the active participants tiles (right side of video feed). |
| 6 | "Open chat" or "Close chat" | Open or close the Chat window (right side of video feed). |
| 7 | "Inking on" or "Inking off" | Select the Direct ink tool or turn off the Direct ink tool. |
| 8 | "Drawing on" or "Drawing off" | Select the Far-field ink tool or turn off the Far-field ink tool. |
| 9 | "Select color," and then say one of these colors: "blue", "gray", "green", "red", or "yellow" | Select the Color tool and apply the selected color to the ink. |
| 10 | "Undo" | Undo the latest action. |
| 11 | "Delete all" | Delete all annotations. |
| 12 | "Add participants" | Display the holographic keyboard to search for contacts. |
| 13 | "Minimize" | Minimize the screen. |
| 14 | "Scroll up" | Scroll up the list. |
| 15 | "Scroll down" | Scroll down the list. |
Meeting confirmation

| Number in screenshot | Say this | To do this |
|---|---|---|
| 1 | "Video on" or "Video off" | Turn video on or off. |
| 2 | "Join meeting" | Join the meeting. |
| 3 | "Back" | Go back to the contact list and leave the meeting. |
Meetings

| Number in screenshot | Say this | To do this |
|---|---|---|
| 1 | "Today" | Select the Today button. |
| 2 | "Last week" | Select the arrow for the previous week. |
| 3 | "Next week" | Select the arrow for the next week. |
| 4 | "Minimize" | Minimize the Meetings window and the Main menu. |
| 5 | "Scroll up" | Scroll up the list. |
| 6 | "Scroll down" | Scroll down the list. |
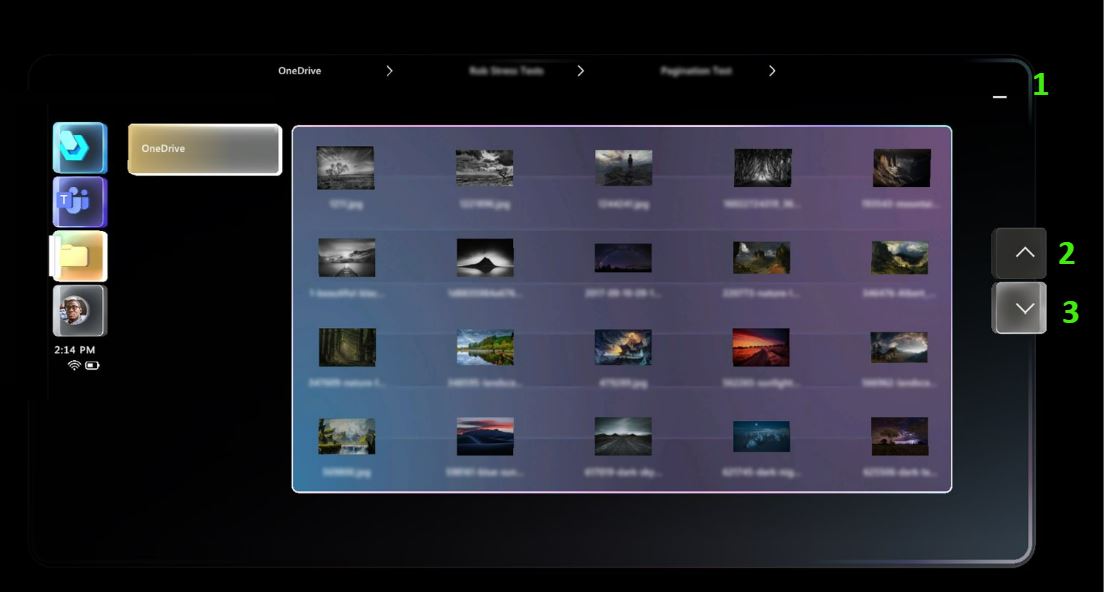
Files (OneDrive) screen

| Number in screenshot | Say this | To do this |
|---|---|---|
| 1 | "Minimize" | Hide the content panel and the Main menu. |
| 2 | "Scroll up" | Scroll up the list. |
| 3 | "Scroll down" | Scroll down the list. |
Profile and settings

| Number in screenshot | Say this | To do this |
|---|---|---|
| 1 | "Minimize" | Hide the content panel and the Main menu. |
| 2 | "Sign out" and then say "Yes" or "No" in the next dialog box | Sign out of Dynamics 365 Guides. |
Guides authoring/operating
Select mode

| Number in screenshot | Say this | To do this |
|---|---|---|
| 1 | "Author" | Select Author mode. |
| 2 | "Operate" | Select Operate mode. |
| 3 | "Minimize" | Hide the content panel and the Main menu. |
| 4 | "Go back" | Go back to the guides and folders list and cancel opening the current guide. |
Align holographic anchor

| Number in screenshot | Say this | To do this |
|---|---|---|
| 1 | "Confirm" | Confirm the position of the anchor so that you can start to use the guide. |
Scan anchor (QR code and circular code)

| Number in screenshot | Say this | To do this |
|---|---|---|
| 1 | "Initiate scan" | Start anchor scanning. |
Anchor found (QR code and circular code)

| Number in screenshot | Say this | To do this |
|---|---|---|
| 1 | "Rescan" | Rescan the anchor if holograms aren't correctly aligned. |
| 2 | "Confirm" | Confirm the position of the anchor so that you can start to use the guide. |
Step card


| Number in screenshot | Button or element | Say this | To do this |
|---|---|---|---|
| 1 |  |
"Follow me" | Turn on Follow mode, and bring the card to the center of the field of view. |
| Not shown |  |
"Place here" | Turn off Follow mode, and bring the card to the center of the field of view. |
| 2 |  |
"Go to anchor" | Go to the anchor step to re-anchor the guide. |
| 3 |  |
"Go back" | Go to the previous step. |
| 4 |  |
"Go to outline" | Go to the Outline view for the task or step. |
| 5 |  |
"Next step" | Go to the next step. |
| 6 |  |
"Hide holograms" | Turn off visibility for 3D parts (if 3D parts have been placed and they are visible). |
| Not shown |  |
"Show holograms" | Turn on visibility for 3D parts (if 3D parts have been placed but they are hidden). |
| 7 |  |
"Play video" | Start the video that is attached to the step (if the step has a video). |
| Not shown |  |
"Pause video" | Pause the video. |
| 8 |  |
"Exit guide" | Exit the current guide. |
| 9 |  |
"Restart guide" | Go to the first step in the guide. Note: You must be on the Completion step to use this voice command. |
Outline list

| Number in screenshot | Button or element | Say this | To do this |
|---|---|---|---|
| 1 |  |
"Scroll up" | Scroll up the list. |
| 2 |  |
"Scroll down" | Scroll down the list. |
Author mode commands
| Button or element | Say this | To do this |
|---|---|---|
 |
"Undo change" | Undo the last change. |
 |
"Redo change" | Redo the last change. |
 |
"Save guide" | Save your most recent changes. |
| None | "Copy 3D position" | Copy the 3D position (position, orientation, and scale) of a hologram to use with another hologram. |
| None | "Paste 3D position" | Paste the 3D position (position, orientation, and scale) of a hologram onto another hologram. |
Narration
You can use the built-in HoloLens Text-to-Speech system to have HoloLens read instructions out loud.
Use voice commands to turn narration on or off or to select a response in a question card
Use the commands in the following table to turn narration on or off or to select a response in a question card.
| Voice command | Action |
|---|---|
| Narration on | Start narration for the current and subsequent steps. If narration is already turned on when you say this voice command, the narrator will repeat the instructions for the current step. |
| Narration off | Turn off narration for the current and subsequent steps. |
| Narrate step | Narrate the current step. |
| Response Number | Select the response in a question card indicated by the specified Number. For example, say Response 1 to go to the item labeled "Response 1". |
Dialog boxes
For dialog boxes, read the label of the button (for example, say "Yes" or "No").
