Add LinkedIn Sales Navigator controls to forms
LinkedIn Sales Navigator controls are custom controls that you can add to forms in Dynamics 365 to show information about a LinkedIn member profile or company profile.
Note
For Dynamics 365 Sales Professional, the lead and contact forms must be treated as custom forms and add the controls to these forms.
Prerequisites
- You have Customizer or System Administrator security role in Dynamics 365.
- To test the controls, you need to be a LinkedIn Sales Navigator seat holder.
Add Sales Navigator controls to a form
You can add the Sales Navigator controls on any form or table of a Unified Interface app in Dynamics 365 that contains a field for last name, primary contact, or account name.
There are different types of LinkedIn controls which are added automatically when you use the latest version of the out-of-box integrations:
- LinkedIn Sales Navigator Lead (member profile): Shows the member profile of a LinkedIn contact using a specific lead or contact name.
- LinkedIn Lead Lookup Control: Shows member profile information using the name of the primary contact related to the record.
- LinkedIn Sales Navigator Account (company profile): Shows information about a LinkedIn company profile using a specific account name.
- LinkedIn Account Lookup Control: Shows company profile information using the account name related to the record.
- LinkedIn InMail Control: Shows a form where you can send an InMail message to another LinkedIn member.
The Sales Navigator controls can be added by modifying a field on a form in Dynamics 365. Modify the following fields according to the control type. Optionally, you can add multiple fields to match the control to make the matches more relevant. Keep in mind that this requires all fields to match before a member profile or company profile is suggested. If no match, or in rare cases a wrong match is found, you can use the search interface to find the right profile.
Add a member profile to a Lead form
This procedure shows an example of how to add a LinkedIn Sales Navigator Lead (member profile) on the Lead form by modifying the Last Name field. Other controls can be configured in the same way on other entities where the controls aren't added by default.
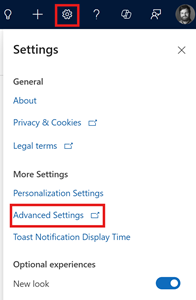
In the sales app, go to Settings > Advanced Settings.

Go to Customization > Customizations > Customize the System.
In the left pane, expand Tables and then the entity you want, and select Forms.
Note
If you are using the classic view, under Components, expand Entities, and then the entity you want, and select Forms.
Open the entity form of type Main and then select Components on the tool bar. In this example, we're using the Lead entity.
To add a reference to a custom control, begin by opening a field on the form, which will be bound to the primary attribute of the control (Last Name field for the member profile control and Company Name for the company profile control). In this example, we already have the Last Name field to the form.
Important
Member profile and company profile controls are read-only controls. We recommend that you create a copy of the two fields (Last Name and Company Name) that you're binding these controls to, so that you can continue to edit the fields.
Select the Last Name field and in the Properties pane, select Components > + Component .
In the Add component dialog box, search and add the LinkedIn Sales Navigator member profile control.
Note
If you don't see the LinkedIn Sales Navigator member profile control in the Components section, select Get more components to add it.
Now you need to configure the Sales Navigator control. In the configuration pane, go to the Show component on sections and select Web form factor for the LinkedIn control and remove other form factors.
Tip
Currently, the controls are available on desktop form factors. On mobile (phone and tablet) scenarios, the controls fall back to the default platform control. To hide the default controls from the forms on mobile scenarios, select the Hide Default Control check box.
In the property area, make sure all required properties (with a red asterisk) have a binding configured. You might need to scroll down in the list to find additional required properties. For this example, we need to configure one additional property. We recommend binding the remaining parameters (first name, email, job title, and company name) to the corresponding fields on the Lead entity. The more parameters are passed to the control, the greater will be the accuracy to find the right match. Configure the First Name property. Use this optional field to specify the LinkedIn member’s first name for the matching query. Specifying this attribute increases the match accuracy.
In the Company Name section, select Table column as First Name (Text).
Select Done.
Save and publish the form.
Tip
When using the Microsoft Edge browser, add your Dynamics 365 domain as a trusted site. This is required to read cookies from the linkedin.com domain.
- Select the lock icon in the address bar on a Dynamics 365 record with Sales Navigator controls.
- Select Manage for all sites under Tracking prevention.
- Select Exceptions and add your Dynamics 365 domain to the list.
Related information
Overview for LinkedIn Sales Navigator solutions
Install and configure LinkedIn Sales Navigator Controls
Work with Sales Navigator controls on forms