Quickstart: Remoting into the Game Development Virtual Machine with Teradici
Important
Azure Game Development Virtual Machine is scheduled for retirement on February 1st, 2024. Learn more.
Access the Game Development Virtual Machine using Teradici CAS (Cloud Access Software).
Using Teradici’s PCoIP protocol, connect to the VM for a highly responsive, color-accurate, lossless, and distortion-free experience. Teradici’s Windows PCoIP agent is pre-installed on the VM and requires a Teradici client to connect to the VM.
Prerequisites
- Teradici CAS License
- Teradici PCoIP Client software
- An Azure Game Development Virtual Machine
Connect Teradici with your Game Development Virtual Machine
- Go to the Azure Portal and search for and select the Game Development Virtual Machine. Click the Create button.
- As you fill out the desired VM configurations, be sure to select Teradici from the dropdown under the Remote Access Configuration tab and input your pre-purchased license in the Registration Key textbox.
- Deploy the Game Development Virtual Machine by clicking the Create button at the bottom of the Review + create tab.
- While the VM is deploying, install the Teradici PCoIP Client software on the device where you will initiate the remote connection from.
- Start the Teradici PCoIP Client and wait until the game development VM is successfully deployed.
- Once the VM is ready, to connect to it you must first input the Public IP address or DNS name of your Azure Game Development Virtual Machine in the Host Address or Code field.

Note
You can find IP address and DNS name of deployed VM from its Overview blade. Make sure your VM is in the Running Status. If this VM doesn’t have a Public IP address, you can use Private IP address instead. You need to ensure the machine which you initiate the remote connection from also has a private IP address that is routable to your Azure VM’s Private IP address.
- Optional: Give a name of your connection in the Connection Name field.
- Click NEXT
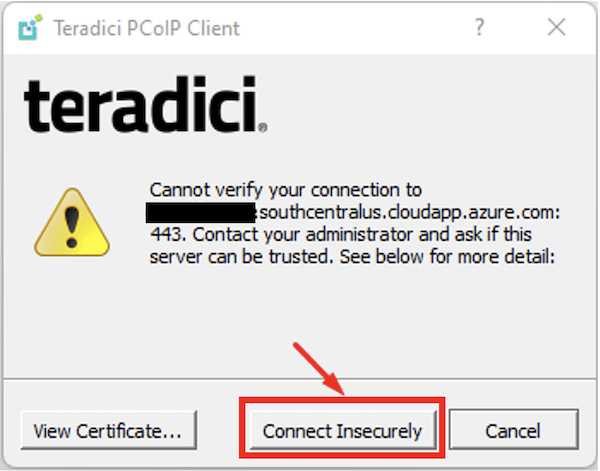
- As Teradici uses self-signed certificates as the default, you may notice a window pop up that warns you that the certificate cannot be verified due to the certificate not being registered with a trusted certificate authority. It doesn’t mean the connection is insecure, as it is still using HTTPs encryption with a self-signed private key, and you can click the Connect Insecurely to login to the VM. Learn more about configuring trusted signed certificates with Teradici, which is recommended when deploying a production system.
- Type in your Azure VM credentials and click LOGIN.
Note
If this is the first time signing into this VM, you’ll be prompted immediately to accept Epic Games store End User License Agreement (EULA) by using your Epic Games account.

- You're ready to start using the tools that are installed and configured on the game development VM, while taking advantage of Teradici’s powerful technology to improve your game development experience with beautiful color accuracy, responsive interactive streaming and support for a wide array of USB peripherals critical in game creation.
Clean up resources
None.
Next steps
- Explore the tools on the Game Development Virtual Machine by opening the Start menu.
- Learn about the game development on Azure by reading Azure for Gaming and trying out tutorials.
- Read the article about the Game Development Virtual Machine.
- Subscribe To Teradici CAS License for Azure Virtual Desktop
- Learn more about Teradici All Access, or request for a demo