Poznámka
Přístup k této stránce vyžaduje autorizaci. Můžete se zkusit přihlásit nebo změnit adresáře.
Přístup k této stránce vyžaduje autorizaci. Můžete zkusit změnit adresáře.
When you create a sensitivity label, you can restrict access to content that the label will be applied to. For example, with the encryption settings for a sensitivity label, you can protect content so that:
- Only users within your organization can open a confidential document or email.
- Only users in the marketing department can edit and print the promotion announcement document or email, while all other users in your organization can only read it.
- Users can't forward an email or copy information from it that contains news about an internal reorganization.
- The current price list that is sent to business partners can't be opened after a specified date.
- Only the people sent a meeting invite to kick off a confidential project can open the meeting invite and they can't forward it to others.
When a document, email, or meeting invite is encrypted, access to the content is restricted, so that it:
- Can be decrypted only by users authorized by the label's encryption settings.
- Remains encrypted no matter where it resides, inside or outside your organization, even if the file's renamed.
- Is encrypted both at rest (for example, in a OneDrive account) and in transit (for example, email as it traverses the internet).
Finally, as an admin, when you configure a sensitivity label to apply encryption, you can choose either to:
- Assign permissions now, so that you determine exactly which users get which permissions to content with that label.
- Let users assign permissions when they apply the label to content. This way, you can allow people in your organization some flexibility that they might need to collaborate and get their work done.
The encryption settings are available when you create or edit a sensitivity label in the Microsoft Purview portal.
Note
A sensitivity label in Outlook can apply S/MIME protection rather than encryption and permissions from the Azure Rights Management service. For more information, see Configure a label to apply S/MIME protection in Outlook.
Tip
If you're not an E5 customer, use the 90-day Microsoft Purview solutions trial to explore how additional Purview capabilities can help your organization manage data security and compliance needs. Start now at the Microsoft Purview trials hub. Learn details about signing up and trial terms.
Understand how the encryption works
Unless you're using S/MIME for Outlook, encryption that's applied by sensitivity labels to documents, emails, and meeting invites all use the Azure Rights Management service (Azure RMS) from Microsoft Purview Information Protection. This protection solution uses encryption, identity, and authorization policies. To learn more, see What is Azure Rights Management?.
When you use this encryption solution, the super user feature ensures that authorized people and services can always read and inspect the data that has been encrypted for your organization. If necessary, the encryption can then be removed or changed. For more information, see Configuring super users for Azure Information Protection and discovery services or data recovery.
Important
You can also use sensitivity labels to apply encryption to audio and video streams for Teams meetings, but this uses a different method of encryption and not the Azure Rights Management service that's used for emails, meeting invites, and documents. For more information about the encryption used for Teams meetings, see the Media encryption from the Teams security guide.
Important prerequisites
Before you can use encryption, you might need to do some configuration tasks. When you configure encryption settings, there's no check to validate that these prerequisites are met.
Activate Azure Rights Management
For sensitivity labels to apply encryption with rights management, the Azure Rights Management service from Microsoft Purview Information Protection must be activated for your tenant. In newer tenants, this is the default setting, but you might need to manually activate the service. For more information, see Activating the protection service from Azure Information Protection.
Check for network requirements
You might need to make some changes on your network devices such as firewalls. For details, see Firewalls and network infrastructure.
Check your Microsoft Entra configuration
There are some Microsoft Entra configurations that can prevent authorized access to encrypted content. For example, cross-tenant access settings and Conditional Access policies. For more information, see Microsoft Entra configuration for encrypted content.
Configure Exchange for Azure Rights Management
Exchange doesn't have to be configured for Azure Rights Management before users can apply labels in Outlook to encrypt their emails. However, until Exchange is configured for Azure Rights Management, you don't get the full functionality of encryption with rights management.
For example, users can't view encrypted emails or encrypted meeting invites on mobile phones or with Outlook on the web, encrypted emails can't be indexed for search, and you can't configure Exchange Online DLP for Rights Management protection.
To ensure that Exchange can support these additional scenarios:
- For Exchange Online, see the instructions for Exchange Online: IRM Configuration.
- For Exchange on-premises, you must deploy the RMS connector and configure your Exchange servers.
How to configure a label for encryption
Follow the general instructions to create or edit a sensitivity label and make sure the Files & other data assets option is selected for the label's scope:

Then, on the Choose protection settings for the types of items you selected page, make sure you select Control access.

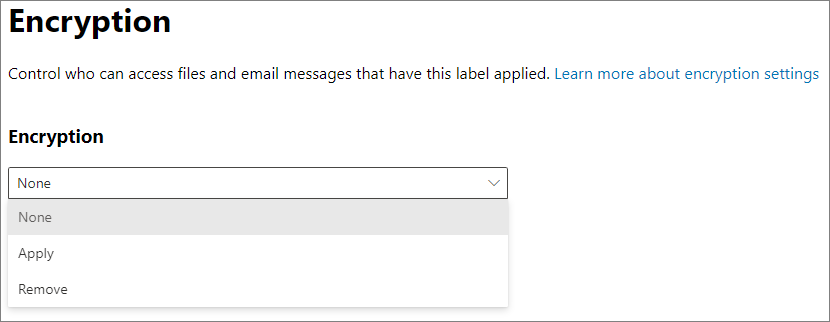
On the Access control page, select one of the following options:
Remove access control settings if already applied to items: When you select this option, applying the label removes existing encryption, even if it was applied independently from a sensitivity label.
It's important to understand that this setting can result in a sensitivity label that users might not be able to apply when they don't have sufficient permissions to remove the existing encryption. For more information about this scenario, see the What happens to existing encryption when a label's applied section.
Configure access control settings: Turns on encryption with rights management and makes the following settings visible:
Instructions for these settings are in the following Configure encryption settings section.
Editing labels to newly apply encryption or change existing encryption settings
It's a common deployment strategy to initially configure sensitivity labels that don't apply encryption, and later edit some of the existing labels to apply encryption. When the label changes reach your apps, the labels that you edited will apply that encryption for newly labeled items.
For files accessed in SharePoint and OneDrive when you've enabled SharePoint and OneDrive for sensitivity labels the new encryption status of files automatically change when these files are next accessed. For example, they're opened in Office for the web, or downloaded. There's no need to remove the label and reapply it. For example, files that were previously unencrypted become encrypted.
For other items that are already labeled, they retain their previous encryption status unless you remove the label and reapply it. For example, after changing the sensitivity label to now apply encryption, when you open previously labeled and unencrypted documents or emails in Office Desktop or Office Mobile, those items remain unencrypted unless you remove the label and reapply it. Similarly, if you change the sensitivity label settings to not apply encryption (remove the option for access control), those items remain encrypted unless you remove the label and reapply it.
For items that are already labeled with encryption and the assign permissions now option, when you change the encryption settings for users or permissions, the new settings will be applied for existing items when users authenticate with the encryption service. In most cases, there's no need to remove and reapply the label. However, if users have already opened an encrypted document or email, they won't get the new settings until their use license has expired and they must reauthenticate. For more information about this scenario, see the related frequently asked question for how the encryption works.
Whenever you change the encryption options for letting users assign permissions, that change only applies to newly labeled or relabeled items. For example:
- You change the label from assigning permissions now to let users assign permissions, or the other way around
- You change the label from Do Not Forward to Encrypt-Only, or the other way around
What happens to existing encryption when a label's applied
If a sensitivity label is applied to unencrypted content, the outcome for the encryption options you can select is self-explanatory. For example, if you didn't select Control access, the content remains unencrypted.
However, the content might be already encrypted. For example, another user might have applied:
- Their own permissions, which include user-defined permissions when prompted by a label, custom permissions by the Microsoft Purview Information Protection client, and the Restricted Access document protection from within an Office app.
- A rights management template that encrypts the content independently from a label. This category includes mail flow rules that apply encryption by using rights protection.
- A label that applies encryption with permissions assigned by the administrator.
The following table identifies what happens to existing encryption when a sensitivity label is applied to that content:
| Encryption: Not selected | Encryption: Configured | Encryption: Remove | |
|---|---|---|---|
| Permissions specified by a user | Original encryption is removed | New label encryption is applied | Original encryption is removed |
| Rights management template | Original encryption is preserved | New label encryption is applied | Original encryption is removed |
| Label with administator-defined permissions | Original encryption is removed | New label encryption is applied | Original encryption is removed |
In the cases where the new label encryption is applied or the original encryption is removed, this happens only if the user who applies the label has a usage right or role that supports this action:
- The usage right Export or Full Control.
- The role of Rights Management issuer or Rights Management owner, or super user.
If the user doesn't have one of these rights or roles, the label can't be applied and so the original encryption is preserved. The user sees the following message: You don't have permission to make this change to the sensitivity label. Please contact the content owner.
For example, the person who applies Do Not Forward to an email message can relabel the thread to replace the encryption or remove it, because they're the Rights Management owner for the email. But except for super users, recipients of this email can't relabel it because they don't have the required usage rights.
Email attachments for encrypted email messages and meeting invites
When an email message or meeting invite is encrypted by any method, any unencrypted Office documents that are attached to the email or invite automatically inherit the same encryption settings. You can't turn off this encryption inheritance, for example, with a setting or label scoping.
Any sensitivity label from the email message or meeting invite is not inherited by the attachment but could be automatically applied when a user in the same tenant opens the document. For more information, see Encryption-based label matching for documents.
Documents that are already encrypted and then added as attachments always preserve their original encryption.
Configure encryption settings
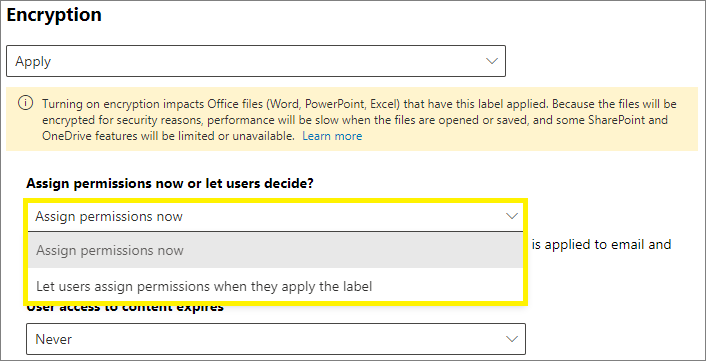
When you select Configure access control settings on the Access control page to create or edit a sensitivity label, choose one of the following options:
- Assign permissions now, so that you can determine exactly which users get which permissions to content that has the label applied. For more information, see the next section Assign permissions now.
- Let users assign permissions when your users apply the label to content. With this option, you can allow people in your organization some flexibility that they might need to collaborate and get their work done. For more information, see the Let users assign permissions section on this page.
For example, if you have a sensitivity label named Highly Confidential that will be applied to your most sensitive content, you might want to decide now who gets what type of permissions to that content.
Alternatively, if you have a sensitivity label named Business Contracts, and your organization's workflow requires that your people collaborate on this content with different people on an unplanned basis, you might want to allow your users to decide who gets permissions when they assign the label. This flexibility both helps your users' productivity and reduces the requests for your admins to update or create new sensitivity labels to address specific scenarios.
Choosing whether to assign permissions now or let users assign permissions:
Assign permissions now
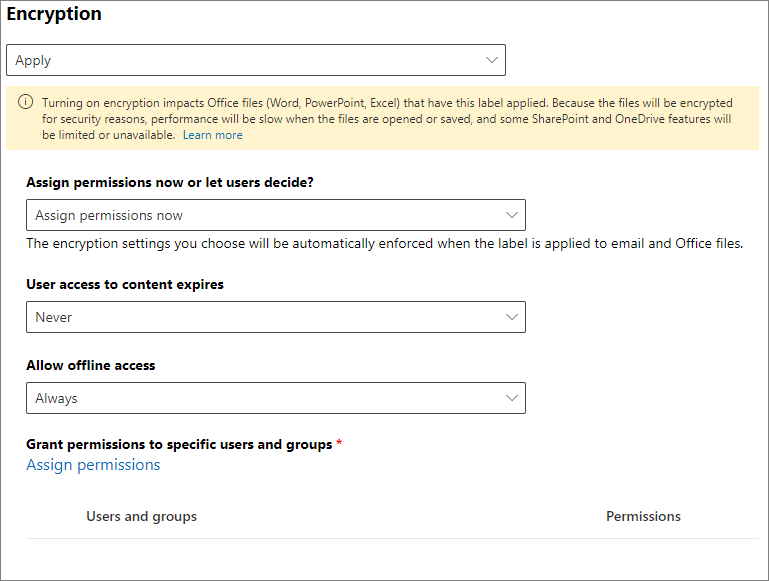
Use the following options to control who can access email, meeting invites (if enabled), or documents to which this label is applied. You can:
Allow access to labeled content to expire, either on a specific date or after a specific number of days after the label is applied. After this time, users won't be able to open the labeled item. If you specify a date, it's effective midnight on that date in your current time zone. Some email clients might not enforce expiration and show emails past their expiration date, due to their caching mechanisms.
Allow offline access never, always, or for a specific number of days after the label is applied. Use this setting to balance any security requirements you have with the ability for users to open encrypted content when they don't have an internet connection. If you restrict offline access to never or a number of days, when that threshold is reached, users must be reauthenticated and their access is logged. For more information about how this process works, see the following section about the Rights Management use license.
Access control settings for encrypted content:
Recommendations for the expiry and offline access settings:
| Setting | Recommended setting |
|---|---|
| User access to content expires | Never unless the content has a specific time-bound requirement. |
| Allow offline access | Depends on the sensitivity of the content: - Only for a number of days = 7 for sensitive business data that could cause damage to the business if shared with unauthorized people. This recommendation offers a balanced compromise between flexibility and security. Examples include contracts, security reports, forecast summaries, and sales account data. - Never for when the label is configured for dynamic watermarks and any very sensitive business data that would cause damage to the business if it was shared with unauthorized people. This recommendation prioritizes security over flexibility, and ensures that if you remove one or more users' access to the document, they won't be able to open it. Examples include employee and customer information, passwords, source code, and pre-announced financial reports. - Always for less sensitive content where it doesn't matter if users can continue to open encrypted content for up to 30 days (or the configured use license validity period for the tenant) after their access is removed and they have previously opened the encrypted content. |
Only labels that are configured to assign permissions now support different values for offline access. Labels that let users assign the permissions automatically use the tenant's Rights Management use license validity period. For example, labels that are configured for Do Not Forward, Encrypt-Only, and prompt users to specify their own permissions. The default value for this setting is 30 days.
Rights Management use license for offline access
Note
Although you can configure the encryption setting to allow offline access, some apps might not support offline access for encrypted content. For example, labeled and encrypted files in Power BI Desktop won't open if you're offline.
When a user opens an item that's been protected by encryption from the Azure Rights Management service, an Azure Rights Management use license for that content is granted to the user. This use license is a certificate that contains the user's usage rights for the document or email, and the encryption key that was used to encrypt the content. The use license also contains an expiration date if this has been set, and how long the use license is valid.
If no expiration date has been set, the default use license validity period for a tenant is 30 days. For the duration of the use license, the user isn't reauthenticated or reauthorized for the content. This process lets the user continue to open the protected document or email without an internet connection. When the use license validity period expires, the next time the user accesses the protected document or email, the user must be reauthenticated and reauthorized.
In addition to reauthentication, the encryption settings and user group membership is reevaluated. This means that users could experience different access results for the same item if there are changes in the encryption settings or group membership from when they last accessed the content.
To learn how to change the default 30-day setting, see Rights Management use license.
Assign permissions to specific users or groups
You can grant permissions to specific people so that only they can interact with the labeled content:
First, add users or groups that will be assigned permissions to the labeled content.
Then, choose which permissions those users should have for the labeled content.
Assigning permissions:
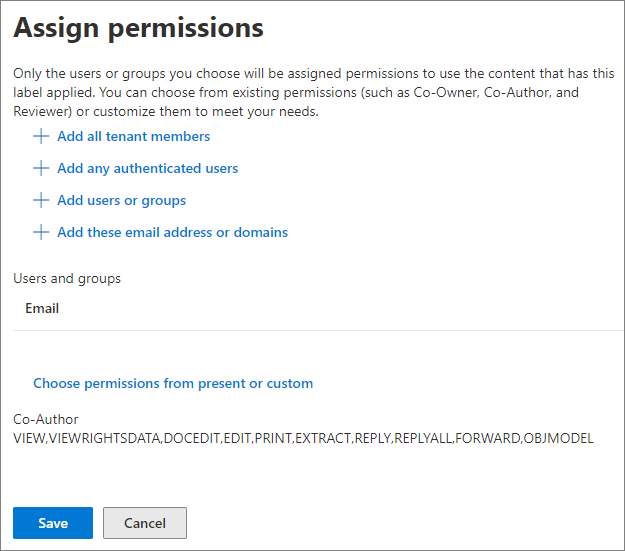
Add users or groups
When you assign permissions, you can choose:
Everyone in your organization (all tenant members). This setting excludes guest accounts.
Any authenticated users. Make sure you understand the requirements and limitations of this setting before selecting it.
Any specific user or email-enabled security group, distribution group, or Microsoft 365 group in Microsoft Entra ID. The Microsoft 365 group can have static or dynamic membership. You can't use a dynamic distribution group from Exchange because this group type isn't synchronized to Microsoft Entra ID. You also can't use a security group that isn't email-enabled.
Although you can specify groups that contain mail contacts as a convenient method to grant access to multiple people outside your organization, there's currently a known issue with this configuration. For more information, see Mail contacts in groups have intermittent access to encrypted content.
Any email address or domain. Use this option to specify all users in another organization who uses Microsoft Entra ID, by entering any domain name from that organization. You can also use this option for social providers, by entering their domain name such as gmail.com, hotmail.com, or outlook.com.
Note
If you specify a domain from an organization that uses Microsoft Entra ID, you can't restrict access to that specific domain. Instead, all verified domains in Microsoft Entra ID are automatically included for the tenant that owns the domain name you specify.
When you choose all users and groups in your organization or browse the directory, the users or groups must have an email address.
As a best practice, use groups rather than users. This strategy keeps your configuration simpler.
Requirements and limitations for "Add any authenticated users"
This setting doesn't restrict who can access the content that the label encrypts, while still encrypting the content and providing you with options to restrict how the content can be used (permissions), and accessed (expiry and offline access). However, the application opening the encrypted content must be able to support the authentication being used. For this reason, federated social providers such as Google, and onetime passcode authentication work only for email and meeting invites, and only when you use Exchange Online. Microsoft accounts can be used with Office 365 apps and the Microsoft Purview Information Protection viewer.
Note
Consider using this setting with SharePoint and OneDrive integration with Microsoft Entra B2B when sensitivity labels are enabled for Office files in SharePoint and OneDrive.
Some typical scenarios for any authenticated users setting:
- You don't mind who views the content, but you want to restrict how it's used. For example, you don't want the content to be edited, copied, or printed.
- You don't need to restrict who accesses the content, but you want to be able to confirm who opens it.
- You have a requirement that the content must be encrypted at rest and in transit, but it doesn't require access controls.
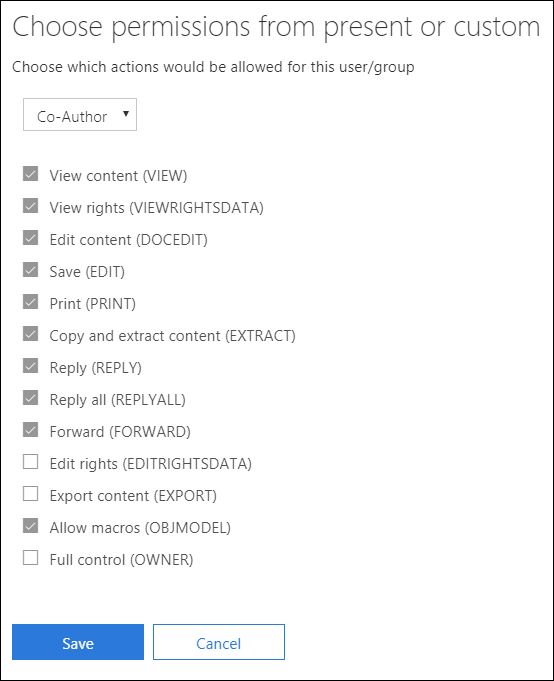
Choose permissions
When you choose which permissions to allow for those users or groups, you can select either:
- A predefined permissions level with a preset group of rights, such as Editor or Restricted Editor.
- Custom permissions, where you choose one or more usage rights.
For more information to help you select the appropriate permissions, see Usage rights and descriptions.
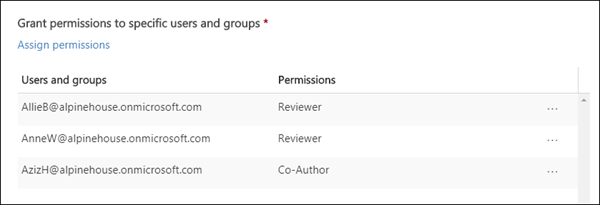
Note that the same label can grant different permissions to different users. For example, a single label can assign some users as Restricted Editor and a different user as Owner, as shown in the following screenshot.
To do this, add users or groups, assign them permissions, and save those settings. Then repeat these steps, adding users and assigning them permissions, saving the settings each time. You can repeat this configuration as often as necessary, to define different permissions for different users.
Rights Management issuer (user applying the sensitivity label) always has Full Control
By default, encryption for a sensitivity label uses the Azure Rights Management service from Microsoft Purview Information Protection. When a user applies a sensitivity label to protect a document or email by using encryption, that user becomes the Rights Management issuer for that content.
The Rights Management issuer is always granted Full Control permissions for the document or email, and in addition:
- If the encryption settings include an expiration date, the Rights Management issuer can still open and edit the document or email after that date.
- The Rights Management issuer can always access the document or email offline.
- The Rights Management issuer can still open a document after it's revoked.
For more information, see Rights Management issuer and Rights Management owner.
Dynamic watermarks
Identify the minimum versions of Office apps required by using the capabilities tables and the rows for Dynamic watermarks.
When a user accesses a file with this sensitivity label applied, by default, their Universal Principal Name (UPN) is dynamically inserted as a watermark on each page of the file. Typically, a user's UPN is the same as their email address. If you select Customize text (optional), you can specify a custom string that also supports including the date and time.
This watermark is highly visible when viewing the file on a device, and persists when printed, although not when exported. This watermarking is more secure than the standard content markings for a label, because the user can't easily manually remove or change it.
The watermark is removed when a user relabels the document, choosing a sensitivity label that applies a different dynamic watermark, or no dynamic watermark. However, as with all encrypted content, a user must have the usage right of Export or Full Control to remove the existing encryption.
This protective watermarking is supported only for sensitivity labels that apply encryption and we also recommend that the encryption option of Allow offline access is set to Never. As with other encryption settings, dynamic watermarks are supported across tenants. Use it for your most sensitive documents as a visual deterrent against screen captures by the person who opened the document. However, be aware of the following considerations.
Limitations in Office where dynamic watermarks are not yet supported, so the document opens without apply the watermark:
- File preview for attachments in Outlook
- PowerPoint Live in Microsoft Teams
- Protected View in Word, Excel, and PowerPoint
Unless opening the document falls into one of the exceptions previously listed, one of the following must be true to open a labeled document that applies dynamic watermarks:
The user is the Rights Management owner, which most of the time, means they applied the label themselves. For more information, see Rights Management issuer and Rights Management owner.
The user opens the document with an app that understands dynamic watermarks. Use the capabilities tables and the row Dynamic watermarks to confirm supported versions.
The user opens the document in Office on the web.
If none of these conditions are met when a user opens the document in an Office app, and they're not one of the listed exceptions, the document won't open. Make sure you understand this restriction before you use this label configuration.
Caution
Except for the listed limitations, Microsoft Office apps will either deny access if they don't support dynamic watermarks, or enforce dynamic watermarks if they do.
Considerations for previously labeled documents:
Like all changed encryption settings, a newly configured dynamic watermark doesn't immediately get applied when you already have a valid Rights Management use license for a document. After the use license expires, you must reauthenticate to the Azure Rights Management service to open the document and then the dynamic watermark setting gets applied.
There's no automatic detection and resolution if the sensitivity label previously applied a standard watermark as a content marking.
Double Key Encryption
Note
For built-in labeling, identify the minimum versions required by using the capabilities tables and the row Double Key Encryption (DKE).
Select the Double Key Encryption label option only after you've configured the Double Key Encryption service and you need to use this double key encryption for files and emails that will have this label applied. After the label is configured and saved, you won't be able to edit it.
For more information, prerequisites, and configuration instructions, see Double Key Encryption (DKE).
Let users assign permissions
Important
Not all labeling clients support all the options that let users assign their own permissions. Use this section to learn more.
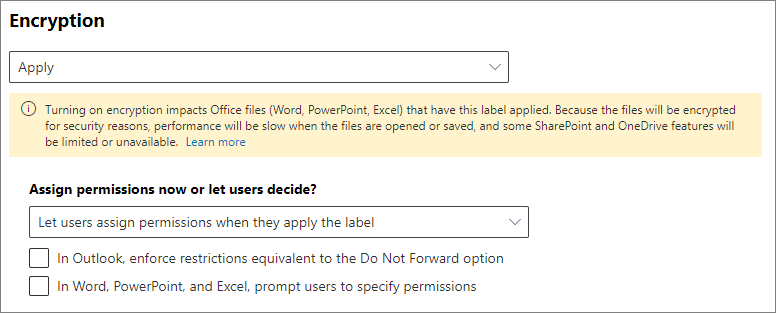
Often referred to as "user-defined permissions", you can use the following options to let users assign permissions when they manually apply a sensitivity label to content:
In Outlook, a user can select restrictions equivalent to the Do Not Forward option or Encrypt-only for their chosen recipients.
The Do Not Forward option is supported by all email clients that support sensitivity labels. However, applying the Encrypt-Only option with a sensitivity label is a more recent release. For email clients that don't support this capability, the label won't be visible.
To check the minimum versions of Outlook apps that use built-in labeling to support applying the Encrypt-Only option with a sensitivity label, use the capabilities table for Outlook and the row Let users assign permissions: - Encrypt-Only.
In Word, PowerPoint, and Excel, unless the label is configured to extend permissions for a SharePoint document library, a user is prompted to select their own permissions for specific users, groups, or organizations.
For Office apps that don't support this capability, the label either won't be visible for users, or the label is visible for consistency but it can't be applied with an explanation message to users.
To check which Office apps support this option, use the capabilities table for Word, Excel, and PowerPoint and the rows for Let users assign permissions.
Note
You won't be able to use these configurations if the label scope excludes email (for Do Not Forward and Encrypt-Only) or excludes files (for prompting users in Word, PowerPoint, and Excel). For more information, see Scope labels to just files or emails.
When the options are supported, use the following table to identify when users see the sensitivity label:
| Setting | Label visible in Outlook | Label visible in Word, Excel, PowerPoint |
|---|---|---|
| In Outlook, enforce restrictions with the Do Not Forward or Encrypt-Only option | Yes | No |
| In Word, PowerPoint, and Excel, prompt users to specify permissions | No | Yes |
When both settings are selected, the label is therefore visible in both Outlook and in Word, Excel, and PowerPoint.
A sensitivity label that lets users assign permissions can be recommended to users, but can only be automatically applied for the Do Not Forward and Encrypt-Only options.
Configuring the user-assigned permissions:
Outlook restrictions
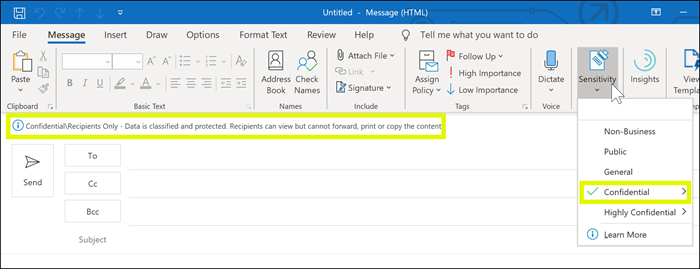
In Outlook, when a user applies a sensitivity label that lets them assign permissions to a message, you can choose the Do Not Forward option or Encrypt-Only. The user will see the label name and description at the top of the message, which indicates the content's being protected. Unlike Word, PowerPoint, and Excel (see the next section), users aren't prompted to select specific permissions. For this configuration, the administrator controls the permissions, but not who has access.
When either of these options are applied to an email, the email is encrypted and recipients must be authenticated. Then, the recipients automatically have restricted usage rights:
Do Not Forward: Recipients can't forward the email, print it, or copy from it. For example, in the Outlook client, the Forward button isn't available, the Save As and Print menu options aren't available, and you can't add or change recipients in the To, Cc, or Bcc boxes.
For more information about how this option works, see Do Not Forward option for emails.
Encrypt-Only: Recipients have all usage rights except Save As, Export and Full Control. This combination of usage rights means that the recipients have no restrictions except that they can't remove the protection. For example, a recipient can copy from the email, print it, and forward it.
For more information about how this option works, see Encrypt-only option for emails.
Unencrypted Office documents that are attached to the email or meeting invite automatically inherit the same restrictions. For Do Not Forward, the usage rights applied to these documents are Edit Content, Edit; Save; View, Open, Read; and Allow Macros. If the user wants different usage rights for an attachment, or the attachment isn't an Office document that supports this inherited protection, the user needs to encrypt the file before attaching it to the email or meeting invite.
Word, PowerPoint, and Excel permissions
In Word, PowerPoint, and Excel, when a user applies a sensitivity label that lets them assign permissions to a document, the user is prompted to specify their choice of users and permissions for the encryption. For this configuration, the user and not the administrator controls both who can access the document, and what permissions they have.
Support for organization-wide custom permissions
For built-in labeling in Windows, users can additionally specify a domain name when they're prompted to specify their choice of users and permissions. When a domain name is entered, the permissions will apply to all users in an organization that owns the domain and it is in Microsoft Entra ID. To identify the minimum versions that support this setting, use the capabilities table and the row Let users assign permissions:- Prompt users for custom permissions (users, groups, and organizations).

Note
The displayed dialog box is updated in the latest versions of Office apps, but the support for organization-wide custom permissions remains when a domain name is entered. Information about this support is included in the popup information box.
For example, a user types @contoso.com (or contoso.com) and grants read access. Because Contoso Corporation owns the contoso.com domain, all users in that domain and all other domains that the organization owns in Microsoft Entra ID will be granted read access.
Note
When you specify these values, don't surround them with quotation marks.
It's important to let users know that access isn't restricted to just the users in the domain specified. For example, @sales.contoso.com wouldn't restrict access to users in just the sales subdomain, but also grant access to users in the marketing.contoso.com domain, and even users with a disjoint namespace in the same Microsoft Entra tenant.
Example configurations for the encryption settings
For each example that follows, do the configuration from the Access control page when the Configure access control settings option is selected:

Example 1: Label that applies Do Not Forward to send an encrypted email to a Gmail account
This label displays only in Outlook and Outlook on the web, and you must use Exchange Online. Instruct users to select this label when they need to send an encrypted email to people using a Gmail account (or any other email account outside your organization).
Your users type the Gmail email address in the To box. Then, they select the label and the Do Not Forward option is automatically added to the email. The result is that recipients can't forward the email, or print it, copy from it, or save the email outside their mailbox by using the Save As option.
On the Access control page: For Assign permissions now or let users decide? select Let users assign permissions when they apply the label.
Select the checkbox: In Outlook, enforce restrictions equivalent to the Do Not Forward option.
If selected, clear the checkbox: In Word, PowerPoint, and Excel, prompt users to specify permissions.
Select Next and complete the configuration.
Example 2: Label that restricts read-only permission to all users in another organization
This label is suitable for sharing very sensitive documents as read-only, and the documents always require an internet connection to view them.
This label isn't suitable for emails.
On the *Access control page: For Assign permissions now or let users decide? select Assign permissions now.
For Allow offline access, select Never.
Select Assign permissions.
On the Assign permissions pane, select Add specific email addresses or domains.
In the text box, enter the name of a domain from the other organization, for example, fabrikam.com. Then select Add.
Select Choose permissions.
On the Choose permissions pane, select the dropdown box, select Viewer, and then select Save.
Back on the Assign Permissions pane, select Save.
On the Access control page, select Next and complete the configuration.
Example 3: Add external users to an existing label that encrypts content
The new users that you add will be able open documents and emails that have already been protected with this label. The permissions that you grant these users can be different from the permissions that the existing users have.
On the Access control page: For Assign permissions now or let users decide? make sure Assign permissions now is selected.
Select Assign permissions.
On the Assign permissions pane, select Add specific email addresses or domains.
In the text box, enter the email address of the first user (or group) to add, and then select Add.
Select Choose permissions.
On the Choose permissions pane, select the permissions for this user (or group), and then select Save.
Back on the Assign Permissions pane, repeat steps 3 through 6 for each user (or group) that you want to add to this label. Then click Save.
On the Access control page, select Next and complete the configuration.
Example 4: Label that encrypts content but doesn't restrict who can access it
This configuration has the advantage that you don't need to specify users, groups, or domains to encrypt an email or document. The content will still be encrypted and you can still specify usage rights, an expiry date, and offline access.
Use this configuration only when you don't need to restrict who can open the protected document or email. See more information about this setting.
On the Access control page: For Assign permissions now or let users decide? make sure Assign permissions now is selected.
Configure settings for User access to content expires and Allow offline access as required.
Select Assign permissions.
On the Assign permissions pane, select Add any authenticated users.
For Users and groups, you see Authenticated users automatically added. You can't change this value, only delete it, which cancels the Add any authenticated users selection.
Select Choose permissions.
On the Choose permissions pane, select the dropdown box, select the permissions you want, and then select Save.
Back on the Assign Permissions pane, select Save.
On the Access control page, select Next and complete the configuration.
Considerations for encrypted content
Encrypting your most sensitive documents and emails helps to ensure that only authorized people can access this data. However, there are some considerations to take into account:
If your organization hasn't enabled sensitivity labels for Office files in SharePoint and OneDrive:
- Search, eDiscovery, and Delve won't work for encrypted files.
- DLP policies work for the metadata of these encrypted files (including retention label information) but not the content of these files (such as credit card numbers within files).
- Users can't open encrypted files using Office for the web. When sensitivity labels for Office files in SharePoint and OneDrive are enabled, users can use Office for the web to open encrypted files, with some limitations that include encryption that has been applied with an on-premises key (known as "hold your own key", or HYOK), double key encryption, and encryption that has been applied independently from a sensitivity label.
If you share encrypted documents with people outside your organization, you might need to create guest accounts and modify Conditional Access policies. For more information, see Sharing encrypted documents with external users.
When authorized users open encrypted documents in their Office apps, they see the label name and description in a yellow message bar at the top of their app. When the encryption permissions extend to people outside your organization, carefully review the label names and descriptions that will be visible in this message bar when the document is opened.
For multiple users to edit an encrypted file at the same time, they must all be using Office for the web or you've enabled co-authoring for files encrypted with sensitivity labels and all users have Office apps that support this feature. If this isn't the case, and the file is already open:
- In Office apps (Windows, Mac, Android, and iOS), users see a File In Use message with the name of the person who has checked out the file. They can then view a read-only copy or save and edit a copy of the file, and receive notification when the file is available.
- In Office for the web, users see an error message that they can't edit the document with other people. They can then select Open in Reading View.
The AutoSave functionality in Office apps is disabled for encrypted files if you haven't enabled co-authoring for files encrypted with sensitivity labels. Users see a message that the file has restricted permissions that must be removed before AutoSave can be turned on.
Office for Windows supports labels that apply encryption when users aren't connected to the internet. But for the other platforms (macOS, iOS, Android), users must be online to apply these labels in Office apps. The Microsoft Purview Information Protection client must also be online to apply these labels in File Explorer and PowerShell. Users don't have to be online to open encrypted content. For more information about offline access, see the Rights Management use license for offline access section.
Encrypted files might take longer to open in Office apps (Windows, Mac, Android, and iOS).
If a label that applies encryption is added by using an Office app when the document is checked out in SharePoint, and the user then discards the checkout, the document remains labeled and encrypted.
Unless you've enabled co-authoring for files encrypted with sensitivity labels, the following actions for encrypted files aren't supported from Office apps (Windows, Mac, Android, and iOS), and users see an error message that something went wrong. However, SharePoint functionality can be used as an alternative:
- View, restore, and save copies of previous versions. As an alternative, users can do these actions using Office for the web when you enable and configure versioning for a list or library.
- Change the name or location of files. As an alternative, users can rename a file, folder, or link in a document library in SharePoint.
For the best collaboration experience for files that are encrypted by a sensitivity label, we recommend you use sensitivity labels for Office files in SharePoint and OneDrive and Office for the web.
Next steps
Need to share your labeled and encrypted documents with people outside your organization? See Sharing encrypted documents with external users.
To use sensitivity labels to encrypt video and audio streams for Teams meetings, see Use sensitivity labels to protect calendar items, Teams meetings and chat.