Podělte se o svůj názor:
Rádi bychom váš názor na dokumentaci pro vývojáře v Microsoft Teams. Odpovězte prosím na náš krátký tříotazový průzkum.Vyplnit dotazník
Tento prohlížeč se už nepodporuje.
Upgradujte na Microsoft Edge, abyste mohli využívat nejnovější funkce, aktualizace zabezpečení a technickou podporu.
Microsoft Entra ID provides app users access to your bot or message extension app. The app user who has signed in to Teams can be given access to your app.
SSO configuration in Microsoft Entra admin center
The bot and message extension apps use Bot Framework for communicating with app users and implementing authentication.
To configure SSO for your bot or message extension app, you'll need to:
Configure bot resource in Microsoft Entra ID
Configure app in Microsoft Entra ID
Poznámka
Ensure that you've created an app and a bot resource in Microsoft Entra ID.
For more information about creating and configuring your bot resource in Microsoft Entra ID, see Create Teams conversation bot.
You can configure your bot resource and app in Microsoft Entra ID for your bot or message extension app in one of the following two ways:
Configure SSO using bot resource and configure Microsoft Entra app: You can start by configuring SSO for your bot resource, and enable SSO for your Microsoft Entra app. You'll configure:
For bot resource: Messaging endpoint and OAuth connection.
Poznámka
When you create your bot resource in Microsoft Entra ID, you can select the option for creating a new app ID, or you can use an existing app ID if you've already registered your app in Microsoft Entra ID.
For Microsoft Entra app: App ID URI, scope and permissions, trusted client IDs, access token version, client secret, and redirect URL.
Configure SSO using Microsoft Entra app and then configuring bot resource: You can start by configuring your Microsoft Entra app, and then use this app ID in the bot resource when you enable SSO for it. You'll configure:
For Microsoft Entra app: App ID URI, access token, trusted client IDs, access token version, client secret, and redirect URL.
For bot resource: Messaging endpoint and OAuth connection.
Poznámka
Configure bot resource using the app ID generated by Microsoft Entra ID when you registered your app.
Enable SSO in Microsoft Entra ID
By the end of this tutorial, you'll learn to configure:
Application ID
Bot ID
Access token
Application ID URI
Scope, permissions, and authorized client IDs
Client secret
Redirect URL
Messaging endpoint and OAuth connection
Select one of the following two ways to configure SSO for your bot resource:
Ensure that when you create your bot resource, select the option to create a new app ID. You can also use an existing app ID, if you've already registered an app in Microsoft Entra admin center.
Configure messaging endpoint
Messaging endpoint is where messages are sent to your bot. It enables communication with your bot.
To configure messaging endpoint for your bot resource
Open the Azure portal on your web browser.
The Microsoft Azure Bot page opens.
Enter the name of your bot resource in Search box, and select Enter to open it.
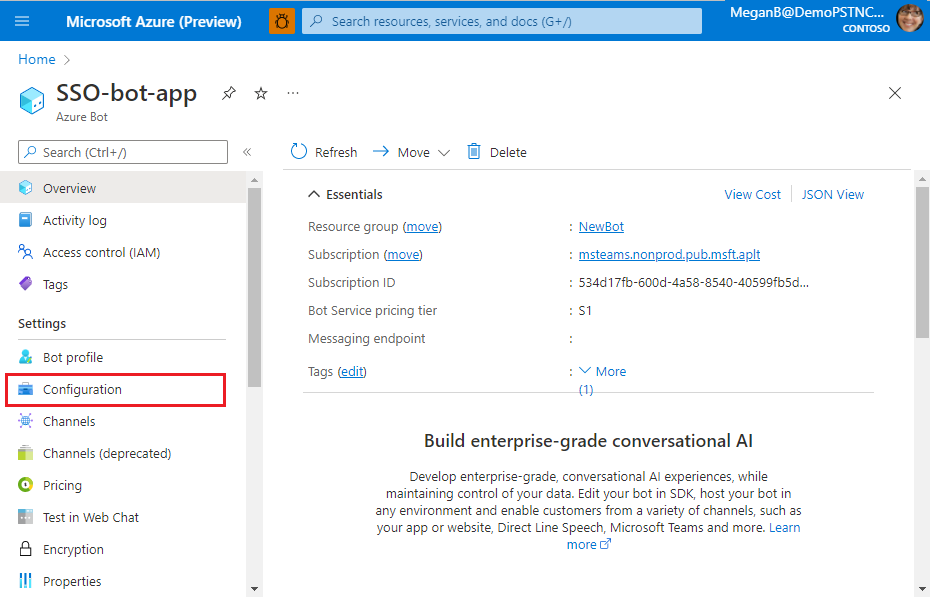
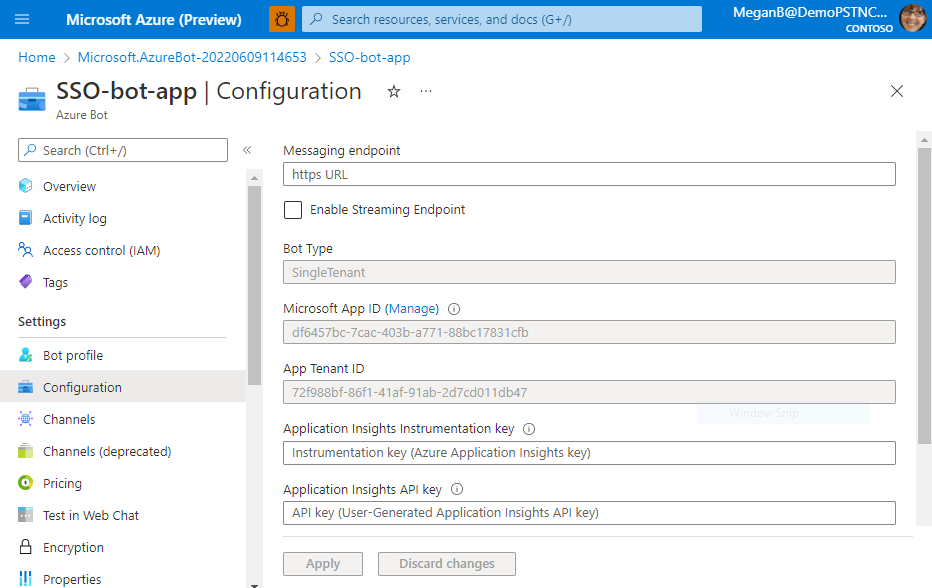
Select Settings > Configuration.
The Configuration page appears.
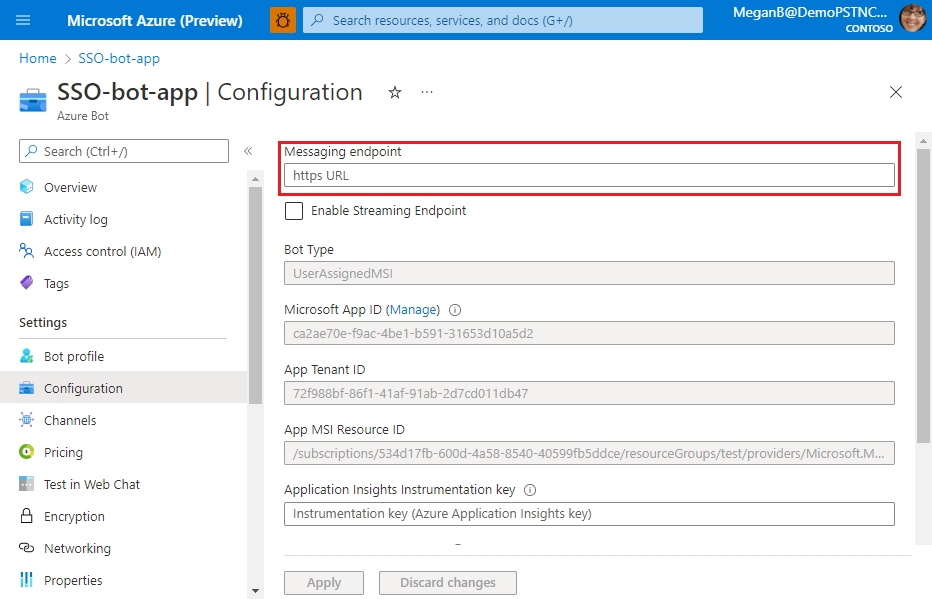
Enter the messaging endpoint URL where your bot receives app user's messages.
Select Apply.
The messaging endpoint is configured.
You've configured the messaging endpoint for your bot resource. Next, you must enable SSO for the Microsoft Entra app.
Configure SSO for Microsoft Entra app
You must configure permissions and scopes, authorize client applications, update app manifest (previously called Teams app manifest), and create client secret for your Microsoft Entra app. These configurations help to invoke SSO for your bot app.
Configure scope for the access token
Configure scope (permission) options for sending access token to Teams client and authorizing trusted client applications to enable SSO.
You need:
To configure application ID URI: Configure scope (permission) options for your app. You'll expose a web API and configure the application ID URI.
To configure API scope: Define scope for the API, and the users who can consent for a scope. You can let only admins provide consent for higher-privileged permissions.
To configure authorized client application: Create authorized client IDs for applications that you want to pre-authorize. It allows the app user to access the app scopes (permissions) you've configured, without requiring any further consent. Pre-authorize only those client applications you trust, as your app users won't have the opportunity to decline consent.
Enter the name of your bot resource in Search box, and then select Enter to open it.
Select Settings > Configuration.
The Configuration page appears.
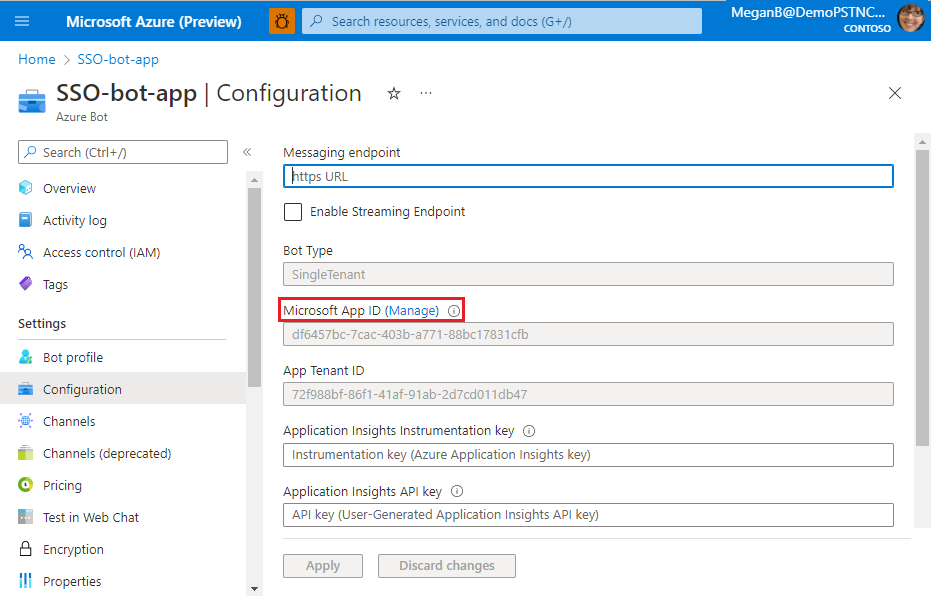
Select Manage.
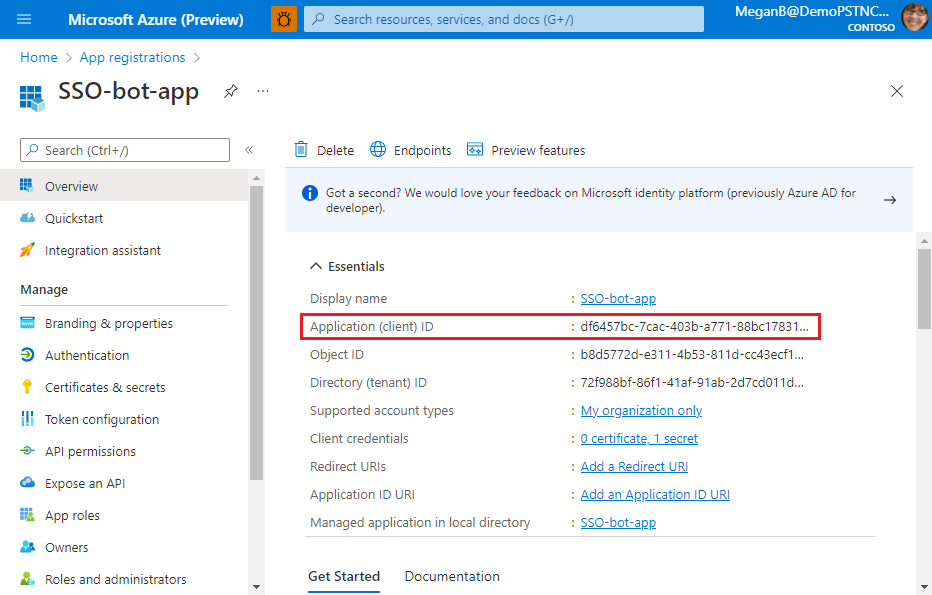
The Microsoft Entra app page appears.
The new app ID (client ID) for the app appears on this page. Note and save this app ID. You'll need to update it in the app manifest later. If you used the ID of an existing app when you created the bot resource, then ID of that app appears in this page.
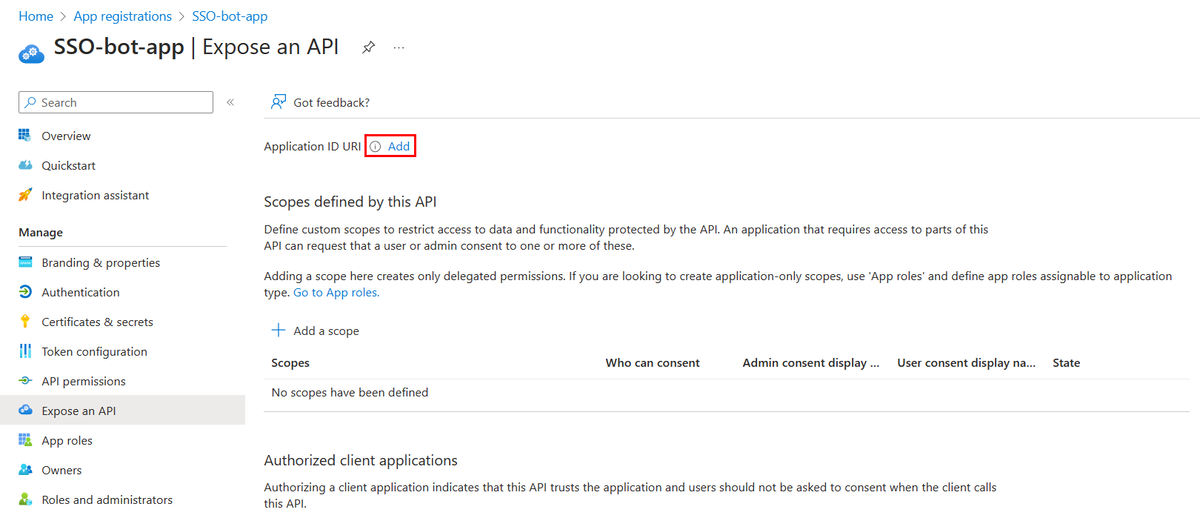
Select Manage > Expose an API from the left pane.
The Expose an API page appears.
Select Add to generate application ID URI.
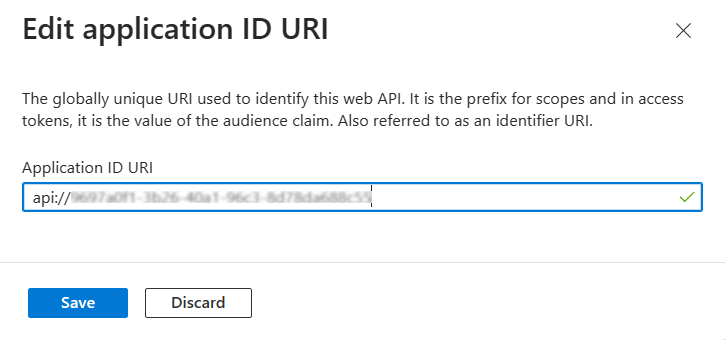
The section for setting application ID URI appears.
Enter the application ID URI in the format explained here.
The Application ID URI is prefilled with app ID (GUID) in the format api://{AppID}.
Důležité
Sensitive information: The application ID URI is logged as part of the authentication process and must not contain sensitive information.
Standalone bot: If you're building a standalone bot, enter the application ID URI as api://botid-{YourBotId}. Here, {YourBotId} is your Microsoft Entra application ID.
Application ID URI for app with multiple capabilities: If you're building an app with a bot, a messaging extension, and a tab, enter the application ID URI as api://fully-qualified-domain-name.com/botid-{YourClientId}, where {YourClientId} is your bot app ID.
Format for domain name: Use lowercase letters for domain name. Don't use upper case.
For example, to create an app service or web app with resource name, 'demoapplication':
If base resource name used is
URL will be...
Format is supported on...
demoapplication
https://demoapplication.example.net
All platforms.
DemoApplication
https://DemoApplication.example.net
Desktop, web, and iOS only. It isn't supported in Android.
Use the lowercase option demoapplication as base resource name.
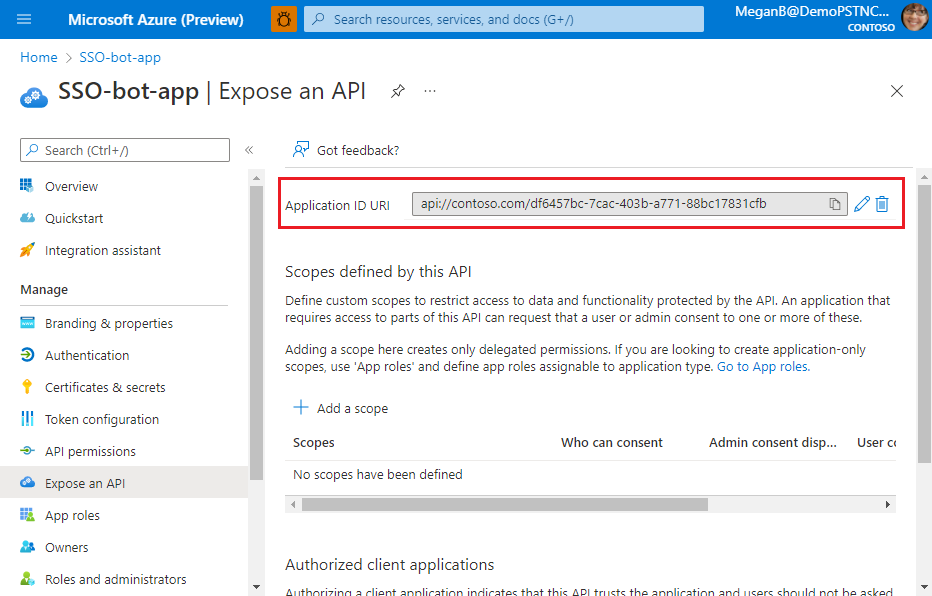
Select Save.
A message appears on the browser stating that the application ID URI was updated.
The application ID URI displays on the page.
Note and save the application ID URI. You'll need it for updating the app manifest later.
The application ID URI is configured. You can now define scope and permissions for your app.
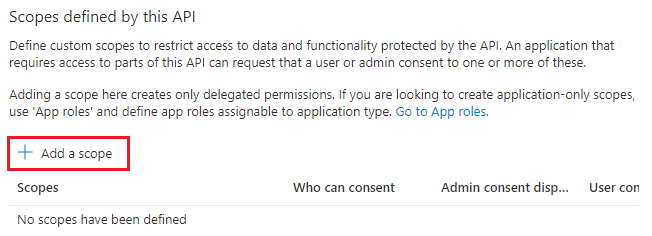
To configure API scope
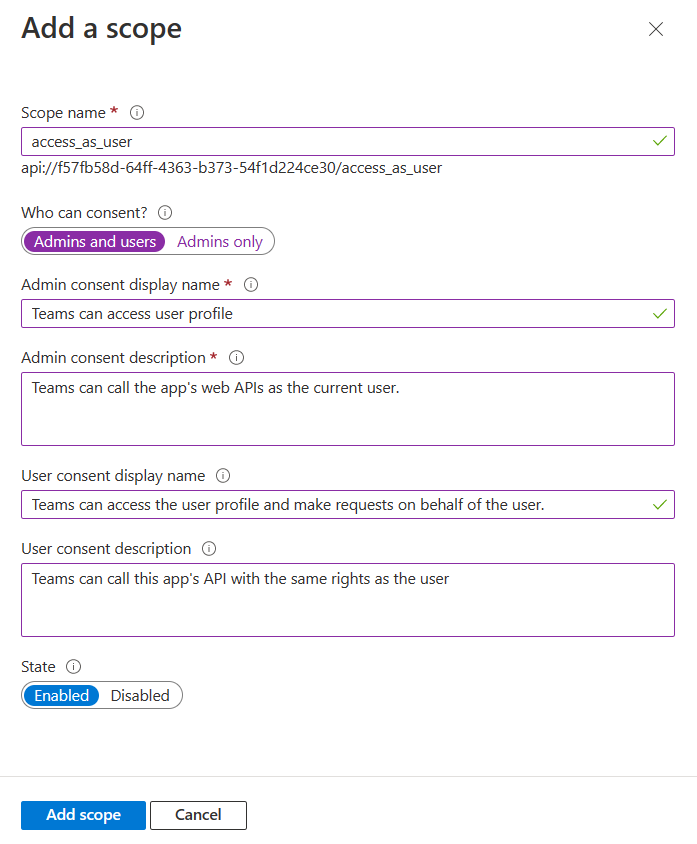
Select + Add a scope in the Scopes defined by this API section.
The Add a scope page appears.
Enter the details for configuring scope.
Enter the scope name.
Select the user who can give consent for this scope. The default option is Admins only.
A message appears on the browser stating that the scope was added.
Poznámka
The new scope you defined displays on the page. Ensure that you note and save the scope that you've configured. You'll need it to update OAuth connection later.
The scope and permissions are now configured. Next, you must configure the authorized client applications for your Microsoft Entra app.
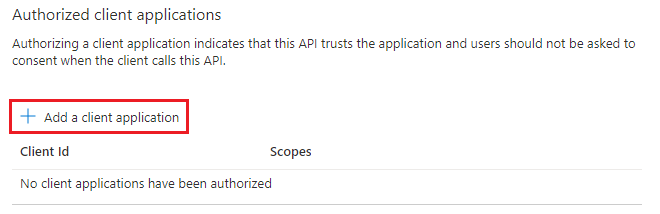
To configure authorized client application
Move through the Expose an API page to the Authorized client application section, and select + Add a client application.
The Add a client application page appears.
Enter the appropriate Microsoft 365 client ID for the applications that you want to authorize for your app’s web application.
Poznámka
The Microsoft 365 client IDs for mobile, desktop, and web applications for Teams, Microsoft 365 app, and Outlook are the actual IDs that you must add.
If your app has a tab app, you'll need either web or SPA, as you can't have a mobile or desktop client application in Teams.
Select one of the following client IDs:
Use client ID
For authorizing...
1fec8e78-bce4-4aaf-ab1b-5451cc387264
Teams mobile or desktop application
5e3ce6c0-2b1f-4285-8d4b-75ee78787346
Teams web application
4765445b-32c6-49b0-83e6-1d93765276ca
Microsoft 365 web application
0ec893e0-5785-4de6-99da-4ed124e5296c
Microsoft 365 desktop application
d3590ed6-52b3-4102-aeff-aad2292ab01c
Microsoft 365 mobile application Outlook desktop application
bc59ab01-8403-45c6-8796-ac3ef710b3e3
Outlook web application
27922004-5251-4030-b22d-91ecd9a37ea4
Outlook mobile application
Select the application ID URI you created for your app in Authorized scopes to add the scope to the web API you exposed.
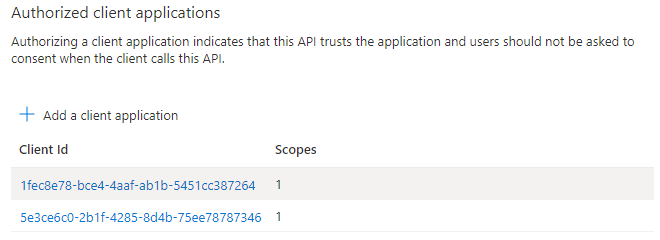
Select Add application.
A message appears on the browser stating that the authorized client app was added.
The authorized app's client ID displays on the page.
Poznámka
You can authorize more than one client application. Repeat the steps of this procedure for configuring another authorized client application.
You've successfully configured app scope, permissions, and client applications. Ensure that you note and save the application ID URI. Next, you configure the access token version.
Configure access token version
You must define the access token version for your app in the Microsoft Entra app manifest.
To define the access token version
Select Manage > Manifest from the left pane.
The Microsoft Entra app manifest appears.
Enter 2 as the value for the accessTokenAcceptedVersion property.
Select Save.
A message appears on the browser stating that the app manifest was updated successfully.
You've updated the access token version. Next, you'll create a client secret for your app.
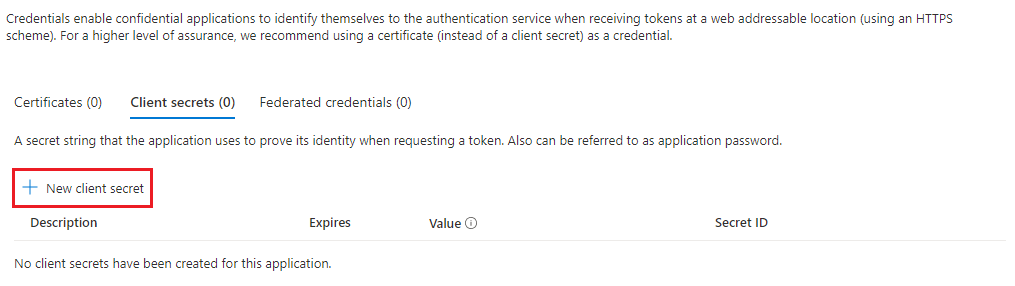
Create client secret
A client secret is a string that the application uses to prove its identity when requesting a token.
To create a client secret for your app
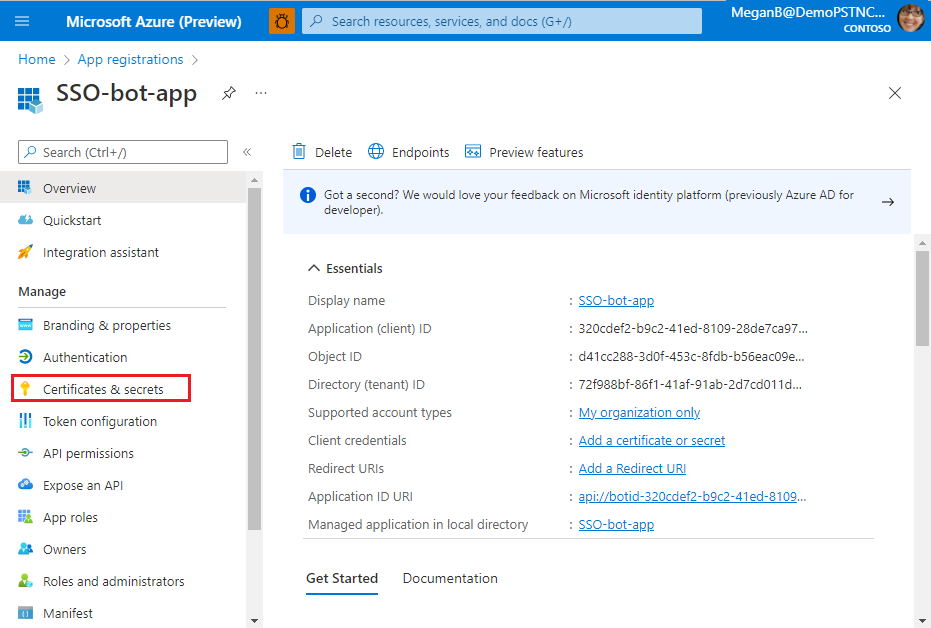
Select Manage > Certificates & secrets.
The Certificates & secrets page appears.
Select + New client secret.
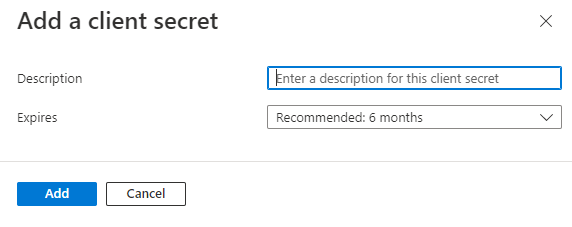
The Add a client secret page appears.
Enter the description.
Select the duration of validity for the secret.
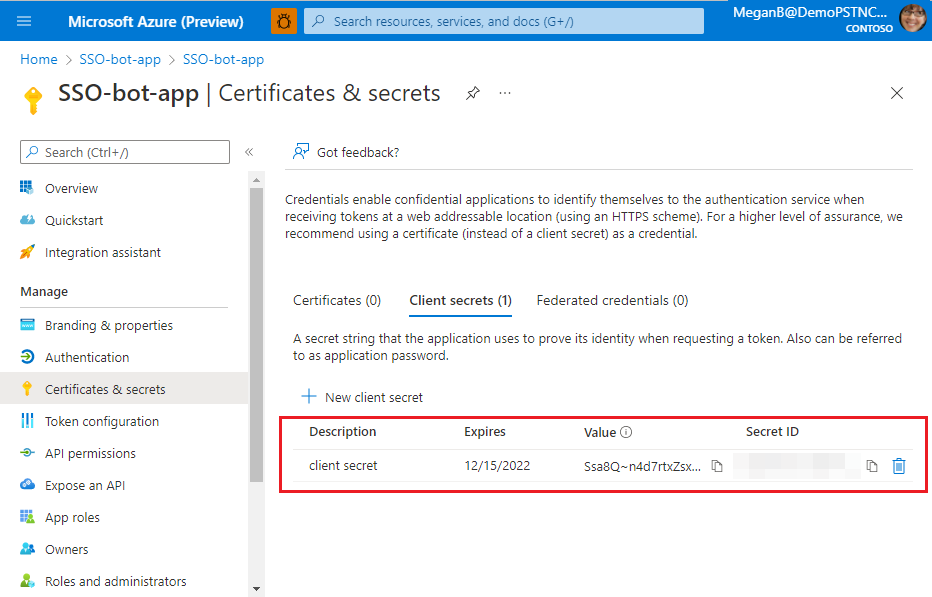
Select Add.
A message appears on the browser stating that the client secret was updated, and the client secret displays on the page.
Select the copy button next to the Value of client secret.
Save the value that you copied. You'll need it later for updating code.
Důležité
Ensure that you copy the value of client secret right after you create it. The value is visible only at the time when the client secret is created, and it can't be viewed after that.
You've configured the client secret. Next, you must configure the redirect URL.
Configure redirect URL
Configuration for authentication depends on the platform or device where you want to target your app. You may need to configure redirect URIs, authentication settings, or platform-specific details.
Poznámka
If your bot app hasn't been granted IT admin consent, app users have to provide consent the first time they use your app on a different platform.
Implicit grant is not required if SSO is enabled on a bot app.
You can configure authentication for multiple platforms as long as the URL is unique.
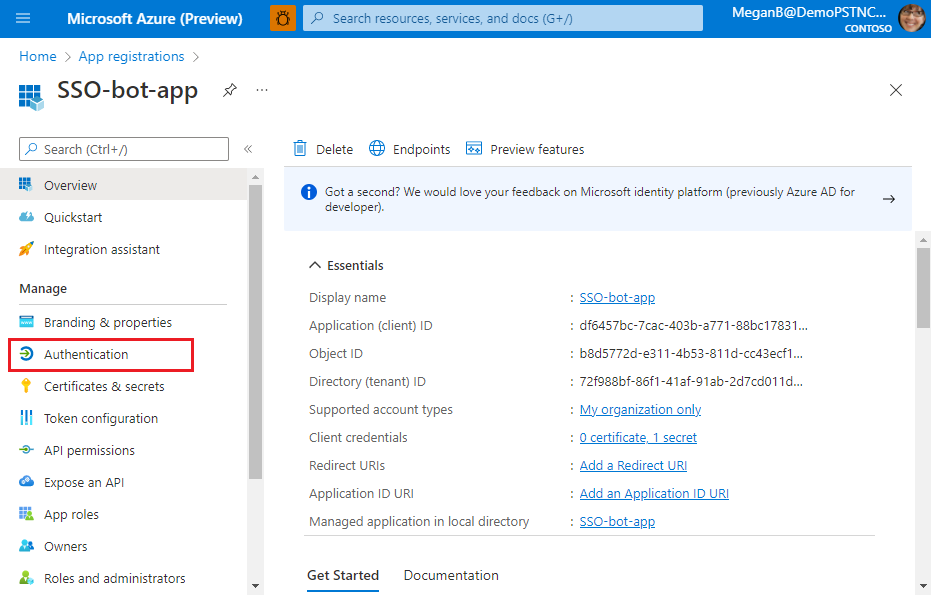
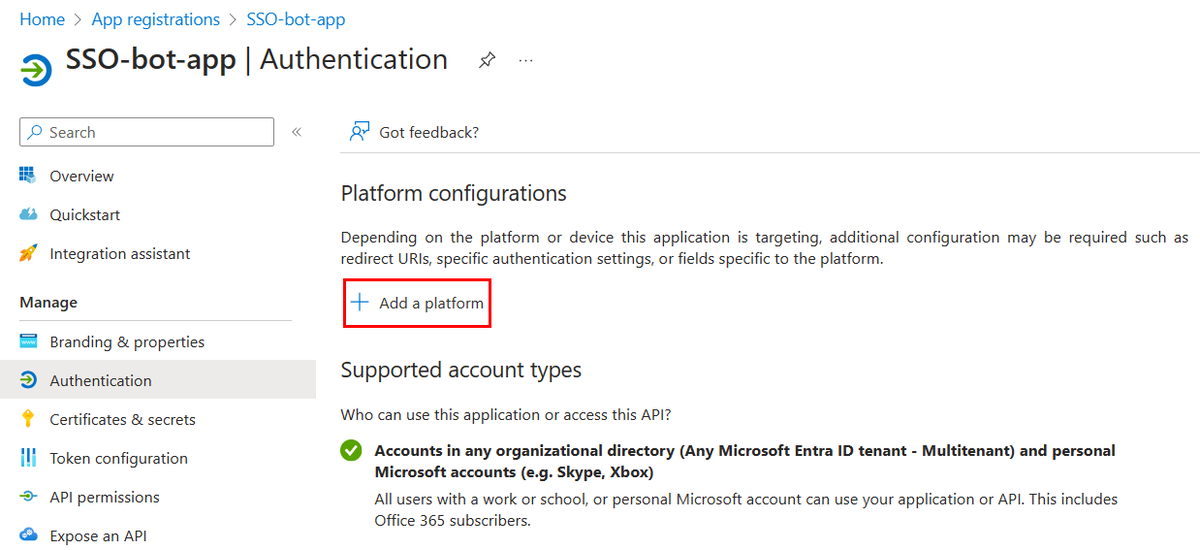
Select Manage > Authentication from the left pane.
The Platform configurations page appears.
Select + Add a platform.
The Configure platforms page appears.
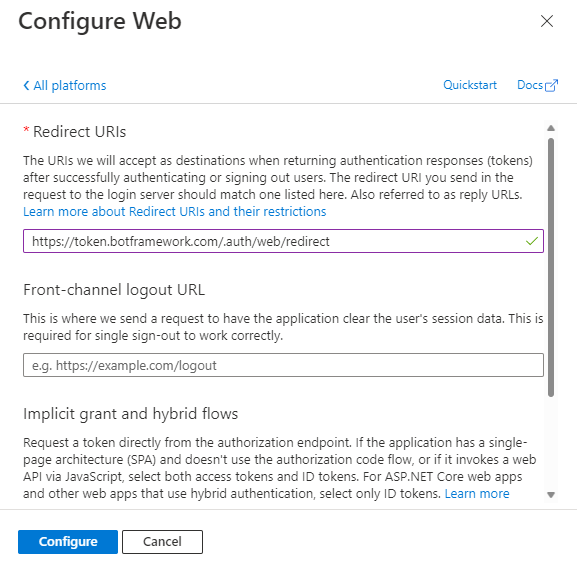
Select the platform that you want to configure for your app. You can select the platform type from Web or SPA.
The Configure Web page appears.
Poznámka
The configurations will be different based on the platform you select.
Enter the configuration details for the platform.
Enter the redirect URI. The URI should be unique.
Poznámka
The URL mentioned in Redirect URIs is an example.
Enter the front-channel logout URL.
Select the tokens you want Microsoft Entra ID to send for your app.
Select Configure.
The platform is configured and displayed in the Platform configurations page.
The Microsoft Entra app configuration is complete, and now you must enable SSO support for your bot resource by configuring OAuth connection.
Configure OAuth connection
For a bot to support SSO, you must update its OAuth connection settings. This process associates the bot with app details that you configured for your Microsoft Entra app:
Microsoft Entra app ID, which is the client ID
Tenant ID
Scope and permissions
With the app (client) ID and client secret provided, the Bot Framework Token Store exchanges the token for a graph token with defined permissions.
To update OAuth connection
Open the Azure portal on your web browser.
The Microsoft Azure Bot page opens.
Enter the name of your Microsoft Entra app in Search box, and open your app.
Select Settings > Configuration.
The Configuration page appears.
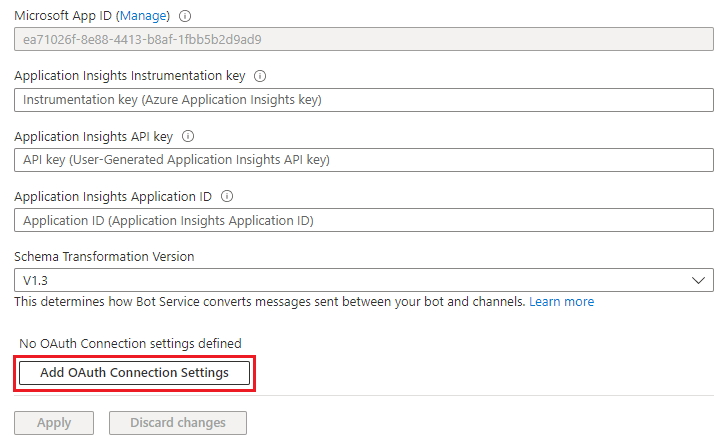
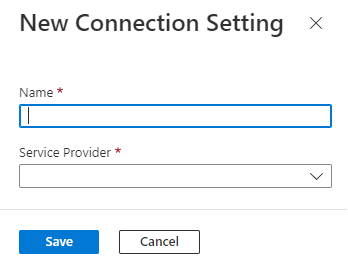
Move through the Configuration page and select Add OAuth Connection Settings.
The New Connection Setting page appears.
Enter the OAuth configuration settings for the Azure bot.
Enter a name for the configuration setting.
Select the service provider.
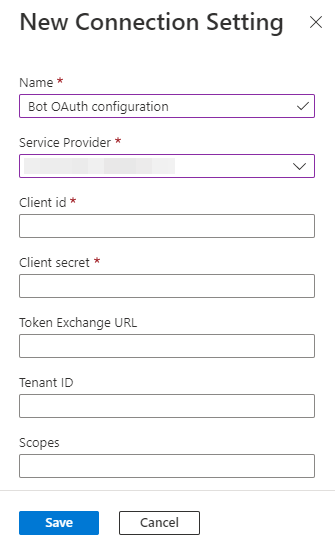
The remaining configuration details appear.
Enter the app (client) ID for the Microsoft Entra app.
Enter the client secret that you've created for your bot.
Enter the application ID URI of your bot in the Token Exchange URL.
Enter the tenant ID.
Enter the scope that you defined when you configured the scope and permissions.
Select Save.
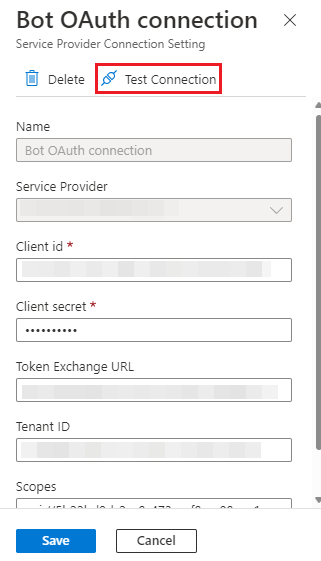
Select Apply.
After you've configured the OAuth connection, you can select Test connection to check if the OAuth connection is successful.
If the connection isn't successful, Microsoft Entra ID displays an error. You can verify all the configurations and test again.
Congratulations! You've completed the following app configurations in Microsoft Entra ID required to enable SSO for your bot app:
Application ID
Bot ID
Access token
Application ID URI
Scope, permissions, and authorized client IDs
Client secret
Redirect URL
Messaging endpoint and OAuth connection
To create and configure your app for enabling SSO in Microsoft Entra ID:
You must configure permissions and scopes, authorize client applications, update app manifest, and create client secret for your Microsoft Entra app. These configurations help invoke SSO for your bot app.
Důležité
Ensure that you've registered your app in Microsoft Entra ID. At registration, Microsoft Entra ID generates a new app ID that you must note. You'll need to update it later in the app manifest file.
Configure scope for access token
You must configure scope (permission) options for your Microsoft Entra app. You need it for sending access token to Teams client and authorize trusted client applications.
To configure scope and authorize trusted client applications, you'll need:
To configure API scope for your app: Define scope for the API and the users who can consent for a scope. You can let only admins provide consent for higher-privileged permissions.
To configure an authorized client application: Create authorized client IDs for applications that you want to pre-authorize. It allows the app user to access the app scopes (permissions) you've configured, without requiring any further consent. Pre-authorize only those client applications you trust as your app users won't have the opportunity to decline consent.
Enter the name of your bot resource in Search box, and then select Enter to open it.
Select Settings > Configuration.
The Configuration page appears.
Select Manage.
The Microsoft Entra app page appears.
The new app ID (client ID) for the app appears on this page. Note and save this app ID. You'll need to update it in the app manifest later. If you used the ID of an existing app when you created the bot resource, then ID of that app appears in this page.
Select Manage > Expose an API from the left pane.
The Expose an API page appears.
Select Add to generate application ID URI.
The section for setting application ID URI appears.
Enter the application ID URI in the format explained here.
The Application ID URI is pre-filled with app ID (GUID) in the format api://{AppID}.
Důležité
Standalone bot: If you're building a standalone bot, enter the application ID URI as api://botid-{YourBotId}. Here, {YourBotId} is your Microsoft Entra application ID.
Application ID URI for app with multiple capabilities: If you're building an app with a bot, a messaging extension, and a tab, enter the application ID URI as api://fully-qualified-domain-name.com/botid-{YourClientId}, where {YourClientId} is your bot app ID.
Format for domain name: Use lowercase letters for domain name. Don't use upper case.
For example, to create an app service or web app with resource name, 'demoapplication':
If base resource name used is
URL will be...
Format is supported on...
demoapplication
https://demoapplication.example.net
All platforms.
DemoApplication
https://DemoApplication.example.net
Desktop, web, and iOS only. It isn't supported in Android.
Use the lowercase option demoapplication as base resource name.
Select Save.
A message appears on the browser stating that the application ID URI was updated.
The application ID URI displays on the page.
Note and save the application ID URI. You'll need it for updating the app manifest later.
The application ID URI is configured. You can now define scope and permissions for your app.
To configure API scope for your app
Select + Add a scope in the Scopes defined by this API section.
The Add a scope page appears.
Enter the details for configuring scope.
Enter the scope name.
Select the user who can give consent for this scope. The default option is Admins only.
A message appears on the browser stating that the scope was added.
Poznámka
The new scope you defined displays on the page. Ensure that you note and save the scope that you've configured. You'll need it to update OAuth connection later.
The scope and permissions are now configured. Next, you must configure the authorized client applications for your Microsoft Entra app.
To configure an authorized client application
Move through the Expose an API page to the Authorized client application section, and select + Add a client application.
The Add a client application page appears.
Enter the appropriate Microsoft 365 client ID for the applications that you want to authorize for your app’s web application.
Poznámka
The Microsoft 365 client IDs for mobile, desktop, and web applications for Teams, Microsoft 365 app, and Outlook are the actual IDs that you must add.
If your app has a tab app, you'll need either web or SPA, as you can't have a mobile or desktop client application in Teams.
Select one of the following client IDs:
Use client ID
For authorizing...
1fec8e78-bce4-4aaf-ab1b-5451cc387264
Teams mobile or desktop application
5e3ce6c0-2b1f-4285-8d4b-75ee78787346
Teams web application
4765445b-32c6-49b0-83e6-1d93765276ca
Microsoft 365 web application
0ec893e0-5785-4de6-99da-4ed124e5296c
Microsoft 365 desktop application
d3590ed6-52b3-4102-aeff-aad2292ab01c
Microsoft 365 mobile application Outlook desktop application
bc59ab01-8403-45c6-8796-ac3ef710b3e3
Outlook web application
27922004-5251-4030-b22d-91ecd9a37ea4
Outlook mobile application
Select the application ID URI you created for your app in Authorized scopes to add the scope to the web API you exposed.
Select Add application.
A message appears on the browser stating that the authorized client app was added.
The authorized app's client ID displays on the page.
Poznámka
You can authorize more than one client application. Repeat the steps of this procedure for configuring another authorized client application.
You've successfully configured app scope, permissions, and client applications. Ensure that you note and save the application ID URI. Next, you configure the access token version.
Configure the access token version
You must define the access token version for your app in the Microsoft Entra app manifest.
To define access token version
Select Manage > Manifest from the left pane.
The Microsoft Entra app manifest appears.
Enter 2 as the value for the accessTokenAcceptedVersion property.
Select Save.
A message appears on the browser stating that the app manifest was updated successfully.
You've updated the access token version. Next step is to create a client secret for your app next.
Create client secret for your app
A client secret is a string that the application uses to prove its identity when requesting a token.
To create a client secret
Select Manage > Certificates & secrets.
The Certificates & secrets page appears.
Select + New client secret.
The Add a client secret page appears.
Enter the description.
Select the duration of validity for the secret.
Select Add.
A message appears on the browser stating that the client secret was updated, and the client secret displays on the page.
Select the copy button next to the Value of client secret.
Save the value that you copied. You'll need it later for updating code.
Důležité
Ensure that you copy the value of client secret right after you create it. The value is visible only at the time when the client secret is created, and it can't be viewed after that.
Configure redirect URL for your app
Configuration for authentication depends on the platform or device where you want to target your app. You may need to configure redirect URIs, authentication settings, or platform-specific details.
Poznámka
If your bot app hasn't been granted IT admin consent, app users have to provide consent the first time they use your app on a different platform.
Implicit grant is not required if SSO is enabled on a bot app.
You can configure authentication for multiple platforms as long as the URL is unique.
Select Manage > Authentication from the left pane.
The Platform configurations page appears.
Select + Add a platform.
The Configure platforms page appears.
Select the platform that you want to configure for your app. You can select the platform type from web or SPA.
The Configure Web page appears.
Poznámka
The configurations will be different based on the platform you select.
Enter the configuration details for the platform.
Enter the redirect URI. The URI should be unique.
Poznámka
The URL mentioned in Redirect URIs is an example.
Enter the front-channel logout URL.
Select the tokens you want Microsoft Entra ID to send for your app.
Select Configure.
The platform is configured and displayed in the Platform configurations page.
The configuration for Microsoft Entra app is complete, and now you can configure your bot resource for enabling SSO.
Configure bot resource in Microsoft Entra ID
Before you enable SSO for your bot app, you must create and configure your bot resource in Microsoft Entra ID. For more information, see Create Teams conversation bot.
Poznámka
Ensure that when you create your bot resource, you select the application ID of your Microsoft Entra app that you registered.
Configure messaging endpoint for your bot resource
Messaging endpoint is where messages are sent to your bot. It enables communication with your bot.
To configure messaging endpoint
Open the Azure portal on your web browser.
The Microsoft Azure Bot page opens.
Enter the name of your bot resource in Search box, and select Enter to open it.
Select Settings > Configuration.
The Configuration page appears.
Enter the messaging endpoint URL where your bot receives app user's messages.
Select Apply.
The messaging endpoint is configured.
Now, you must configure the OAuth connection to enable SSO for your bot resource.
Configure OAuth connection for your bot resource
For a bot to support SSO, you must update its OAuth connection settings. This process associates the bot with app details that you configured for your Microsoft Entra app:
Microsoft Entra app ID, which is the client ID
Tenant ID
Scope and permissions
With the app (client) ID and client secret provided, the Bot Framework Token Store exchanges the token for a graph token with defined permissions.
To update OAuth connection for your bot resource
Open the Azure portal on your web browser.
The Microsoft Azure Bot page opens.
Enter the name of your Microsoft Entra app in Search box, and open your app.
Select Settings > Configuration.
The Configuration page appears.
Move through the Configuration page and select Add OAuth Connection Settings.
The New Connection Setting page appears.
Enter the OAuth configuration settings for the Azure bot.
Enter a name for the configuration setting.
Select the service provider.
The remaining configuration details appear.
Enter the client ID that was generated when you created the bot app.
Enter the client secret that you've created for your bot.
Enter the application ID URI of your bot in the Token Exchange URL.
Enter the tenant ID.
Enter the scope that you defined when you configured the permissions.
Poznámka
For this tutorial, you can use openid profile User.Read User.ReadBasic.All as scope. This scope is suitable for using the Code sample.
Select Save.
Select Apply.
After you've configured the OAuth connection, you can select Test connection to check if the OAuth connection is successful.
If the connection isn't successful, Microsoft Entra ID displays an error. You can verify all configurations and test again.
Congratulations! You've completed the following app configurations in Microsoft Entra ID required to enable SSO for your bot app:
Application ID
Bot ID
Access token
Application ID URI
Scope, permissions, and authorized client IDs
Client secret
Redirect URL
Messaging endpoint and OAuth connection
Best practices
Keep the Microsoft Entra app registration restricted to its original purpose of service to service application.
For better control over disabling authentication connections, rolling secrets, or reusing the Microsoft Entra app with other applications, create an additional Microsoft Entra app for any user to service authentication.
If you use the Microsoft Entra registration app for authentication, you might encounter the following issues:
If you renew the certificate attached to the Microsoft Entra app registration, it affects the users who have authenticated with other Microsoft Entra services using the certificate.
It creates a single point of failure and control for all authentication-related activities with the bot.
Zdroj tohoto obsahu najdete na GitHubu, kde můžete také vytvářet a kontrolovat problémy a žádosti o přijetí změn. Další informace najdete v našem průvodci pro přispěvatele.
Zpětná vazba k produktu Platform Docs
Platform Docs je open source projekt. Vyberte odkaz pro poskytnutí zpětné vazby:
V tomto modulu prozkoumáme proces vytvoření registrace aplikace v Microsoft Entra ID. Pak prozkoumejte nastavení a možnosti konfigurace. Vytvoříte jednostrákovou aplikaci, zaregistrujete víceklientovou aplikaci a další možnosti. V rámci tohoto procesu se podíváme na udělení přístupu uživatelů k aplikacím a konfiguraci toho, jak a kdy může aplikaci a její data používat.
Learn about Single sign-on (SSO) authentication in Microsoft Teams and how to enable it in bots and message extension, user experience, and SSO in Teams at runtime.
Learn to update and configure the app manifest to enable SSO for bot and message extension, upload a custom app and preview, and SSO support in Developer Portal.
Learn how to add code configuration, handle an access token, receive token, and handle app user log out for enabling in Teams bots. Sample (C#, Node.js).
Learn how to enable authentication using third-party provider to a bot app in Teams using Entra ID. Learn to create and register bot resource group and service plan.