Creating a Data-Driven Coded UI Test
Note
This article applies to Visual Studio 2015. If you're looking for the latest Visual Studio documentation, see Visual Studio documentation. We recommend upgrading to the latest version of Visual Studio. Download it here
To test different conditions, you can run your tests multiple times with different parameter values. Data-driven coded UI tests are a convenient way to do this. You define parameter values in a data source, and each row in the data source is an iteration of the coded UI test. The overall result of the test will be based on the outcome for all the iterations. For example, if one test iteration fails, the overall test result is failure.
Requirements
- Visual Studio Enterprise
Create a data-driven coded UI test
This sample creates a coded UI test that runs on the Windows Calculator application. It adds two numbers together and uses an assertion to validate that the sum is correct. Next, the assertion and the parameter values for the two numbers are coded to become data-driven and stored in a comma-separated value (.csv) file.
Step 1 - Create a coded UI test
Create a project.

Choose to record the actions.

Open the calculator app and start recording the test.

Add 1 plus 2, pause the recorder, and generate the test method. Later we’ll replace the values of this user input with values from a data file.

Close the test builder. The method is added to the test:
[TestMethod]
public void CodedUITestMethod1()
{
    // To generate code for this test, select "Generate Code for Coded UI Test" from the shortcut menu and select one of the menu items.
    this.UIMap.AddNumbers();

}
Use the
AddNumbers()method to verify that the test runs. Place the cursor in the test method shown above, open the context menu, and choose Run Tests. (Keyboard shortcut: Ctrl + R, T).The test result that shows if the test passed or failed is displayed in the Test Explorer window. To open the Test Explorer window, from the TEST menu, choose Windows and then choose Test Explorer.
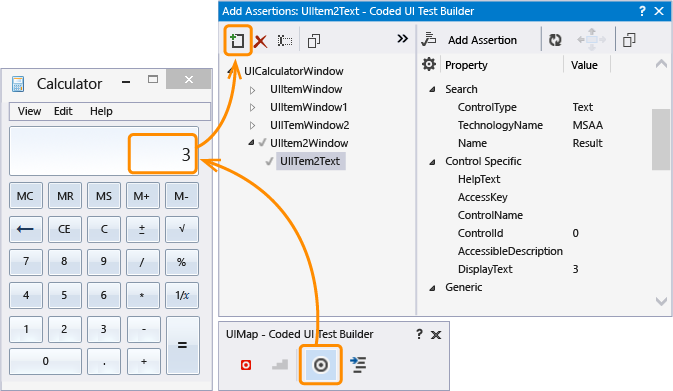
Because a data source can also be used for assertion parameter values—which are used by the test to verify expected values—let’s add an assertion to validate that the sum of the two numbers is correct. Place the cursor in the test method shown above, open the context menu and choose Generate Code for Coded UI Test, and then Use Coded UI Test Builder.
Map the text control in the calculator that displays the sum.

Add an assertion that validates that the value of the sum is correct. Choose the DisplayText property that has the value of 3 and then choose Add Assertion. Use the AreEqual comparator and verify that the comparison value is 3.

After configuring the assertion, generate code from the builder again. This creates a new method for the validation.

Because the
ValidateSummethod validates the results of theAddNumbersmethod, move it to the bottom of the code block.public void CodedUITestMethod1() { // To generate code for this test, select "Generate Code for Coded UI Test" from the shortcut menu and select one of the menu items. this.UIMap.AddNumbers(); this.UIMap.ValidateSum(); }Verify that the test runs by using the
ValidateSum()method. Place the cursor in the test method shown above, open the context menu, and choose Run Tests. (Keyboard shortcut:Ctrl + R, T).At this point, all the parameter values are defined in their methods as constants. Next, let’s create a data set to make our test data-driven.
Step 2 - Create a data set
Add a text file to the dataDrivenSample project named
data.csv.
Populate the .csv file with the following data:
Num1 Num2 Sum 3 4 7 5 6 11 6 8 14 After adding the data, the file should appear as the following:

It is important to save the .csv file using the correct encoding. On the FILE menu, choose Advanced Save Options and choose Unicode (UTF-8 without signature) – Codepage 65001 as the encoding.
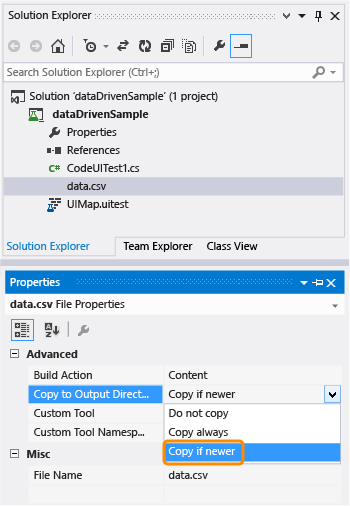
The .csv file, must be copied to the output directory, or the test can’t run. Use the Properties window to copy it.

Now that we have the data set created, let’s bind the data to the test.
Step 3 – Add data source binding
To bind the data source, add a
DataSourceattribute within the existing[TestMethod]attribute that is immediately above the test method.[DataSource("Microsoft.VisualStudio.TestTools.DataSource.CSV", "|DataDirectory|\\data.csv", "data#csv", DataAccessMethod.Sequential), DeploymentItem("data.csv"), TestMethod] public void CodedUITestMethod1() { // To generate code for this test, select "Generate Code for Coded UI Test" from the shortcut menu and select one of the menu items. this.UIMap.AddNumbers(); this.UIMap.ValidateSum(); }The data source is now available for you to use in this test method.
Tip
See data source attribute samples in the Q & A section for samples of using other data source types such as XML, SQL Express and Excel.
Run the test.
Notice that the test runs through three iterations. This is because the data source that was bound contains three rows of data. However, you will also notice that the test is still using the constant parameter values and is adding 1 + 2 with a sum of 3 each time.
Next, we’ll configure the test to use the values in the data source file.
Step 4 – Use the data in the coded UI test
Add
using Microsoft.VisualStudio.TestTools.UITesting.WinControlsto the top of the CodedUITest.cs file:using System; using System.Collections.Generic; using System.Text.RegularExpressions; using System.Windows.Input; using System.Windows.Forms; using System.Drawing; using Microsoft.VisualStudio.TestTools.UITesting; using Microsoft.VisualStudio.TestTools.UnitTesting; using Microsoft.VisualStudio.TestTools.UITest.Extension; using Keyboard = Microsoft.VisualStudio.TestTools.UITesting.Keyboard; using Microsoft.VisualStudio.TestTools.UITesting.WinControls;Add
TestContext.DataRow[]in theCodedUITestMethod1()method which will apply values from the data source. The data source values override the constants assigned to UIMap controls by using the controlsSearchProperties:public void CodedUITestMethod1() { // To generate code for this test, select "Generate Code for Coded UI Test" from the shortcut menu and select one of the menu items. this.UIMap.UICalculatorWindow.UIItemWindow.UIItem1Button.SearchProperties[WinButton.PropertyNames.Name] = TestContext.DataRow["Num1"].ToString();this.UIMap.UICalculatorWindow.UIItemWindow21.UIItem2Button.SearchProperties[WinButton.PropertyNames.Name] = TestContext.DataRow["Num2"].ToString(); this.UIMap.AddNumbers(); this.UIMap.ValidateSumExpectedValues.UIItem2TextDisplayText = TestContext.DataRow["Sum"].ToString(); this.UIMap.ValidateSum(); }To figure out which search properties to code the data to, use the Coded UI Test Editor.
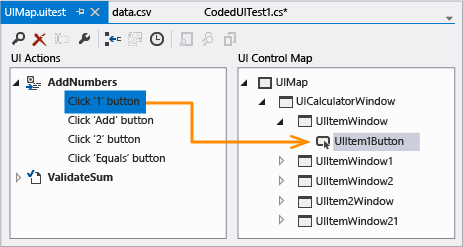
Open the UIMap.uitest file.

Choose the UI action and observe the corresponding UI control mapping. Notice how the mapping corresponds to the code, for example,
this.UIMap.UICalculatorWindow.UIItemWindow.UIItem1Button.
In the Properties Window, open Search Properties. The search properties Name value is what is being manipulated in the code using the data source. For example, the
SearchPropertiesis being assigned the values in the first column of each data row:UIItem1Button.SearchProperties[WinButton.PropertyNames.Name] = TestContext.DataRow["Num1"].ToString();. For the three iterations, this test will change the Name value for the search property to 3, then 5, and finally 6.
Save the solution.
Step 5 – Run the data-driven test
Verify that the test is now data-driven by running the test again.
You should see the test run through the three iterations using the values in the .csv file. The validation should work as well and the test should display as passed in the Test Explorer.
Guidance
For additional information, see Testing for Continuous Delivery with Visual Studio 2012 – Chapter 2: Unit Testing: Testing the Inside and Testing for Continuous Delivery with Visual Studio 2012 – Chapter 5: Automating System Tests
Q & A
What are the data source attributes for other data source types, such as SQL Express or XML?
You can use the sample data source strings in the table below by copying them to your code and making the necessary customizations.
Data Source Types and Attributes
CSV
[DataSource("Microsoft.VisualStudio.TestTools.DataSource.CSV", "|DataDirectory|\\data.csv", "data#csv", DataAccessMethod.Sequential), DeploymentItem("data.csv"), TestMethod]Excel
DataSource("System.Data.Odbc", "Dsn=ExcelFiles;Driver={Microsoft Excel Driver (*.xls)};dbq=|DataDirectory|\\Data.xls;defaultdir=.;driverid=790;maxbuffersize=2048;pagetimeout=5;readonly=true", "Sheet1$", DataAccessMethod.Sequential), DeploymentItem("Sheet1.xls"), TestMethod]Test case in Team Foundation Server
[DataSource("Microsoft.VisualStudio.TestTools.DataSource.TestCase", "http://vlm13261329:8080/tfs/DefaultCollection;Agile", "30", DataAccessMethod.Sequential), TestMethod]XML
[DataSource("Microsoft.VisualStudio.TestTools.DataSource.XML", "|DataDirectory|\\data.xml", "Iterations", DataAccessMethod.Sequential), DeploymentItem("data.xml"), TestMethod]SQL Express
[DataSource("System.Data.SqlClient", "Data Source=.\\sqlexpress;Initial Catalog=tempdb;Integrated Security=True", "Data", DataAccessMethod.Sequential), TestMethod]
Q: Can I use data-driven tests on my Windows Phone app?
A: Yes. Data-driven Coded UI tests for Windows Phone are defined using the DataRow attribute on a test method. In the following example, x and y use the values of 1 and 2 for the first iteration and -1 and -2 for the second iteration of the test.
[DataRow(1, 2, DisplayName = "Add positive numbers")]
[DataRow(-1, -2, DisplayName = "Add negative numbers")]
[TestMethod]
public void DataDrivingDemo_MyTestMethod(int x, int y)
Q: Why can’t I modify the code in the UIMap.Designer file?
A: Any code changes you make in the UIMapDesigner.cs file will be overwritten every time you generate code using the UIMap - Coded UI Test Builder. In this sample, and in most cases, the code changes needed to enable a test to use a data source can be made to the test's source code file (that is, CodedUITest1.cs).
If you have to modify a recorded method, you must copy it to UIMap.cs file and rename it. The UIMap.cs file can be used to override methods and properties in the UIMapDesigner.cs file. You must remove the reference to the original method in the Coded UITest.cs file and replace it with the renamed method name.