View and manage event attendance
As people register for an event, an event registration record is created. On the day of the event, you'll want to capture which of those registrants attended the event. Dynamics 365 has capabilities that help you capture these check-ins automatically or manually.
For both types of events, you can also check in registrants automatically using the built-in tools described in the previous module. You can also check-in registrants manually.
View event check-ins
To view check-ins for all events, go to Event planning > Participants > Check-ins. Note that check-in records can be created at the event level or at the session level. The list view of check-ins captures all check-ins across events and sessions.
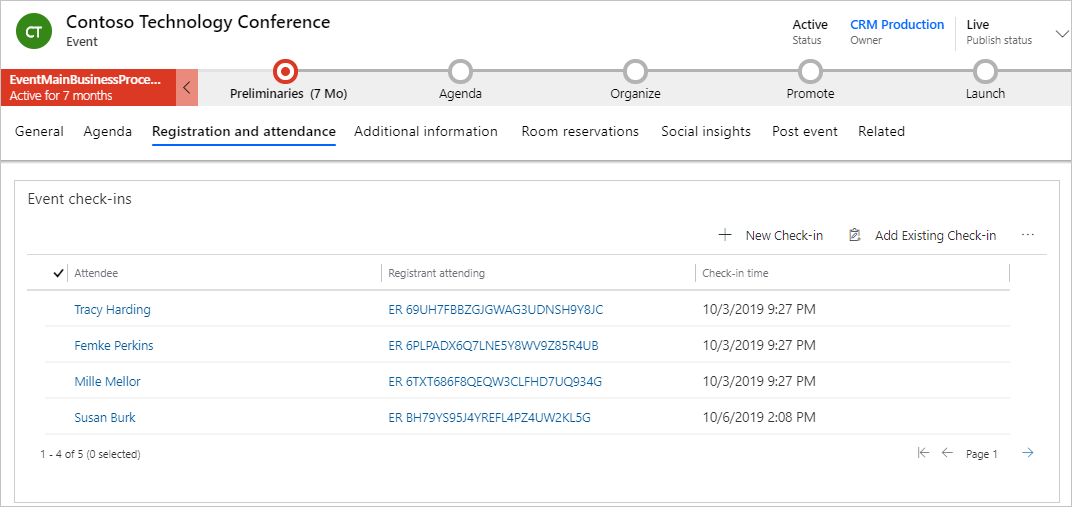
To view check-ins for a specific event, go to Event planning > Event > Events, open the event record, and then go to the Registration and attendance tab. The Event check-ins section shows all current attendees that have checked in to your event.
To view check-ins for a specific session, go to Event planning > Participants > Check-ins. Filter the Sessions attended column to the desired session.
Check in registrants automatically
For Teams webinar events, the check-in process is accomplished by sending registrants an email with the attendee URL. The Join in Teams button generates a unique attendee URL for each registrant. When the registrant selects the button, the Customer Insights - Journeys app creates a relevant check-in record for them, giving insights about the Teams event attendance in Customer Insights - Journeys. For more information, see Inviting registrants to attend the Teams event through email.
For non-Teams webinar events, the check-in process is usually accomplished through the integration with the webinar provider. When an attendee joins the webinar by selecting the attendee URL that was sent to them, a record is generated in the external platform, which is later synced back to Dynamics 365 Customer Insights - Journeys.
For on-site events, you can use the QR functionality that the Events module includes for a seamless check-in experience for your attendees. After your guests have checked in, these records can be viewed within the event record. For more information, see Event registration QR code elements.
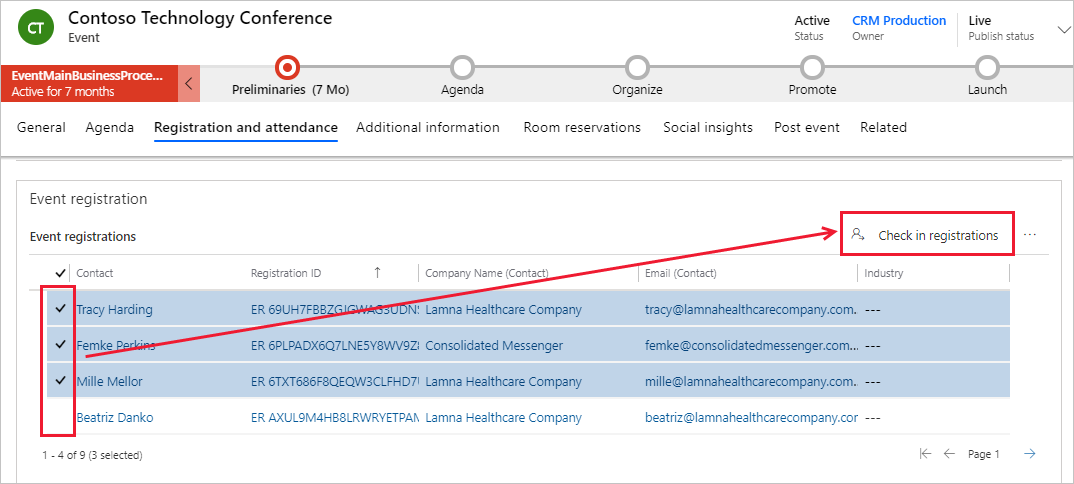
Check in registrants manually
To check in registrants manually, follow these steps:
Open the Event planning work area and go to Event > Events.
Open the event.
Go to the Registration and attendance tab.
In the Event registration section, select the check mark column to the left of the contact(s) that you want to check in.
After you have selected the contact(s) that you want to check in, select Check in registrations on the right.
A pop-up message will appear asking you to confirm that you want to check in the selected registrations. Select OK.
After you check in your selected contacts, you can scroll down to the Event check-ins section to view your checked-in attendees.
For more information, see Register attendees for events, sessions, and passes.