How to configure Kerberos Constrained Delegation for Web Enrollment proxy pages
The article provides step-by-step instructions to implement Service for User to Proxy (S4U2Proxy) or Kerberos Only Constrained Delegation on a custom service account for Web Enrollment proxy pages.
Original KB number: 4494313
Summary
This article provides step-by-step instructions to implement Service for User to Proxy (S4U2Proxy) or Kerberos-only constrained delegation for Web Enrollment proxy pages. This article describes the following configuration scenarios:
- Configuring delegation for a custom service account
- Configuring delegation to the NetworkService account
Note
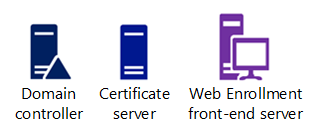
The workflows that are described in this article are specific to a particular environment. The same workflows may not work for a different situation. However, the principles remain the same. The following figure summarizes this environment.
Scenario 1: Configure constrained delegation for a custom service account
This section describes how to implement Service for User to Proxy (S4U2Proxy) or Kerberos-only constrained delegation when you use a custom service account for the Web Enrollment proxy pages.
1. Add an SPN to the service account
Associate the service account with a Service Principal Name (SPN). To do this, follow these steps:
In Active Directory Users and Computers, connect to the domain, and then select PKI > PKI Users.
Right-click the service account (for example, web_svc), and then select Properties.
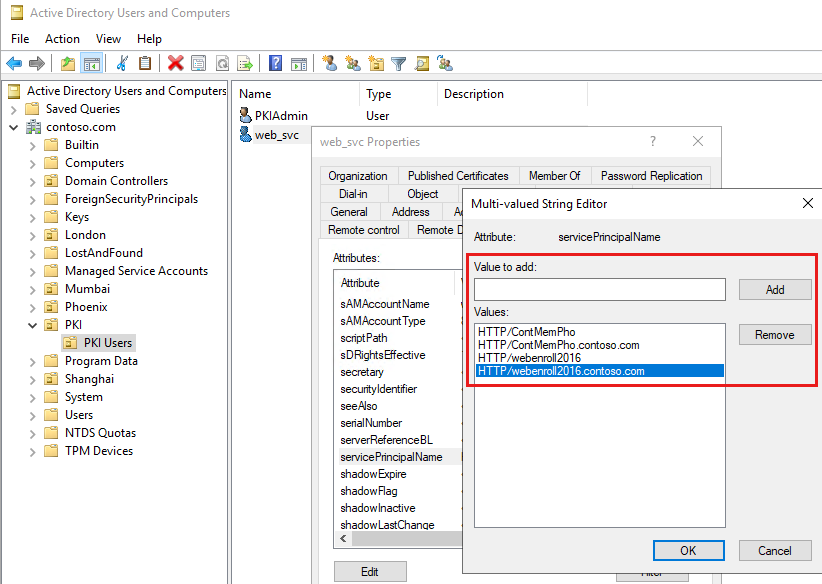
Select Attribute Editor > servicePrincipalName.
Type the new SPN string, select Add (as shown in the following figure), and then select OK.
You can also use Windows PowerShell to configure the SPN. To do this, open an elevated PowerShell window, and then run
setspn -s SPN Accountname. For example, run the following command:setspn -s HTTP/webenroll2016.contoso.com web_svc
2. Configure the delegation
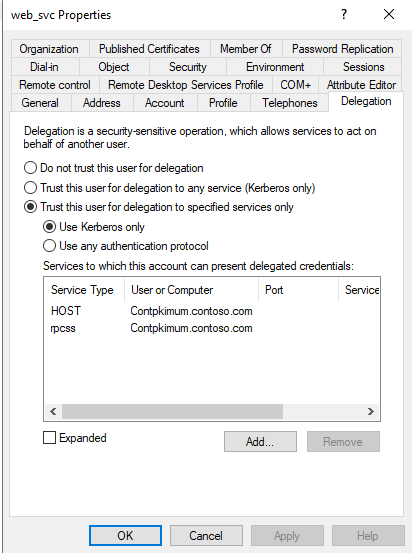
Configure S4U2proxy (Kerberos only) constrained delegation on the service account. To do this, in the Properties dialog box of the service account (as described in the previous procedure), select Delegation > Trust this user for delegation to specified services only. Make sure that Use Kerberos only is selected.
Close the dialog box.
In the console tree, select Computers, and then select the computer account of the Web Enrollment front-end server.
Note
This account is also known as the "machine account."
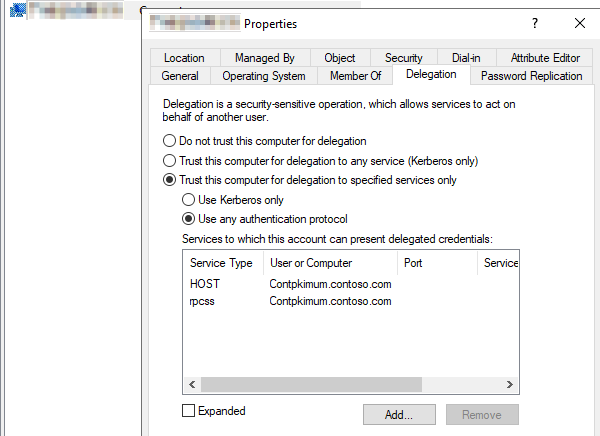
Configure S4U2self (Protocol Transition) constrained delegation on the computer account. To do this, right-click the computer account, and then select Properties > Delegation > Trust this computer for delegation to specified services only. Select Use any authentication protocol.
3. Create and bind the SSL certificate for web enrollment
To enable the web enrollment pages, create a domain certificate for the website, and then bind it to the Default Web Site. To do this, follow these steps:
Open Internet Information Services (IIS) Manager.
In the console tree, select <HostName>, and then select Server Certificates.
Note
<HostName> is the name of the front-end web server.
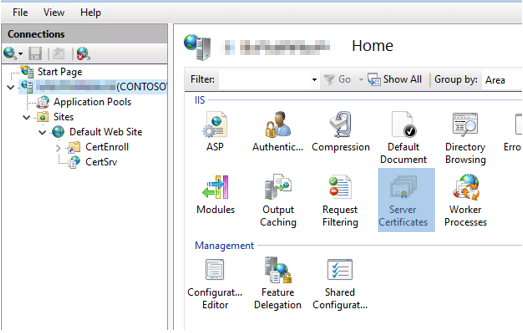
In the Actions menu, select Create a Domain Certificate.
After the certificate is created, select Default Web Site in the console tree, and then select Bindings.
Make sure that Port is set to 443. Then under SSL certificate, select the certificate that you created in step 3.
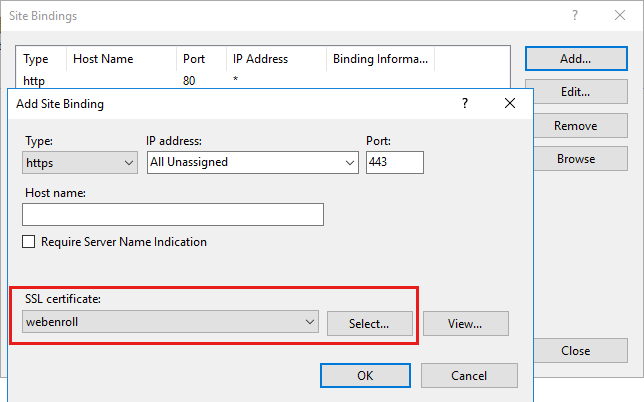
Select OK to bind the certificate to port 443.
4. Configure the Web Enrollment front-end server to use the service account
Important
Make sure that the service account is part of either the local administrators or IIS_Users group on the web server.

Right-click DefaultAppPool, and then select Advanced Settings.

Select Process Model > Identity, select Custom account, and then select Set. Specify the name and password of the service account.
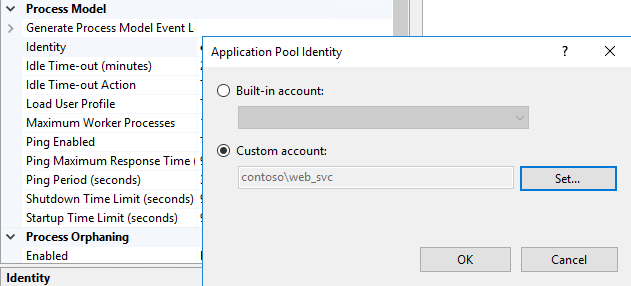
Select OK in the Set Credentials and Application Pool Identity dialog boxes.
In Advanced Settings, locate Load User Profile, and make sure that it's set to True.
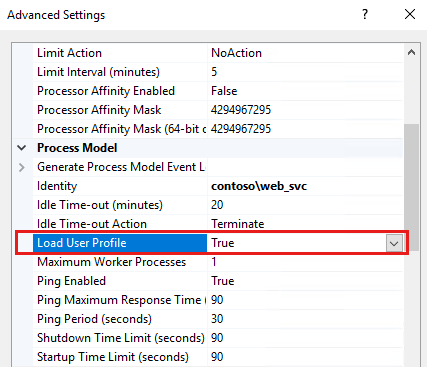
Restart the computer.
Scenario 2: Configure constrained delegation on the NetworkService account
This section describes how to implement S4U2Proxy or Kerberos-only constrained delegation when your use the NetworkService account for the Web Enrollment proxy pages.
Optional step: Configure a name to use for connections
You can assign a name to the Web Enrollment role that clients can use to connect. This configuration means that incoming requests do not have to know the computer name of the Web Enrollment front-end server, or other routing information such as the DNS canonical name (CNAME).
For example, suppose the computer name of your Web Enrollment server is WEBENROLLMAC (in the Contoso domain). You want incoming connections to use the name ContosoWebEnroll instead. In this case, the connection URL would be the following:
https://contosowebenroll.contoso.com/certsrv
It would not be the following:
https://WEBENROLLMAC.contoso.com/certsrv
To use such a configuration, follow these steps:
In the DNS zone file for the domain, create an alias record or a host name record that maps the new connection name to the Web Enrollment role IP address. Use the Ping tool to test the routing configuration.
In the example that was previously discussed, the
Contoso.comzone file has an alias record that maps ContosoWebEnroll to the IP address of the Web Enrollment role.Configure the new name as an SPN for the Web Enrollment front-end server. To do this, follow these steps:
- In Active Directory Users and Computers, connect to the domain, and then select Computers.
- Right-click the computer account of the Web Enrollment front-end server, and then select Properties.
Note
This account is also known as the "machine account."
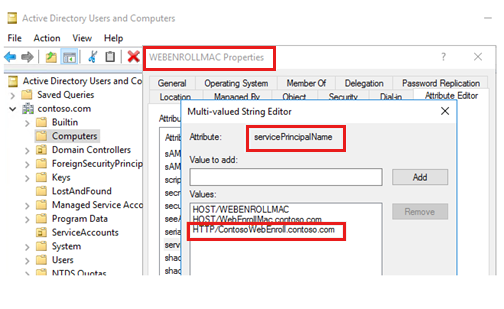
- Select Attribute Editor > servicePrincipalName.
- Type HTTP/<ConnectionName>.<DomainName.com>, select Add, and then select OK.
Note
In this string, <ConnectionName> is the new name that you have defined, and <DomainName> is the name of the domain. In the example, the string is HTTP/ContosoWebEnroll.contoso.com.
1. Configure the delegation
If you haven't already connected to the domain, do this now in Active Directory Users and Computers, and then select Computers.
Right-click the computer account of the Web Enrollment front-end server, and then select Properties.
Note
This account is also known as the "machine account."
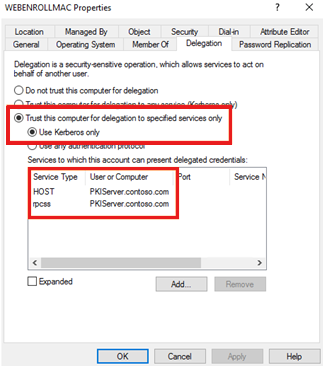
Select Delegation, and then select Trust this computer for delegation to specified services only.
Note
If you can guarantee that clients will always use Kerberos authentication when they connect to this server, select Use Kerberos only. If some clients will use other authentication methods, such as NTLM or forms-based authentication, select Use any authentication protocol.
2. Create and bind the SSL certificate for web enrollment
To enable the web enrollment pages, create a domain certificate for the website, and then bind it to the default first site. To do this, follow these steps:
Open IIS Manager.
In the console tree, select <HostName>, and then select Server Certificates in the actions pane.
Note
<HostName> is the name of the front-end web server.

In the Actions menu, select Create a Domain Certificate.
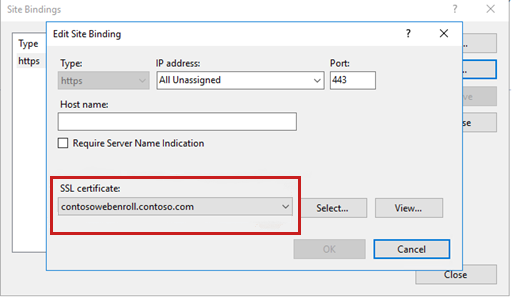
After the certificate is created, select Default Web Site, and then select Bindings.
Make sure that Port is set to 443. Then, under SSL certificate, select the certificate that you created in step 3. Select OK to bind the certificate to port 443.
3. Configure the Web Enrollment front-end server to use the NetworkService account
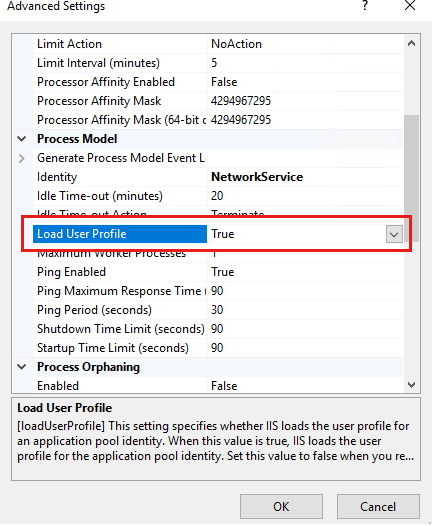
Right-click DefaultAppPool, and then select Advanced Settings.

Select Process Model > Identity. Make sure that Built-in account is selected, and then select NetworkService. Then, select OK.
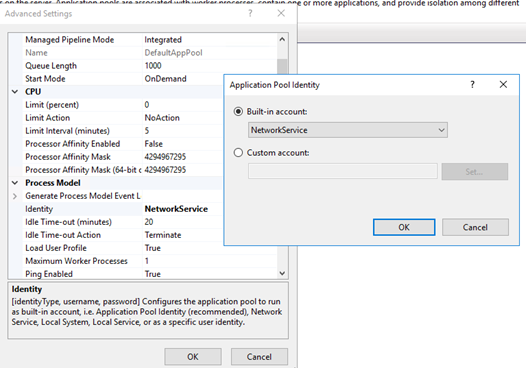
In Advanced Properties, locate Load User Profile, and then make sure that it's set to True.
Restart the IIS service.
Related topics
For more information about these processes, see Authenticating Web Application Users.
For more information about the S4U2self and S4U2proxy protocol extensions, see the following articles: