Poznámka
Přístup k této stránce vyžaduje autorizaci. Můžete se zkusit přihlásit nebo změnit adresáře.
Přístup k této stránce vyžaduje autorizaci. Můžete zkusit změnit adresáře.
Note
This feature is rolling out gradually to all customers with more than 50 Copilot assigned licenses.
As an admin, you can configure several features of the Microsoft Copilot Dashboard and the Viva Insights web app. With these settings, for example, you can control who can access the dashboard, upload organizational data, create an exclusion list, upload aggregated survey data, and set the minimum group size for generating insights. Let's review them.
Note
In addition to the roles described below, all settings can also be managed by Microsoft 365 Global Administrators.
Important
Previous controls to manage access to the dashboard using the Copilot Dashboard control in the Microsoft 365 admin center or using Powershell are no longer available. You can manage access to the dashboard by enabling or disabling the Viva Insights web app. Learn how.
Manage access to the Viva Insights web app for individual users and groups
Applies to: AI Administrator
Note
When you add or remove users to the Viva Insights web app, the change will go into effect in 24 hours.
You can turn access to the Viva Insights web app on or off for individual users or groups using Microsoft Entra ID.
In the Microsoft 365 admin center:
Go to the Settings tab and select Setup. You need to enter your credentials if you're not already signed in.
At the top, select Set up and manage settings.
Under Microsoft Copilot Dashboard, select Manage access settings for Microsoft Copilot Dashboard.
To enable access for new individual users:
At the top, select Users. Search for the people you'd like to add, and select them from the list.
At the bottom, select Add.
To enable access for new groups:
At the top, select Groups. Search for the Entra ID groups you'd like to add, and select them from the list.
At the bottom, select Add.
To disable access for existing report users:
To remove access for individual users, at the top, select Users. To remove access for entire Entra ID groups, select Groups.
Select the users or groups from the list for whom you'd like to remove access.
Select Remove selected users or Remove selected groups.
Enable or disable the Viva Insights web app
Applies to: AI Administrator
The Viva Insights web app is on by default. The AI admin can turn the Viva Insights web app on or off at the tenant, group, or user level using the Viva Insights web app feature access management control in the Microsoft 365 admin center. Turning this control off disables the entire app, which includes the Microsoft Copilot Dashboard, Copilot Analytics reports, and advanced analysis and admin tools.
If you previously removed access to the Copilot Dashboard using Copilot Dashboard feature access management control or Powershell, those configurations now apply to the entire Viva Insights web app. For example, if you disabled Copilot Dashboard for the tenant, the Viva Insights web app would also be disabled for the tenant.
Example: Turn off the Viva Insights web app for all users in your tenant
ModuleId : VivaInsights
FeatureId : Viva Insights web app
Name : DisableFeatureForAll
IsFeatureEnabled : false
Everyone
Turn off Viva Insights web app auto-enablement with Powershell
Applies to: AI Administrator
This feature access control allows AI Administrators to enable or disable the auto-enablement feature for the Viva Insights web app in their tenant. This control supports tenant-level policies only, not user or group-level policies. You can set tenant polices using PowerShell cmdlets. Learn more about how to set these policies. Learn more about how to set these policies.
Default state: Enabled, meaning that eligible users will be auto-enabled for access to the dashboard based on the identification criteria.
Disable or enable: Admins can disable the dashboard auto-enablement control for their entire tenant using PowerShell cmdlets. Disabling the control prevents any user from getting auto-enabled for access to the dashboard.
Note
User- and group-level policies aren't supported for this feature and will not take effect if used.
Connect to Exchange Online and, when prompted, sign in with your admin credentials.
After you’ve signed in, you can manage access for your tenant using the Add-VivaModuleFeaturePolicy cmdlet: Add-VivaModuleFeaturePolicy.
Example: Turn off dashboard auto-enablement for your tenant
 ModuleId : VivaInsights
 FeatureId : AutoCxoIdentification
 Name : DisableFeatureForAll
 IsFeatureEnabled : false
 Everyone
Delegate access to the dashboard
If you have access to the dashboard, you can also delegate access to the dashboard to other people in your company. Learn how.
Note
Employees can view the dashboard in the Viva Insights web app.
Upload organizational data for the dashboard
For Viva Insights customers
Applies to: Viva Insights Administrator
Note
This data upload process will go into effect within seven days.
If your company has Viva Insights licenses, your Viva Insights Administrator can continue to upload organizational data through the Viva Insights web app as explained here. Your Microsoft 365 Global Administrator may choose to upload more organizational attributes through the Microsoft 365 admin center using these steps.
There are two ways you can upload Organizational data:
Your Viva Insights Administrator can upload data through the Viva Insights web app using these steps. This is the recommended way to upload data if you have Viva Insights.
- Learn more about data quality in the Viva Insights web app.
- To avoid more delays on data showing in the dashboard, the Viva Insights Administrator should include EffectiveDate fields and set the date earlier than the upload date. Learn more.
Your Microsoft 365 Global Administrator can upload data through the admin center using these steps.
If the Viva Insights Administrator and Microsoft 365 Global Administrator both upload data, the dashboard displays insights based on the merge of the uploads and show data based on the more recent upload. The uploaded .csv file should include the required attributes shown below, otherwise the data won't show in the dashboard.
Below are the attributes that are used in the Copilot Dashboard. Your admin should use the exact same attribute names as below when uploading correspondingly.
Attribute names for organizational data in Viva Insights Attribute names for organizational data in Microsoft 365 Required or optional for Copilot Dashboard PersonId Microsoft_PersonEmail Required ManagerId Microsoft_ManagerEmail Required Organization Microsoft_Organization Required FunctionType Microsoft_JobDiscipline Optional. The “Job function” filter in the dashboard will be available if this attribute is uploaded.
For Copilot customers
Applies to: Microsoft 365 Global Administrator
Note
This data upload process will go into effect within seven days.
If your company has Copilot licenses but not Viva Insights licenses, you can upload organizational data through the Microsoft 365 admin center using these steps.
Below are the attributes used in the dashboard. The admin should use the exact same attribute names as below when uploading the data.
| Attribute names for organizational Data in Microsoft 365 | Required or optional for Copilot Dashboard |
|---|---|
| Microsoft_PersonEmail | Required |
| Microsoft_ManagerEmail | Required |
| Microsoft_Organization | Required |
| Microsoft_JobDiscipline | Optional. The “Job function” filter in the dashboard will be available if this attribute is uploaded. |
Upload aggregated survey results for the dashboard
Applies to: Microsoft 365 Global Administrator
You can also upload aggregated survey responses to enable a summary view of Copilot sentiment for the entire company. Learn how using these steps. If you use this upload method, filters and heat maps are not supported. Filters and heat maps are only available to customers with a Viva Insights license.
Note
If you upload survey data both as a .csv file and as aggregated results through the Microsoft 365 admin center, only the .csv survey results are shown in the dashboard. If you subsequently delete the .csv data, then the aggregated results are shown in the dashboard.
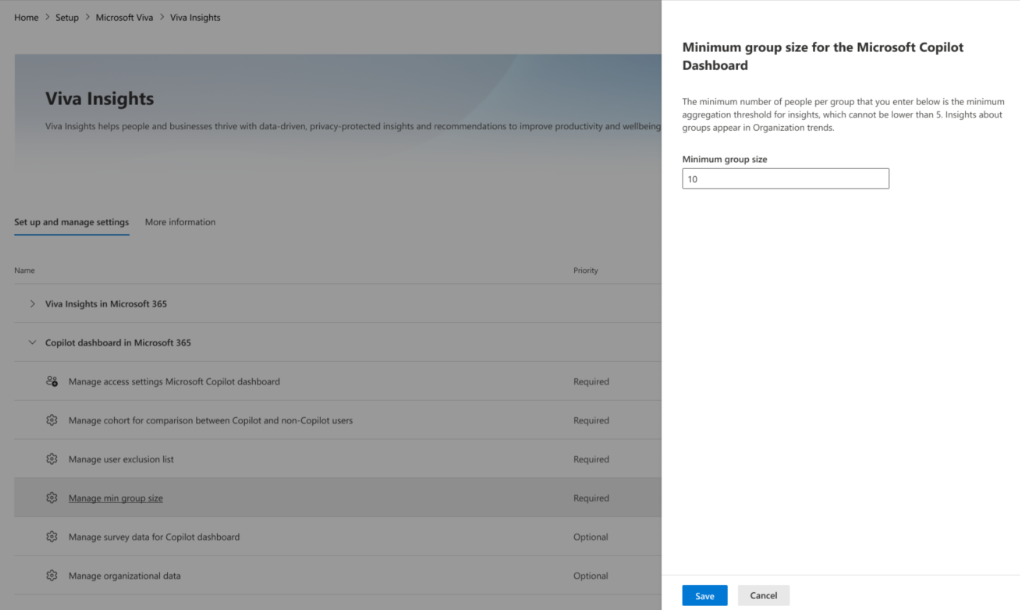
Set minimum group size for the dashboard
Applies to: AI Administrator and Viva Insights Administrator
Note
This change will go into effect in 24 hours. This will be used for the metric comparison between groups in the Copilot Dashboard.
The dashboard's adoption and impact pages provide group-level metrics for groups that meet or exceed the minimum group size you set, which by default is 10 employees.
If your tenant does not have a Viva Insights license, use these steps to set the minimum group size:
In the Microsoft 365 Admin Center, go to the Settings tab and select Microsoft Viva, then Microsoft Viva Insights.
Under Copilot Dashboard in Microsoft 365, select Manage minimum group size.
Enter your preferred minimum group size, which must be at least five, then select Save.
Or, if your tenant has a Viva Insights license and you're a Viva Insights Administrator, use these steps to change the minimum group size.
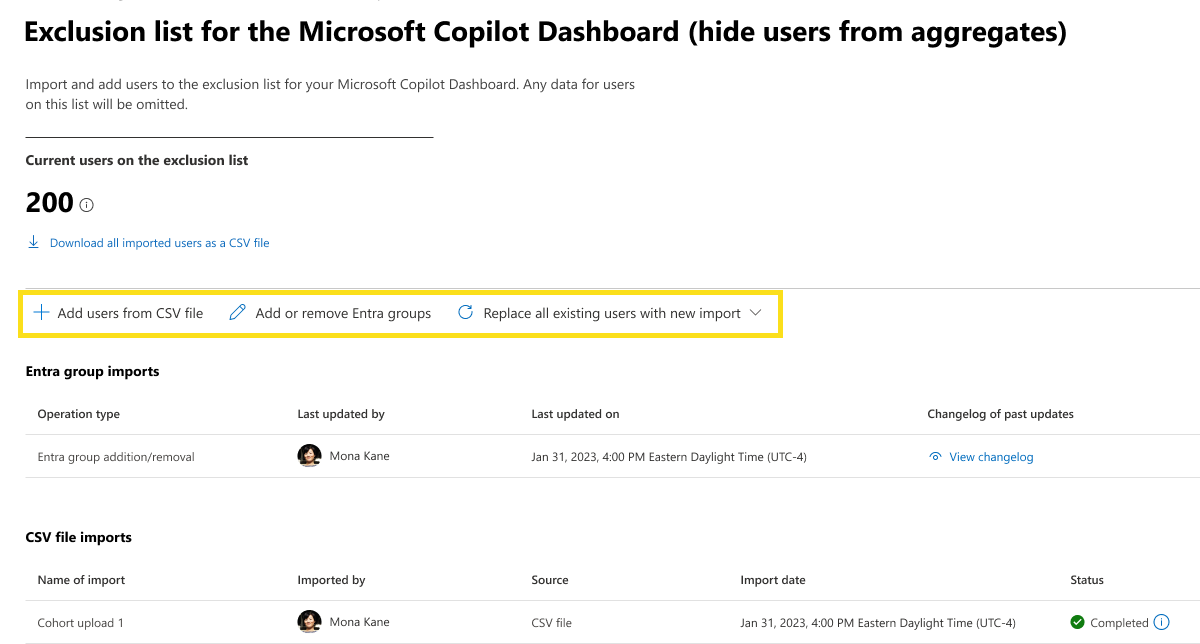
Create an exclusion list for the dashboard (hide users from aggregates)
Applies to: AI Administrator
Important
If you don’t create an exclusion list, all employees who either have a Copilot license, a Viva Insights license, or are uploaded manually using the Cohort upload feature in the admin center, are included in the Copilot Dashboard’s insights. Any previous exclusions made in the analyst workbench do not apply to this feature. Any user exclusions you make with this feature do not apply elsewhere in Viva Insights or the analyst workbench.
Note
When you upload an exclusion list, the process could take up to five days to run and complete. This means that users won’t be immediately excluded after the list is uploaded.
Your organization might want to exclude certain users from being included in the aggregated insights in the Microsoft Copilot Dashboard for various reasons, such as legal, compliance, or ethical concerns.
The user exclusion list allows admins to specify which employees' data should not be shown in the dashboard. You can exclude employees individually using a .csv file, or you can exclude groups of people using Microsoft Entra ID.
You can access this feature in the Microsoft 365 Admin Center using these steps:
Go to the Settings tab and select Microsoft Viva, then Microsoft Viva Insights.
Select Exclusion list for the Copilot in Microsoft 365 Dashboard.
To upload excluded users individually with a .csv file, select Add users from CSV file. To upload or remove excluded users with Microsoft Entra ID, select Add or remove Entra groups. Or, to overwrite an existing list of excluded users with a different set of users, select Replace all existing users with new import, and select either the .csv file or Microsoft Entra ID method.
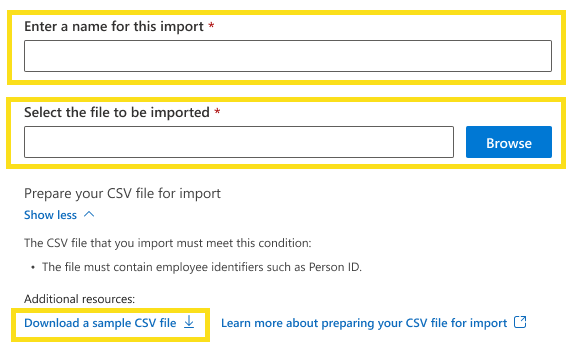
To upload or remove excluded users with a .csv file:
To upload a list of users, upload a .csv file that contains the “PersonId” of the users you want to include in the cohort analysis. The “PersonId” is a unique identifier for the employee record. It can be an employee's primary SMTP address or email alias. For example, person.name@xyz.com. For guidance, you can download a template for the .csv file from the admin center.
Validate the list of users: Before you upload the list, you can validate the data to ensure that it’s accurate and compliant with the formatting rules. The validation checks for errors such as missing or invalid attributes, duplicate or conflicting records, or unsupported characters. The validation results show the number of errors, warnings, and successful records, and the results allow you to download a detailed report or fix the errors in the file.
Confirm the list of users: After you upload the list, you can confirm the data and view a summary of the upload status, such as the number of users added, removed, or updated, the upload mode, and the upload date and time. The confirmation also shows a sample of the uploaded data and allows you to download the full list or undo the upload.
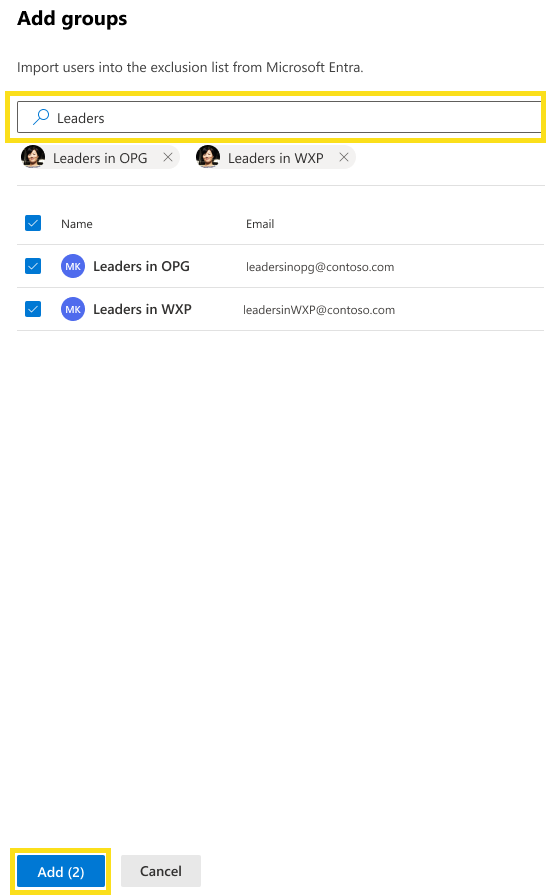
To upload or remove excluded groups with Microsoft Entra ID:
Select Add or remove Entra groups.
To add groups, search for the Entra ID group you’d like to add, and select it from the list. Then at the bottom, select Add.
To remove existing excluded groups, select the groups from the list for whom you’d like to remove access. Then select Remove selected groups.
To overwrite your existing list of excluded users and add a new group of excluded users with Microsoft Entra ID, select Replace all existing users with new import, then select Using Entra ID. Follow the same steps above for adding new groups.
Note
After you remove users with an exclusion list, it will take up to 96 hours for the changes to take effect.
Related topic
Connect to the Microsoft Copilot Dashboard for Microsoft 365 customers