Poznámka
Přístup k této stránce vyžaduje autorizaci. Můžete se zkusit přihlásit nebo změnit adresáře.
Přístup k této stránce vyžaduje autorizaci. Můžete zkusit změnit adresáře.
Teď můžete vytvořit vlastní moduly plug-in pro blokování nebo přiřazení rizikového skóre pro žádosti o ověření v různých fázích – přijetí požadavku, předběžné ověření a následné ověření. Toho lze dosáhnout pomocí nového modelu posouzení rizik zavedeného ve službě AD FS 2019.
Co je model posouzení rizik?
Model posouzení rizik je sada rozhraní a tříd, které vývojářům umožňují číst hlavičky žádostí o ověření a implementovat vlastní logiku posouzení rizik. Implementovaný kód (plug-in) se pak spustí v souladu s procesem ověřování služby AD FS. Například pomocí rozhraní a tříd, které jsou součástí modelu, můžete implementovat kód pro blokování nebo povolení žádosti o ověření na základě IP adresy klienta zahrnuté v hlavičce požadavku. Služba AD FS spustí kód pro každý požadavek na ověření a provede odpovídající akci podle implementované logiky.
Model umožňuje vložit kód v kterékoli ze tří fází potrubí ověřování služby AD FS, jak je znázorněno níže:
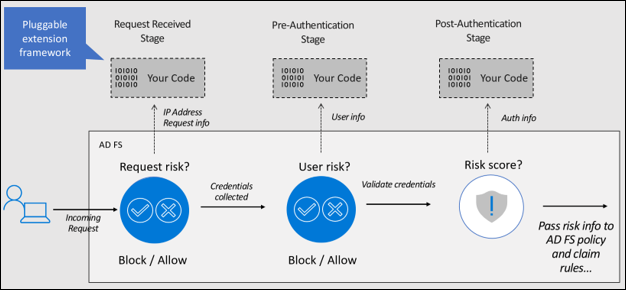
Fáze přijetí žádosti – umožňuje vytvářet moduly plug-in, které buď povolí, nebo zablokují požadavek, když služba AD FS obdrží žádost o ověření, tj. před zadáním přihlašovacích údajů uživatelem. K posouzení rizik můžete použít kontext požadavku (například IP adresa klienta, metoda HTTP, DNS proxy serveru atd.). Můžete například vytvořit modul plug-in pro čtení IP adresy z kontextu požadavku a zablokovat požadavek na ověření, pokud je IP adresa v předem definovaném seznamu rizikových IP adres.
Fáze předběžného ověřování – Umožňuje vytváření plug-in modulů k povolení nebo blokování požadavku v okamžiku, kdy uživatel poskytne přihlašovací údaje, ale před tím, než je služba AD FS vyhodnotí. V této fázi máte kromě kontextu požadavku také informace o kontextu zabezpečení (například token uživatele, identifikátor uživatele atd.) a kontextu protokolu (například: ověřovací protokol, ID klienta, ID prostředku atd.), který se má použít v logice posouzení rizik. Můžete například vytvořit modul plug-in, který zabrání útokům password spray tím, že si přečte heslo uživatele z tokenu uživatele a zablokuje žádost o ověření, pokud je heslo v předem definovaném seznamu rizikových hesel.
po ověření – umožňuje modulu plug-in vyhodnotit riziko poté, co uživatel zadal přihlašovací údaje a služba AD FS provedla autentizaci. V této fázi kromě kontextu požadavku, kontextu zabezpečení a kontextu protokolu máte také informace o výsledku ověřování (úspěch nebo selhání). Plug-in může vyhodnotit skóre rizika na základě dostupných informací a předat skóre rizika pro pojistné požadavky a pravidla politiky pro další vyhodnocení.
Abychom lépe pochopili, jak vytvořit modul plug-in pro posouzení rizik a spustit ho v souladu s procesem služby AD FS, vytvoříme ukázkový modul plug-in, který blokuje požadavky přicházející z určitých extranetových IP adres identifikovaných jako rizikové, zaregistrujme modul plug-in ve službě AD FS a nakonec otestujeme funkčnost.
Poznámka
Alternativně můžete vytvořit rizikový uživatelský plug-in, ukázkový plug-in, který využívá úroveň rizika uživatele určenou službou Microsoft Entra ID Protection k blokování ověřování nebo prosazení vícefaktorového ověřování (MFA). Postup sestavení zásuvného modulu pro rizikového uživatele je k dispozici zde.
Vytvoření ukázkového zásuvného modulu
Poznámka
Tento návod vám předvádí, jak můžete vytvořit ukázkový zásuvný modul. Řešení, které vytváříme, není řešení připravené pro podniky.
Požadavky
Následuje seznam požadavků potřebných k sestavení tohoto ukázkového modulu plug-in:
- Nainstalovaná a nakonfigurovaná služba AD FS 2019
- .NET Framework 4.7 a novější
- Vizuální studio
Sestavení knihovny DLL modulu plug-in
Následující postup vás provede vytvořením ukázkové DLL knihovny pro plug-in:
- Stáhněte si ukázkový modul plug-in, použijte Git Bash a zadejte následující:
git clone https://github.com/Microsoft/adfs-sample-RiskAssessmentModel-RiskyIPBlock
- Vytvořte soubor .csv na libovolném místě na serveru SLUŽBY AD FS (v mém případě jsem vytvořil soubor authconfigdb.csv na C:\extensions) a přidejte IP adresy, které chcete do tohoto souboru blokovat.
Ukázkový modul plug-in zablokuje všechny požadavky na ověřování přicházející z IP adres extranetu uvedených v tomto souboru.
Poznámka
Pokud máte farmu služby AD FS, můžete soubor vytvořit na kterémkoli nebo všech serverech služby AD FS. Všechny soubory je možné použít k importu rizikových IP adres do služby AD FS. Podrobně probereme proces importu níže v části Zaregistrujte DLL soubor modulu plug-in ve službě AD FS.
Otevřete projekt
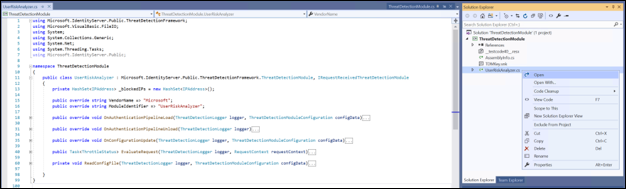
ThreatDetectionModule.slnpomocí sady Visual Studio.Odeberte
Microsoft.IdentityServer.dllz Průzkumníka řešení, jak je uvedeno níže: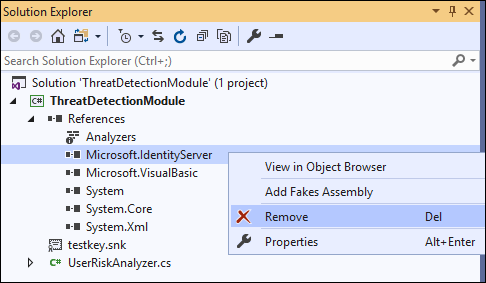
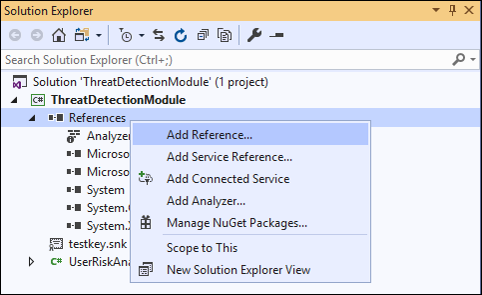
Přidejte odkaz na
Microsoft.IdentityServer.dllslužby AD FS, jak je uvedeno níže:
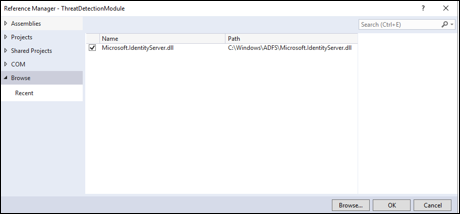
a. Klikněte pravým tlačítkem na Reference v průzkumníku řešení a vyberte Přidat odkaz....
b) V okně Reference Manager vyberte Procházet. V dialogovém okně Vyberte soubory, na které chcete odkazovat… vyberte Microsoft.IdentityServer.dll z instalační složky služby AD FS (v mém případě C:\Windows\ADFS) a klikněte na Přidat.
Poznámka
V mém případě vytvářím modul plug-in na samotném serveru AD FS. Pokud je vaše vývojové prostředí na jiném serveru, zkopírujte Microsoft.IdentityServer.dll z instalační složky služby AD FS na serveru na váš vývojový počítač.
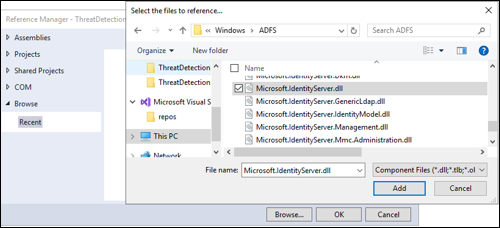
c) Klepněte na OK v okně Správce odkazů poté, co se ujistíte, že je zaškrtnuto políčko Microsoft.IdentityServer.dll.
- Všechny třídy a reference jsou nyní připraveny k sestavení. Vzhledem k tomu, že výstupem tohoto projektu je knihovna DLL, musí být nainstalována do globální mezipaměti sestaveníneboli GAC serveru AD FS, a nejprve musí být podepsána. To lze provést následujícím způsobem:
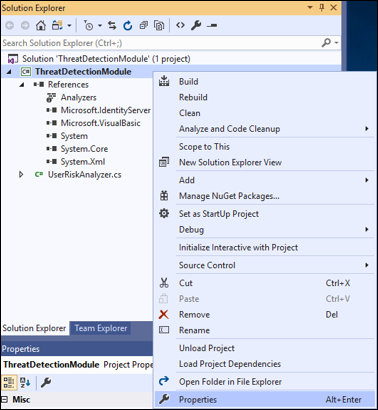
a.
klikněte pravým tlačítkem na název projektu ThreatDetectionModule. V nabídce klepněte na Vlastnosti.
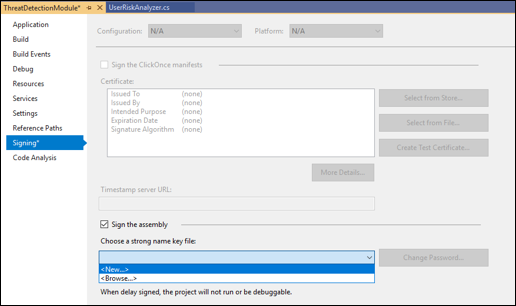
b) Na stránce Vlastnosti klikněte vlevo na Podpisa pak zaškrtněte políčko označené Podepsat sestavení. Z rozevírací nabídky Vybrat silný název klíče: v rozevírací nabídce vyberte <Nový...>.
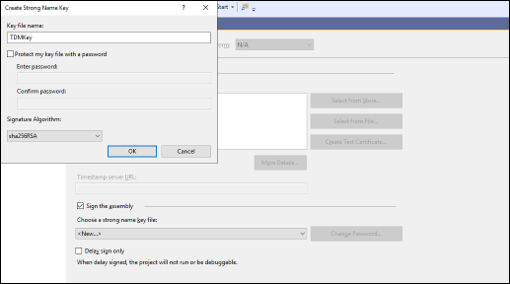
c) V dialogovém okně Vytvořit silný název klíčezadejte název klíče (můžete zvolit libovolný název) zrušte zaškrtnutí políčka Zamknout soubor klíče heslem. Potom klepněte na tlačítko OK.
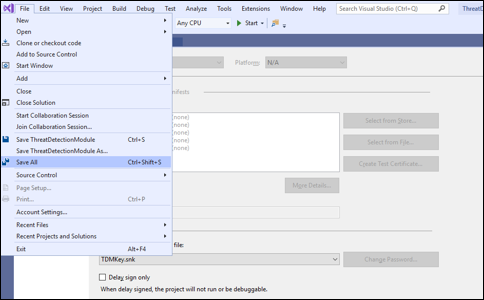
d. Uložte projekt, jak je znázorněno níže:
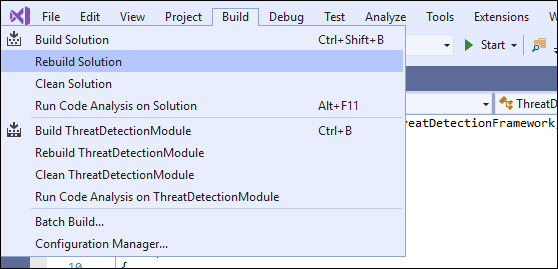
- Sestavte projekt tak, že kliknete na Sestavit a poté na Znovu sestavit řešení, jak je znázorněno níže:
Zkontrolujte okno výstupu v dolní části obrazovky a zjistěte, jestli nedošlo k nějakým chybám.

Modul plug-in (dll) je teď připravený k použití a je ve složce \bin\Debug složky projektu (v mém případě to je C:\extensions\ThreatDetectionModule\bin\Debug\ThreatDetectionModule.dll).
Dalším krokem je registrace této knihovny DLL ve službě AD FS, takže se spustí v souladu s procesem ověřování služby AD FS.
Registrace DLL plug-inu ve službě AD FS
K registraci knihovny DLL ve službě AD FS potřebujeme použít příkaz Register-AdfsThreatDetectionModule PowerShellu na serveru služby AD FS. Než se ale zaregistrujeme, musíme získat token veřejného klíče. Tento token veřejného klíče byl vytvořen, když jsme vytvářeli klíč a podepsali knihovnu DLL pomocí tohoto klíče. Pokud chcete zjistit, co je token veřejného klíče pro knihovnu DLL, můžete použít SN.exe následujícím způsobem:
Zkopírujte soubor dll ze složky \bin\Debug do jiného umístění (v mém případě zkopírujte soubor do C:\extensions).
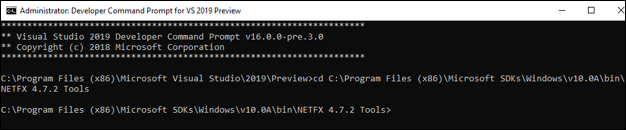
Spusťte příkazový řádek pro vývojáře pro Visual Studio a přejděte do adresáře obsahujícího sn.exe (v mém případě je adresář C:\Program Files (x86)\Microsoft SDK\Windows\v10.0A\bin\NETFX 4.7.2 Tools).
- Spusťte příkaz SN s parametrem -T a umístěním souboru (v mém případě
SN -T "C:\extensions\ThreatDetectionModule.dll").
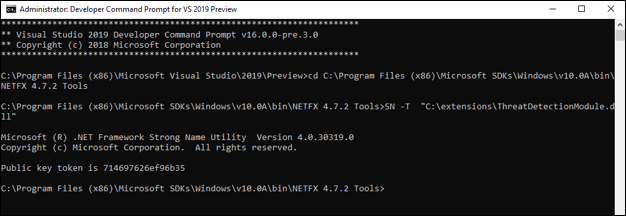
Příkaz vám poskytne token veřejného klíče (pro mě je token veřejného klíče 714697626ef96b35)
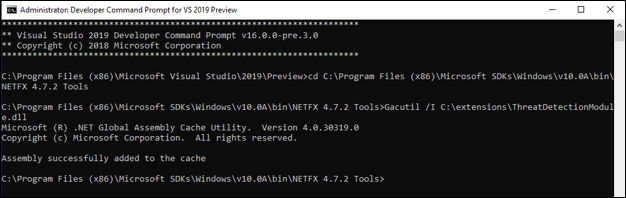
- Přidejte dll do globální mezipaměti sestavení na serveru AD FS. Naším osvědčeným postupem je vytvořit vhodný instalační program pro váš projekt a použít jej k přidání souboru do GAC. Dalším řešením je použít Gacutil.exe (další informace o Gacutil.exe dostupných zde) na vývojovém počítači. Vzhledem k tomu, že mám visual studio na stejném serveru jako AD FS, budu používat Gacutil.exe následujícím způsobem:
a. Na příkazovém řádku pro vývojáře pro Visual Studio přejděte do adresáře obsahujícího Gacutil.exe (v mém případě je adresář C:\Program Files (x86)\Microsoft SDK\Windows\v10.0A\bin\NETFX 4.7.2 Tools).
b) Spusťte příkaz
Poznámka
Pokud máte farmu služby AD FS, musí se výše uvedené příkazy spouštět na každém serveru služby AD FS ve farmě.
- Otevřete prostředí Windows PowerShell a spuštěním následujícího příkazu zaregistrujte knihovnu DLL:
Register-AdfsThreatDetectionModule -Name "<Add a name>" -TypeName "<class name that implements interface>, <dll name>, Version=10.0.0.0, Culture=neutral, PublicKeyToken=< Add the Public Key Token from Step 2. above>" -ConfigurationFilePath "<path of the .csv file>"
V mém případě je příkaz:
Register-AdfsThreatDetectionModule -Name "IPBlockPlugin" -TypeName "ThreatDetectionModule.UserRiskAnalyzer, ThreatDetectionModule, Version=10.0.0.0, Culture=neutral, PublicKeyToken=714697626ef96b35" -ConfigurationFilePath "C:\extensions\authconfigdb.csv"
Poznámka
DLL knihovnu musíte zaregistrovat pouze jednou, i v případě, že máte farmu AD FS.
- Po registraci knihovny DLL restartujte službu AD FS.
To znamená, že knihovna DLL je teď zaregistrovaná ve službě AD FS a je připravená k použití.
Poznámka
Pokud se v modulu plug-in provede nějaké změny a projekt se znovu sestaví, musí být aktualizovaná knihovna DLL znovu zaregistrována. Před registrací budete muset zrušit registraci aktuální knihovny DLL pomocí následujícího příkazu:
UnRegister-AdfsThreatDetectionModule -Name "<name used while registering the dll in 5. above>"
V mém případě příkaz je:
UnRegister-AdfsThreatDetectionModule -Name "IPBlockPlugin"
Testování zásuvného modulu
- Otevřete soubor authconfig.csv, který jsme vytvořili dříve (v mém případě v umístění C:\extensions) a přidejte IP adresy extranetu, chcete blokovat. Každá IP adresa by měla být na samostatném řádku a na konci by neměly být žádné mezery.
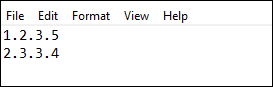
Uložte a zavřete soubor.
Spuštěním následujícího příkazu PowerShellu naimportujte aktualizovaný soubor ve službě AD FS:
Import-AdfsThreatDetectionModuleConfiguration -name "<name given while registering the dll>" -ConfigurationFilePath "<path of the .csv file>"
V mém případě je příkaz:
Import-AdfsThreatDetectionModuleConfiguration -name "IPBlockPlugin" -ConfigurationFilePath "C:\extensions\authconfigdb.csv")
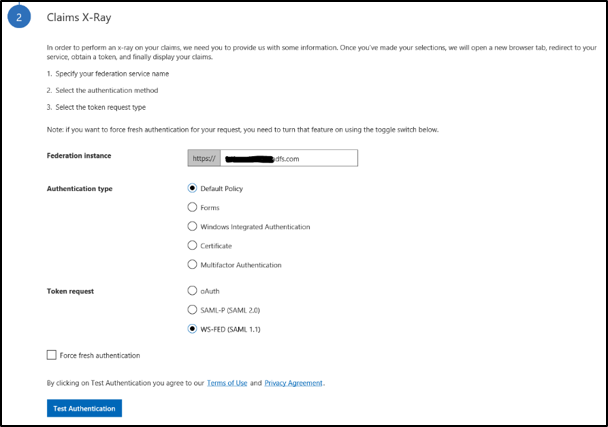
- Zahajte žádost o ověření ze serveru se stejnou IP adresou, kterou jste přidali v authconfig.csv.
Zadejte instanci federačního serveru a klikněte na tlačítko Test ověřování.
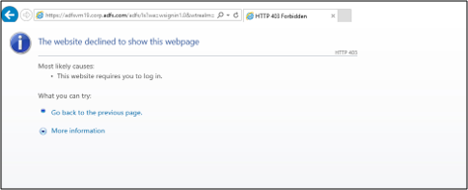
- Ověřování je blokované, jak je znázorněno níže.
Teď, když víme, jak vytvořit a zaregistrovat modul plug-in, pojďme si projít kód modulu plug-in, abychom porozuměli implementaci pomocí nových rozhraní a tříd zavedených v modelu.
Prohlídka kódu zásuvného modulu
Otevřete projekt ThreatDetectionModule.sln pomocí sady Visual Studio a pak otevřete hlavní soubor UserRiskAnalyzer.cs z průzkumníka řešení na pravé straně obrazovky
Soubor obsahuje hlavní třídu UserRiskAnalyzer, která implementuje abstraktní třídu ThreatDetectionModule a rozhraní IRequestReceivedThreatDetectionModule ke čtení IP adresy z kontextu požadavku, porovnejte získanou IP adresu s IP adresami načtenými ze služby AD FS DB a zablokujte požadavek, pokud se ip adresa shoduje. Pojďme tyto typy podrobněji projít.
Abstraktní třída ModulDetekceHrozeb
Tato abstraktní třída načte modul plug-in do kanálu služby AD FS, aby bylo možné spustit kód modulu plug-in v souladu s procesem služby AD FS.
public abstract class ThreatDetectionModule
{
  protected ThreatDetectionModule();

  public abstract string VendorName { get; }
  public abstract string ModuleIdentifier { get; }

  public abstract void OnAuthenticationPipelineLoad(ThreatDetectionLogger logger, ThreatDetectionModuleConfiguration configData);
  public abstract void OnAuthenticationPipelineUnload(ThreatDetectionLogger logger);
  public abstract void OnConfigurationUpdate(ThreatDetectionLogger logger, ThreatDetectionModuleConfiguration configData);
}
Třída obsahuje následující metody a vlastnosti:
| Metoda | Typ | Definice |
|---|---|---|
| OnAuthenticationPipelineLoad | Prázdnota | Volá služba AD FS, když se plugin načte do svého kanálu. |
| OnAuthenticationPipelineUnload | Prázdnota | Volá služba AD FS při uvolnění plug-inu z jeho potrubí |
| OnConfigurationUpdate | Prázdnota | Voláno službou AD FS při aktualizaci konfigurace |
| Vlastnosti | typ | Definice |
| Název dodavatele | Řetězec | Získá název dodavatele, který vlastní modul plug-in. |
| Identifikátor modulu | Řetězec | Získá identifikátor modulu plug-in. |
V našem ukázkovém modulu plug-in používáme OnAuthenticationPipelineLoad a metody OnConfigurationUpdate ke čtení předem definovaných IP adres ze služby AD FS DB.
OnAuthenticationPipelineLoad je volána při registraci modulu plug-in ve službě AD FS, zatímco OnConfigurationUpdate je volána při importu .csv pomocí rutiny Import-AdfsThreatDetectionModuleConfiguration.
Rozhraní IRequestReceivedThreatDetectionModule
Toto rozhraní umožňuje implementovat posouzení rizik v okamžiku, kdy služba AD FS obdrží žádost o ověření, ale před tím, než uživatel zadá přihlašovací údaje, tj. ve fázi přijaté žádosti procesu ověřování.
public interface IRequestReceivedThreatDetectionModule
{
  Task<ThrottleStatus> EvaluateRequest (
  ThreatDetectionLogger logger,
  RequestContext requestContext );
}
Rozhraní obsahuje metodu EvaluateRequest, která umožňuje použít kontext požadavku na ověření předaného vstupním parametrem requestContext k zápisu logiky posouzení rizik. Parametr requestContext je typu RequestContext.
Druhý vstupní parametr, který je předán, je logger typu ThreatDetectionLogger. Tento parametr lze použít k zápisu chybových, auditních a/nebo ladicích zpráv do protokolů služby AD FS.
Metoda vrátí ThrottleStatus (0 pro nevyhodnoceno, 1 pro blokování a 2 pro povolení) službě AD FS, která pak buď blokuje, nebo povoluje požadavek.
V našem ukázkovém plug-inu implementace metody EvaluateRequest analyzuje clientIpAddress z parametru requestContext a porovnává ji se všemi IP adresami načtenými z databáze AD FS. Pokud je nalezena shoda, vrátí metoda 2 pro Block, jinak vrátí hodnotu 1 pro Allow. Na základě vrácené hodnoty služba AD FS buď blokuje nebo povoluje požadavek.
Poznámka
Ukázkový doplňkový modul, který jsme diskutovali výše, implementuje pouze rozhraní IRequestReceivedThreatDetectionModule. Model posouzení rizik však poskytuje dvě další rozhraní – IPreAuthenticationThreatDetectionModule (pro implementaci logiky posouzení rizik během fáze předběžného ověřování) a IPostAuthenticationThreatDetectionModule (pro implementaci logiky posouzení rizik během fáze po ověření). Podrobnosti o těchto dvou rozhraních najdete níže.
IPreAuthenticationThreatDetectionModule – rozhraní
Toto rozhraní umožňuje implementovat logiku posouzení rizik v okamžiku, kdy uživatel poskytuje přihlašovací údaje, ale před tím, než je služba AD FS vyhodnotí, tj. fázi předběžného ověřování.
public interface IPreAuthenticationThreatDetectionModule
{
  Task<ThrottleStatus> EvaluatePreAuthentication (
  ThreatDetectionLogger logger,
  RequestContext requestContext,
  SecurityContext securityContext,
  ProtocolContext protocolContext,
  IList<Claim> additionalClams
  );
}
Rozhraní zahrnuje metodu EvaluatePreAuthentication, která vám umožňuje použít informace předané v RequestContext requestContext, SecurityContext securityContext, ProtocolContext protocolContexta IList<Claim> additionalClaims jako vstupní parametry k napsání vaší logiky posouzení rizik před ověřením.
Poznámka
Seznam vlastností předaných s každým typem kontextu naleznete, navštivte RequestContext, SecurityContexta ProtocolContext definicích tříd.
Druhý vstupní parametr, který je předán, je logger typu ThreatDetectionLogger. Tento parametr lze použít k zápisu chybových, auditních a/nebo ladicích zpráv do protokolů služby AD FS.
Metoda vrátí ThrottleStatus (0 pro nevyhodnoceno, 1 pro blokování a 2 pro povolení) službě AD FS, která pak buď blokuje, nebo povoluje požadavek.
IPostAuthenticationThreatDetectionModule – rozhraní
Toto rozhraní umožňuje implementovat logiku posouzení rizik po zadání přihlašovacích údajů uživatelem a služba AD FS provedla ověřování, tj. fázi po ověření.
public interface IPostAuthenticationThreatDetectionModule
{
  Task<RiskScore> EvaluatePostAuthentication (
  ThreatDetectionLogger logger,
  RequestContext requestContext,
  SecurityContext securityContext,
  ProtocolContext protocolContext,
  AuthenticationResult authenticationResult,
  IList<Claim> additionalClams
  );
}
Rozhraní zahrnuje EvaluatePostAuthentication metoda, která umožňuje použít informace předané v RequestContext requestContext, SecurityContext securityContext, ProtocolContext protocolContexta IList<Claim> additionalClams vstupní parametry pro zápis logiky hodnocení rizik po ověření.
Poznámka
Úplný seznam vlastností předaných s každým typem kontextu najdete v RequestContext, SecurityContexta v ProtocolContext definicích tříd.
Druhý vstupní parametr, který je předán, je logger typu ThreatDetectionLogger. Tento parametr lze použít k zápisu chybových, auditních a/nebo ladicích zpráv do protokolů služby AD FS.
Metoda vrátí skóre rizika, které lze použít v zásadách AD FS a pravidlech deklarace identity.
Poznámka
Aby modul plug-in fungoval, musí hlavní třída (v tomto případě UserRiskAnalyzer) odvodit ThreatDetectionModule abstraktní třídu a měla by implementovat alespoň jedno ze tří rozhraní popsaných výše. Jakmile je knihovna DLL zaregistrovaná, služba AD FS zkontroluje, která rozhraní jsou implementována, a zavolá je ve vhodné fázi zpracování.
Nejčastější dotazy
Proč mám tyto moduly plug-in sestavit?
A: Tyto moduly plug-in poskytují nejen další možnosti zabezpečení prostředí před útoky, jako jsou útoky typu password spray, ale také poskytuje flexibilitu při vytváření vlastní logiky posouzení rizik na základě vašich požadavků.
Kde se zaznamenávají protokoly?
A: Protokoly chyb můžete zapisovat do protokolu událostí "AD FS/Admin" pomocí metody WriteAdminLogErrorMessage, protokoly auditu do protokolu zabezpečení "AD FS Auditing" pomocí metody WriteAuditMessage a ladicí protokoly do ladicího protokolu "AD FS Tracing" pomocí metody WriteDebugMessage.
Může přidání těchto modulů plug-in zvýšit latenci procesu ověřování služby AD FS?
A: Dopad na latenci bude určen časem potřebným ke spuštění logiky posouzení rizik, kterou implementujete. Před nasazením modulu plug-in do produkčního prostředí doporučujeme vyhodnotit dopad na latenci.
Proč nemůže služba AD FS navrhnout seznam rizikových IP adres, uživatelů atd.?
A: I když momentálně není k dispozici, pracujeme na vytváření inteligentních informací, abychom v modelu posouzení rizik navrhli rizikové IP adresy, uživatele atd. Brzy se podělíme o data spuštění.
Jaké další ukázkové moduly plug-in jsou k dispozici?
A: jsou k dispozici následující ukázkové moduly plug-in:
| Jméno | Popis |
|---|---|
| Rizikový uživatelský plug-in | Ukázkový modul plug-in, který blokuje ověřování nebo vynucuje vícefaktorové ověřování na základě úrovně rizika uživatele určené službou Microsoft Entra ID Protection. |