Poznámka:
Přístup k této stránce vyžaduje autorizaci. Můžete se zkusit přihlásit nebo změnit adresáře.
Přístup k této stránce vyžaduje autorizaci. Můžete zkusit změnit adresáře.
Pomocí služby Storage Migration Service a Windows Admin Center (WAC) můžete migrovat jeden server do druhého, včetně jejich souborů a konfigurace. Tento článek popisuje, jak migrovat server s Windows, prostředek souborového serveru s podporou převzetí služeb při selhání systému Windows, server Samba nebo pole služby NetApp Fabric Attached Storage (FAS) na jiný windows server nebo cluster s podporou převzetí služeb při selhání systému Windows.
Proces migrace začíná inventářem serveru, který identifikuje obsah, který se má migrovat, a kontrola brány firewall, která zajistí úspěšnou migraci. Proces přenáší data ze zdrojových serverů do cílových serverů a poté přepne na nové servery. Po migraci můžete zpracovat vyřazené zdrojové servery z provozu a znovu vytvořit certifikáty na novém cílovém serveru.
Krok 1: Instalace služby migrace a kontrola brány firewall
Než začnete, nainstalujte službu Storage Migration Service a ujistěte se, že jsou otevřené potřebné porty brány firewall.
Zkontrolujte požadavky služby Storage Migration Service a nainstalujte si nejnovější verzi Windows Admin Center na váš počítač nebo server pro správu, pokud jste to ještě neudělali. Potřebujete také nejnovější verzi rozšíření služby Storage Migration Service, která se instaluje automaticky ve WAC, pokud je povoleno automaticky aktualizovat rozšíření v nastavení Nastavení>Rozšíření. Pokud migrujete zdrojové počítače připojené k doméně, musíte nainstalovat a spustit službu Storage Migration Service na serveru připojeném ke stejné doméně nebo doménové struktuře jako zdrojové počítače.
V WAC se připojte k serveru orchestrátoru s Windows Serverem 2019 nebo novějším. Tento orchestrátor je server, na který nainstalujete službu Storage Migration Service, a používá se ke správě migrace.
- Pokud migrujete jenom jeden server, můžete cílový server použít, pokud používá Windows Server 2019 nebo novější.
- Pro všechny migrace s více servery doporučujeme použít samostatný server orchestrace.
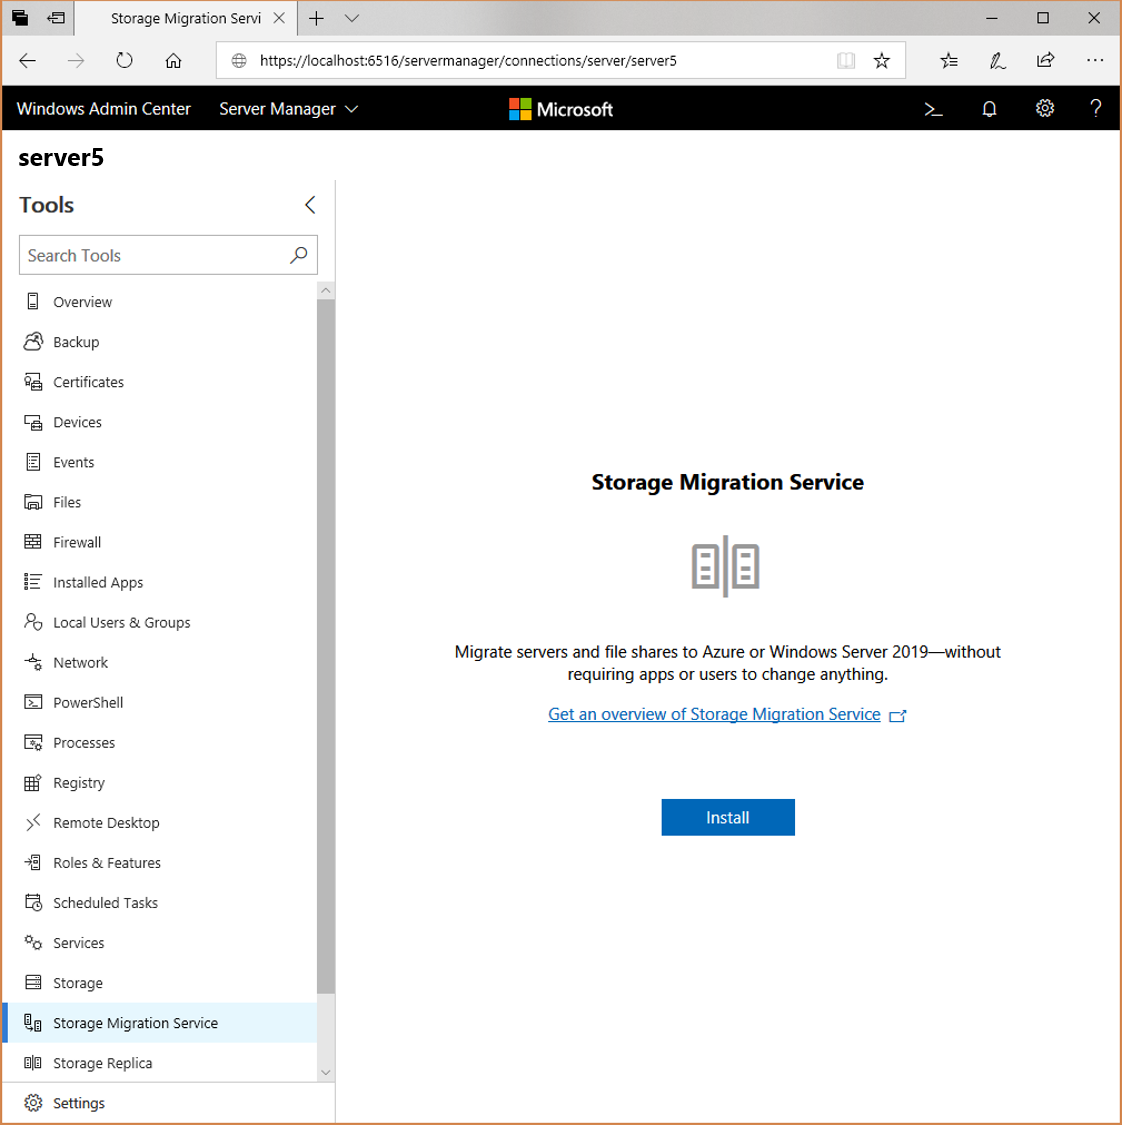
V WAC přejděte do Správce serveru>služby Migrace úložiště. Výběrem Nainstalovat nainstalujte službu Storage Migration Service a její požadované součásti, jak je znázorněno na následujícím obrázku.
Nainstalujte proxy službu Storage Migration Service na všechny cílové servery s Windows Serverem 2019 nebo novějším. Toto nastavení zdvojnásobí rychlost přenosu při instalaci na cílových serverech.
- Připojte se k cílovému serveru v WAC.
- Přejděte na Role a funkce>Správce serveru (v WAC>).
- Vyberte proxy služby Storage Migration Servicea pak vyberte Nainstalovat.
Pokud máte v úmyslu migrovat do clusterů s podporou převzetí služeb při selhání systému Windows nebo z clusterů s podporou převzetí služeb při selhání, nainstalujte nástroje clusteringu s podporou převzetí služeb při selhání na server orchestrátoru. Tato instalace se automaticky provede v nejnovější verzi WAC, když vyberete Migrovat z clusterů s podporou převzetí služeb při selhání v nastavení úlohy možnost Inventory.
- Pokud chcete nainstalovat mimo fázi inventáře služby Storage Migration Service, připojte se k serveru orchestrátoru v WAC.
- Přejděte na Role a funkce> (v WAC), >, >Nástroje pro vzdálenou správu serveru, >Nástroje pro správu funkcí.
- Vyberte nástroje clusteringu s podporou převzetí služeb při selhánía pak vyberte Nainstalovat.
Note
Pokud migrujete z pole NetApp FAS, musíte do orchestrátoru ručně nainstalovat nejnovější verzi sady nástrojů NetApp PowerShell. Tato sada nástrojů je dostupná všem licencovaným zákazníkům NetApp s aktivní smlouvou o podpoře NetApp z mysupport.netapp.com.
Na všech zdrojových serverech a cílových serverech se systémem Windows Server 2016 při použití WAC se připojte ke každému serveru, přejděte na Správce serveru (ve WAC) >Brána firewall>Příchozí pravidla, a ověřte, že jsou aktivována následující pravidla:
- Sdílení souborů a tiskáren (SMB-In)
- Služba Netlogon (NP-In)
- Instrumentace pro správu Windows (DCOM-In)
- Instrumentace pro správu Windows (WMI-In)
Pokud používáte brány firewall třetích stran, rozsahy portů pro příchozí provoz jsou uvedeny níže.
- TCP/445 (SMB)
- TCP/135 (mapovač koncových bodů RPC/DCOM)
- TCP 1025-65535 (dočasné porty RPC/DCOM)
Porty služby Storage Migration Service jsou následující:
- TCP/28940 (Orchestrator)
- TCP/28941 (Proxy).
Pokud používáte server orchestrátoru a chcete stáhnout události nebo protokol přenosu dat, zkontrolujte, jestli je na serveru povolené pravidlo brány firewall pro sdílení souborů a tiskáren (SMB-In).
Krok 2: Vytvoření dat serveru úloh a inventáře
V tomto kroku určete, které servery se mají migrovat, a pak je naskenujte a shromážděte informace o souborech a konfiguracích.
Ve službě Storage Migration Service vyberte Novou úlohu, pojmenujte ji a pak vyberte, jestli se mají migrovat servery a clustery s Windows, servery s Linuxem, které používají pole Samba nebo NetApp FAS. Pak vyberte OK.
Na stránce Kontrola požadovaných součástí zkontrolujte požadavky. Pak vyberte Další.
Pokud migrujete z pole NetApp FAS, na stránce Vyberte pole NetApp FAS, zadejte IP adresu pole NetApp FAS, přihlašovací údaje správce a heslo. Pak vyberte Další.
Pokud migrujete ze serveru nebo clusteru s Windows, na stránce Zadat přihlašovací údaje zadejte přihlašovací údaje správce pro servery, ze kterých chcete migrovat, a pak vyberte Další.
Pokud migrujete ze serverů s Linuxem, zadejte přihlašovací údaje na přihlašovacích údajích Samba a na stránkách s přihlašovacími údaji Pro Linux , včetně hesla SSH nebo privátního klíče.
Pokud migrujete z pole NetApp FAS, proveďte následující kroky:
- Pomocí stránky pro zadání přihlašovacích údajů a pro předskenování NetApp zadejte přihlašovací údaje správce pro servery NetApp Common Internet File System (CIFS), ze kterých chcete migrovat.
- Výběrem možnosti Spustit kontrolu zobrazíte seznam všech serverů NetApp CIFS spuštěných v poli NetApp FAS. Můžete zrušit zaškrtnutí všech serverů CIFS, které nechcete migrovat.
- Vyberte Další.
Na stránce Nainstalovat požadované nástroje potvrďte, že se požadované nástroje nainstalovaly bez chyby. Pak vyberte Další.
Pokud migrujete ze serveru nebo clusteru s Windows nebo z LinuxU Samba, na stránce Přidat a skenovat zařízení vyberte Přidat zařízenía vyhledejte cluster zdrojového serveru ve službě Active Directory. Pomocí hvězdičky (*) můžete provádět částečná hledání se zástupnými znaky. Můžete také zadat přesný název zdrojového serveru nebo název prostředku souborového serveru clusteru. Vyberte OK.
Tento krok opakujte pro všechny ostatní servery, které chcete inventarizaci provést. Pokud migrujete z pole NetApp FAS, stránka Výběr a kontrola serverů již uvádí zdrojový server.Vyberte Ověřit a ujistěte se, že ověřování projde pro všechny servery.
Note
Na serverech NetApp CIFS se očekává chyba pro oprávnění zálohování. Tuto chybu můžete bezpečně ignorovat.
Vyberte Spustit kontrolu. Stránka se aktualizuje, aby ukázala, že kontrola je dokončena.
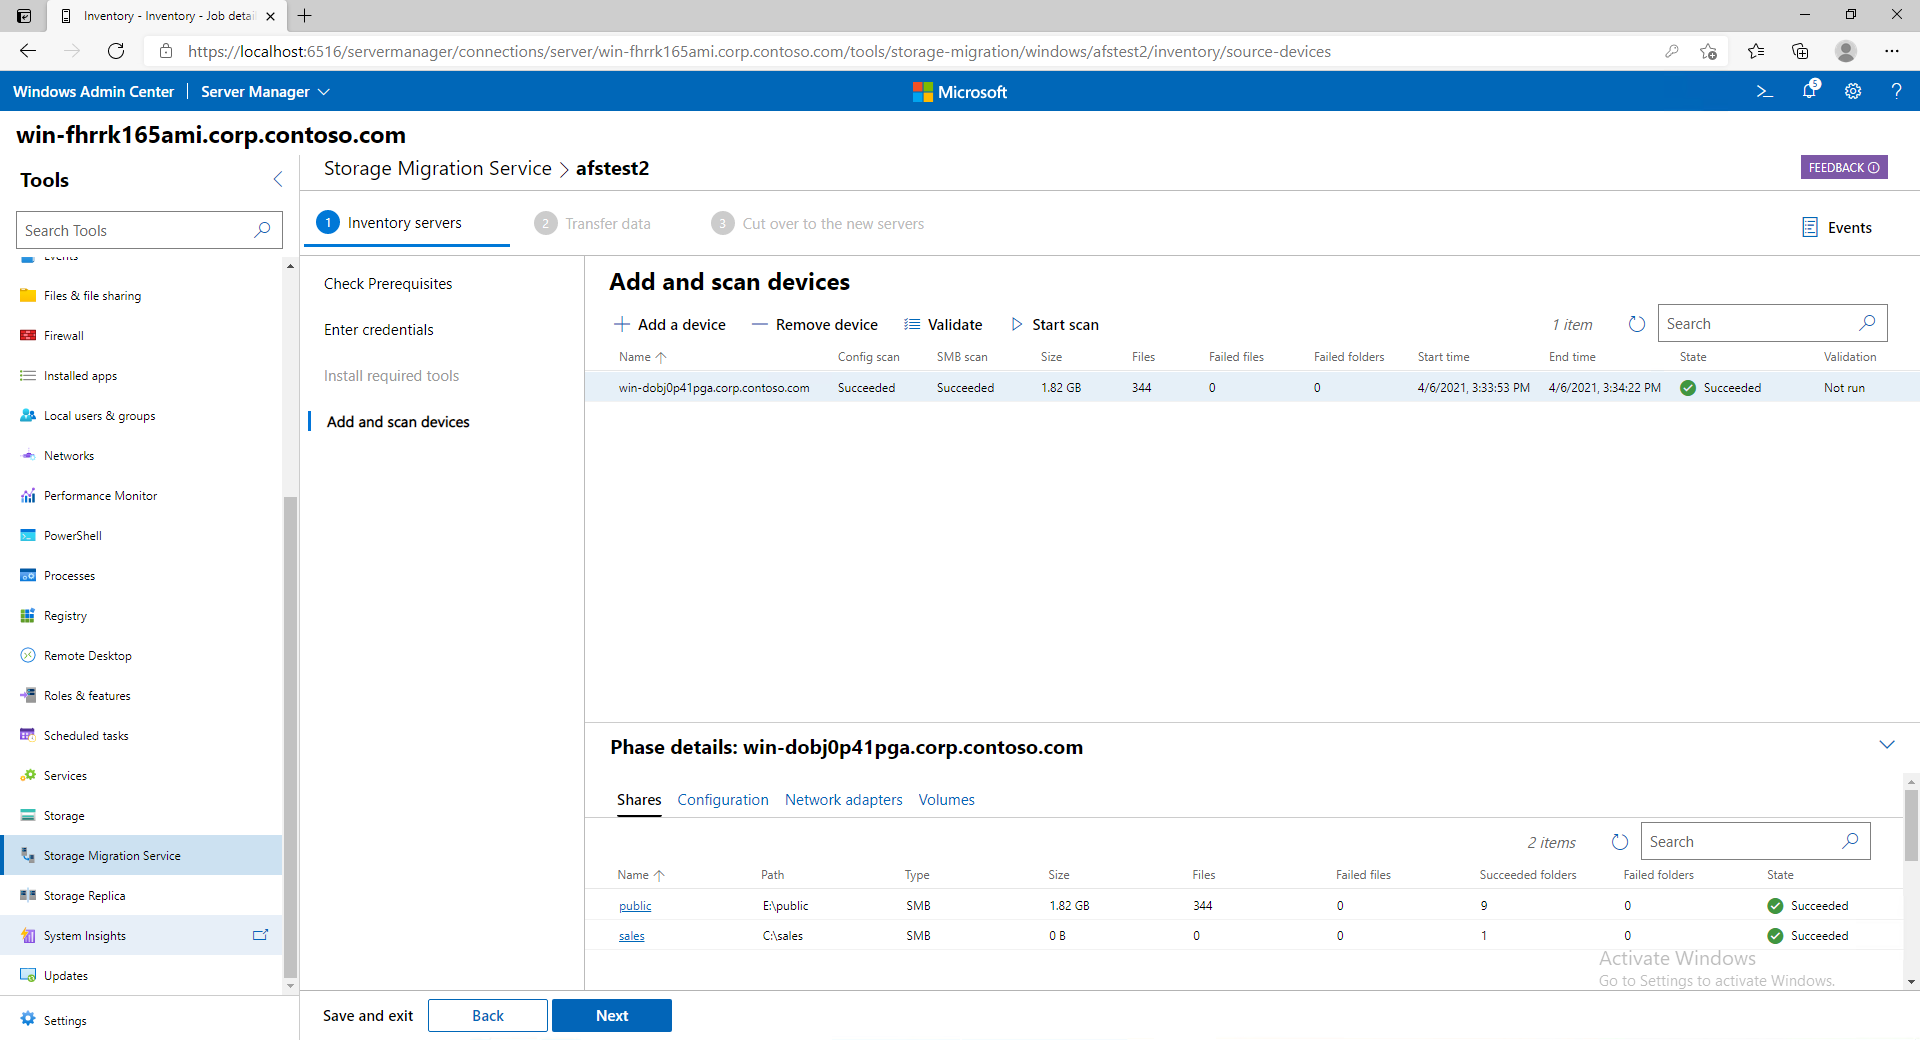
Vyberte jednotlivé servery a zkontrolujte inventarizované sdílené složky, konfiguraci, síťové adaptéry a svazky.
Služba Storage Migration Service nepřevádí soubory ani složky, které by mohly narušit provoz windows, takže se zobrazí upozornění pro všechny sdílené složky umístěné v systémové složce Systému Windows. Tyto akcie musíte během fáze převodu přeskočit. Další informace naleznete v tématu Jaké soubory a složky jsou vyloučeny z přenosů.
Výběrem možnosti Další přejdete na přenos dat.

Krok 3: Přenos dat na cílové servery
V tomto kroku přenesete data po zadání umístění na cílových serverech.
Na stránce Pro přenos dat>zadejte přihlašovací údaje správce, které fungují na cílových serverech, na které chcete migrovat, a pak vyberte Další.
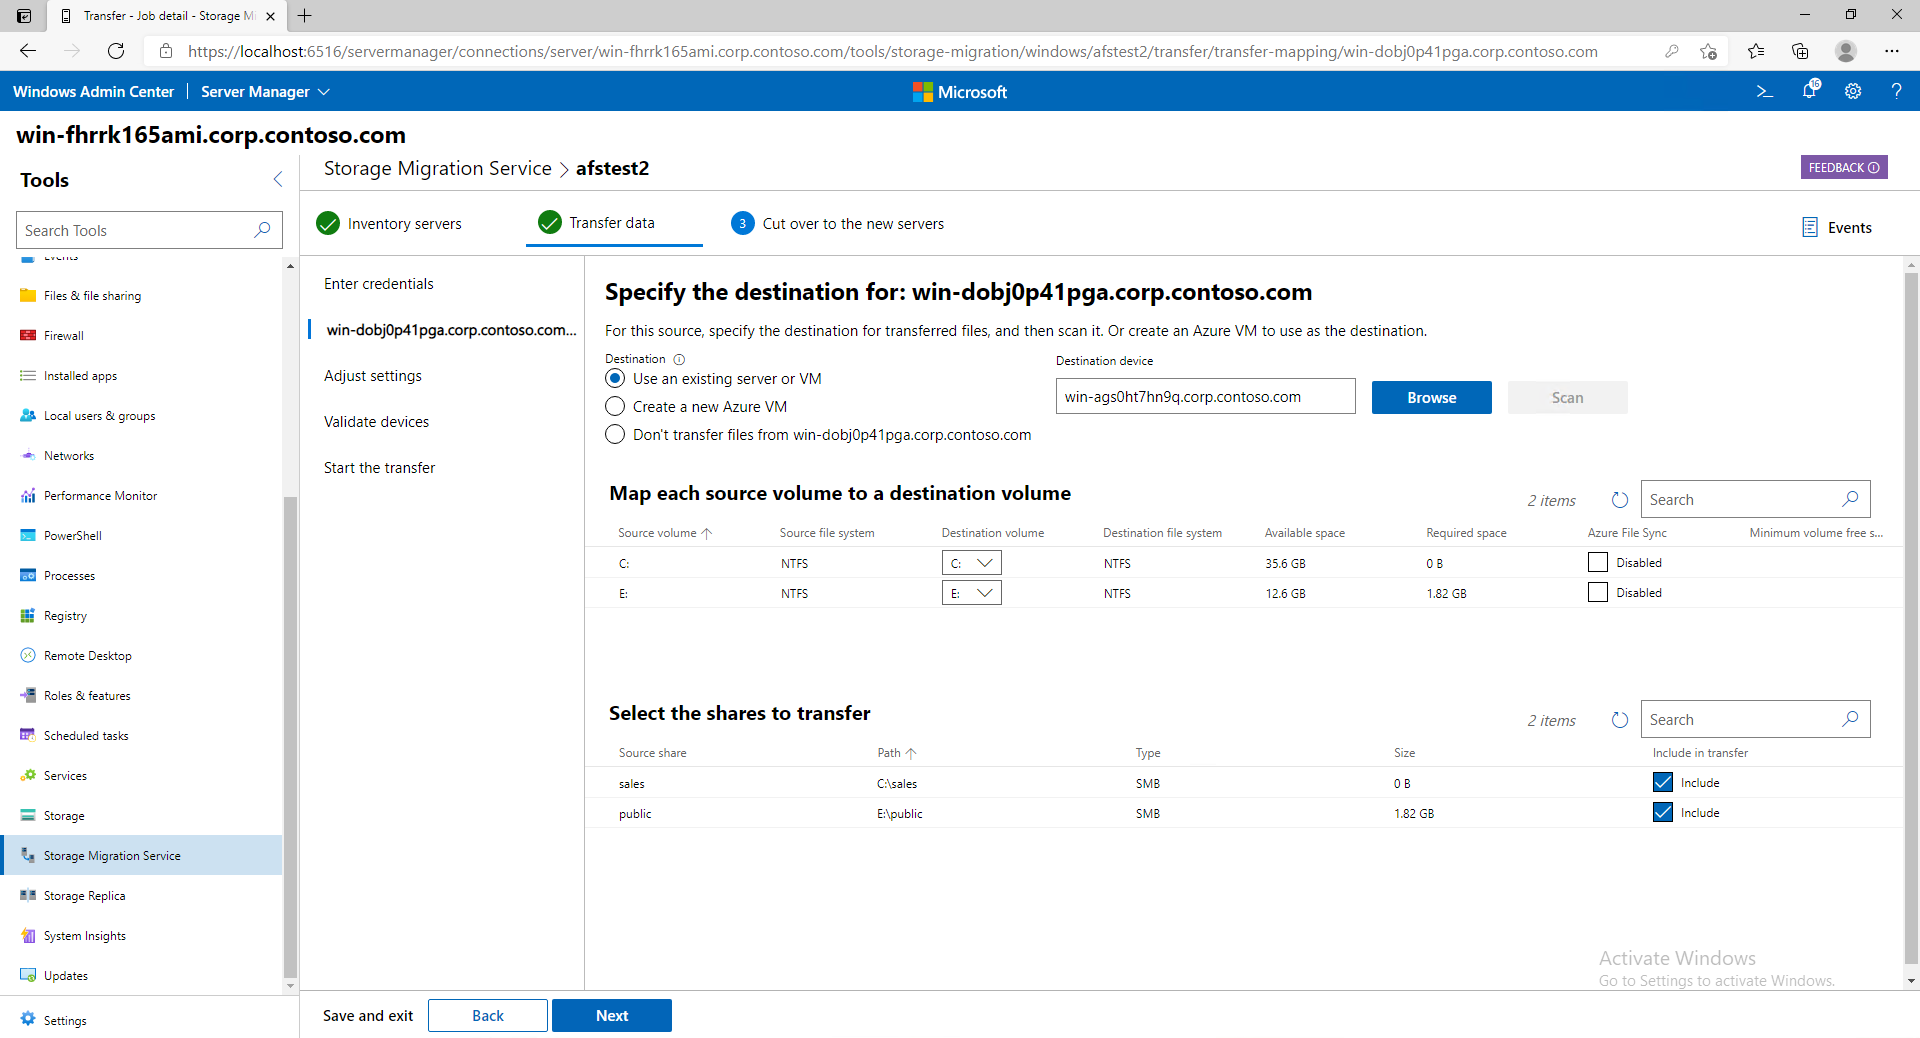
Na stránce Přidat cílové zařízení a mapování se zobrazí první zdrojový server. Zadejte název prostředku clusteru serveru nebo souborového serveru, do kterého chcete migrovat, a pak vyberte Zkontrolovat zařízení. Pokud migrujete ze zdrojového počítače připojeného k doméně, musí být cílový server připojený ke stejné doméně. Můžete také vybrat Vytvořit nový virtuální počítač Azure a pak pomocí průvodce nasadit nový cílový server v Azure. Tato funkce automaticky zformátuje virtuální počítač, zřídí úložiště, naformátuje disky, připojí k doméně a přidá proxy server služby Storage Migration Service do cíle Windows Serveru 2019 nebo novějšího. Můžete si vybrat z virtuálních počítačů s Windows Serverem 2025 (doporučeno), Windows Server 2022, Windows Server 2019 a Windows Server 2016 libovolné velikosti a používat spravované disky.
Note
Použití Vytvoření nového virtuálního počítače Azure vyžaduje, abyste měli následující položky:
- Platné předplatné Azure.
- Existující skupina prostředků Azure Compute, ve které máte oprávnění k vytváření.
- Existující virtuální síť a podsíť Azure.
- Okruh Azure ExpressRoute nebo řešení Azure VPN vázané na virtuální síť a podsíť, které umožňuje připojení z tohoto virtuálního počítače Azure IaaS k místním klientům, řadičům domény, počítači orchestratoru služby Storage Migration Service, počítači, na kterém běží WAC, a zdrojovému počítači, který se má migrovat.
Následující video ukazuje, jak pomocí služby Storage Migration Service migrovat na virtuální počítače Azure.
Namapujte zdrojové svazky na cílové svazky, zrušte zaškrtnutí políčka Zahrnout u všech sdílených složek, které nechcete přenášet (včetně jakýchkoli sdílených složek pro správu umístěných ve složce systému Windows) a ujistěte se, že je políčko Synchronizace souborů Azure nastavené pro všechny svazky nebo sdílené složky cloudové vrstvení pomocí Synchronizace souborů Azure a pak vyberte Další.
Note
Při migraci serverů NetApp CIFS zdrojové svazky nezobrazují písmena jednotek. Tyto svazky můžete mapovat na všechny cílové svazky a můžete namapovat několik svazků NetApp CIFS na stejný cílový svazek. Vytvoří se nové cesty ke kořenové složce, aby nedocházelo k přepsání nebo kolizím složek, a potom se sdílené složky vytvoří na správné úrovni. V podokně podrobností sdílení se zobrazí struktura složek, kterou se chystáte vytvořit.
Přidejte cílový server a mapování pro další zdrojové servery a pak vyberte Další.
Na stránce Upravit nastavení přenosu určete, zda chcete migrovat místní uživatele a skupiny na zdrojových serverech, a pak vyberte Další. Tato možnost umožňuje znovu vytvořit všechny místní uživatele a skupiny na cílových serverech, takže oprávnění k souborům nebo sdílení nastavená na místní uživatele a skupiny se neztratí. Tady jsou možnosti migrace místních uživatelů a skupin:
Important
Pokud migrujete servery NetApp CIFS, nemůžete migrovat místní uživatele a skupiny.
- Přejmenovat účty se stejným názvem je ve výchozím nastavení vybráno a migruje všechny místní uživatele a skupiny na zdrojovém serveru. Pokud jsou místní uživatelé nebo skupiny ve zdroji nalezeni se stejným názvem v cíli, obdrží tyto položky nové názvy v cíli. Předdefinovaný uživatel nebo skupina však používá stejný název ve zdroji a cíli, jako je uživatel Správce nebo skupina Administrators.
- opakovaně používat účty se stejným názvem, mapuje stejně pojmenované uživatele a skupiny ve zdroji a cíli. Toto nastavení nepoužívejte, pokud je zdrojovým nebo cílovým serverem řadič domény.
- Nepřenášejte uživatele a skupiny přeskočí migraci místních uživatelů a skupin, což je nutné, když je zdrojem nebo cílem řadič domény, nebo při předvýběru dat pro replikaci DFS (Replikace DFS nepodporuje místní skupiny a uživatele).
Note
Migrované uživatelské účty jsou v cíli zakázané a mají přiřazené 127mísíkové heslo, které je složité i náhodné, takže je budete muset povolit a přiřadit nové heslo, abyste je mohli dál používat. To pomáhá zajistit, aby žádné staré účty se zapomenutými a slabými hesly na zdrojové straně nepředstavovaly bezpečnostní problém na cílové straně. Měli byste také zkontrolovat Co je Windows LAPS? jako způsob správy hesel místního správce.
Vyberte Ověřit a pak vyberte Další.
Výběrem možnosti Zahájit přenos dat zahájíte přenos dat.
Při prvním přenosu přesuneme všechny existující soubory v cíli do záložní složky. U cílových serverů, které používají synchronizaci souborů Azure s vrstvením cloudu, není tato možnost zálohování podporována. V opačném případě plně podporujeme Synchronizaci souborů Azure s vrstvení cloudu a do WAC zahrneme aktualizované podrobnosti o přenosu. Při následných přenosech ve výchozím nastavení aktualizujeme cíl, aniž bychom ho napřed zálohovali. Služba Storage Migration Service je dostatečně chytrá pro řešení překrývajících se sdílených složek – stejné složky nekopírujeme dvakrát ve stejné úloze.
Po dokončení přenosu zkontrolujte cílový server a ujistěte se, že se vše přeneslo správně. Vyberte Pouze protokol chyb, pokud chcete stáhnout protokol o souborech, které se nepřenesly.
Note
Pokud chcete zachovat záznam o auditu přenosů nebo plánujete provést více než jeden přenos v rámci jedné úlohy, klikněte na Přenosový protokol nebo na jiné možnosti uložení protokolu, abyste si uložili CSV kopii. Každý další přenos přepíší databázové informace z předchozího běhu. Pokud migrujete velký počet souborů, možná budete muset upravit časový limit pro uložení tohoto souboru CSV. Podrobnosti naleznete v části o službě Storage Migration Service, která časově překračuje stahování přenosu nebo chyby CSV.

V tuto chvíli máte tři možnosti:
- Přejděte k dalšímu kroku, přepněte tak, aby cílové servery přijaly identity zdrojových serverů.
- zvažte dokončení migrace bez převzetí identit zdrojových serverů.
- Přeneste znovu, kopírování pouze souborů aktualizovaných od posledního přenosu.
Pokud je vaším cílem synchronizovat soubory s Azure, můžete po přenosu souborů nebo po přepnutí na cílové servery nastavit cílové servery s Azure File Sync. Viz Plánování nasazení synchronizace souborů Azure.
Krok 4: Přechod na nové servery
V tomto kroku přejdete ze zdrojových serverů na cílové servery a přesunete IP adresy a názvy počítačů na cílové servery. Po dokončení tohoto kroku budou aplikace a uživatelé přistupovat k novým serverům prostřednictvím názvů a adres serverů, ze které jste migrovali.
Pokud jste přešli mimo úlohu migrace, přejděte v WAC doslužby Migrace úložiště> serveru a vyberte úlohu, kterou chcete dokončit.
Na stránce Přepnutí na nové servery>Zadejte přihlašovací údaje, vyberte možnost Další pro použití přihlašovacích údajů, které jste zadali dříve.
Na stránce Konfigurace přímé migrace určete, který síťový adaptér v cíli by měl převzít nastavení z každého adaptéru ve zdroji. Tato možnost přesune IP adresu ze zdroje do cíle jako součást přepnutí, přičemž zdrojovému serveru přiřadí novou adresu DHCP nebo statickou IP adresu. Můžete přeskočit všechny migrace sítě nebo určitá rozhraní.
Zadejte, kterou IP adresu použít pro zdrojový server po přesměrování jeho adresy na cílový server. Pokud migrujete souborový server systému Windows nebo souborový server clusteru nebo na Linux Samba, můžete použít protokol DHCP nebo zadat novou statickou IP adresu. Pokud používáte statickou adresu, musí být nová podsíť stejná jako ta stará, jinak selže proces přepnutí. Pokud migrujete pole NetApp FAS, použijte místo DHCP podsítě NetApp.
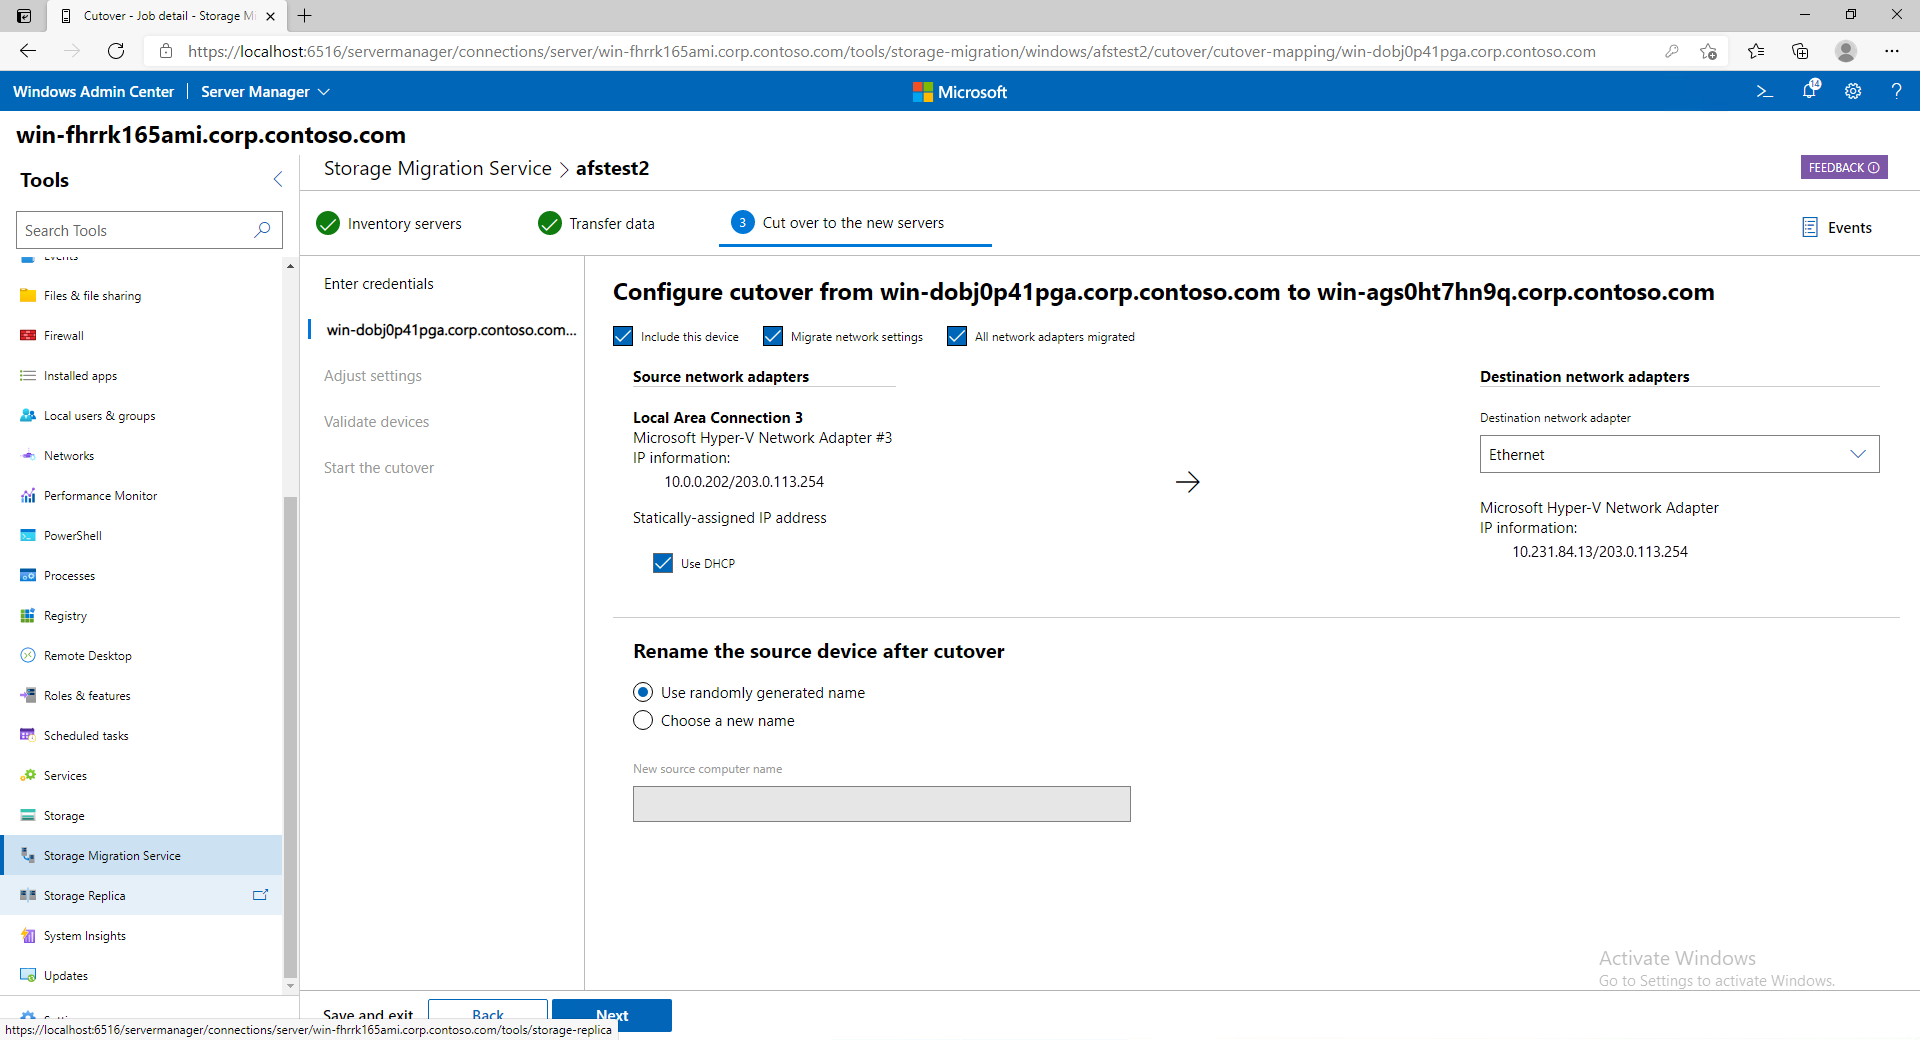
Určete, jak přejmenovat zdrojový server po převzetí názvu cílového serveru. Můžete použít náhodně vygenerovaný název nebo ho zadat sami. Pak vyberte Další.
Na stránce Upravit nastavení možná budete muset zadat nové přihlašovací údaje uživatele AD s oprávněními k odebrání zdrojového počítače nebo clusterového souborového serveru z domény a pak je přidat zpět s novým názvem, pokud přihlašovací údaje pro migraci zdroje toto oprávnění nemají.
Na stránce Ověřit zdrojové a cílové zařízení vyberte Ověřit a pak vyberte Další.
Až budete připraveni provést přepojení, vyberte Spustit přepojení.
Uživatelé a aplikace můžou zaznamenat přerušení, když se adresa a jména přesunou a servery se několikrát restartují. Mějte na paměti, že migrace uživatele a aplikace jinak neovlivní. Doba dokončení přímé migrace závisí na tom, jak rychle se servery restartují, a časy replikace Active Directory a DNS.

Operace po migraci
Po migraci serveru nebo clusteru vyhodnoťte prostředí kvůli možným operacím po migraci.
- Vytvořte plán pro nyní vyřazený zdrojový server: Služba Migrace úložiště používá proces převedení k tomu, aby cílový server mohl předpokládat identitu zdrojového serveru. Proces změní názvy a IP adresy zdrojového serveru, aby zabránil přístupu uživatelů a aplikací. Nejenže to nevypne, ale ani jinak nezmění obsah zdrojového serveru. Měli byste vytvořit plán pro vyřazení zdrojového serveru z provozu. Doporučujeme uchovávat zdroj online alespoň dva týdny, aby bylo možné migrovat všechna použitá data. Čekací doba zajišťuje, aby se všechny soubory mohly snadno načíst bez nutnosti obnovení offline zálohování. Po uplynutí této doby doporučujeme server po dobu dalších čtyř týdnů vypnout, aby byl stále dostupný pro načítání dat, ale už nepoužívá provozní ani napájecí zdroje. Po uplynutí tohoto období proveďte jednu konečnou úplnou zálohu serveru, poté vyhodnoťte jeho další využití, pokud se jedná o fyzický server, nebo jej odstraňte, pokud se jedná o virtuální počítač.
- Převalidace certifikátů na novém cílovém serveru: V době, kdy byl cílový server online, ale ještě nebyl přesměrován, mohly být certifikáty vydány prostřednictvím automatického přihlašování nebo jiných procesů. Přejmenování Windows Serveru automaticky nezmění ani znovu nevydá stávající certifikáty, takže existující certifikáty mohou obsahovat název serveru před jeho přejmenováním. Měli byste prozkoumat existující certifikáty na serveru a podle potřeby znovu vytvořit nové certifikáty.
Související odkazy
- Přehled služby Storage Migration Service
- Nejčastější dotazy ke službě Storage Migration Services
- Plánování nasazení Azure File Sync