Poznámka
Přístup k této stránce vyžaduje autorizaci. Můžete se zkusit přihlásit nebo změnit adresáře.
Přístup k této stránce vyžaduje autorizaci. Můžete zkusit změnit adresáře.
Úvod do sítě WebNN, včetně informací o podpoře operačního systému, podpoře modelů a dalších informací, najdete v přehledu sítě WebNN.
V tomto kurzu se dozvíte, jak používat WebNN s webem onNX Runtime k vytvoření systému klasifikace obrázků na webu, který je hardwarově akcelerovaný pomocí GPU na zařízení. Budeme využívat model MobileNetV2 , což je opensourcový model na Hugging Face , který se používá ke klasifikaci obrázků.
Pokud chcete zobrazit a spustit konečný kód tohoto kurzu, najdete ho na GitHubu webNN Developer Preview.
Poznámka:
Rozhraní WebNN API je doporučení pro kandidáty W3C a je v počátečních fázích verze Preview pro vývojáře. Některé funkce jsou omezené. Máme seznam aktuálních stavů podpory a implementace.
Požadavky a nastavení:
Nastavení Windows
Ujistěte se, že máte správné verze ovladačů Edge, Windows a hardwaru, jak je podrobně popsáno v části Požadavky sítě WebNN.
Nastavení Edge
Stáhněte a nainstalujte Microsoft Edge Dev.
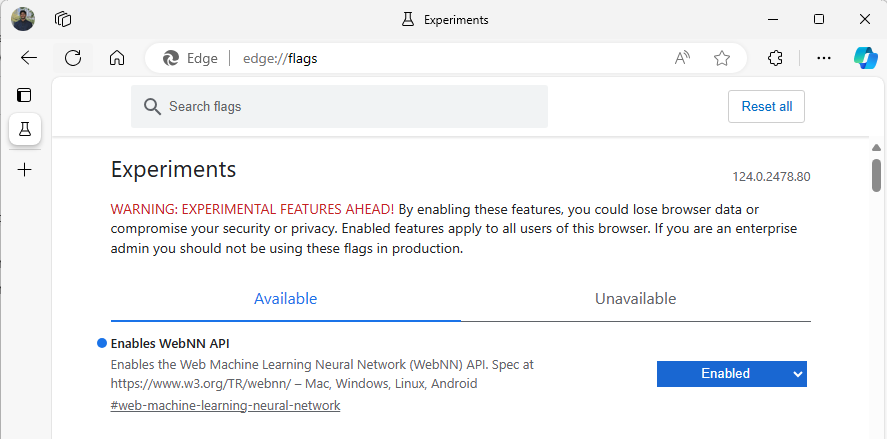
Spusťte Edge Beta a přejděte na
about:flagsv adresním řádku.Vyhledejte "WebNN API", klikněte na rozevírací seznam a nastavte na Povoleno.
Restartujte Edge podle výzvy.
Nastavení vývojového prostředí
Stáhněte a nainstalujte Visual Studio Code (VSCode).
Spusťte VSCode.
Stáhněte a nainstalujte rozšíření Live Server pro VSCode v rámci VSCode.
Vyberte
File --> Open Foldera vytvořte prázdnou složku v požadovaném umístění.
Krok 1: Inicializace webové aplikace
- Začněte vytvořením nové
index.htmlstránky. Na novou stránku přidejte následující šablonový kód.
<!DOCTYPE html>
<html lang="en">
  <head>
    <meta charset="UTF-8">
    <meta name="viewport" content="width=device-width, initial-scale=1.0">
    <title>My Website</title>
  </head>
  <body>
    <main>
        <h1>Welcome to My Website</h1>
    </main>
  </body>
</html>
- Ověřte, že šablonový kód a nastavení pro vývojáře funguje, tím, že vyberete tlačítko Spustit živě v pravém dolním rohu aplikace VSCode. Tím by se měl spustit místní server v prohlížeči Edge Beta, který bude spouštět šablonový kód.
- Nyní vytvořte nový soubor s názvem
main.js. Bude obsahovat kód javascriptu pro vaši aplikaci. - Dále vytvořte podsložku z kořenového adresáře s názvem
images. Stáhněte a uložte libovolný obrázek do složky. Pro tuto ukázku použijeme výchozí názevimage.jpg. - Stáhněte si model MobileNet z ONNX Model Zoo. V tomto kurzu budete používat soubor mobilenet2-10.onnx . Uložte tento model do kořenové složky webové aplikace.
- Nakonec stáhněte a uložte tento soubor tříd obrázků .
imagenetClasses.jsTo poskytuje 1 000 běžných klasifikací obrázků, které má váš model používat.
Krok 2: Přidání prvků uživatelského rozhraní a nadřazené funkce
- V textu
<main>značek HTML, které jste přidali v předchozím kroku, nahraďte stávající kód následujícími prvky. Vytvoří se tlačítko a zobrazí se výchozí obrázek.
<h1>Image Classification Demo!</h1>
<div><img src="./images/image.jpg"></div>
<button onclick="classifyImage('./images/image.jpg')"  type="button">Click Me to Classify Image!</button>
<h1 id="outputText"> This image displayed is ... </h1>
- Teď na stránku přidáte ONNX Runtime Web, což je JavaScriptová knihovna, kterou použijete k přístupu k rozhraní WebNN API. Do textu
<head>značek HTML přidejte následující zdrojové odkazy javascriptu.
<script src="./main.js"></script>
<script src="imagenetClasses.js"></script>
<script src="https://cdn.jsdelivr.net/npm/onnxruntime-web@1.18.0-dev.20240311-5479124834/dist/ort.webgpu.min.js"></script>
-
main.jsOtevřete soubor a přidejte následující fragment kódu.
async function classifyImage(pathToImage){
  var imageTensor = await getImageTensorFromPath(pathToImage); // Convert image to a tensor
  var predictions = await runModel(imageTensor); // Run inference on the tensor
  console.log(predictions); // Print predictions to console
  document.getElementById("outputText").innerHTML += predictions[0].name; // Display prediction in HTML
}
Krok 3: Předběžné zpracování dat
- Funkce, kterou jste právě přidali, volá
getImageTensorFromPath, další funkci, kterou musíte implementovat. Doplníte to níže, spolu s další asynchronní funkcí, kterou volá k načtení samotného obrázku.
  async function getImageTensorFromPath(path, width = 224, height = 224) {
    var image = await loadImagefromPath(path, width, height); // 1. load the image
    var imageTensor = imageDataToTensor(image); // 2. convert to tensor
    return imageTensor; // 3. return the tensor
  }

  async function loadImagefromPath(path, resizedWidth, resizedHeight) {
    var imageData = await Jimp.read(path).then(imageBuffer => { // Use Jimp to load the image and resize it.
      return imageBuffer.resize(resizedWidth, resizedHeight);
    });

    return imageData.bitmap;
  }
- Musíte také přidat
imageDataToTensorfunkci, na kterou odkazujeme výše, která vykreslí načtený obrázek do formátu tensoru, který bude fungovat s naším modelem ONNX. Jedná se o více zapojenou funkci, i když se může zdát, že jste dříve pracovali s podobnými aplikacemi pro klasifikaci obrázků. Pro rozšířené vysvětlení si můžete prohlédnout tento kurz ONNX.
  function imageDataToTensor(image) {
    var imageBufferData = image.data;
    let pixelCount = image.width * image.height;
    const float32Data = new Float32Array(3 * pixelCount); // Allocate enough space for red/green/blue channels.

    // Loop through the image buffer, extracting the (R, G, B) channels, rearranging from
    // packed channels to planar channels, and converting to floating point.
    for (let i = 0; i < pixelCount; i++) {
      float32Data[pixelCount * 0 + i] = imageBufferData[i * 4 + 0] / 255.0; // Red
      float32Data[pixelCount * 1 + i] = imageBufferData[i * 4 + 1] / 255.0; // Green
      float32Data[pixelCount * 2 + i] = imageBufferData[i * 4 + 2] / 255.0; // Blue
      // Skip the unused alpha channel: imageBufferData[i * 4 + 3].
    }
    let dimensions = [1, 3, image.height, image.width];
    const inputTensor = new ort.Tensor("float32", float32Data, dimensions);
    return inputTensor;
  }
Krok 4: Volání webového modulu ONNX Runtime
- Nyní jste přidali všechny funkce potřebné k načtení vašeho obrázku a vykreslení ho jako tenzor. Teď pomocí webové knihovny ONNX Runtime, kterou jste načetli výše, spustíte model. Všimněte si, že pokud zde chcete použít webNN, jednoduše zadáte
executionProvider = "webnn"– podpora modulu runtime ONNX usnadňuje povolení sítě WebNN.
  async function runModel(preprocessedData) {
    // Set up environment.
    ort.env.wasm.numThreads = 1;
    ort.env.wasm.simd = true;
    // Uncomment for additional information in debug builds:
    // ort.env.wasm.proxy = true;
    // ort.env.logLevel = "verbose";
    // ort.env.debug = true;

    // Configure WebNN.
    const modelPath = "./mobilenetv2-10.onnx";
    const devicePreference = "gpu"; // Other options include "npu" and "cpu".
    const options = {
        executionProviders: [{ name: "webnn", deviceType: devicePreference, powerPreference: "default" }],
      freeDimensionOverrides: {"batch": 1, "channels": 3, "height": 224, "width": 224}
      // The key names in freeDimensionOverrides should map to the real input dim names in the model.
      // For example, if a model's only key is batch_size, you only need to set
      // freeDimensionOverrides: {"batch_size": 1}
    };
    modelSession = await ort.InferenceSession.create(modelPath, options);

    // Create feeds with the input name from model export and the preprocessed data.
    const feeds = {};
    feeds[modelSession.inputNames[0]] = preprocessedData;
    // Run the session inference.
    const outputData = await modelSession.run(feeds);
    // Get output results with the output name from the model export.
    const output = outputData[modelSession.outputNames[0]];
    // Get the softmax of the output data. The softmax transforms values to be between 0 and 1.
    var outputSoftmax = softmax(Array.prototype.slice.call(output.data));
    // Get the top 5 results.
    var results = imagenetClassesTopK(outputSoftmax, 5);

    return results;
  }
Krok 5: Data po zpracování
- Nakonec přidáte funkci a pak přidáte konečnou
softmaxfunkci, která vrátí nejpravděpodobnější klasifikaci obrázků.softmaxtransformuje vaše hodnoty na rozmezí od 0 do 1, což je nutná pravděpodobnostní forma pro konečnou klasifikaci.
Nejprve přidejte následující zdrojové soubory pro pomocné knihovny Jimp a Lodash do hlavní značky main.js.
<script src="https://cdnjs.cloudflare.com/ajax/libs/jimp/0.22.12/jimp.min.js" integrity="sha512-8xrUum7qKj8xbiUrOzDEJL5uLjpSIMxVevAM5pvBroaxJnxJGFsKaohQPmlzQP8rEoAxrAujWttTnx3AMgGIww==" crossorigin="anonymous" referrerpolicy="no-referrer"></script>
<script src="https://cdn.jsdelivr.net/npm/lodash@4.17.21/lodash.min.js"></script>
Nyní přidejte tyto následující funkce do main.jssouboru .
// The softmax transforms values to be between 0 and 1.
function softmax(resultArray) {
  // Get the largest value in the array.
  const largestNumber = Math.max(...resultArray);
  // Apply the exponential function to each result item subtracted by the largest number, using reduction to get the
  // previous result number and the current number to sum all the exponentials results.
  const sumOfExp = resultArray
    .map(resultItem => Math.exp(resultItem - largestNumber))
    .reduce((prevNumber, currentNumber) => prevNumber + currentNumber);

  // Normalize the resultArray by dividing by the sum of all exponentials.
  // This normalization ensures that the sum of the components of the output vector is 1.
  return resultArray.map((resultValue, index) => {
    return Math.exp(resultValue - largestNumber) / sumOfExp
  });
}

function imagenetClassesTopK(classProbabilities, k = 5) {
  const probs = _.isTypedArray(classProbabilities)
    ? Array.prototype.slice.call(classProbabilities)
    : classProbabilities;

  const sorted = _.reverse(
    _.sortBy(
      probs.map((prob, index) => [prob, index]),
      probIndex => probIndex[0]
    )
  );

  const topK = _.take(sorted, k).map(probIndex => {
    const iClass = imagenetClasses[probIndex[1]]
    return {
      id: iClass[0],
      index: parseInt(probIndex[1].toString(), 10),
      name: iClass[1].replace(/_/g, " "),
      probability: probIndex[0]
    }
  });
  return topK;
}
- Teď jste do základní webové aplikace přidali všechny skriptování potřebné ke spuštění klasifikace obrázků pomocí WebNN. Pomocí rozšíření Live Server pro VS Code teď můžete spustit základní webovou stránku v aplikaci, abyste viděli výsledky klasifikace sami.