Poznámka:
Přístup k této stránce vyžaduje autorizaci. Můžete se zkusit přihlásit nebo změnit adresáře.
Přístup k této stránce vyžaduje autorizaci. Můžete zkusit změnit adresáře.

V tomto rychlém startu vytvoříte desktopovou aplikaci pro Windows, která odesílá a přijímá oznámení místních aplikací, označovaná také jako informační oznámení, pomocí sady Windows App SDK.
Important
Oznámení u aplikací se zvýšenými oprávněními (správcovských aplikací) nejsou v současné době podporována.
Prerequisites
- Začínáme s WinUI
- Buď Vytvořit nový projekt, který používá sadu Windows App SDK NEBO Použít sadu Windows App SDK v existujícím projektu
Sample app
Tato rychlá příručka popisuje kód z vzorových aplikací pro oznámení, které najdete na GitHubu .
API reference
Referenční dokumentaci k rozhraní API pro oznámení aplikací viz Microsoft.Windows.AppNotifications – obor názvů.
Krok 1: Přidejte deklarace jmenných prostorů
Přidejte obor názvů pro upozornění aplikací Windows App SDK Microsoft.Windows.AppNotifications.
using Microsoft.Windows.AppNotifications;
Krok 2: Aktualizace manifestu aplikace
Pokud je vaše aplikace nebalená (tj. chybí identita balíčku za běhu), přejděte na krok 3: Registrace k zpracování oznámení aplikace.
Pokud je vaše aplikace předem zabalená (včetně těch s externím umístěním):
- Otevřete prosím Package.appxmanifest.
- Přidejte obory názvů
xmlns:com="http://schemas.microsoft.com/appx/manifest/com/windows10"axmlns:desktop="http://schemas.microsoft.com/appx/manifest/desktop/windows10"do<Package> - Přidáním
<desktop:Extension>prowindows.toastNotificationActivationdeklarujte aktivátor COM CLSID. IDENTIFIKÁTOR CLSID můžete získat tak, že v sadě Visual Studio přejdete na Create GUID v části Tools. - Přidejte
<com:Extension>pro aktivátor COM pomocí stejného CLSID.- V atributu
Executablezadejte soubor .exe. Soubor .exe musí být stejný proces jako voláníRegister()při registraci vaší aplikace pro oznámení, což je podrobněji popsáno v kroku 3. V následujícím příkladu používámeExecutable="SampleApp\SampleApp.exe". - Zadejte
Arguments="----AppNotificationActivated:", abyste zajistili, že sada Windows App SDK dokáže zpracovat obsah oznámení jako typ AppNotification. - Zadejte
DisplayName.
- V atributu
Important
Upozornění: Pokud definujete typ rozšíření aplikace Windows.Protocol v manifestu appx s <uap:Protocol>, kliknutím na oznámení se spustí nové procesy stejné aplikace, i když je vaše aplikace již spuštěná.
<!--Packaged apps only-->
<!--package.appxmanifest-->

<Package
  xmlns:com="http://schemas.microsoft.com/appx/manifest/com/windows10"
  xmlns:desktop="http://schemas.microsoft.com/appx/manifest/desktop/windows10"
  ...
  <Applications>
    <Application>
      ...
      <Extensions>

        <!--Specify which CLSID to activate when notification is clicked-->
        <desktop:Extension Category="windows.toastNotificationActivation">
          <desktop:ToastNotificationActivation ToastActivatorCLSID="replaced-with-your-guid-C173E6ADF0C3" />
        </desktop:Extension>

        <!--Register COM CLSID-->
        <com:Extension Category="windows.comServer">
          <com:ComServer>
            <com:ExeServer Executable="SampleApp\SampleApp.exe" DisplayName="SampleApp" Arguments="----AppNotificationActivated:">
              <com:Class Id="replaced-with-your-guid-C173E6ADF0C3" />
            </com:ExeServer>
          </com:ComServer>
        </com:Extension>

      </Extensions>
    </Application>
  </Applications>
 </Package>
Krok 3: Registrace pro zpracování oznámení aplikace
Zaregistrujte aplikaci, abyste mohli zpracovávat oznámení, a po ukončení aplikace ji odregistrujte.
V souboru App.xaml se zaregistrujte pro AppNotificationManager::Default().NotificationInvokeda poté zavolejte AppNotificationManager::Default().Register. Na pořadí těchto hovorů záleží.
Important
Musíte volat AppNotificationManager::D efault(). Zaregistrujte před voláním AppInstance.GetCurrent.GetActivatedEventArgs.
Když se aplikace ukončuje, zavolejte AppNotificationManager::Default().Odregistrovat(), aby se uvolnil server COM a umožnilo se následným voláním spustit nový proces.
// App.xaml.cs
namespace CsUnpackagedAppNotifications
{

    public partial class App : Application
    {
        private Window mainWindow;
        private NotificationManager notificationManager;

        public App()
        {
            this.InitializeComponent();
            notificationManager = new NotificationManager();
            AppDomain.CurrentDomain.ProcessExit += new EventHandler(OnProcessExit);
        }

        protected override void OnLaunched(LaunchActivatedEventArgs args)
        {
            mainWindow = new MainWindow();

            notificationManager.Init();

            // Complete in Step 5

            mainWindow.Activate();
        }

        void OnProcessExit(object sender, EventArgs e)
        {
            notificationManager.Unregister();
        }
    }
}


// NotificationManager.cs
namespace CsUnpackagedAppNotifications
{
    internal class NotificationManager
    {
        private bool m_isRegistered;

        private Dictionary<int, Action<AppNotificationActivatedEventArgs>> c_map;

        public NotificationManager()
        {
            m_isRegistered = false;

            // When adding new a scenario, be sure to add its notification handler here.
            c_map = new Dictionary<int, Action<AppNotificationActivatedEventArgs>>();
            c_map.Add(ToastWithAvatar.ScenarioId, ToastWithAvatar.NotificationReceived);
            c_map.Add(ToastWithTextBox.ScenarioId, ToastWithTextBox.NotificationReceived);
        }

        ~NotificationManager()
        {
            Unregister();
        }

        public void Init()
        {
            // To ensure all Notification handling happens in this process instance, register for
            // NotificationInvoked before calling Register(). Without this a new process will
            // be launched to handle the notification.
            AppNotificationManager notificationManager = AppNotificationManager.Default;

            notificationManager.NotificationInvoked += OnNotificationInvoked;

            notificationManager.Register();
            m_isRegistered = true;
        }

        public void Unregister()
        {
            if (m_isRegistered)
            {
                AppNotificationManager.Default.Unregister();
                m_isRegistered = false;
            }
        }

        public void ProcessLaunchActivationArgs(AppNotificationActivatedEventArgs notificationActivatedEventArgs)
        {
            // Complete in Step 5
        }

    }
}
Krok 4: Zobrazení oznámení aplikace
Oznámení z aplikace 
Než budete pokračovat, musíte dokončit krok 3: Zaregistrujte se, abyste mohli zpracovat oznámení aplikace.
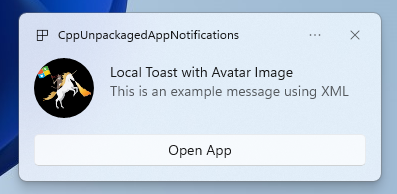
Teď zobrazíte jednoduché oznámení aplikace s obrázkem appLogoOverride a tlačítkem.
Vytvořte oznámení aplikace pomocí třídy AppNotificationBuilder a pak volejte Show. Další informace o tom, jak vytvořit oznámení aplikace pomocí XML, najdete v příkladech v obsahu toasty a ve schématu XML oznámení.
Note
Pokud je vaše aplikace balíčkována (včetně balíčku s externím umístěním), pochází ikona aplikace v levém horním rohu oznámení z package.manifest. Pokud vaše aplikace není zabalená, ikona se nejprve vyhledá v zástupci a poté se zkontroluje ve zdrojovém souboru v rámci procesu aplikace. Pokud všechny pokusy selžou, použije se výchozí ikona aplikace pro Windows. Podporované typy souborů ikon jsou .jpg, .png, .bmpa .ico.
// ToastWithAvatar.cs
class ToastWithAvatar
{
    public const int ScenarioId = 1;
    public const string ScenarioName = "Local Toast with Avatar Image";

    public static bool SendToast()
    {
        var appNotification = new AppNotificationBuilder()
            .AddArgument("action", "ToastClick")
            .AddArgument(Common.scenarioTag, ScenarioId.ToString())
            .SetAppLogoOverride(new System.Uri("file://" + App.GetFullPathToAsset("Square150x150Logo.png")), AppNotificationImageCrop.Circle)
            .AddText(ScenarioName)
            .AddText("This is an example message using XML")
            .AddButton(new AppNotificationButton("Open App")
                .AddArgument("action", "OpenApp")
                .AddArgument(Common.scenarioTag, ScenarioId.ToString()))
            .BuildNotification();

        AppNotificationManager.Default.Show(appNotification);

        return appNotification.Id != 0; // return true (indicating success) if the toast was sent (if it has an Id)
    }

    public static void NotificationReceived(AppNotificationActivatedEventArgs notificationActivatedEventArgs)
    {
        // Complete in Step 5
    }
}

// Call SendToast() to send a notification.
Krok 5: Zpracování výběru oznámení uživatelem
Uživatelé můžou vybrat text nebo tlačítko vašeho oznámení. Vaše aplikace potřebuje zpracovat vyvolání v reakci na uživatele, který komunikuje s vaším oznámením.
Existují 2 běžné způsoby, jak to zpracovat:
- Rozhodnete se, že se vaše aplikace spustí v konkrétním kontextu uživatelského rozhraní NEBO
- Rozhodnete se, že aplikace vyhodnotí chování specifické pro akci (například stisknutí tlačítka v textu oznámení) bez vykreslení uživatelského rozhraní. Označuje se také jako akce na pozadí.
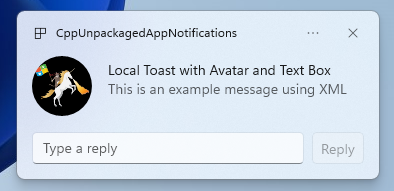
Následující příklad kódu, který není z ukázkové aplikace, ilustruje oba způsoby zpracování akce generované uživatelem. Přidejte hodnotu launch (odpovídá uživateli, který klikne na text oznámení), prvek input (textové pole rychlé odpovědi) a tlačítko s hodnotou arguments (odpovídá uživateli, který na tlačítko klikne) do datové části XML oznámení. Upravte velká a malá písmena u každého argumentu v ProcessLaunchActivationArgs.
Important
Nastavení activationType="background" v datové části XML oznámení se pro desktopové aplikace ignoruje. Místo toho musíte zpracovat aktivační argumenty a rozhodnout, zda se má zobrazit okno, jak je uvedeno v tomto kroku.
Oznámení aplikace s možností odpovědět 
// Example of how to process a user either selecting the notification body or inputting a quick reply in the text box.
// Notification XML payload
//<toast launch="action=openThread&threadId=92187">
// <visual>
// <binding template="ToastGeneric">
// <image placement="appLogoOverride" hint-crop="circle" src="C:\<fullpath>\Logo.png"/>
// <text>Local Toast with Avatar and Text box</text>
// <text>This is an example message using</text>
// </binding>
// </visual>
// <actions>
// <input id="replyBox" type="text" placeHolderContent="Reply" />
// <action
// content="Send"
// hint-inputId="replyBox"
// arguments="action=reply&threadId=92187" />
// </actions>
//</toast>
void ProcessLaunchActivationArgs(const winrt::AppNotificationActivatedEventArgs& notificationActivatedEventArgs)
{
// If the user clicks on the notification body, your app needs to launch the chat thread window
if (std::wstring(notificationActivatedEventArgs.Argument().c_str()).find(L"openThread") != std::wstring::npos)
{
GenerateChatThreadWindow();
}
else // If the user responds to a message by clicking a button in the notification, your app needs to reply back to the other user with no window launched
if (std::wstring(notificationActivatedEventArgs.Argument().c_str()).find(L"reply") != std::wstring::npos)
{
auto input = notificationActivatedEventArgs.UserInput();
auto replyBoxText = input.Lookup(L"replyBox");
// Process the reply text
SendReplyToUser(replyBoxText);
}
}
postupujte podle následujících pokynů:
- Pokud uživatel vybere oznámení a vaše aplikace není spuštěná, očekává se, že se aplikace spustí a uživatel uvidí okno popředí v kontextu oznámení.
- Pokud uživatel vybere oznámení a vaše aplikace se minimalizuje, očekává se, že se aplikace přenese do popředí a v kontextu oznámení se vykreslí nové okno.
- Pokud uživatel vyvolá akci na pozadí oznámení (např. uživatel odpoví na oznámení zadáním do textového pole oznámení a stisknutím odpovědi), aplikace zpracuje datovou část bez vykreslení okna popředí.
Podrobnější příklad najdete v ukázkovém kódu aplikace, který najdete na GitHubu.
Krok 6: Odebrání oznámení
Odeberte oznámení, pokud už nejsou pro uživatele relevantní.
V tomto příkladu se uživateli zobrazily všechny zprávy ze skupinového chatu ve vaší aplikaci, takže vymažete všechna oznámení ze skupinového chatu. Pak uživatel ztlumí přítele, takže vymažete všechna oznámení od přítele. Nejprve jste do oznámení přidali vlastnosti skupiny a značky před zobrazením, abyste je nyní mohli identifikovat.
void SendNotification(winrt::hstring const& payload, winrt::hstring const& friendId, winrt::hstring const& groupChatId)
{
    winrt::AppNotification notification(payload);

    // Setting Group Id here allows clearing notifications from a specific chat group later
    notification.Group(groupChatId);

    // Setting Tag Id here allows clearing notifications from a specific friend later
    notification.Tag(friendId);

    winrt::AppNotificationManager::Default().Show(notification);
}

winrt::Windows::Foundation::IAsyncAction RemoveAllNotificationsFromGroupChat(const std::wstring groupChatId)
{
    winrt::AppNotificationManager manager = winrt::AppNotificationManager::Default();
    co_await manager.RemoveByGroupAsync(groupChatId);
}

winrt::Windows::Foundation::IAsyncAction RemoveAllNotificationsFromFriend(const std::wstring friendId)
{
    winrt::AppNotificationManager manager = winrt::AppNotificationManager::Default();
    co_await manager.RemoveByTagAsync(friendId);
}
Additional features
Odeslání oznámení o cloudové aplikaci
Pokud chcete odeslat oznámení aplikace z cloudu, postupujte podle Odeslání oznámení aplikace z cloudu v Rychlý start: Oznámení push v sadě Windows App SDK.
Nastavení času vypršení platnosti
Nastavte u oznámení aplikace dobu vypršení platnosti pomocí vlastnosti Expiration, pokud je zpráva v oznámení relevantní jenom po určitou dobu. Pokud například odešlete připomenutí události kalendáře, nastavte čas vypršení platnosti na konec události kalendáře.
Note
Výchozí a maximální doba vypršení platnosti je 3 dny.
class ToastWithAvatar
{
    public static bool SendToast()
    {

        var appNotification = new AppNotificationBuilder()
            .SetAppLogoOverride(new System.Uri("ms-appx:///images/logo.png"), AppNotificationImageCrop.Circle)
            .AddText("Example expiring notification")
            .AddText("This is an example message")
            .BuildNotification();


        appNotification.Expiration = DateTime.Now.AddDays(1);
        AppNotificationManager.Default.Show(appNotification);

        return appNotification.Id != 0; // return true (indicating success) if the toast was sent (if it has an Id)
    }
}
Zajištění vypršení platnosti oznámení při restartování
Nastavte vlastnost ExpiresOnReboot na hodnotu True, pokud chcete, aby se při restartování odstranila oznámení.
class ToastWithAvatar
{
    public static bool SendToast()
    {

        var appNotification = new AppNotificationBuilder()
            .SetAppLogoOverride(new System.Uri("ms-appx:///images/logo.png"), AppNotificationImageCrop.Circle)
            .AddText("Example ExpiresOnReboot notification")
            .AddText("This is an example message")
            .BuildNotification();


            appNotification.ExpiresOnReboot = true;
            AppNotificationManager.Default.Show(appNotification);

            return appNotification.Id != 0; // return true (indicating success) if the toast was sent (if it has an Id)
    }
}
Odeslání a aktualizace oznámení indikátoru průběhu
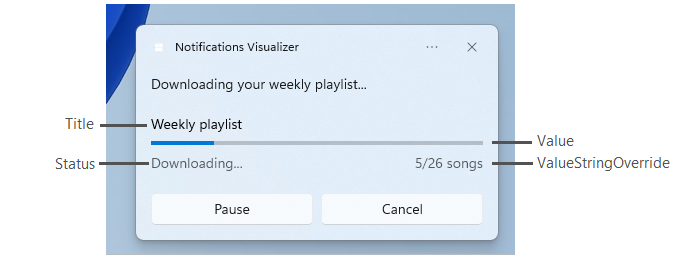
Indikátor průběhu souvisejících aktualizací můžete zobrazit v oznámení:

Pomocí konstrukce AppNotificationProgressData aktualizujte oznámení ukazatele průběhu.
const winrt::hstring c_tag = L"weekly-playlist";
const winrt::hstring c_group = L"downloads";

// Send first Notification Progress Update
void SendUpdatableNotificationWithProgress()
{
    auto notification{ winrt::AppNotificationBuilder()
            .AddText(L"Downloading this week's new music...")
            .AddProgressBar(winrt::AppNotificationProgressBar()
                .BindTitle()
                .BindValue()
                .BindValueStringOverride()
                .BindStatus())
            .BuildNotification() }

    notification.Tag(c_tag);
    notification.Group(c_group);

    // Assign initial values for first notification progress UI
    winrt::AppNotificationProgressData data(1); // Sequence number
    data.Title(L"Weekly playlist"); // Binds to {progressTitle} in xml payload
    data.Value(0.6); // Binds to {progressValue} in xml payload
    data.ValueStringOverride(L"15/26 songs"); // Binds to {progressValueString} in xml payload
    data.Status(L"Downloading..."); // Binds to {progressStatus} in xml payload

    notification.Progress(data);
    winrt::AppNotificationManager::Default().Show(notification);
}

// Send subsequent progress updates
winrt::Windows::Foundation::IAsyncAction UpdateProgressAsync()
{
    // Assign new values
    winrt::AppNotificationProgressData data(2 /* Sequence number */ );
    data.Title(L"Weekly playlist"); // Binds to {progressTitle} in xml payload
    data.Value(0.7); // Binds to {progressValue} in xml payload
    data.ValueStringOverride(L"18/26 songs"); // Binds to {progressValueString} in xml payload
    data.Status(L"Downloading..."); // Binds to {progressStatus} in xml payload

    auto result = co_await winrt::AppNotificationManager::Default().UpdateAsync(data, c_tag, c_group);
    if (result == winrt::AppNotificationProgressResult::AppNotificationNotFound)
    {
        // Progress Update failed since the previous notification update was dismissed by the user! So account for this in your logic by stopping updates or starting a new Progress Update flow.
    }
}
Resources
- Podrobnosti rozhraní API Microsoft.Windows.AppNotifications
- Ukázka kódu oznámení na GitHubu
- specifikace oznámení aplikace na GitHubu
- Toast content
- XML schéma oznámení
Windows developer
