Poznámka:
Přístup k této stránce vyžaduje autorizaci. Můžete se zkusit přihlásit nebo změnit adresáře.
Přístup k této stránce vyžaduje autorizaci. Můžete zkusit změnit adresáře.
Předchozí téma představilo Rust pro Windows a knihovnupro Windows.
Teď si pojďme vyzkoušet Rust pro Windows tím, že napíšeme jednoduchou konzolovou aplikaci, která stáhne názvy blogových příspěvků z informačního kanálu RSS (Really Simple Syndication).
Spusťte příkazový řádek (
cmd.exe) acddo složky, do které chcete zachovat projekty Rust.Pomocí cargo vytvořte nový projekt Rust s názvem rss_reader a
cddo nově vytvořené složky:> cargo new rss_reader > Created binary (application) `rss_reader` package > cd rss_readerPak otevřete projekt rss_reader v editoru VS Code.
code .Pojďme implementovat hlavní projekt rss_reader. Nejprve otevřete
Cargo.tomlsoubor v kořenovém adresáři projektu.Cargo.tomlSoubor je textový soubor, který popisuje projekt Rust, včetně všech závislostí, které obsahuje.Přidejte závislost na crate windows, jak je uvedeno v následujícím výpisu. okenní bedna je velká. Abychom zachovali časy sestavení rychle, vybereme jenom
Foundation_Collectionsfunkce,Web_Syndicationkteré potřebujeme pro tento kód.# Cargo.toml ... [dependencies.windows] version = "0.43.0" features = [ "Foundation_Collections", "Web_Syndication", ]Pak otevřete soubor zdrojového kódu rss_reader projektu
src/main.rs. Tam najdete výchozí kód Cargo „Hello, world!“. Na začátek přidejte následujícímain.rs:// src\main.rs use windows::{ core::*, Foundation::Uri, Web::Syndication::SyndicationClient }; fn main() { println!("Hello, world!"); }Deklarace use zkracuje cestu k typům, které budeme používat. Existuje typ URI, který jsme zmínili dříve.
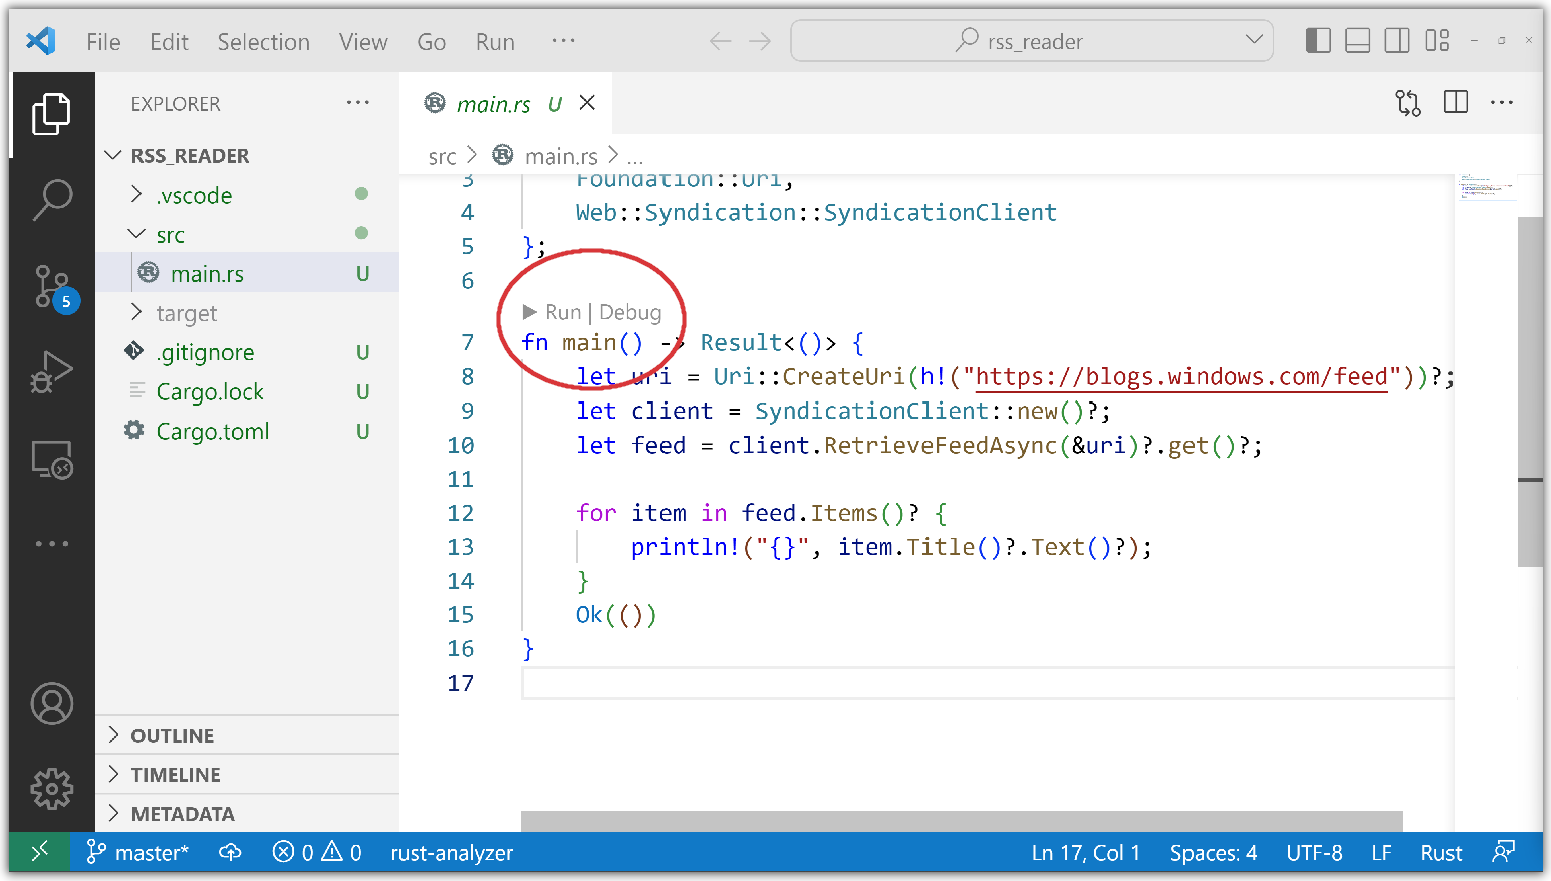
Pokud chcete vytvořit nový URI, nahraďte výchozí funkci main v Cargo tímto:
// src\main.rs
...

fn main() -> Result<()> {
    let uri = Uri::CreateUri(h!("https://blogs.windows.com/feed"))?;

    Ok(())
}
Všimněte si, že návratový typ hlavní funkce je Resultz windows::core::. To vám usnadní práci, protože je běžné řešit chyby z rozhraní API operačního systému (OS). windows::core::Result nám pomáhá s propagací chyb a stručným zpracováním chyb.
Na konci řádku kódu se zobrazí operátor otazníku. Abychom ušetřili při psaní, uděláme to tak, že použijeme logiku šíření chyb a zkratování Rustu. To znamená, že pro tento jednoduchý příklad nemusíme provádět spoustu ručního zpracování chyb. Další informace o této funkci Rustu naleznete na odkazu operátor ? pro snadnější zpracování chyb.
Také si všimněte h! makra z Windows crate. Používáme to ke konstrukci odkazu HSTRING z řetězcového literálu v Rustu. Rozhraní API WinRT rozsáhle používá HSTRING pro řetězcové hodnoty.
Abychom stáhli informační kanál RSS, vytvoříme nový SyndicationClient.
// src\main.rs
...

fn main() -> windows::core::Result<()> {
    let uri = Uri::CreateUri(h!("https://blogs.windows.com/feed"))?;
    let client = SyndicationClient::new()?;

    Ok(())
}
nová funkce je konstruktor v jazyce Rust. Všechny objekty v oknech crate dodržují konvenci Rust a pojmenují své konstruktory new.
Teď můžeme k načtení informačního kanálu použít SyndicationClient.
// src\main.rs
...

fn main() -> windows::core::Result<()> {
    let uri = Uri::CreateUri(h!("https://blogs.windows.com/feed"))?;
    let client = SyndicationClient::new()?;
    let feed = client.RetrieveFeedAsync(&uri)?.get()?;

    Ok(())
}
Vzhledem k tomu, že RetrieveFeedAsync je asynchronní API, používáme blokující funkci get k zachování jednoduchého příkladu. Případně bychom mohli pomocí operátoru
awaitv rámci funkceasyncspolečně čekat na výsledky. Složitější aplikace s grafickým uživatelským rozhraním bude často používatasync.Teď můžeme iterovat výsledné položky a vytiskneme jenom názvy. Uvidíte také několik dalších řádků kódu níže, abyste nastavili hlavičku uživatelského agenta, protože některé informační kanály RSS to vyžadují.
// src\main.rs
...

fn main() -> windows::core::Result<()> {
    let uri = Uri::CreateUri(h!("https://blogs.windows.com/feed"))?;
    let client = SyndicationClient::new()?;

    client.SetRequestHeader(
        h!("User-Agent"),
        h!("Mozilla/5.0 (compatible; MSIE 10.0; Windows NT 6.2; WOW64; Trident/6.0)"),
    )?;

    let feed = client.RetrieveFeedAsync(&uri)?.get()?;

    for item in feed.Items()? {
        println!("{}", item.Title()?.Text()?);
    }

    Ok(())
}
Teď ověříme, že můžeme sestavit a spustit kliknutím na Spustit>bez ladění (nebo stisknutím kombinace kláves Ctrl+F5). Pokud se zobrazí nějaké neočekávané zprávy, ujistěte se, že jste úspěšně dokončili kurz Hello, World! (Rust with VS Code).
K dispozici jsou také příkazy Ladění a Spustit vložené do textového editoru. Případně z příkazového řádku ve složce
rss_readerzadejtecargo run, což zkompiluje a poté spustí program.
V podokně terminálu VS Code vidíte, že Cargo úspěšně stáhne a zkompiluje crate windows , uloží výsledky do mezipaměti a použije je k dokončení následných sestavení rychleji. Pak sestaví ukázku a spustí ji a zobrazí se seznam názvů blogových příspěvků.

To je stejně jednoduché, jako je program Rust pro Windows. Pod kapotou je však věnována velká péče konstrukci nástrojů, aby umožnila Rustu parsovat .winmd soubory na základě ECMA-335 (Common Language Infrastructure, nebo CLI), a zároveň věrně dodržet binární rozhraní aplikace založené na modelu COM (ABI) za běhu se zřetelem na bezpečnost a efektivitu.
Zobrazení pole se zprávou
Řekli jsme, že Rust pro Windows umožňuje volat libovolné rozhraní API systému Windows (minulé, současné a budoucí). V této části se tedy zobrazí několik oken se zprávami windows.
Stejně jako jsme to udělali pro projekt RSS, přejděte v příkazovém řádku do složky s vašimi projekty v Rustu pomocí příkazu
cd.Vytvořte nový projekt s názvem message_box a otevřete ho ve VS Code:
> cargo new message_box
>     Created binary (application) `message_box` package
> cd message_box
> code .
Ve VS Code otevřete a
Cargo.tomlpřidejte závislosti Windows pro tento projekt:# message_box\Cargo.toml ... [dependencies.windows] version = "0.43.0" features = [ "Win32_Foundation", "Win32_UI_WindowsAndMessaging", ]Teď otevřete soubor projektu
src/main.rsa přidejteusedeklarace s novými obory názvů (jak je znázorněno níže). A nakonec přidejte kód pro volání funkcí MessageBoxA a MessageBoxW . Dokumentace k rozhraní API pro Windows je napsaná hlavně v jazyce C/C++, takže je užitečné porovnat dokumentaci rozhraní API s dokumentací pro projekce v Rustu v windows crate: MessageBoxA (Rust) a MessageBoxW (Rust).// src\main.rs use windows::{ core::*, Win32::UI::WindowsAndMessaging::* }; fn main() { unsafe { MessageBoxA(None, s!("Ansi"), s!("World"), MB_OK); MessageBoxW(None, w!("Wide"), w!("World"), MB_OK); } }Jak vidíte, musíme tato rozhraní API Win32 používat v
unsafebloku (viz Nebezpečné bloky). Všimněte si také makra s! a w!, která vytvářejí argumenty LPCSTR a LPCWSTR z Rust UTF-8 řetězcových literálů; podobně jako jsme vytvořili HSTRING pomocí makra h! pro rss_reader. Rust je nativně Unicode s řetězci UTF-8, takže použití širokých Unicode rozhraní API s příponou W v systému Windows se upřednostňuje před rozhraními API ANSI s příponou A. To může být důležité, pokud v kódu používáte neanglické texty.
Tentokrát, když sestavíte a spustíte, Rust zobrazí dvě okna se zprávami systému Windows.
Související
Windows developer
