Bemærk
Adgang til denne side kræver godkendelse. Du kan prøve at logge på eller ændre mapper.
Adgang til denne side kræver godkendelse. Du kan prøve at ændre mapper.
Controlling outbound network access is an important part of an overall network security plan. For example, you might want to limit access to websites. Or, you might want to limit the outbound IP addresses and ports that can be accessed.
You can control outbound network access from an Azure subnet by using Azure Firewall and Firewall Policy. By using Azure Firewall and Firewall Policy, you can configure:
- Application rules that define fully qualified domain names (FQDNs) that can be accessed from a subnet.
- Network rules that define source address, protocol, destination port, and destination address.
Network traffic is subjected to the configured firewall rules when you route your network traffic to the firewall as the subnet default gateway.
For this tutorial, you create a simplified single virtual network (VNet) with two subnets for easy deployment.
- AzureFirewallSubnet - the firewall is in this subnet.
- Workload-SN - the workload server is in this subnet. This subnet's network traffic goes through the firewall.
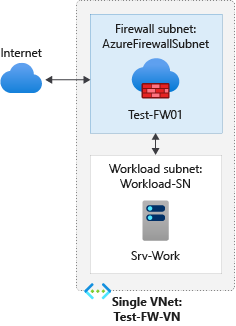
For production deployments, use a hub and spoke model, where the firewall is in its own VNet. The workload servers are in peered VNets in the same region with one or more subnets.
In this tutorial, you learn how to:
- Set up a test network environment
- Deploy a firewall and firewall policy
- Create a default route
- Configure an application rule to allow access to www.google.com
- Configure a network rule to allow access to external DNS servers
- Configure a NAT rule to allow inbound HTTP access to the test server
- Test the firewall
If you prefer, you can complete this procedure by using Azure PowerShell.
Prerequisites
If you don't have an Azure subscription, create a free account before you begin.
Choose a region that supports Azure Bastion Developer, such as West US. Use that region for all resources in this tutorial.
Set up the network
First, create a resource group to contain the resources needed to deploy the firewall. Then create a virtual network, subnets, and a test server.
Create a resource group
The resource group contains all the resources for the tutorial.
Sign in to the Azure portal.
On the Azure portal menu, select Resource groups or search for and select Resource groups from any page, and then select Create. Enter or select the following values:
Setting Value Subscription Select your Azure subscription. Resource group Enter Test-FW-RG. Region Select a region. All other resources that you create must be in the same region. Select Review + create > Create.
Create a VNet
This VNet has two subnets.
Note
The size of the AzureFirewallSubnet subnet is /26. For more information about the subnet size, see Azure Firewall FAQ.
On the Azure portal menu or from Home, select Create a resource, search for Virtual network, and select Create.
Enter or select the following values:
Setting Value Subscription Select your Azure subscription. Resource group Select Test-FW-RG. Name Enter Test-FW-VN. Region Select the same location that you used previously. Select Next twice to get to the IP addresses tab.
For IPv4 Address space, accept the default 10.0.0.0/16.
Under Subnets, select default. On the Edit subnet pane, set Subnet purpose to Azure Firewall.
The firewall is in this subnet, and the subnet name must be AzureFirewallSubnet.
For Starting address, type 10.0.1.0, then select Save.
Select Add subnet and enter the following values, then select Add:
Setting Value Subnet name Workload-SN Starting address 10.0.2.0/24 Select Review + create > Create.
Deploy Azure Bastion
Use Azure Bastion Developer to securely connect to Srv-Work for testing. Developer uses shared infrastructure and connects to VMs in the same virtual network. It doesn't require a dedicated AzureBastionSubnet or public IP address.
There's no separate dedicated-host deployment in this tutorial. After you create the VM and configure the firewall, the test steps connect through Bastion. In a supported region, selecting Connect deploys Bastion Developer automatically. For details, see Deploy Bastion Developer.
Create a virtual machine
Create the workload virtual machine and place it in the Workload-SN subnet.
In the search box at the top of the portal, enter Virtual machine, select Virtual machines, then select Create > Virtual machine.
Enter or select these values for the virtual machine:
Setting Value Project details Subscription Select your Azure subscription. Resource group Select Test-FW-RG. Instance details Virtual machine name Enter Srv-Work. Region Select the same location that you used previously. Availability options Select No infrastructure redundancy required. Security type Select Standard. Image Select Ubuntu Server 24.04 LTS -x64 Gen2 Size Select a size for the virtual machine. Administrator account Username Enter azureuser. SSH public key source Select Generate new key pair. Key pair name Enter Srv-Work_key. Under Inbound port rules, set Public inbound ports to None.
Accept the other defaults, and on the Networking tab, make sure Test-FW-VN / Workload-SN is selected and Public IP is None.
Select Review + create > Create. When prompted, select Download private key and create resource and save the key file.
After deployment finishes, note the Srv-Work private IP address for later use.
Deploy the firewall and policy
Deploy the firewall into the virtual network.
On the Azure portal menu or from Home, select Create a resource, search for Firewall, and select Create.
On Create a Firewall, use the following table to configure the firewall:
Setting Value Project details Subscription Select your Azure subscription. Resource group Select Test-FW-RG. Instance details Name Enter Test-FW01. Region Select the same location that you used previously. Firewall SKU Select Standard. Firewall management Select Use a Firewall Policy to manage this firewall. Firewall policy Select Add new, and enter fw-test-pol.
Select the same region that you used previously. Select OK.Choose a virtual network Select Use existing, and then select Test-FW-VN. Ignore the warning about the Force Tunneling. The warning is resolved in a later step. Public IP address Select Add new, and enter fw-pip for the Name. Select OK. Clear the Enable Firewall Management NIC checkbox, and then select Next: Advanced.
Leave Enable NAT gateway cleared for this tutorial. To configure a StandardV2 NAT gateway during firewall creation, see Integrate NAT gateway with Azure Firewall.
Select Review + create, review the settings, and then select Create.
Deployment takes a few minutes.
After deployment finishes, go to Test-FW-RG, select the Test-FW01 firewall, and note the private and public IP addresses for later use.
Create a default route
For the Workload-SN subnet, configure the outbound default route to go through the firewall.
Search for and select Route tables, select Create, and enter the following values:
Setting Value Project details Subscription Select your Azure subscription. Resource group Select Test-FW-RG. Instance details Name Enter Firewall-route. Region Select the same location that you used previously. Select Review + create > Create.
After deployment finishes, select Go to resource.
On the Firewall-route pane, under Settings, select Subnets > Associate.
For Virtual network, select Test-FW-VN, and for Subnet, select Workload-SN. Select OK.
Select Routes > Add, and enter the following values:
Setting Value Route name fw-dg Destination type IP Addresses Destination IP addresses/CIDR ranges prefix 0.0.0.0/0 Next hop type Virtual appliance Next hop address The private IP address for the firewall that you noted previously Note
Azure Firewall is actually a managed service, but virtual appliance works in this situation.
Select Add.
Install a web server
The VM has no public IP address. Use the workload route you just created and a temporary application rule to download nginx through the firewall. Keep the VM's default Azure-provided DNS settings during installation.
Open fw-test-pol. Under Settings > Rules, select Application rules > Add a rule collection.
Enter the following values:
Setting Value Name Install-Nginx Rule collection type Application Priority 100 Rule collection action Allow Rule collection group DefaultApplicationRuleCollectionGroup Rule name Allow-Package-Repositories Source type IP address Source 10.0.2.0/24 Protocol:port http:80, https:443 Destination type FQDN Target FQDNs azure.archive.ubuntu.com, archive.ubuntu.com, security.ubuntu.com, packages.microsoft.com Select Add and wait for the policy update to complete.
In Test-FW-RG, select Srv-Work. Select Operations > Run command > RunShellScript, enter the following commands, and select Run:
set -eu
sudo apt-get update
sudo apt-get install -y nginx
echo "<html><body><h1>Azure Firewall DNAT Test</h1><p>If you can see this page, the DNAT rule is working correctly!</p></body></html>" | sudo tee /var/www/html/index.html
curl --fail http://localhost
Confirm that the command completes successfully and returns the Azure Firewall DNAT Test page. If package downloads fail, check the repository hostname in the error against the temporary rule. Allow only the configured package repositories; don't add a wildcard internet rule. See Troubleshoot common issues with APT on Ubuntu.
Return to fw-test-pol and delete the Install-Nginx rule collection. Wait for the policy update to complete before continuing. This removal ensures that the later tests evaluate only the tutorial's permanent rules.
Configure an application rule
This application rule grants outbound access to www.google.com.
Open the Test-FW-RG resource group, and select the fw-test-pol firewall policy.
Under Settings > Rules, select Application rules > Add a rule collection.
Enter the following values:
Setting Value Name App-Coll01 Priority 200 Rule collection action Allow Rules Name Allow-Google Source type IP address Source 10.0.2.0/24 Protocol:port http, https Destination Type FQDN Destination www.google.comSelect Add.
Azure Firewall includes a built-in rule collection for infrastructure FQDNs that are allowed by default. These FQDNs are specific to the platform and can't be used for other purposes. For more information, see Infrastructure FQDNs.
Wait for the application rule deployment to complete before continuing.
Configure a network rule
This network rule grants outbound access to two IP addresses at port 53 (DNS).
Select Network rules > Add a rule collection.
Enter the following values:
Setting Value Name Net-Coll01 Priority 200 Rule collection action Allow Rule collection group DefaultNetworkRuleCollectionGroup Rules Name Allow-DNS Source type IP Address Source 10.0.2.0/24 Protocol UDP Destination Ports 53 Destination type IP address Destination 209.244.0.3,209.244.0.4 (public DNS servers operated by CenturyLink) Select Add.
Wait for the network rule deployment to complete before continuing.
Configure a DNAT rule
This rule connects to the web server on the Srv-Work virtual machine through the firewall.
Select DNAT rules > Add a rule collection.
Enter the following values:
Setting Value Name HTTP Priority 200 Rule collection group DefaultDnatRuleCollectionGroup Rules Name http-nat Source type IP address Source * Protocol TCP Destination Ports 80 Destination The firewall public IP address Translated type IP Address Translated address The Srv-Work private IP address Translated port 80 Select Add.
Change the primary and secondary DNS address for the Srv-Work network interface
For testing purposes in this tutorial, configure the server's primary and secondary DNS addresses. This configuration isn't a general Azure Firewall requirement.
- In the Test-FW-RG resource group, select the network interface for the Srv-Work virtual machine.
- Under Settings, select DNS servers > Custom.
- Enter 209.244.0.3 and 209.244.0.4 as the DNS servers, then select Save.
- Restart the Srv-Work virtual machine.
Test the firewall
Now, test the firewall to confirm that it works as expected.
Test the DNAT rule
- In a web browser on your local computer, enter
http://<firewall-public-ip-address>. - You see the custom web page: Azure Firewall DNAT Test. This confirms that the DNAT rule is working.
Test the application and network rules
Use Azure Bastion to securely connect to the Srv-Work virtual machine and test the firewall rules.
In the Test-FW-RG resource group, select the Srv-Work virtual machine, then select Connect > Connect via Bastion.
On the Bastion page, enter or select the following values:
Setting Value Authentication Type Select SSH Private Key from Local File. Username Enter azureuser. Local File Select Browse and select the Srv-Work_key.pem file that you downloaded during VM creation. Select Connect.
Bastion Developer deploys automatically and opens an SSH session to Srv-Work in the portal.
In the SSH session, enter the following command to test access to Google:
curl -I https://www.google.comYou see a successful HTTP response (200 OK), indicating that the application rule is allowing access to Google.
Now test access to Microsoft, which should be blocked. Enter:
curl -I https://www.microsoft.comThe command times out or fails after approximately 60 seconds, indicating that the firewall is blocking access.
Now you verified that the firewall rules are working:
- You can access the web server through the DNAT rule.
- You can browse to the one allowed FQDN, but not to any others.
- You can resolve DNS names by using the configured external DNS server.
Clean up resources
You can keep your firewall resources for the next tutorial. If you no longer need them, delete the Test-FW-RG resource group to delete all firewall-related resources.