Windows Virtual Desktop – First Thoughts

 By Joe Carlyle, Principal Azure Solution Architect at Evros Technology Group and owner of wedoAzure
Last month, Microsoft released Windows Virtual Desktop (WVD) to the public in preview. The service was first announced back at Ignite 2018. Microsoft describe the service as follows:
Windows Virtual Desktop is a desktop and app virtualization service that runs on the cloud.
Here’s what you can do when you run Windows Virtual Desktop on Azure:
- Set up a multi-session Windows 10 deployment that delivers a full Windows 10 with scalability
- Virtualize Office 365 ProPlus and optimize it to run in multi-user virtual scenarios
- Provide Windows 7 virtual desktops with free Extended Security Updates
- Bring your existing Remote Desktop Services (RDS) and Windows Server desktops and apps to any computer
- Virtualize both desktops and apps
- Manage Windows 10, Windows Server, and Windows 7 desktops and apps with a unified management experience
One point not mentioned that is important - Azure is the only public cloud you can run Windows 10 workloads.
There are a couple of pre-requisites to deploying WVD. First up is licensing, below are the requirements for running WVD
| OS | Required License |
| Windows 10 Enterprise multi-session or Windows 10 single-session | Microsoft E3, E5, A3, A5, BusinessWindows E3, E5, A3, A5 |
| Windows 7 | Microsoft E3, E5, A3, A5, BusinessWindows E3, E5, A3, A5 |
| Windows Server 2012 R2, 2016, 2019 | RDS Client Access License (CAL) with Software Assurance |
Next, you’ll need the following infrastructure components:
- Azure AD tenant to register the service against
- AD Domain Services reachable by VMs in WVD pool, so either a domain controller in the vnet or enable AAD DS.
- An Azure subscription to host and pay for the above 🙂
Once the above is all ready to go, you’ll want to start your deployment. First, you need to register your AAD tenant with the WVD service. This requires Global Admin rights and your tenant ID, full details here. I found the process quick, simple and well documented.
Second, you need to create a host pool. This links the IaaS resources to your domain and your WVD service. I opted for an isolated vnet with AADDS activated to domain join the VMs, using a server pool for applications. Full details for this step here.
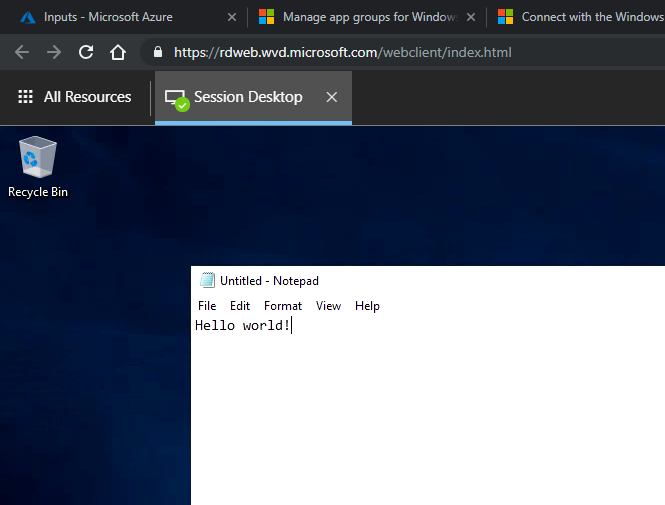
After a little time, my host pool was deployed and I could access the service via the web client.
[caption id="attachment_28795" align="aligncenter" width="665"] A Windows 10 desktop session running via the HTML5 client right in the browser[/caption]
The experience was good but I wouldn’t call it seamless. Simple things jumped out straight away from the authentication side of things with the HTML5 client. After logging into the Azure AD app, I then have to login again to the desktop, I would have expected SSO here. The same lack of SSO is present in the RDS client on Windows 10.
However, once connected, performance and latency were good. Exactly as expected in fact. Even via the HTML5 client.
Next, I wanted to test some individual apps. Namely, the powerhouse of app virtualisation, Notepad. I created a new RemoteApp Group, following the instructions here, again they were easy to follow. Although, Notepad didn’t show up in the list of available apps, I just entered the location where I know it is installed and it worked.
Again performance was as expected however the issue I ran into here was the fact that I couldn’t assign the same user to multiple groups, it was one group or the other as I had a “desktop” group and an “app” group. Hopefully this is something that is fixed, or a workaround in place for GA.
Next on my list will be to test the FSlogix option for profiles, load balancing options and creating a pool with a customised image. But so far I am impressed with the simplicity of deployment. I will follow this post up with impressions relative to that next level of customisation required for a production environment.
One final note is that all of the customisation of the Windows Virtual Desktop service is done via Powershell. If you’re not familiar or comfortable with this, you may struggle to get a working POC in place. My advice is to follow the published guides exactly or ask on Twitter for help!