Limit network traffic with Azure Firewall in Azure Kubernetes Service (AKS)
Learn how to use the Outbound network and FQDN rules for AKS clusters to control egress traffic using the Azure Firewall in AKS. To simplify this configuration, Azure Firewall provides an Azure Kubernetes Service (AzureKubernetesService) Fully Qualified Domain Name (FQDN) tag that restricts outbound traffic from the AKS cluster. This article shows how you can configure your AKS Cluster traffic rules through Azure firewall.
Note
The FQDN tag contains all the FQDNs listed in Outbound network and FQDN rules for AKS clusters and is automatically updated.
For production scenarios, we recommend having a minimum of 20 frontend IPs on the Azure Firewall to avoid SNAT port exhaustion issues.
The following information provides an example architecture of the deployment:
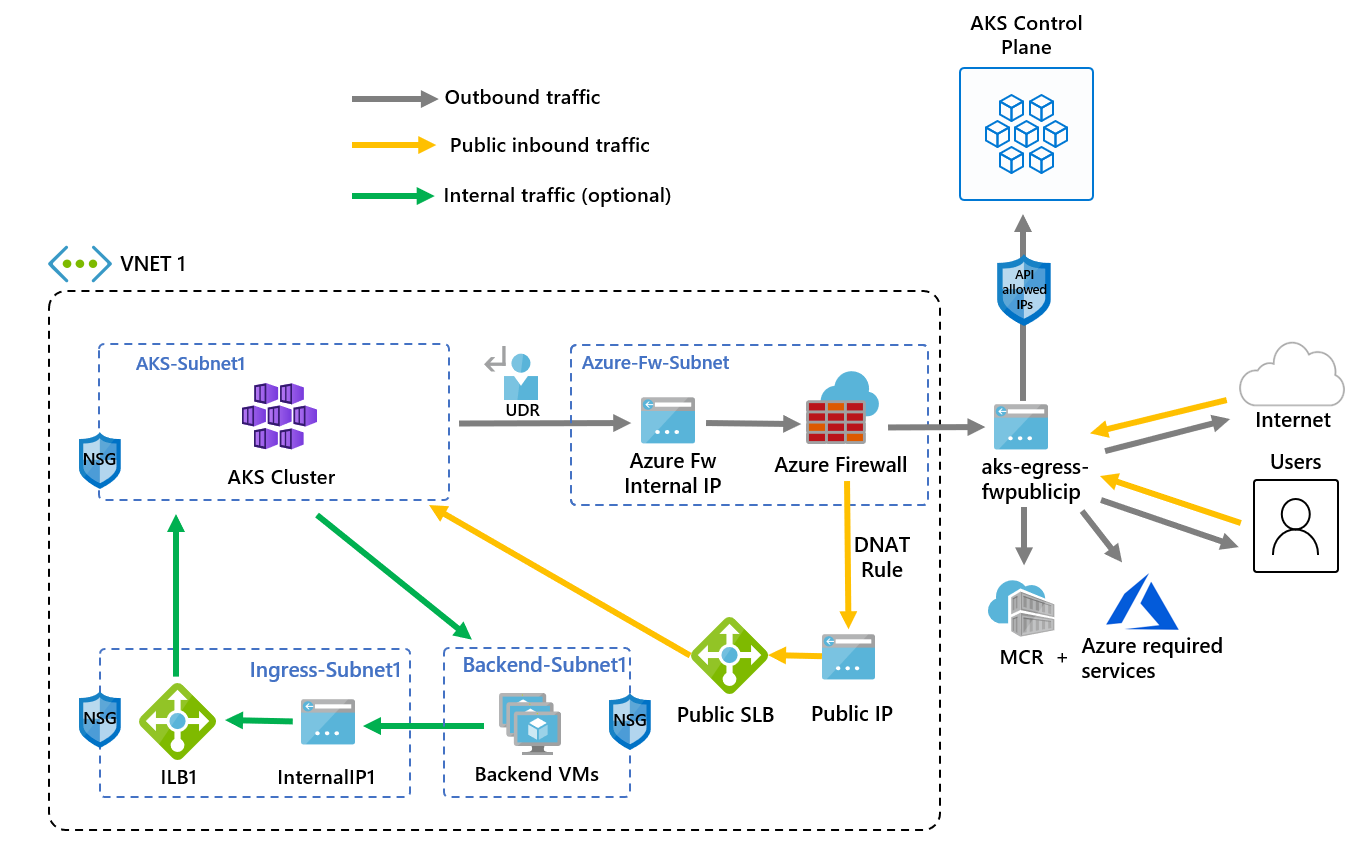
- Public ingress is forced to flow through firewall filters
- AKS agent nodes are isolated in a dedicated subnet
- Azure Firewall is deployed in its own subnet
- A DNAT rule translates the firewall public IP into the load balancer frontend IP
- Outbound requests start from agent nodes to the Azure Firewall internal IP using a user-defined route (UDR)
- Requests from AKS agent nodes follow a UDR that has been placed on the subnet the AKS cluster was deployed into
- Azure Firewall egresses out of the virtual network from a public IP frontend
- Access to the public internet or other Azure services flows to and from the firewall frontend IP address
- Access to the AKS control plane can be protected by API server authorized IP ranges, including the firewall public frontend IP address
- Internal traffic
- You can use an internal load balancer for internal traffic, which you could isolate on its own subnet, instead of or alongside a public load balancer
Configure environment variables
Define a set of environment variables to be used in resource creations.
PREFIX="aks-egress"
RG="${PREFIX}-rg"
LOC="eastus"
PLUGIN=azure
AKSNAME="${PREFIX}"
VNET_NAME="${PREFIX}-vnet"
AKSSUBNET_NAME="aks-subnet"
# DO NOT CHANGE FWSUBNET_NAME - This is currently a requirement for Azure Firewall.
FWSUBNET_NAME="AzureFirewallSubnet"
FWNAME="${PREFIX}-fw"
FWPUBLICIP_NAME="${PREFIX}-fwpublicip"
FWIPCONFIG_NAME="${PREFIX}-fwconfig"
FWROUTE_TABLE_NAME="${PREFIX}-fwrt"
FWROUTE_NAME="${PREFIX}-fwrn"
FWROUTE_NAME_INTERNET="${PREFIX}-fwinternet"
Create a virtual network with multiple subnets
Provision a virtual network with two separate subnets: one for the cluster and one for the firewall. Optionally, you can create one for internal service ingress.

Create a resource group using the
az group createcommand.az group create --name $RG --location $LOCCreate a virtual network with two subnets to host the AKS cluster and the Azure Firewall using the
az network vnet createandaz network vnet subnet createcommands.# Dedicated virtual network with AKS subnet az network vnet create \ --resource-group $RG \ --name $VNET_NAME \ --location $LOC \ --address-prefixes 10.42.0.0/16 \ --subnet-name $AKSSUBNET_NAME \ --subnet-prefix 10.42.1.0/24 # Dedicated subnet for Azure Firewall (Firewall name can't be changed) az network vnet subnet create \ --resource-group $RG \ --vnet-name $VNET_NAME \ --name $FWSUBNET_NAME \ --address-prefix 10.42.2.0/24
Create and set up an Azure Firewall
You need to configure Azure Firewall inbound and outbound rules. The main purpose of the firewall is to enable organizations to configure granular ingress and egress traffic rules into and out of the AKS cluster.
Important
If your cluster or application creates a large number of outbound connections directed to the same or a small subset of destinations, you might require more firewall frontend IPs to avoid maxing out the ports per frontend IP.
For more information on how to create an Azure Firewall with multiple IPs, see Create an Azure Firewall with multiple public IP addresses using Bicep.

Create a standard SKU public IP resource using the
az network public-ip createcommand. This resource will be used as the Azure Firewall frontend address.az network public-ip create --resource-group $RG -n $FWPUBLICIP_NAME --location $LOC --sku "Standard"Register the Azure Firewall CLI extension to create an Azure Firewall using the
az extension addcommand.az extension add --name azure-firewallCreate an Azure Firewall and enable DNS proxy using the
az network firewall createcommand and setting the--enable-dns-proxytotrue.az network firewall create --resource-group $RG --name $FWNAME --location $LOC --enable-dns-proxy true
Setting up the public IP address to the Azure Firewall may take a few minutes. Once it's ready, the IP address created earlier can be assigned to the firewall front end.
Note
To leverage FQDN on network rules, we need DNS proxy enabled. When DNS proxy is enabled, the firewall listens on port 53 and forwards DNS requests to the DNS server specified above. This allows the firewall to translate the FQDN automatically.
Create an Azure Firewall IP configuration using the
az network firewall ip-config createcommand.az network firewall ip-config create --resource-group $RG --firewall-name $FWNAME --name $FWIPCONFIG_NAME --public-ip-address $FWPUBLICIP_NAME --vnet-name $VNET_NAMEOnce the previous command succeeds, save the firewall frontend IP address for configuration later.
FWPUBLIC_IP=$(az network public-ip show --resource-group $RG --name $FWPUBLICIP_NAME --query "ipAddress" -o tsv)
FWPRIVATE_IP=$(az network firewall show --resource-group $RG --name $FWNAME --query "ipConfigurations[0].privateIPAddress" -o tsv)
Note
If you use secure access to the AKS API server with authorized IP address ranges, you need to add the firewall public IP into the authorized IP range.
Create a route with a hop to Azure Firewall
Azure automatically routes traffic between Azure subnets, virtual networks, and on-premises networks. If you want to change any of Azure's default routing, you can create a route table.
Important
Outbound type of UDR (userDefinedRouting) requires a route for 0.0.0.0/0 and a next hop destination of NVA in the route table.
The route table already has a default 0.0.0.0/0 to the Internet. Without a public IP address for Azure to use for Source Network Address Translation (SNAT), simply adding this route won't provide you outbound Internet connectivity. AKS validates that you don't create a 0.0.0.0/0 route pointing to the Internet but instead to a gateway, NVA, etc.
When using an outbound type of UDR, a load balancer public IP address for inbound requests isn't created unless you configure a service of type loadbalancer. AKS never creates a public IP address for outbound requests if you set an outbound type of UDR.
For more information, see Outbound rules for Azure Load Balancer.
Create an empty route table to be associated with a given subnet using the
az network route-table createcommand. The route table will define the next hop as the Azure Firewall created above. Each subnet can have zero or one route table associated to it.az network route-table create --resource-group $RG --location $LOC --name $FWROUTE_TABLE_NAMECreate routes in the route table for the subnets using the
az network route-table route createcommand.az network route-table route create --resource-group $RG --name $FWROUTE_NAME --route-table-name $FWROUTE_TABLE_NAME --address-prefix 0.0.0.0/0 --next-hop-type VirtualAppliance --next-hop-ip-address $FWPRIVATE_IP az network route-table route create --resource-group $RG --name $FWROUTE_NAME_INTERNET --route-table-name $FWROUTE_TABLE_NAME --address-prefix $FWPUBLIC_IP/32 --next-hop-type Internet
For information on how to override Azure's default system routes or add additional routes to a subnet's route table, see the virtual network route table documentation.
Add firewall rules
Note
For applications outside of the kube-system or gatekeeper-system namespaces that need to talk to the API server, an additional network rule to allow TCP communication to port 443 for the API server IP in addition to adding application rule for fqdn-tag AzureKubernetesService is required.
This section covers three network rules and an application rule you can use to configure on your firewall. You may need to adapt these rules based on your deployment.
- The first network rule allows access to port 9000 via TCP.
- The second network rule allows access to port 1194 and 123 via UDP. If you're deploying to Microsoft Azure operated by 21Vianet, see the Azure operated by 21Vianet required network rules. Both these rules will only allow traffic destined to the Azure Region CIDR in this article, which is East US.
- The third network rule opens port 123 to
ntp.ubuntu.comFQDN via UDP. Adding an FQDN as a network rule is one of the specific features of Azure Firewall, so you'll need to adapt it when using your own options. - The fourth and fifth network rules allow access to pull containers from GitHub Container Registry (ghcr.io) and Docker Hub (docker.io).
Create the network rules using the
az network firewall network-rule createcommand.az network firewall network-rule create --resource-group $RG --firewall-name $FWNAME --collection-name 'aksfwnr' --name 'apiudp' --protocols 'UDP' --source-addresses '*' --destination-addresses "AzureCloud.$LOC" --destination-ports 1194 --action allow --priority 100 az network firewall network-rule create --resource-group $RG --firewall-name $FWNAME --collection-name 'aksfwnr' --name 'apitcp' --protocols 'TCP' --source-addresses '*' --destination-addresses "AzureCloud.$LOC" --destination-ports 9000 az network firewall network-rule create --resource-group $RG --firewall-name $FWNAME --collection-name 'aksfwnr' --name 'time' --protocols 'UDP' --source-addresses '*' --destination-fqdns 'ntp.ubuntu.com' --destination-ports 123 az network firewall network-rule create --resource-group $RG --firewall-name $FWNAME --collection-name 'aksfwnr' --name 'ghcr' --protocols 'TCP' --source-addresses '*' --destination-fqdns ghcr.io pkg-containers.githubusercontent.com --destination-ports '443' az network firewall network-rule create --resource-group $RG --firewall-name $FWNAME --collection-name 'aksfwnr' --name 'docker' --protocols 'TCP' --source-addresses '*' --destination-fqdns docker.io registry-1.docker.io production.cloudflare.docker.com --destination-ports '443'Create the application rule using the
az network firewall application-rule createcommand.az network firewall application-rule create --resource-group $RG --firewall-name $FWNAME --collection-name 'aksfwar' --name 'fqdn' --source-addresses '*' --protocols 'http=80' 'https=443' --fqdn-tags "AzureKubernetesService" --action allow --priority 100
To learn more about Azure Firewall, see the Azure Firewall documentation.
Associate the route table to AKS
To associate the cluster with the firewall, the dedicated subnet for the cluster's subnet must reference the route table created above. Use the az network vnet subnet update command to associate the route table to AKS.
az network vnet subnet update --resource-group $RG --vnet-name $VNET_NAME --name $AKSSUBNET_NAME --route-table $FWROUTE_TABLE_NAME
Deploy an AKS cluster that follows your outbound rules
Now, you can deploy an AKS cluster into the existing virtual network. You will use the userDefinedRouting outbound type, which ensures that any outbound traffic is forced through the firewall and no other egress paths will exist. The loadBalancer outbound type can also be used.

The target subnet to be deployed into is defined with the environment variable, $SUBNETID. Set the value for the subnet ID using the following command:
SUBNETID=$(az network vnet subnet show --resource-group $RG --vnet-name $VNET_NAME --name $AKSSUBNET_NAME --query id -o tsv)
You'll define the outbound type to use the UDR that already exists on the subnet. This configuration will enable AKS to skip the setup and IP provisioning for the load balancer.
Tip
You can add additional features to the cluster deployment, such as private clusters.
You can add the AKS feature for API server authorized IP ranges to limit API server access to only the firewall's public endpoint. The authorized IP ranges feature is denoted in the diagram as optional. When enabling the authorized IP range feature to limit API server access, your developer tools must use a jumpbox from the firewall's virtual network, or you must add all developer endpoints to the authorized IP range.
- Create an AKS cluster with system-assigned identities
- Create an AKS cluster with user-assigned identities
Note
AKS will create a system-assigned kubelet identity in the node resource group if you don't specify your own kubelet managed identity.
For user-defined routing, system-assigned identity only supports the CNI network plugin.
Create an AKS cluster using a system-assigned managed identity with the CNI network plugin using the az aks create command.
az aks create --resource-group $RG --name $AKSNAME --location $LOC \
    --node-count 3 \
    --network-plugin azure \
    --outbound-type userDefinedRouting \
    --vnet-subnet-id $SUBNETID \
    --api-server-authorized-ip-ranges $FWPUBLIC_IP \
    --generate-ssh-keys
Enable developer access to the API server
If you used authorized IP ranges for your cluster in the previous step, you need to add your developer tooling IP addresses to the AKS cluster list of approved IP ranges so you access the API server from there. You can also configure a jumpbox with the needed tooling inside a separate subnet in the firewall's virtual network.
Retrieve your IP address using the following command:
CURRENT_IP=$(dig @resolver1.opendns.com ANY myip.opendns.com +short)Add the IP address to the approved ranges using the
az aks updatecommand.az aks update --resource-group $RG --name $AKSNAME --api-server-authorized-ip-ranges $CURRENT_IP/32Configure
kubectlto connect to your AKS cluster using theaz aks get-credentialscommand.az aks get-credentials --resource-group $RG --name $AKSNAME
Deploy a public service on AKS
You can now start exposing services and deploying applications to this cluster. In this example, we'll expose a public service, but you also might want to expose an internal service using an internal load balancer.

Review the AKS Store Demo quickstart manifest to see all the resources that will be created.
Deploy the service using the
kubectl applycommand.kubectl apply -f https://raw.githubusercontent.com/Azure-Samples/aks-store-demo/main/aks-store-quickstart.yaml
Allow inbound traffic through Azure Firewall
Important
When you use Azure Firewall to restrict egress traffic and create a UDR to force all egress traffic, make sure you create an appropriate DNAT rule in Azure Firewall to correctly allow ingress traffic. Using Azure Firewall with a UDR breaks the ingress setup due to asymmetric routing. The issue occurs if the AKS subnet has a default route that goes to the firewall's private IP address, but you're using a public load balancer - ingress or Kubernetes service of type loadBalancer. In this case, the incoming load balancer traffic is received via its public IP address, but the return path goes through the firewall's private IP address. Because the firewall is stateful, it drops the returning packet because the firewall isn't aware of an established session. To learn how to integrate Azure Firewall with your ingress or service load balancer, see Integrate Azure Firewall with Azure Standard Load Balancer.
To configure inbound connectivity, you need to write a DNAT rule to the Azure Firewall. To test connectivity to your cluster, a rule is defined for the firewall frontend public IP address to route to the internal IP exposed by the internal service. The destination address can be customized. The translated address must be the IP address of the internal load balancer. The translated port must be the exposed port for your Kubernetes service. You also need to specify the internal IP address assigned to the load balancer created by the Kubernetes service.
Get the internal IP address assigned to the load balancer using the
kubectl get servicescommand.kubectl get servicesThe IP address will be listed in the
EXTERNAL-IPcolumn, as shown in the following example output:NAME TYPE CLUSTER-IP EXTERNAL-IP PORT(S) AGE kubernetes ClusterIP 10.0.0.1 <none> 443/TCP 9m10s order-service ClusterIP 10.0.104.144 <none> 3000/TCP 11s product-service ClusterIP 10.0.237.60 <none> 3002/TCP 10s rabbitmq ClusterIP 10.0.161.128 <none> 5672/TCP,15672/TCP 11s store-front LoadBalancer 10.0.89.139 20.39.18.6 80:32271/TCP 10sGet the service IP using the
kubectl get svc store-frontcommand.SERVICE_IP=$(kubectl get svc store-front -o jsonpath='{.status.loadBalancer.ingress[*].ip}')Add the NAT rule using the
az network firewall nat-rule createcommand.az network firewall nat-rule create --collection-name exampleset --destination-addresses $FWPUBLIC_IP --destination-ports 80 --firewall-name $FWNAME --name inboundrule --protocols Any --resource-group $RG --source-addresses '*' --translated-port 80 --action Dnat --priority 100 --translated-address $SERVICE_IP
Validate connectivity
Navigate to the Azure Firewall frontend IP address in a browser to validate connectivity.
You should see the AKS store app. In this example, the firewall public IP was 52.253.228.132.

On this page, you can view products, add them to your cart, and then place an order.
Clean up resources
To clean up Azure resources, delete the AKS resource group using the az group delete command.
az group delete --name $RG
Next steps
In this article, you learned how to secure your outbound traffic using Azure Firewall. If needed, you can generalize the steps above to forward the traffic to your preferred egress solution following the Outbound Type userDefinedRoute documentation.

Azure Kubernetes Service