Use Azure Automation extension for Visual Studio Code
This article explains about the Visual Studio that you can use to create and manage runbooks. You can perform all runbook management operations such as creating runbooks, editing runbook, triggering a job, tracking recent jobs outputs, linking a schedule, asset management and local debugging.
Prerequisites
The following items are required for completing the steps in this article:
- An Azure subscription. If you don't have an Azure subscription, create a free account
- Visual Studio Code.
- PowerShell modules and Python packages used by runbook must be locally installed on the machine to run the runbook locally.
Install and configure the Azure Automation extension
After you meet the prerequisites, you can install the Azure Automation extension for Visual Studio Code by following these steps:
- Open Visual Studio Code.
- From the menu bar, go to View > Extensions.
- In the search box, enter Azure Automation.
- Select Azure Automation from the search results, and then select Install.
- Select Reload when necessary.
Connect to Azure Account
To view all the resources within your Automation account, you must connect to your Azure account. Follow the steps to connect to Azure from Visual Studio Code:
You can sign in to Azure from the Azure Automation extension or the Command Palette.
To sign in from the Azure Automation extension: select Sign in to Azure.
Or
To sign in from the Command Palette: from the menu bar, go to View > Command Palette and enter Azure:Sign-in.
Follow the sign in instructions to sign in to Azure. After you're connected, you will find the Azure account name on the status bar of Visual Studio Code.
Select subscriptions
When you sign in for the first time, the extension loads only the default subscription resources and Automation accounts. To add or remove subscriptions, follow these steps:
You can use the Command Palette or the window footer to start the subscription command.
To sign in from Command Palette - from the menu bar, go to View > Command Palette and enter Azure: Select Subscriptions.
Or
To sign in from window footer - In the window footer, select the segment that matches Azure: your account.
Use the filter to find the subscriptions by name.
Check or uncheck each subscription to add or remove them from the list of subscriptions shown by Azure Automation extension.
Select OK after you have completed adding or removing the subscriptions.
Using the Azure Automation extension
The extension simplifies the process of creating and editing runbooks. You can now test them locally without logging into the Azure portal. The various actions that you can perform are listed below:
Create a runbook
To create a runbook in the Automation account. Follow these steps:
Sign in to Azure from the Azure Automation extension.
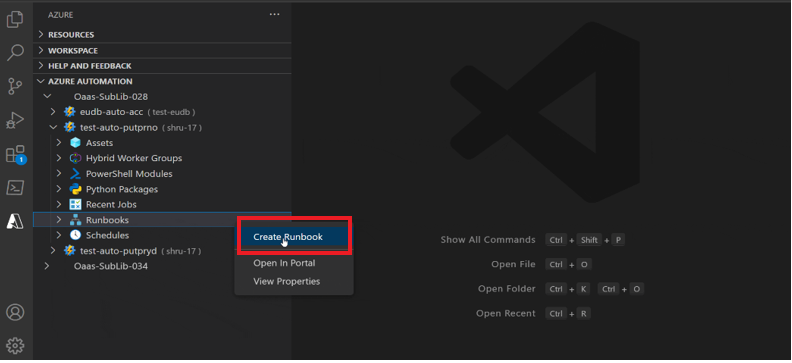
Select Runbooks
Right click and select Create Runbook to create a new Runbook in the Automation account.
Publish a runbook
To publish a runbook in the Automation account. Follow these steps:
In Automation account, select the runbook.
Right click and select Publish runbook to publish the runbook.
A notification appears that the runbook is successfully published.
Run local version of Automation job
To run local version of Automation job, follow these steps:
In Automation account, select the runbook.
Right click and select Run Local to run local version of the Automation job.
Run Automation job
To run the Automation job, follow these steps:
In Automation account, select the runbook.
Right click and select Start Automation job to run the Automation job.
Add new webhook
To add a webhook to the runbook, follow these steps:
In Automation account, select the runbook.
Right click and select Add New Webhook.
Select and copy the Webhook URI.
Use the command palette and select Azure Automation Trigger Webhook
Paste the Webhook URI.
A notification appears that JobId is created successfully.
Link a schedule
In Automation account, go to Schedules and select your schedule.
Go to Runbooks, select your runbook.
Right click and select Link Schedule and confirm the schedule.
In the drop-down select Azure
A notification appears that the schedule is linked.
Manage Assets
In Automation account, go to Assets > fx Variables.
Right click and select Create or Update.
Provide a name in the text box.
A notification appears that the variable is created, you can view the new variable in fx Variables option.
Run local in debug mode
- In Automation account, go to Runbooks and select a runbook.
- In the edit pane, add the break point.
- Right click on the runbook and select Run local in Debug Mode.
Compare local runbook
- In Automation account, go to Runbooks and select a runbook
- Right click on the runbook and select Compare local runbook.
- In the edit pane, you will see the information in two layouts - runbook copy and published/draft copy.
Note
If the runbook is InEdit mode, you will have to select either the Compare Published content or Compare Draft content to compare.
Next steps
- For information on key features and limitations of Azure Automation extension see, Runbook authoring through VS Code in Azure Automation


