Configure customer-managed keys for Azure NetApp Files volume encryption
Customer-managed keys for Azure NetApp Files volume encryption enable you to use your own keys rather than a platform-managed key when creating a new volume. With customer-managed keys, you can fully manage the relationship between a key's life cycle, key usage permissions, and auditing operations on keys.
The following diagram demonstrates how customer-managed keys work with Azure NetApp Files:

Azure NetApp Files grants permissions to encryption keys to a managed identity. The managed identity is either a user-assigned managed identity that you create and manage or a system-assigned managed identity associated with the NetApp account.
You configure encryption with a customer-managed key for the NetApp account.
You use the managed identity to which the Azure Key Vault admin granted permissions in step 1 to authenticate access to Azure Key Vault via Microsoft Entra ID.
Azure NetApp Files wraps the account encryption key with the customer-managed key in Azure Key Vault.
Customer-managed keys have no performance impact on Azure NetApp Files. Its only difference from platform-managed keys is how the key is managed.
For read/write operations, Azure NetApp Files sends requests to Azure Key Vault to unwrap the account encryption key to perform encryption and decryption operations.
Considerations
- Customer-managed keys can only be configured on new volumes. You can't migrate existing volumes to customer-managed key encryption.
- To create a volume using customer-managed keys, you must select the Standard network features. You can't use customer-managed key volumes with volume configured using Basic network features. Follow instructions in to Set the Network Features option in the volume creation page.
- For increased security, you can select the Disable public access option within the network settings of your key vault. When selecting this option, you must also select Allow trusted Microsoft services to bypass this firewall to permit the Azure NetApp Files service to access your encryption key.
- Customer-managed keys support automatic Managed System Identity (MSI) certificate renewal. If your certificate is valid, you don't need to manually update it.
- Applying Azure network security groups on the private link subnet to Azure Key Vault isn't supported for Azure NetApp Files customer-managed keys. Network security groups don't affect connectivity to Private Link unless
Private endpoint network policyis enabled on the subnet. It's required to keep this option disabled. - If Azure NetApp Files fails to create a customer-managed key volume, error messages are displayed. Refer to the Error messages and troubleshooting section for more information.
- If Azure Key Vault becomes inaccessible, Azure NetApp Files loses its access to the encryption keys and the ability to read or write data to volumes enabled with customer-managed keys. In this situation, create a support ticket to have access manually restored for the affected volumes.
- Azure NetApp Files supports customer-managed keys on source and data replication volumes with cross-region replication or cross-zone replication relationships.
Supported regions
Azure NetApp Files customer-managed keys is supported for the following regions:
- Australia Central
- Australia Central 2
- Australia East
- Australia Southeast
- Brazil South
- Brazil Southeast
- Canada Central
- Canada East
- Central India
- Central US
- East Asia
- East US
- East US 2
- France Central
- Germany North
- Germany West Central
- Japan East
- Japan West
- Korea Central
- Korea South
- North Central US
- North Europe
- Norway East
- Norway West
- Qatar Central
- South Africa North
- South Central US
- South India
- Southeast Asia
- Sweden Central
- Switzerland North
- Switzerland West
- UAE Central
- UAE North
- UK South
- UK West
- West Europe
- West US
- West US 2
- West US 3
Requirements
Before creating your first customer-managed key volume, you must set up:
- An Azure Key Vault, containing at least one key.
- The key vault must have soft delete and purge protection enabled.
- The key must be of type RSA.
- The key vault must have an Azure Private Endpoint.
- The private endpoint must reside in a different subnet than the one delegated to Azure NetApp Files. The subnet must be in the same VNet as the one delegated to Azure NetApp.
For more information about Azure Key Vault and Azure Private Endpoint, refer to:
- Quickstart: Create a key vault
- Create or import a key into the vault
- Create a private endpoint
- More about keys and supported key types
- Network security groups
- Manage network policies for private endpoints
Configure a NetApp account to use customer-managed keys
In the Azure portal and under Azure NetApp Files, select Encryption.
The Encryption page enables you to manage encryption settings for your NetApp account. It includes an option to let you set your NetApp account to use your own encryption key, which is stored in Azure Key Vault. This setting provides a system-assigned identity to the NetApp account, and it adds an access policy for the identity with the required key permissions.

When you set your NetApp account to use customer-managed key, you have two ways to specify the Key URI:
The Select from key vault option allows you to select a key vault and a key.
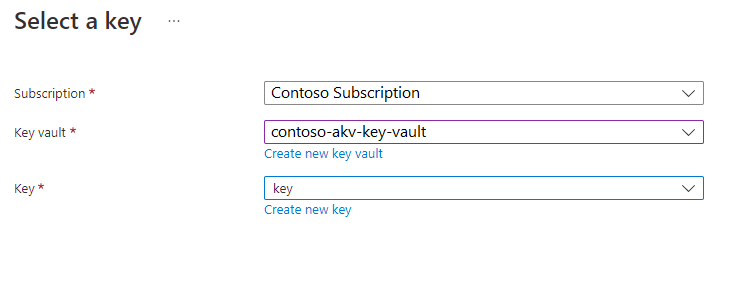
The Enter key URI option allows you to enter manually the key URI.

Select the identity type that you want to use for authentication to the Azure Key Vault. If your Azure Key Vault is configured to use Vault access policy as its permission model, both options are available. Otherwise, only the user-assigned option is available.
- If you choose System-assigned, select the Save button. The Azure portal configures the NetApp account automatically with the following process: A system-assigned identity is added to your NetApp account. An access policy is to be created on your Azure Key Vault with key permissions Get, Encrypt, Decrypt.
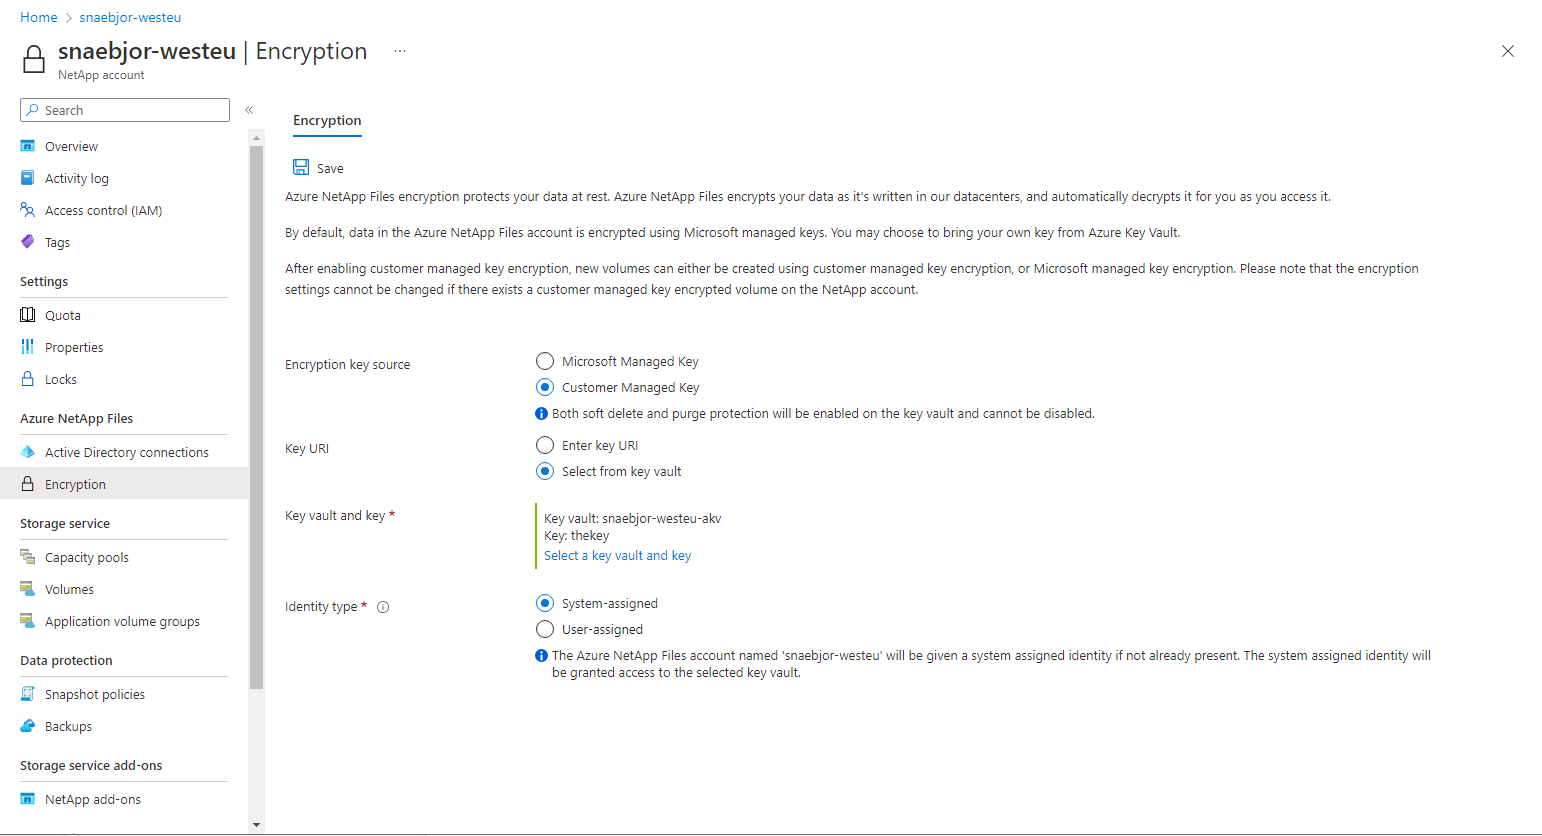
- If you choose User-assigned, you must select an identity. Choose Select an identity to open a context pane where you select a user-assigned managed identity.

If you've configured your Azure Key Vault to use Vault access policy, the Azure portal configures the NetApp account automatically with the following process: The user-assigned identity you select is added to your NetApp account. An access policy is created on your Azure Key Vault with the key permissions Get, Encrypt, Decrypt.
If you've configure your Azure Key Vault to use Azure role-based access control, then you need to make sure the selected user-assigned identity has a role assignment on the key vault with permissions for actions:
Microsoft.KeyVault/vaults/keys/readMicrosoft.KeyVault/vaults/keys/encrypt/actionMicrosoft.KeyVault/vaults/keys/decrypt/actionThe user-assigned identity you select is added to your NetApp account. Due to the customizable nature of role-based access control (RBAC), the Azure portal doesn't configure access to the key vault. See Provide access to Key Vault keys, certificates, and secrets with an Azure role-based access control for details on configuring Azure Key Vault.
Select Save then observe the notification communicating the status of the operation. If the operation was not successful, an error message displays. Refer to error messages and troubleshooting for assistance in resolving the error.


Use role-based access control
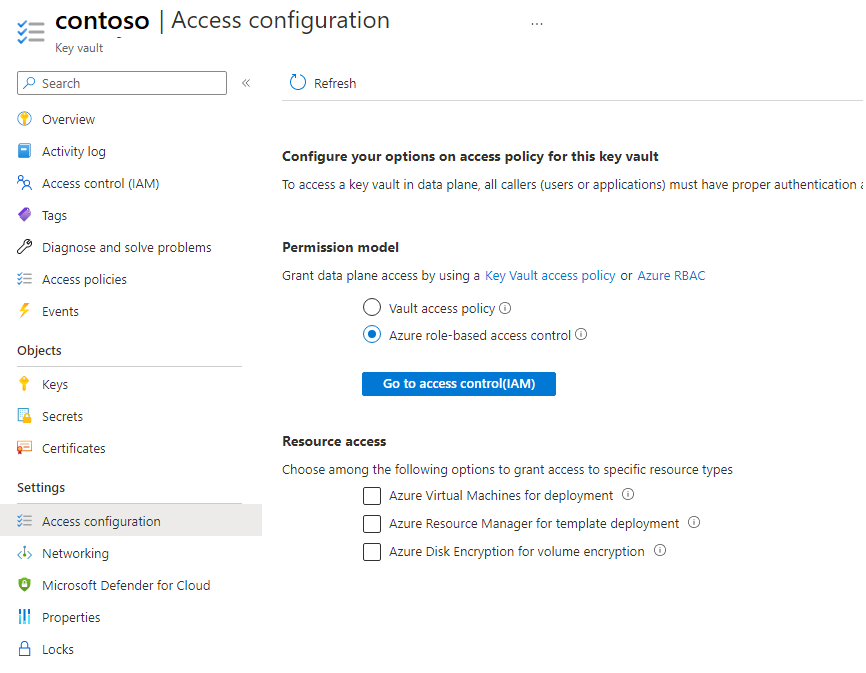
You can use an Azure Key Vault that is configured to use Azure role-based access control. To configure customer-managed keys through Azure portal, you need to provide a user-assigned identity.
In your Azure account, navigate to Key vaults then Access policies.
To create an access policy, under Permission model, select Azure role-based access-control.
When creating the user-assigned role, there are three permissions required for customer-managed keys:
Microsoft.KeyVault/vaults/keys/readMicrosoft.KeyVault/vaults/keys/encrypt/actionMicrosoft.KeyVault/vaults/keys/decrypt/action
Although there are predefined roles that include these permissions, those roles grant more privileges than are required. It's recommended that you create a custom role with only the minimum required permissions. For more information, see Azure custom roles.
{
    "id": "/subscriptions/<subscription>/Microsoft.Authorization/roleDefinitions/<roleDefinitionsID>",
    "properties": {
        "roleName": "NetApp account",
        "description": "Has the necessary permissions for customer-managed key encryption: get key, encrypt and decrypt",
        "assignableScopes": [
            "/subscriptions/<subscriptionID>/resourceGroups/<resourceGroup>"
        ],
        "permissions": [
          {
            "actions": [],
            "notActions": [],
            "dataActions": [
                "Microsoft.KeyVault/vaults/keys/read",
                "Microsoft.KeyVault/vaults/keys/encrypt/action",
                "Microsoft.KeyVault/vaults/keys/decrypt/action"
            ],
            "notDataActions": []
            }
        ]
      }
}
Once the custom role is created and available to use with the key vault, you apply it to the user-assigned identity.


Create an Azure NetApp Files volume using customer-managed keys
From Azure NetApp Files, select Volumes and then + Add volume.
Follow the instructions in Configure network features for an Azure NetApp Files volume:
- Set the Network Features option in volume creation page.
- The network security group for the volume’s delegated subnet must allow incoming traffic from NetApp's storage VM.
For a NetApp account configured to use a customer-managed key, the Create Volume page includes an option Encryption Key Source.
To encrypt the volume with your key, select Customer-Managed Key in the Encryption Key Source dropdown menu.
When you create a volume using a customer-managed key, you must also select Standard for the Network features option. Basic network features are not supported.
You must select a key vault private endpoint as well. The dropdown menu displays private endpoints in the selected Virtual network. If there's no private endpoint for your key vault in the selected virtual network, then the dropdown is empty, and you won't be able to proceed. If so, see to Azure Private Endpoint.

Continue to complete the volume creation process. Refer to:

Rekey all volumes under a NetApp account
If you have already configured your NetApp account for customer-managed keys and have one or more volumes encrypted with customer-managed keys, you can change the key that is used to encrypt all volumes under the NetApp account. You can select any key that is in the same key vault. Changing key vaults isn't supported.
Under your NetApp account, navigate to the Encryption menu. Under the Current key input field, select the Rekey link.
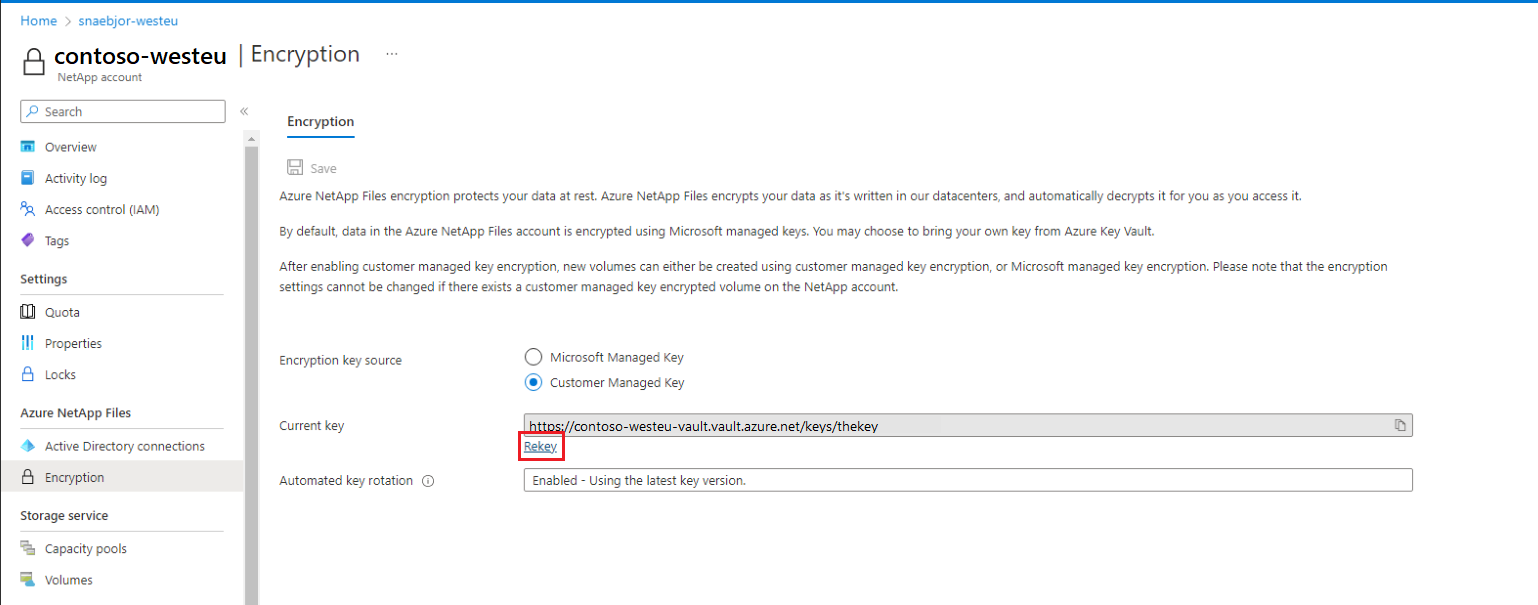
In the Rekey menu, select one of the available keys from the dropdown menu. The chosen key must be different from the current key.

Select OK to save. The rekey operation may take several minutes.


Switch from system-assigned to user-assigned identity
To switch from system-assigned to user-assigned identity, you must grant the target identity access to the key vault being used with read/get, encrypt, and decrypt permissions.
Update the NetApp account by sending a PATCH request using the
az restcommand:az rest -m PATCH -u <netapp-account-resource-id>?api-versions=2022-09-01 -b @path/to/payload.jsonThe payload should use the following structure:
{
  "identity": {
    "type": "UserAssigned",
    "userAssignedIdentities": {
     "<identity-resource-id>": {}
    }
  },
  "properties": {
    "encryption": {
      "identity": {
        "userAssignedIdentity": "<identity-resource-id>"
      }
    }
  }
}
Confirm the operation completed successfully with the
az netappfiles account showcommand. The output includes the following fields:"id": "/subscriptions/<subscription-id>/resourceGroups/<resource-group>/providers/Microsoft.NetApp/netAppAccounts/account", "identity": { "principalId": null, "tenantId": null, "type": "UserAssigned", "userAssignedIdentities": { "/subscriptions/<subscription-id>/resourceGroups/<resource-group>/providers/Microsoft.ManagedIdentity/userAssignedIdentities/<identity>": { "clientId": "<client-id>", "principalId": "<principalId>", "tenantId": <tenantId>" } } },Ensure that:
encryption.identity.principalIdmatches the value inidentity.userAssignedIdentities.principalIdencryption.identity.userAssignedIdentitymatches the value inidentity.userAssignedIdentities[]
"encryption": {
    "identity": {
        "principalId": "<principal-id>",
        "userAssignedIdentity": "/subscriptions/<subscriptionId>/resourceGroups/<resource-group>/providers/Microsoft.ManagedIdentity/userAssignedIdentities/<identity>"
    },
    "KeySource": "Microsoft.KeyVault",
},
Error messages and troubleshooting
This section lists error messages and possible resolutions when Azure NetApp Files fails to configure customer-managed key encryption or create a volume using a customer-managed key.
Errors configuring customer-managed key encryption on a NetApp account
| Error Condition | Resolution |
|---|---|
The operation failed because the specified key vault key was not found |
When entering key URI manually, ensure that the URI is correct. |
Azure Key Vault key is not a valid RSA key |
Ensure that the selected key is of type RSA. |
Azure Key Vault key is not enabled |
Ensure that the selected key is enabled. |
Azure Key Vault key is expired |
Ensure that the selected key is not expired. |
Azure Key Vault key has not been activated |
Ensure that the selected key is active. |
Key Vault URI is invalid |
When entering key URI manually, ensure that the URI is correct. |
Azure Key Vault is not recoverable. Make sure that Soft-delete and Purge protection are both enabled on the Azure Key Vault |
Update the key vault recovery level to: “Recoverable/Recoverable+ProtectedSubscription/CustomizedRecoverable/CustomizedRecoverable+ProtectedSubscription” |
Account must be in the same region as the Vault |
Ensure the key vault is in the same region as the NetApp account. |
Errors creating a volume encrypted with customer-managed keys
| Error Condition | Resolution |
|---|---|
Volume cannot be encrypted with Microsoft.KeyVault, NetAppAccount has not been configured with KeyVault encryption |
Your NetApp account doesn't have customer-managed key encryption enabled. Configure the NetApp account to use customer-managed key. |
EncryptionKeySource cannot be changed |
No resolution. The EncryptionKeySource property of a volume can't be changed. |
Unable to use the configured encryption key, please check if key is active |
Check that: -Are all access policies correct on the key vault: Get, Encrypt, Decrypt? -Does a private endpoint for the key vault exist? -Is there a Virtual Network NAT in the VNet, with the delegated Azure NetApp Files subnet enabled? |
Could not connect to the KeyVault |
Ensure that the private endpoint is set up correctly and the firewalls are not blocking the connection from your Virtual Network to your KeyVault. |
Next steps
Feedback
Kommer snart: I hele 2024 udfaser vi GitHub-problemer som feedbackmekanisme for indhold og erstatter det med et nyt feedbacksystem. Du kan få flere oplysninger under: https://aka.ms/ContentUserFeedback.
Indsend og få vist feedback om