Develop a Kubernetes application for Azure SQL Database
Applies to: ![]() Azure SQL Database
Azure SQL Database
In this tutorial, learn how to develop a modern application using Python, Docker Containers, Kubernetes, and Azure SQL Database.
Modern application development has several challenges. From selecting a "stack" of front-end through data storage and processing from several competing standards, through ensuring the highest levels of security and performance, developers are required to ensure the application scales and performs well and is supportable on multiple platforms. For that last requirement, bundling up the application into Container technologies such as Docker and deploying multiple Containers onto the Kubernetes platform is now de rigueur in application development.
In this example, we explore using Python, Docker Containers, and Kubernetes - all running on the Microsoft Azure platform. Using Kubernetes means that you also have the flexibility of using local environments or even other clouds for a seamless and consistent deployment of your application, and allows for multicloud deployments for even higher resiliency. We'll also use Microsoft Azure SQL Database for a service-based, scalable, highly resilient and secure environment for the data storage and processing. In fact, in many cases, other applications are often using Microsoft Azure SQL Database already, and this sample application can be used to further use and enrich that data.
This example is fairly comprehensive in scope, but uses the simplest application, database and deployment to illustrate the process. You can adapt this sample to be far more robust, even including using the latest technologies for the returned data. It's a useful learning tool to create a pattern for other applications.
Use Python, Docker Containers, Kubernetes, and the AdventureWorksLT sample database in a practical example
The AdventureWorks (fictitious) company uses a database that stores data about Sales and Marketing, Products, Customers and Manufacturing. It also contains views and stored procedures that join information about the products, such as the product name, category, price, and a brief description.
The AdventureWorks Development team wants to create a proof-of-concept (PoC) that returns data from a view in the AdventureWorksLT database, and make them available as a REST API. Using this PoC, the Development team will create a more scalable and multicloud ready application for the Sales team. They have selected the Microsoft Azure platform for all aspects of deployment. The PoC is using the following elements:
- A Python application using the Flask package for headless web deployment.
- Docker Containers for code and environment isolation, stored in a private registry so that the entire company can reuse the application Containers in future projects, saving time and money.
- Kubernetes for ease of deployment and scale, and to avoid platform lock-in.
- Microsoft Azure SQL Database for selection of size, performance, scale, automanagement and backup, in addition to Relational data storage and processing at the highest security level.
In this article, we explain the process for creating the entire proof-of-concept project. The general steps for creating the application are:
- Set up prerequisites
- Create the application
- Create a Docker Container to deploy the application and test
- Create an Azure Container Service (ACS) Registry and load the Container to the ACS Registry
- Create the Azure Kubernetes Service (AKS) environment
- Deploy the application container from the ACS Registry to AKS
- Test the application
- Clean up
Prerequisites
Throughout this article, there are several values you should replace. Ensure that you consistently replace these values for each step. You might want to open a text editor and drop these values in to set the correct values as you work through the proof-of-concept project:
ReplaceWith_AzureSubscriptionName: Replace this value with the name of the Azure subscription name you have.ReplaceWith_PoCResourceGroupName: Replace this value with the name of the resource group you would like to create.ReplaceWith_AzureSQLDBServerName: Replace this value with the name of the Azure SQL Database logical server you create using the Azure portal.ReplaceWith_AzureSQLDBSQLServerLoginName: Replace this value with the value of the SQL Server user name you create in the Azure portal.ReplaceWith_AzureSQLDBSQLServerLoginPassword: Replace this value with the value of the SQL Server user password you create in the Azure portal.ReplaceWith_AzureSQLDBDatabaseName: Replace this value with the name of the Azure SQL Database you create using the Azure portal.ReplaceWith_AzureContainerRegistryName: Replace this value with the name of the Azure Container Registry you would like to create.ReplaceWith_AzureKubernetesServiceName: Replace this value with the name of the Azure Kubernetes Service you would like to create.
The developers at AdventureWorks use a mix of Windows, Linux, and Apple systems for development, so they are using Visual Studio Code as their environment and git for the source control, both of which run cross-platform.
For the PoC, the team requires the following prerequisites:
Python, pip, and packages - The development team chooses the Python programming language as the standard for this web-based application. Currently they are using version 3.9, but any version supporting the PoC required packages is acceptable.
- You can download Python version 3.9 from python.org.
The team is using the
pyodbcpackage for database access.- You can install the pyodbc package with pip commands.
- You might also need the Microsoft ODBC Driver software if you do not have it installed already.
The team is using the
ConfigParserpackage for controlling and setting configuration variables.The team is using the Flask package for a web interface for the application.
Next, the team installed the Azure CLI tool, easily identified with
azsyntax. This cross-platform tool allows a command-line and scripted approach to the PoC, so that they can repeat the steps as they make changes and improvements.- You can download and install Azure CLI tool.
With Azure CLI set up, the team signs in to their Azure subscription, and sets the subscription name they used for the PoC. They then ensured the Azure SQL Database server and database is accessible to the subscription:
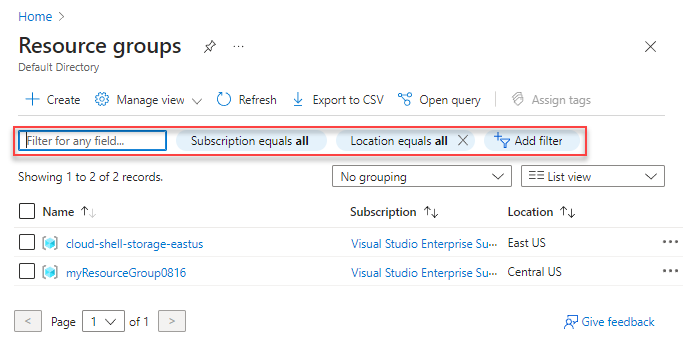
az login
az account set --name "ReplaceWith_AzureSubscriptionName"
az sql server list
az sql db list ReplaceWith_AzureSQLDBDatabaseName
A Microsoft Azure Resource Group is a logical container that holds related resources for an Azure solution. Generally, resources that share the same lifecycle are added to the same resource group so you can easily deploy, update, and delete them as a group. The resource group stores metadata about the resources, and you can specify a location for the resource group.
Resource groups can be created and managed using the Azure portal or Azure CLI. They can also be used to group related resources for an application and divide them into groups for production and nonproduction, or any other organizational structure you prefer.
In the following code snippet, you can see the
azcommand used to create a resource group. In our sample, we use the eastus region of Azure.az group create --name ReplaceWith_PoCResourceGroupName --location eastusThe Development team creates an Azure SQL Database with the
AdventureWorksLTsample database installed, using a SQL authenticated login.AdventureWorks has standardized on the Microsoft SQL Server Relational Database Management System platform, and the Development team wants to use a managed service for the database rather than installing locally. Using Azure SQL Database allows this managed service to be completely code-compatible wherever they run the SQL Server engine: on-premises, in a Container, in Linux or Windows, or even in an Internet of Things (IoT) environment.
During creation, they used the Azure Management Portal to set the Firewall for the application to the local development machine, and changed the default you see here to enable Allow all Azure Services, and also retrieved the connection credentials.
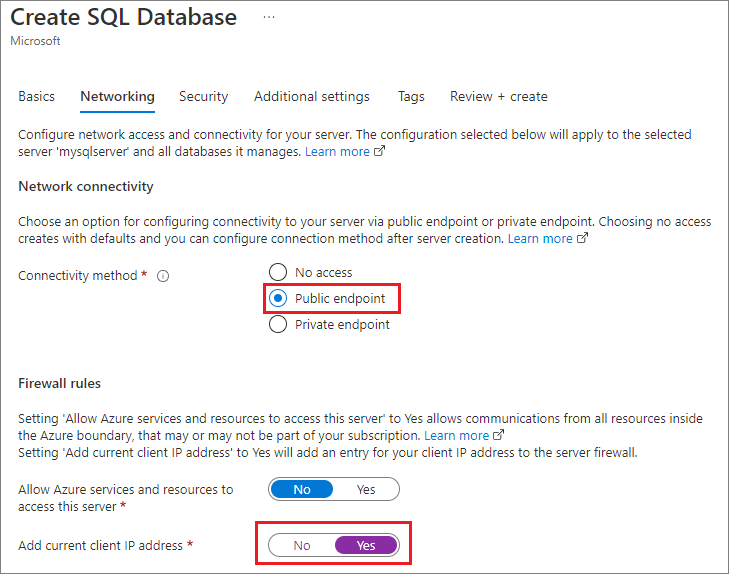
With this approach, the database could be accessible in another region or even a different subscription.
The team set up a SQL authenticated login for testing, but will revisit this decision in a security review.
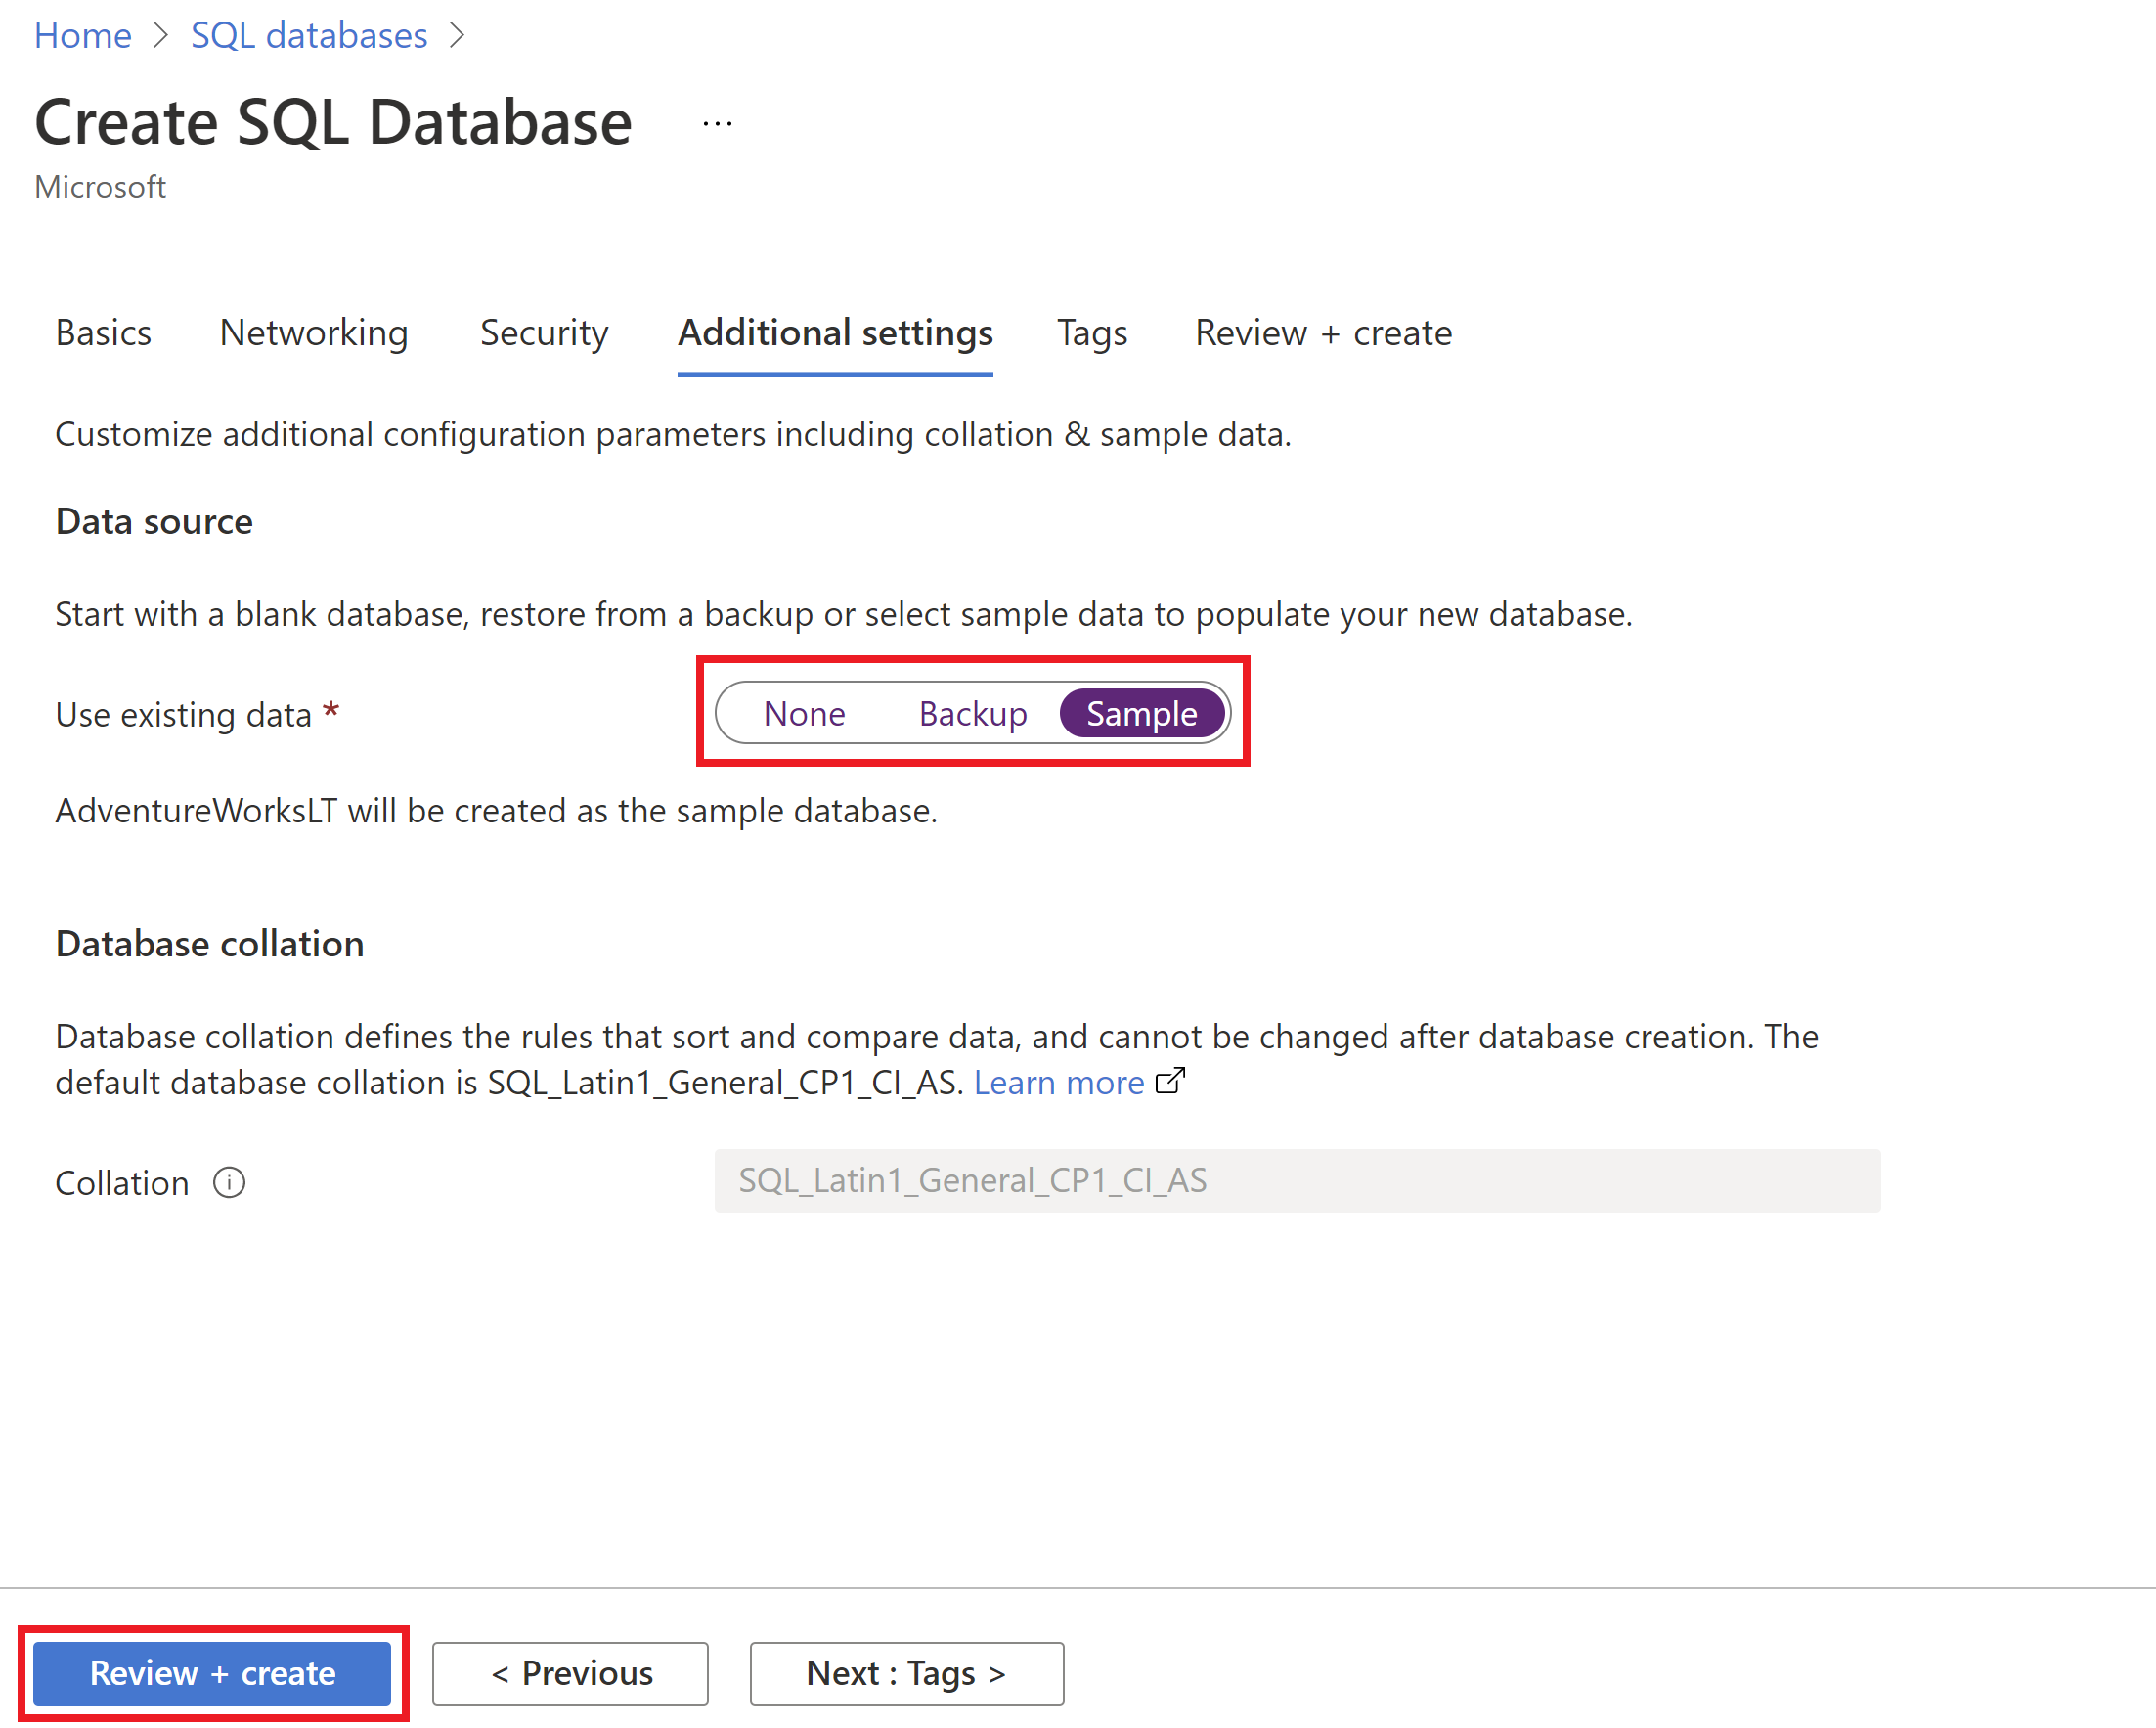
The team used the sample
AdventureWorksLTdatabase for the PoC using the same PoC resource group. Don't worry, at the end of this tutorial, we'll clean up all resources in this new PoC resource group.You can use the Azure portal to deploy the Azure SQL Database. When creating the Azure SQL Database, in the Additional settings tab, for the Use existing data option, select Sample.
Finally, on the Tags tab of the new Azure SQL Database, the Development team provided tags metadata for this Azure resource, such as Owner or ServiceClass or WorkloadName.

Create the application
Next, the Development team created a simple Python application that opens a connection to Azure SQL Database, and returns a list of products. This code will be replaced with more complex functions, and might also include more than one application deployed into the Kubernetes Pods in production for a robust, manifest-driven approach to application solutions.
The Team created a simple text file called
.envto hold variables for the server connections and other information. Using thepython-dotenvlibrary they can then separate out the variables from the Python Code. This is a common approach to keeping secrets and other information out of the code itself.SQL_SERVER_ENDPOINT = ReplaceWith_AzureSQLDBServerName SQL_SERVER_USERNAME = ReplaceWith_AzureSQLDBSQLServerLoginName SQL_SERVER_PASSWORD = ReplaceWith_AzureSQLDBSQLServerLoginPassword SQL_SERVER_DATABASE = ReplaceWith_AzureSQLDBDatabaseNameCaution
For clarity and simplicity, this application is using a configuration file that is read from Python. Since the code will deploy with the container, the connection information might be able to derive from the contents. You should carefully consider the various methods of working with security, connections, and secrets and determine the best level and mechanism you should use for our application. Always pick the highest level of security, and even multiple levels to ensure your application is secure. You have multiple options of working with secret information such as connection strings and the like, and the following list shows a few of those options.
For more information, see Azure SQL Database security.
- Another method to work with secrets in Python is to use the python-secrets library.
- Review Docker security and secrets.
- Review Kubernetes secrets.
- You can also learn more about Microsoft Entra (formerly Azure Active Directory) authentication.
The team next wrote the PoC application and called it
app.py.The following script accomplishes these steps:
- Set up the libraries for the configuration and base web interfaces.
- Load the variables from the
.envfile. - Create the Flask-RESTful Application.
- Get to Azure SQL Database connection information using the
config.inifile values. - Create connection to Azure SQL Database using the
config.inifile values. - Connect to Azure SQL Database using the
pyodbcpackage. - Create the SQL query to run against the database.
- Create the class that will be used to return the data from the API.
- Set the API endpoint to the
Productsclass. - Finally, start the app on default Flask port 5000.
# Set up the libraries for the configuration and base web interfaces
from dotenv import load_dotenv
from flask import Flask
from flask_restful import Resource, Api
import pyodbc

# Load the variables from the .env file
load_dotenv()

# Create the Flask-RESTful Application
app = Flask(__name__)
api = Api(app)

# Get to Azure SQL Database connection information using the config.ini file values
server_name = os.getenv('SQL_SERVER_ENDPOINT')
database_name = os.getenv('SQL_SERVER_DATABASE')
user_name = os.getenv('SQL_SERVER_USERNAME')
password = os.getenv('SQL_SERVER_PASSWORD')

# Create connection to Azure SQL Database using the config.ini file values
ServerName = config.get('Connection', 'SQL_SERVER_ENDPOINT')
DatabaseName = config.get('Connection', 'SQL_SERVER_DATABASE')
UserName = config.get('Connection', 'SQL_SERVER_USERNAME')
PasswordValue = config.get('Connection', 'SQL_SERVER_PASSWORD')

# Connect to Azure SQL Database using the pyodbc package
# Note: You may need to install the ODBC driver if it is not already there. You can find that at:
# https://learn.microsoft.com/sql/connect/odbc/download-odbc-driver-for-sql-server
connection = pyodbc.connect(f'Driver=ODBC Driver 17 for SQL Server;Server={ServerName};Database={DatabaseName};uid={UserName};pwd={PasswordValue}')

# Create the SQL query to run against the database
def query_db():
    cursor = connection.cursor()
    cursor.execute("SELECT TOP (10) [ProductID], [Name], [Description] FROM [SalesLT].[vProductAndDescription] WHERE Culture = 'EN' FOR JSON AUTO;")
    result = cursor.fetchone()
    cursor.close()
    return result

# Create the class that will be used to return the data from the API
class Products(Resource):
    def get(self):
        result = query_db()
        json_result = {} if (result == None) else json.loads(result[0])
        return json_result, 200

# Set the API endpoint to the Products class
api.add_resource(Products, '/products')

# Start App on default Flask port 5000
if __name__ == "__main__":
    app.run(debug=True)
They checked that this application runs locally, and returns a page to
http://localhost:5000/products.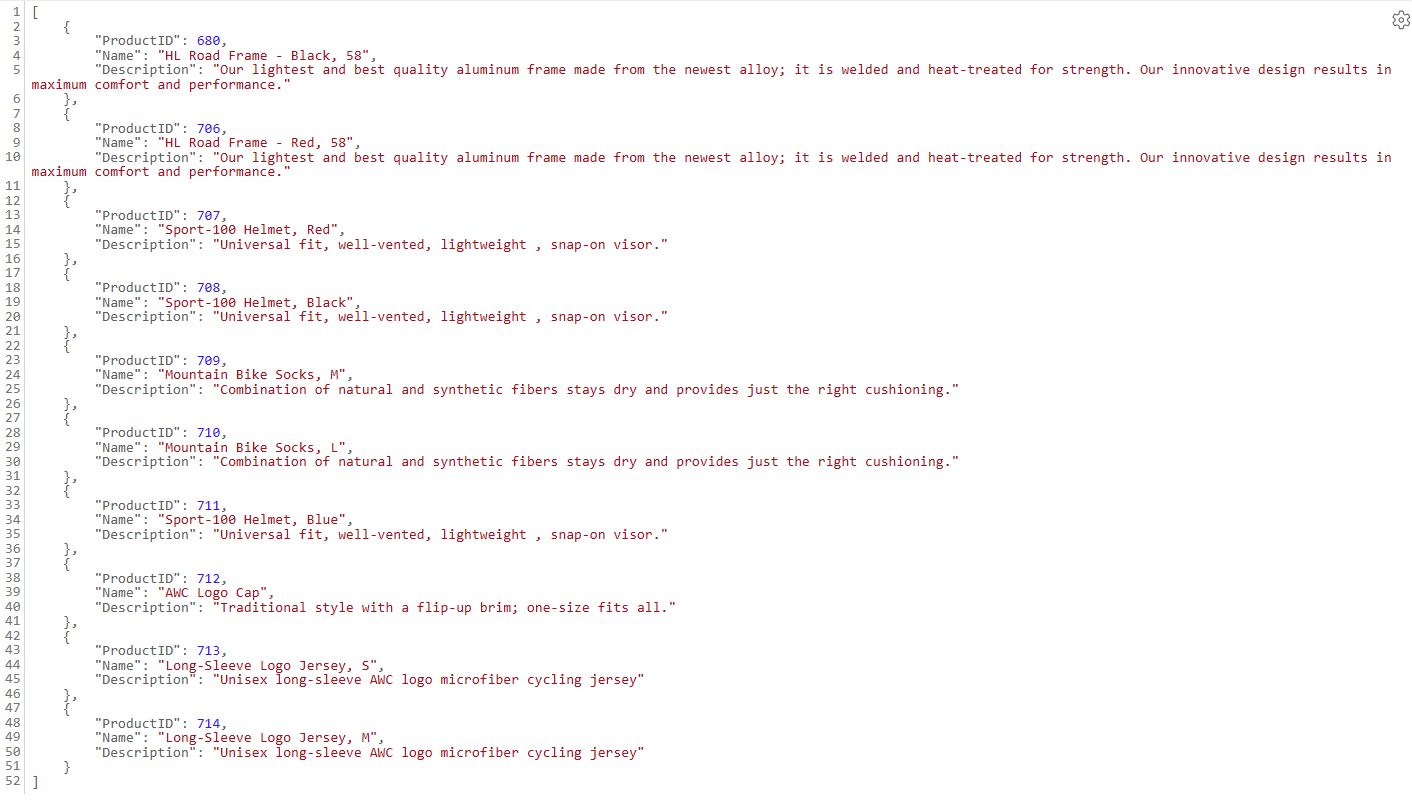
Important
When building production applications, do not use the administrator account to access the database. For more information, read more about how to set up an account for your application. The code in this article is simplified so that you can quickly get started with applications using Python and Kubernetes in Azure.
More realistically, you could use a contained database user with read-only permissions, or a login or contained database user connected to a user-assigned managed identity with read-only permissions.
For more information, review a complete example on how to create API with Python and Azure SQL Database.

Deploy the application to a Docker container
A Container is a reserved, protected space in a computing system that provides isolation and encapsulation. To create a container, use a Manifest file, which is simply a text file describing the binaries and code you wish to contain. Using a Container Runtime (such as Docker), you can then create a binary image that has all of the files you want to run and reference. From there, you can "run" the binary image, and that is called a Container, which you can reference as if it were a full computing system. It's a smaller, simpler way to abstract your application runtimes and environment than using a full virtual machine. For more information, see Containers and Docker.
The team started with a DockerFile (the Manifest) that layers the elements of what the team wants to use. They start with a base Python image that already has the pyodbc
libraries installed, and then they run all commands necessary to contain the program and config file in the previous step.
The following Dockerfile has the following steps:
- Start with a Container binary that already has Python and
pyodbcinstalled. - Create a Working directory for the application.
- Copy all of the code from the current directory into the
WORKDIR. - Install the libraries that are required.
- Once the container starts, run the application, and open all TCP/IP ports.
# syntax=docker/dockerfile:1

# Start with a Container binary that already has Python and pyodbc installed
FROM laudio/pyodbc

# Create a Working directory for the application
WORKDIR /flask2sql

# Copy all of the code from the current directory into the WORKDIR
COPY . .

# Install the libraries that are required
RUN pip install -r ./requirements.txt

# Once the container starts, run the application, and open all TCP/IP ports
CMD ["python3", "-m" , "flask", "run", "--host=0.0.0.0"]
With that file in place, the team dropped to a command-prompt in the coding directory and ran the following code to create the binary Image from the Manifest, and then another command to start the Container:
docker build -t flask2sql .
docker run -d -p 5000:5000 -t flask2sql
Once again, the team tests the http://localhost:5000/products link to ensure the Container can access the database, and they see the following return:

Deploy the image to a Docker registry
The Container is now working, but is only available on the developer's machine. The Development team would like to make this application Image available to the rest of the company, and then on to Kubernetes for production deployment.
The storage area for Container Images is called a repository, and there can be both public and private repositories for Container Images. In fact, AdvenureWorks used a public Image for the Python environment in their Dockerfile.
The team would like to control access to the Image, and rather than putting it on the web they decide they would like to host it themselves, but in Microsoft Azure where they have full control over security and access. You can read more about Microsoft Azure Container Registry here.
Returning to the command-line, the Development team uses az CLI to add a Container registry service, enable an administration account, set it to anonymous "pulls" during the testing phase, and set a login context to the registry:
az acr create --resource-group ReplaceWith_PoCResourceGroupName --name ReplaceWith_AzureContainerRegistryName --sku Standard
az acr update -n ReplaceWith_AzureContainerRegistryName --admin-enabled true
az acr update --name ReplaceWith_AzureContainerRegistryName --anonymous-pull-enabled
az acr login --name ReplaceWith_AzureContainerRegistryName
This context will be used in subsequent steps.
Tag the local Docker image to prepare it for uploading
The next step is to send the local application Container Image to the Azure Container Registry (ACR) service so that it's available in the cloud.
- In the following sample script, the team uses the Docker commands to list the Images on the machine.
- They use the
az CLIutility to list the Images in the ACR service. - They use the Docker command to "tag" the image with the destination name of the ACR they created in the previous step, and to set a version number for proper DevOps.
- Finally, they list the local Image information again to ensure the tag applied correctly.
docker images
az acr list --resource-group ReplaceWith_PoCResourceGroupName --query "[].{acrLoginServer:loginServer}" --output table
docker tag flask2sql ReplaceWith_AzureContainerRegistryName.azurecr.io/azure-flask2sql:v1
docker images
With the code written and tested, the Dockerfile, image and container run and tested, the ACR service set up, and all tags applied, the team can upload the image to the ACR service.
They use the Docker "push" command to send the file, and then the az CLI utility to ensure the image was loaded:
docker push ReplaceWith_AzureContainerRegistryName.azurecr.io/azure-flask2sql:v1
az acr repository list --name ReplaceWith_AzureContainerRegistryName --output table
Deploy to Kubernetes
The team could simply run containers and deploy the application to on-premises and in-cloud environments. However, they would like to add multiple copies of the application for scale and availability, add other containers performing different tasks, and add monitoring and instrumentation to the entire solution.
To group containers together into a complete solution, the team decided to use Kubernetes. Kubernetes runs on-premises and in all major cloud platforms. Microsoft Azure has a complete managed environment for Kubernetes, called the Azure Kubernetes Service (AKS). Learn more about AKS with the Introduction to Kubernetes on Azure training path.
Using the az CLI utility, the team adds AKS to the same resource group they created earlier. With a single az command, the Development team accomplishes the following steps:
- Add two "nodes" or computing environments for resiliency in the testing phase
- Automatically generate SSH Keys for access to the environment
- Attach the ACR service they created in the previous steps so that the AKS cluster can locate the images they want to use for the deployment
az aks create --resource-group ReplaceWith_PoCResourceGroupName --name ReplaceWith_AzureKubernetesServiceName --node-count 2 --generate-ssh-keys --attach-acr ReplaceWith_AzureContainerRegistryName
Kubernetes uses a command-line tool to access and control a cluster, called kubectl. The team uses the az CLI utility to download the kubectl tool and install it:
az aks install-cli
Since they have a connection to AKS at the moment, they can ask it to send the SSH keys for connection to be used when they execute the kubectl utility:
az aks get-credentials --resource-group ReplaceWith_PoCResourceGroupName --name ReplaceWith_AzureKubernetesServiceName
These keys are stored in a file called .config in the user's directory. With that security context set, the team uses kubectl get nodes to show the nodes in the cluster:
kubectl get nodes
Now the team uses the az CLI tool to list the Images in the ACR service:
az acr list --resource-group ReplaceWith_PoCResourceGroupName --query "[].{acrLoginServer:loginServer}" --output table
Now they can build the manifest that Kubernetes uses to control the deployment. This is a text file stored in a yaml format. Here's the annotated text in the flask2sql.yaml file:
apiVersion: apps/v1
# The type of commands that will be sent, along with the name of the deployment
kind: Deployment
metadata:
  name: flask2sql
# This section sets the general specifications for the application
spec:
  replicas: 1
  selector:
    matchLabels:
      app: flask2sql
  strategy:
    rollingUpdate:
      maxSurge: 1
      maxUnavailable: 1
  minReadySeconds: 5
  template:
    metadata:
      labels:
        app: flask2sql
    spec:
      nodeSelector:
        "kubernetes.io/os": linux
# This section sets the location of the Image(s) in the deployment, and where to find them
      containers:
      - name: flask2sql
        image:  bwoodyflask2sqlacr.azurecr.io/azure-flask2sql:v1
# Recall that the Flask application uses (by default) TCIP/IP port 5000 for access. This line tells Kubernetes that this "pod" uses that address.
        ports:
        - containerPort: 5000
---
apiVersion: v1
# This is the front-end of the application access, called a "Load Balancer"
kind: Service
metadata:
  name: flask2sql
spec:
  type: LoadBalancer
# this final step then sets the outside exposed port of the service to TCP/IP port 80, but maps it internally to the app's port of 5000
  ports:
  - protocol: TCP
    port: 80
    targetPort: 5000
  selector:
    app: flask2sql
With the flask2sql.yaml file defined, the team can deploy the application to the running AKS cluster. That's done with the kubectl apply command, which as you recall still has a security context to the cluster. Then, the kubectl get service command is sent to watch the cluster as it is being built.
kubectl apply -f flask2sql.yaml
kubectl get service flask2sql --watch
After a few moments, the "watch" command will return an external IP address. At that point the team presses CTRL-C to break the watch command, and records the external IP address of the load balancer.
Test the application
Using the IP Address (Endpoint) they obtained in the last step, the team checks to ensure the same output as the local application and the Docker Container:
Clean up
With the application created, edited, documented and tested, the team can now "tear down" the application. By keeping everything in a single resource group in Microsoft Azure, it's a simple matter of deleting the PoC resource group using the az CLI utility:
az group delete -n ReplaceWith_PoCResourceGroupName -y
Note
If you created your Azure SQL Database in another resource group and you no longer need it, you can use the Azure portal to delete it.
The team member leading the PoC project uses Microsoft Windows as their workstation, and wants to retain the secrets file from Kubernetes but remove it from the system as the active location. They can simply copy the file to a config.old text file, then delete it:
copy c:\users\ReplaceWith_YourUserName\.kube\config c:\users\ReplaceWith_YourUserName\.kube\config.old
del c:\users\ReplaceWith_YourUserName\.kube\config