Bemærk
Adgang til denne side kræver godkendelse. Du kan prøve at logge på eller ændre mapper.
Adgang til denne side kræver godkendelse. Du kan prøve at ændre mapper.
Azure Cloud HSM supports certificate storage via PKCS#11, enabling applications to manage X.509 certificates alongside keys. This tutorial provides step-by-step instructions for setting up certificate storage prerequisites, including Azure Blob Storage and managed identity configuration. For details on using PKCS#11 APIs to manage certificates, see PKCS#11 API for certificate storage.
Prerequisites
The following prerequisites are required to support certificate storage with Azure Cloud HSM. See the Azure Cloud HSM onboarding guide for SDK installation and configuration if HSM deployment isn't complete.
System requirements
- Azure Cloud HSM resource is deployed, initialized, and configured.
- Azure Cloud HSM Client SDK
- Copy of partition owner certificate "PO.crt" on application server.
- Known address of your HSM
hsm1.chsm-<resource-name>-<unique-string>.privatelink.cloudhsm.azure.net. - Knowledge of Crypto User credentials
Certificate storage prerequisites
- Azure Blob Storage account
- Managed identity to access storage
Important
Customers using any version of Windows Server should install the most recent version of Visual C++ Redistributable.
Set up an Azure Blob Storage account
Before you can use the PKCS#11 API for certificate storage, you must create an Azure Blob Storage account. This storage account holds the PKCS#11 certificate objects, which are saved and retrieved in JWS format.
To set up an Azure Blob Storage account for PKCS#11 certificate storage, go to the Azure portal and create a new Storage Account.
After the storage account is created, go to it in the Azure portal and select Containers under Data storage. Create a new container to store the blobs.
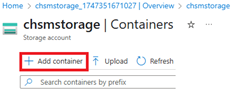
After creating the container, locate the container endpoint URL by navigating to Container properties. This URL is needed later.
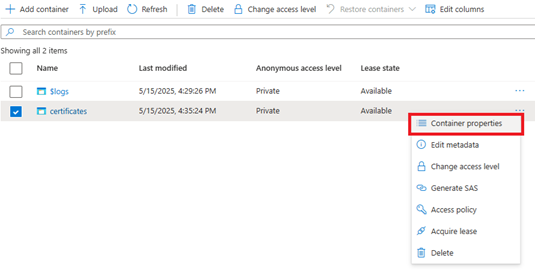
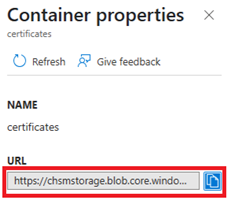
In Container properties, you find the container URL listed. This URL is required later in the azcloudhsm_application.cfg file to enable PKCS#11 applications to locate the storage location for certificate objects.
Set up a user-assigned managed identity to access storage
The next prerequisite for certificate storage is to create a User Assigned Managed Identity. This identity is granted the necessary role to access the Azure Blob Storage Account and is used to authenticate from your designated Admin VM.
Note
The following example creates and uses a User Assigned Managed Identity. A System Assigned Managed Identity can also be created and used on the VM.
To create a User Assigned Managed Identity for PKCS#11 certificate storage, navigate to the Azure portal and create a new identity.
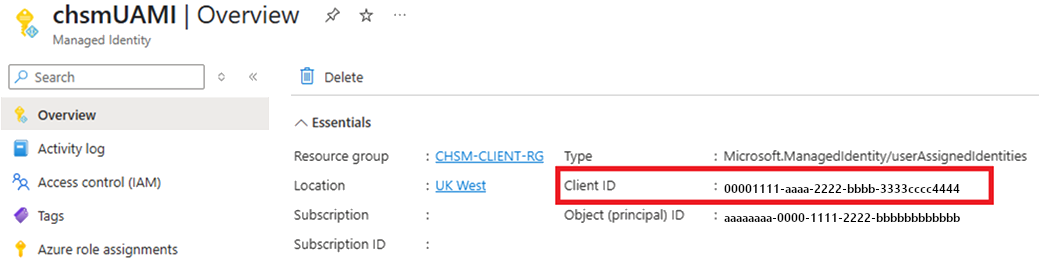
After successfully creating the Managed Identity, make note of the Client ID, which is required later in the azcloudhsm_application.cfg file to enable authentication to the storage account from your VM.
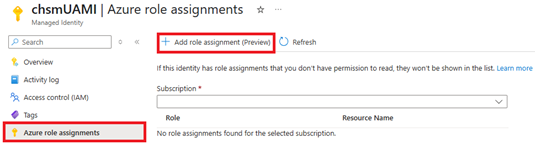
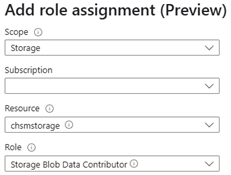
Assign the appropriate Azure role to grant the managed identity permission to read and write to the previously created Blob Storage account. Assign the Storage Blob Data Contributor role to the managed identity, setting the Scope to Storage and selecting the specific storage account resource.
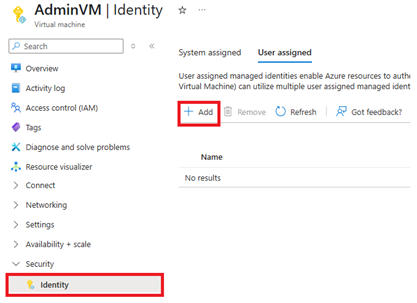
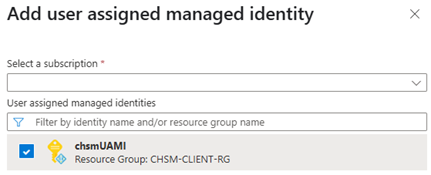
Assign the User Assigned Managed Identity to the VM that runs your PKCS#11 certificate storage application. Go to your VM resource in the Azure portal, select the Security section, select Identity, and add the user-assigned identity.
Configure the Azure Cloud HSM client tools
Create a storage signing key
Use the following azcloudhsm_util command to create an RSA signing key pair for PKCS#11 certificate storage in a single step. By default, it generates a 2048-bit RSA key with a public exponent of 65537. You can modify the key size as needed. Before you run the command, ensure that azcloudhsm_client is running as a service in the background.
Replace the placeholders as follows:
PKCS11_Swith your cryptography user username (for example,cu1)PKCS11_Pwith your cryptography user password (for example,user1234)SIGNING_KEY_IDwith the desired key pair ID (this ID is also used later in yourazcloudhsm_application.cfgfile)
Set SIGNING_KEY_ID to a random value for this example:
SIGNING_KEY_ID=$(tr -dc 'a-z' </dev/urandom | head -c 10)
Linux:
sudo ./azcloudhsm_util singlecmd loginHSM -u CU -s $PKCS11_S -p $PKCS11_P genRSAKeyPair -m 2048 -e 65537 -l $SIGNING_KEY_ID -id $SIGNING_KEY_ID
Windows:
.\azcloudhsm_util.exe singlecmd loginHSM -u CU -s %PKCS11_S% -p %PKCS11_P% genRSAKeyPair -m 2048 -e 65537 -l %SIGNING_KEY_ID% -id %SIGNING_KEY_ID%
Important
Ensure that each of the HSM nodes returns success.
chsmVMAdmin@AdminVM:/opt/azurecloudhsm/bin$ sudo ./azcloudhsm_util singlecmd loginHSM -u CU -s cu1 -p user1234 genRSAKeyPair -m 2048 -e 65537 -l signkeyid -id signkeyid
Version info, Client Version: <version>, SDK API Version: <version>, SDK Package Version: <version>

Cfm3Initialize() returned app id : 01000000

    session_handle 1000000

    Current FIPS mode is: 00000000

Cfm3LoginHSM returned: 0x00 : HSM Return: SUCCESS

Cluster Status:
Node id 1 status: 0x00000000 : HSM Return: SUCCESS
Node id 2 status: 0x00000000 : HSM Return: SUCCESS
Node id 3 status: 0x00000000 : HSM Return: SUCCESS
Command: genRSAKeyPair -m 2048 -e 65537 -L signkeyid -id signkeyid

Cfm3GenerateKeyPair returned: 0x00 : HSM Return: SUCCESS

Cfm3GenerateKeyPair:    public key handle: 262151    private key handle: 262152

Cluster Status:
Node id 1 status: 0x00000000 : HSM Return: SUCCESS
Node id 2 status: 0x00000000 : HSM Return: SUCCESS
Node id 3 status: 0x00000000 : HSM Return: SUCCESS
Update configuration files
Update application config
You will need to update the following parameters in the azcloudhsm_application.cfg file.
CERTSTORAGE_URL: This field refers to the URL of the container within the customer's Blob Storage Account and is used to store certificate information. (e.g. https://chsmstorage.blob.core.windows.net/certificates)
CERTSTORAGE_SIGNING_KEYID: This field refers to the ID assigned to the key pair, which is used to perform integrity checks during read and write operations to storage (signing and verification).
UAMI_CLIENT_ID: This field refers to the Client ID of the User Assigned Managed Identity, which is used to authenticate to the customer's Blob Storage Account. If left blank, authentication will default to using a System Assigned Managed Identity.
Note
These parameters only apply when running certificate operations in PKCS#11. It is not required for Key Operations.
DAEMON_ID=1
SOCKET_TYPE=UNIXSOCKET
PORT=1111
USER_KEK_HANDLE=262150
DEFAULT_WRAP_WITH_TRUSTED=1
CERTSTORAGE_URL=https://chsmstorage.blob.core.windows.net/certificates
CERTSTORAGE_SIGNING_KEYID=hjgrwvvofe
UAMI_CLIENT_ID=25e659cc-6570-4f3b-9617-adfbc84b2565
Validate PKCS#11 configuration
For sample-based validation of your PKCS#11 configuration, see the PKCS#11 integration guide.
chsmVMAdmin@AdminVM:/opt/azurecloudhsm$ sudo ./cust_p11_app -s cu1 -p user1234 -l /opt/azurecloudhsm/lib64/libazcloudhsm_pkcs11.so
[INFO] Azure Cloud HSM – Loading PKCS#11 library.
[INFO] Azure Cloud HSM – C_GetFunctionList
[INFO] Azure Cloud HSM – Preparing PIN with given username and password.
[INFO] Azure Cloud HSM – C_Initialize
[INFO] Azure Cloud HSM – C_GetInfo
[INFO] Azure Cloud HSM – Retrieve access token, C_GetTokenInfo
[INFO] Azure Cloud HSM – Start session with specified token, C_OpenSession
[INFO] Azure Cloud HSM – Login with PIN, C_Login
Add Your PKCS#11 Code Here
Next steps
- PKCS#11 API for Certificate Storage: Learn how to use PKCS#11 APIs to manage X.509 certificates in Azure Cloud HSM.
- Overview of Azure Cloud HSM
- Secure your Azure Cloud HSM