Quickstart: Configure voice routing programmatically
Configure outbound voice routing rules for Azure Communication Services direct routing.
Prerequisites
- An Azure account with an active subscription. Create an account for free.
- An active Communication Services resource. Create a Communication Services resource.
- The fully qualified domain name (FQDN) and port number of a session border controller (SBC) in an operational telephony system.
- The verified domain name of the SBC FQDN.
Note
You can find more usage examples for SipRoutingClient on GitHub.
Add a session border controller
On the left pane, under Voice Calling - PSTN, select Direct routing. On the Session Border Controller tab, select Configure.
Enter an FQDN and signaling port for the SBC. Requirements for the SBC FQDN include:
- The domain part of the FQDN must be verified before you can add it to your direct routing configuration, as mentioned earlier in the prerequisites.
- The SBC certificate must match the name. Wildcard certificates are supported.
- You can't use the
*.onmicrosoft.comand*.azure.comdomains for the FQDN.
For the full list of requirements, see Azure direct routing infrastructure requirements.
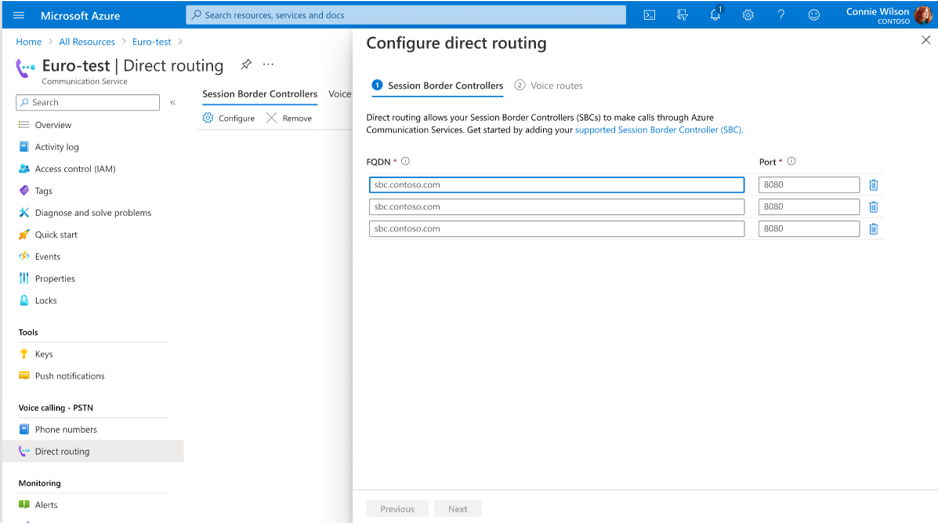
Select Next. If everything is set up correctly, you should see the status of SBC as Active in Azure portal.
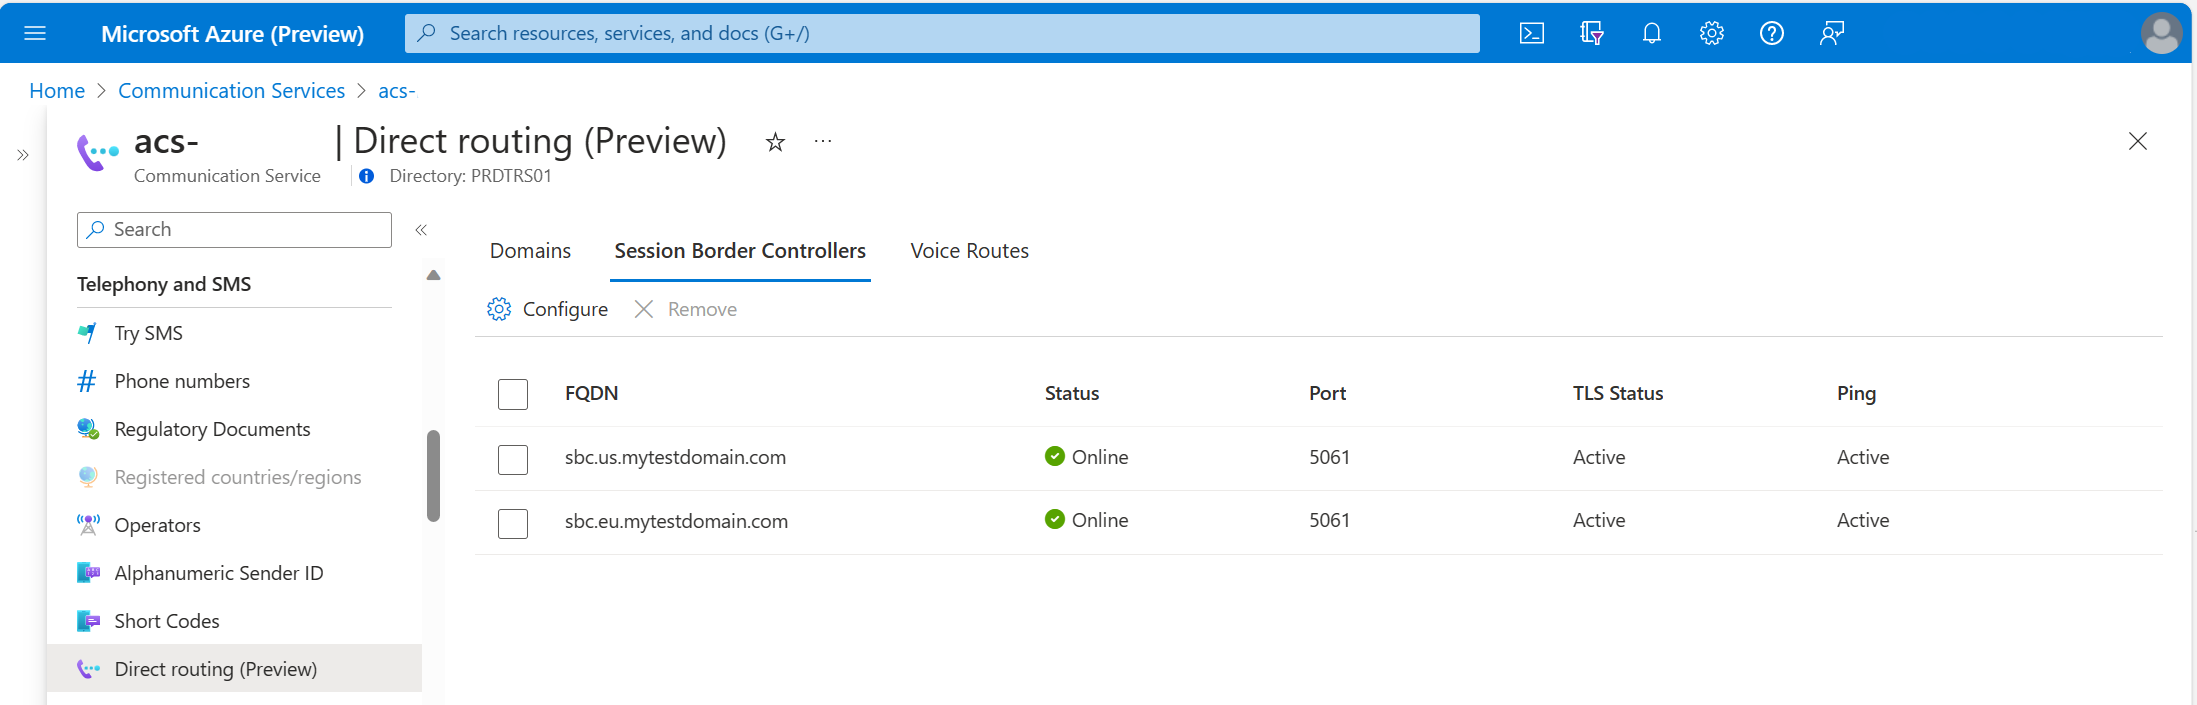

Important
Before placing or receiving calls, make sure that SBC status is Online
Create voice routing rules

Give your voice route a name, specify the number pattern by using regular expressions, and select the SBC for that pattern. Here are some examples of basic regular expressions:
^\+\d+$: Matches a telephone number with one or more digits that start with a plus.^\+1(\d{10})$: Matches a telephone number with 10 digits after+1.^\+1(425|206)(\d{7})$: Matches a telephone number that starts with+1425or with+1206, followed by seven digits.^\+0?1234$: Matches both+01234and+1234telephone numbers.
For more information about regular expressions, see .NET regular expressions overview.
You can select multiple SBCs for a single pattern. In such a case, the routing algorithm chooses them in random order. You can also specify the exact number pattern more than once. The higher row has higher priority. If all SBCs associated with that row aren't available, the next row is selected. This way, you create complex routing scenarios.
Remove a direct routing configuration
To delete a voice route:
- On the left pane, under Voice Calling - PSTN, go to Direct routing.
- On the Voice Routes tab, select the checkboxes for the route (or routes) that you want to delete.
- Select Remove.
To delete an SBC:
- On the left pane, under Voice Calling - PSTN, go to Direct routing.
- On the Session Border Controllers tab, select Configure.
- Clear the FQDN and port fields for the SBC that you want to remove, and then select Next.
- On the Voice Routes tab, review the voice routing configuration. Make changes if needed, and then select Save.
When you remove an SBC that's associated with a voice route, you can choose a different SBC for the route on the Voice Routes tab. The voice route without an SBC will be deleted.
Prerequisites
- An Azure account with an active subscription. Create an account for free.
- An active Communication Services resource and connection string. Create a Communication Services resource.
- The latest version of the .NET Core client library for your operating system.
- The fully qualified domain name (FQDN) and port number of a session border controller (SBC) in an operational telephony system.
- The verified domain name of the SBC FQDN.
Final code
Find the finalized code for this quickstart on GitHub.
You can also find more usage examples for SipRoutingClient on GitHub.
Create a C# application
In a console window (such as Command Prompt, PowerShell, or Bash), use the dotnet new command to create a new console app:
dotnet new console -o DirectRoutingQuickstart
This command creates a simple "Hello World" C# project with a single source file: Program.cs.
Change your directory to the newly created app folder, and use the dotnet build command to compile your application:
    cd DirectRoutingQuickstart
    dotnet build
Install the package
While you're still in the application directory, install the Azure Communication PhoneNumbers client library for .NET by using the dotnet add package command:
dotnet add package Azure.Communication.PhoneNumbers --version 1.1.0
Add a using directive to the top of Program.cs to include the namespaces:
using Azure.Communication.PhoneNumbers.SipRouting;
Authenticate the client
Authenticate phone number clients by using a connection string from an Azure Communication Services resource:
// Get a connection string to the Azure Communication Services resource.
var connectionString = "<connection_string>";
var client = new SipRoutingClient(connectionString);
Set up a direct routing configuration
In the prerequisites, you verified domain ownership. The next steps are to create trunks (add SBCs) and create voice routes.
Create or update trunks
Azure Communication Services direct routing allows communication with registered SBCs only. To register an SBC, you need its FQDN and port:
// Register your SBCs by providing their fully qualified domain names and port numbers.
var usSbcFqdn = "sbc.us.contoso.com";
var euSbcFqdn = "sbc.eu.contoso.com";
var sbcPort = 5061;

var usTrunk = new SipTrunk(usSbcFqdn, sbcPort);
var euTrunk = new SipTrunk(euSbcFqdn, sbcPort);

await client.SetTrunksAsync(new List<SipTrunk> { usTrunk, euTrunk });
Create or update routes
Provide routing rules for outbound calls. Each rule consists of two parts: a regex pattern that should match a dialed phone number, and the FQDN of a registered trunk where the call is routed.
The order of routes determines the priority of routes. The first route that matches the regex will be picked for a call.
In this example, you create one route for numbers that start with +1 and a second route for numbers that start with just +:
var usRoute = new SipTrunkRoute("UsRoute", "^\\+1(\\d{10})$", trunks: new List<string> { usSbcFqdn });
var defaultRoute = new SipTrunkRoute("DefaultRoute", "^\\+\\d+$", trunks: new List<string> { usSbcFqdn, euSbcFqdn });

await client.SetRoutesAsync(new List<SipTrunkRoute> { usRoute, defaultRoute });
Update a direct routing configuration
You can update the properties of a specific trunk by overwriting the record with the same FQDN. For example, you can set a new SBC port value:
var usTrunk = new SipTrunk("sbc.us.contoso.com", 5063);
await client.SetTrunkAsync(usTrunk);
You use the same method to create and update routing rules. When you update routes, send all of them in a single update. The new routing configuration fully overwrites the former one.
Remove a direct routing configuration
You can't edit or remove a single voice route. You should overwrite the entire voice routing configuration. Here's an example of an empty list that removes all the routes and trunks:
//delete all configured voice routes
await client.SetRoutesAsync(new List<SipTrunkRoute>());

//delete all trunks
await client.SetTrunksAsync(new List<SipTrunk>());
You can use the following example to delete a single trunk (SBC), if no voice routes are using it. If the SBC is listed in any voice route, delete that route first.
await client.DeleteTrunkAsync("sbc.us.contoso.com");
Prerequisites
- An Azure account with an active subscription. Create an account for free.
- Java Development Kit (JDK) version 8 or later.
- Apache Maven.
- A deployed Communication Services resource and connection string. Create a Communication Services resource.
- The fully qualified domain name (FQDN) and port number of a session border controller (SBC) in an operational telephony system.
- The verified domain name of the SBC FQDN.
Final code
Find the finalized code for this quickstart on GitHub.
You can also find more usage examples for SipRoutingClient on GitHub.
Create a Java application
Open your terminal or command window. Go to the directory where you want to create your Java application. Then, run the command to generate the Java project from the maven-archetype-quickstart template:
mvn archetype:generate -DgroupId=com.communication.quickstart -DartifactId=communication-quickstart -DarchetypeArtifactId=maven-archetype-quickstart -DarchetypeVersion=1.4 -DinteractiveMode=false
The generate task created a directory with the same name as the artifactId value. Under this directory, the src/main/java directory contains the project source code, the src/test/java directory contains the test source, and the pom.xml file is the project's Project Object Model (POM).
Install the package
Open the pom.xml file in your text editor. Add the following dependency elements to the group of dependencies:
<dependencies>
	<dependency>
		<groupId>com.azure</groupId>
		<artifactId>azure-communication-phonenumbers</artifactId>
		<version>1.1.0</version>
	</dependency>
</dependencies>
Set up the app framework
From the project directory:
- Go to the /src/main/java/com/communication/quickstart directory.
- Open the App.java file in your editor.
- Replace the
System.out.println("Hello world!");statement. - Add
importdirectives.
Use the following code to begin:
import com.azure.communication.phonenumbers.siprouting.SipRoutingAsyncClient;
import com.azure.communication.phonenumbers.siprouting.SipRoutingClientBuilder;
import com.azure.communication.phonenumbers.siprouting.models.SipTrunk;
import com.azure.communication.phonenumbers.siprouting.models.SipTrunkRoute;
import static java.util.Arrays.asList;

public class App
{
    public static void main( String[] args ) throws IOException
    {
        System.out.println("Azure Communication Services - Direct Routing Quickstart");
        // Quickstart code goes here
    }
}
Authenticate the client
With SipRoutingClientBuilder, you can use Microsoft Entra authentication:
// You can find your endpoint and access key from your resource in the Azure portal
String endpoint = "https://<RESOURCE_NAME>.communication.azure.com";

SipRoutingAsyncClient sipRoutingAsyncClient = new SipRoutingClientBuilder()
    .endpoint(endpoint)
    .credential(new DefaultAzureCredentialBuilder().build())
    .buildClient();
Alternatively, use the endpoint and access key from the communication resource to authenticate:
// You can find your connection string from your resource in the Azure portal
String connectionString = "endpoint=https://<RESOURCE_NAME>.communication.azure.com/;accesskey=<ACCESS_KEY>";

SipRoutingAsyncClient sipRoutingAsyncClient = new SipRoutingClientBuilder()
    .connectionString(connectionString)
    .buildClient();
Set up a direct routing configuration
In the prerequisites, you verified domain ownership. The next steps are to create trunks (add SBCs) and create voice routes.
Create or update trunks
Azure Communication Services direct routing allows communication with registered SBCs only. To register an SBC, you need its FQDN and port:
sipRoutingAsyncClient.setTrunksWithResponse(asList(
	new SipTrunk("sbc.us.contoso.com", 5061),
	new SipTrunk("sbc.eu.contoso.com", 5061)
)).block();
Create or update routes
Provide routing rules for outbound calls. Each rule consists of two parts: a regex pattern that should match a dialed phone number, and the FQDN of a registered trunk where the call is routed.
The order of routes determines the priority of routes. The first route that matches the regex will be picked for a call.
In this example, you create one route for numbers that start with +1 and a second route for numbers that start with just +:
sipRoutingAsyncClient.setRoutes(asList(
	new SipTrunkRoute("UsRoute", "^\\+1(\\d{10})$").setTrunks(asList("sbc.us.contoso.com")),
	new SipTrunkRoute("DefaultRoute", "^\\+\\d+$").setTrunks(asList("sbc.us.contoso.com", "sbc.eu.contoso.com"))
)).block();
Update a direct routing configuration
You can update the properties of a specific trunk by overwriting the record with the same FQDN. For example, you can set a new SBC port value:
sipRoutingClient.setTrunk(new SipTrunk("sbc.us.contoso.com", 5063));
You use the same method to create and update routing rules. When you update routes, send all of them in a single update. The new routing configuration fully overwrites the former one.
Remove a direct routing configuration
You can't edit or remove a single voice route. You should overwrite the entire voice routing configuration. Here's an example of an empty list that removes all the routes and trunks.
Add two imports:
import java.util.Collections;
import java.util.List;
Use the following code to delete a direct routing configuration:
//delete all configured voice routes
System.out.println("Delete all routes");
List<SipTrunkRoute> routes = Collections.<SipTrunkRoute> emptyList();
sipRoutingAsyncClient.setRoutes(routes).block();

//delete all trunks
System.out.println("Delete all trunks");
List<SipTrunk> trunks = Collections.<SipTrunk> emptyList();
sipRoutingAsyncClient.setTrunksWithResponse(trunks).block();
You can use the following example to delete a single trunk (SBC), if no voice routes are using it. If the SBC is listed in any voice route, delete that route first.
sipRoutingClient.deleteTrunk("sbc.us.contoso.com");
Run the code
Go to the directory that contains the pom.xml file and compile the project by using the following mvn command:
mvn clean compile
Then, build the package:
mvn package
Run the following mvn command to run the app:
mvn exec:java -Dexec.mainClass="com.communication.quickstart.App" -Dexec.cleanupDaemonThreads=false
Prerequisites
- An Azure account with an active subscription. Create an account for free.
- An active Communication Services resource and connection string. Create a Communication Services resource.
- Active LTS and Maintenance LTS versions of Node.js for your operating system.
- The fully qualified domain name (FQDN) and port number of a session border controller (SBC) in an operational telephony system.
- The verified domain name of the SBC FQDN.
Final code
Find the finalized code for this quickstart on GitHub.
You can also find more usage examples for SipRoutingClient on GitHub.
Create a Node.js application
Open your terminal or command window, create a new directory for your app, and go to it:
mkdir direct-routing-quickstart && cd direct-routing-quickstart
Run npm init -y to create a package.json file with default settings:
npm init -y
Create a file called direct-routing-quickstart.js in the root of the directory that you created. Add the following snippet to it:
async function main() {
    // quickstart code will go here
}

main();
Install the package
Use the npm install command to install the Azure Communication Services Phone Numbers client library for JavaScript:
npm install @azure/communication-phone-numbers --save
The --save option adds the library as a dependency in your package.json file.
Authenticate the client
Import SipRoutingClient from the client library and instantiate it with your connection string. The code retrieves the connection string for the resource from an environment variable named COMMUNICATION_SERVICES_CONNECTION_STRING. Learn how to manage your resource's connection string.
Add the following code to direct-routing-quickstart.js:
const { SipRoutingClient } = require('@azure/communication-phone-numbers');

// This code demonstrates how to fetch your connection string
// from an environment variable.
const connectionString = process.env['COMMUNICATION_SERVICES_CONNECTION_STRING'];

// Instantiate the phone numbers client
const sipRoutingClient = new SipRoutingClient(connectionString);
Set up a direct routing configuration
In the prerequisites, you verified domain ownership. The next steps are to create trunks (add SBCs) and create voice routes.
Create or update trunks
Azure Communication Services direct routing allows communication with registered SBCs only. To register an SBC, you need its FQDN and port:
  await client.setTrunks([
    {
      fqdn: 'sbc.us.contoso.com',
      sipSignalingPort: 5061
    },{
      fqdn: 'sbc.eu.contoso.com',
      sipSignalingPort: 5061
    }
  ]);
Create or update routes
Provide routing rules for outbound calls. Each rule consists of two parts: a regex pattern that should match a dialed phone number, and the FQDN of a registered trunk where the call is routed.
The order of routes determines the priority of routes. The first route that matches the regex will be picked for a call.
In this example, you create one route for numbers that start with +1 and a second route for numbers that start with just +:
   await client.setRoutes([
    {
      name: "UsRoute",
      description: "route's description",
      numberPattern: "^\+1(\d{10})$",
      trunks: [ 'sbc.us.contoso.com' ]
    },{
      name: "DefaultRoute",
      description: "route's description",
      numberPattern: "^\+\d+$",
      trunks: [ 'sbc.us.contoso.com', 'sbc.eu.contoso.com']
    }
  ]);
Update a direct routing configuration
You can update the properties of a specific trunk by overwriting the record with the same FQDN. For example, you can set a new SBC port value:
  await client.setTrunk({
    fqdn: 'sbc.us.contoso.com',
    sipSignalingPort: 5063
  });
You use the same method to create and update routing rules. When you update routes, send all of them in a single update. The new routing configuration fully overwrites the former one.
Remove a direct routing configuration
You can't edit or remove a single voice route. You should overwrite the entire voice routing configuration. Here's an example of an empty list that removes all the routes and trunks:
//delete all configured voice routes
console.log("Deleting all routes...");
await client.setRoutes([]);

//delete all trunks
console.log("Deleting all trunks...");
await client.setTrunks([]);
You can use the following example to delete a single trunk (SBC), if no voice routes are using it. If the SBC is listed in any voice route, delete that route first.
await client.deleteTrunk('sbc.us.contoso.com');
Run the code
Use the node command to run the code that you added to the direct-routing-quickstart.js file:
node direct-routing-quickstart.js
Prerequisites
- An Azure account with an active subscription. Create an account for free.
- Python 3.7+.
- A deployed Communication Services resource and a connection string. Create a Communication Services resource.
- The fully qualified domain name (FQDN) and port number of a session border controller (SBC) in an operational telephony system.
- The verified domain name of the SBC FQDN.
Final code
Find the finalized code for this quickstart on GitHub.
You can also find more usage examples for SipRoutingClient on GitHub.
Create a Python application
Open your terminal or command window. Create a new directory for your app, and then go to it:
mkdir direct-routing-quickstart && cd direct-routing-quickstart
Use a text editor to create a file called direct_routing_sample.py in the project root directory and add the following code:
import os
from azure.communication.phonenumbers.siprouting import SipRoutingClient, SipTrunk, SipTrunkRoute

try:
   print('Azure Communication Services - Direct Routing Quickstart')
   # Quickstart code goes here
except Exception as ex:
   print('Exception:')
   print(ex)
You add the remaining quickstart code in the following sections.
Install the package
While you're still in the application directory, install the Azure Communication Services Administration client library for Python by using the pip install command:
pip install azure-communication-phonenumbers==1.1.0
Authenticate the client
With SipRoutingClient, you can use Microsoft Entra authentication. Using the DefaultAzureCredential object is the easiest way to get started with Microsoft Entra ID, and you can install it by using the pip install command:
pip install azure-identity
Creating a DefaultAzureCredential object requires you to have AZURE_CLIENT_ID, AZURE_CLIENT_SECRET, and AZURE_TENANT_ID already set as environment variables with their corresponding values from your registered Microsoft Entra application. For a quick way to get these environment variables, see Authenticate using Microsoft Entra ID.
After you've installed the azure-identity library, you can continue with authenticating the client:
import os
from azure.communication.phonenumbers.siprouting import SipRoutingClient
from azure.identity import DefaultAzureCredential

# You can find your endpoint from your resource in the Azure portal
endpoint = 'https://<RESOURCE_NAME>.communication.azure.com'
try:
    print('Azure Communication Services - Direct Routing Quickstart')
    credential = DefaultAzureCredential()
    sip_routing_client = SipRoutingClient(endpoint, credential)
except Exception as ex:
    print('Exception:')
    print(ex)
Alternatively, you can use the endpoint and access key from the communication resource to authenticate:
import os
from azure.communication.phonenumbers.siprouting import SipRoutingClient

# You can find your connection string from your resource in the Azure portal
connection_string = 'https://<RESOURCE_NAME>.communication.azure.com/;accesskey=<YOUR_ACCESS_KEY>'
try:
    print('Azure Communication Services - Direct Routing Quickstart')
    sip_routing_client = SipRoutingClient.from_connection_string(connection_string)
except Exception as ex:
    print('Exception:')
    print(ex)
Set up a direct routing configuration
In the prerequisites, you verified domain ownership. The next steps are to create trunks (add SBCs) and create voice routes.
Create or update trunks
Register your SBCs by providing their fully qualified domain names and port numbers:
new_trunks = [SipTrunk(fqdn="sbc.us.contoso.com", sip_signaling_port=1234), SipTrunk(fqdn="sbc.eu.contoso.com", sip_signaling_port=1234)]
sip_routing_client.set_trunks(new_trunks)
Create or update routes
Provide routing rules for outbound calls. Each rule consists of two parts: a regex pattern that should match a dialed phone number, and the FQDN of a registered trunk where the call is routed.
The order of routes determines the priority of routes. The first route that matches the regex will be picked for a call.
In this example, you create one route for numbers that start with +1 and a second route for numbers that start with just +:
us_route = SipTrunkRoute(name="UsRoute", description="Handle US numbers '+1'", number_pattern="^\\+1(\\d{10})$", trunks=["sbc.us.contoso.com"])
def_route = SipTrunkRoute(name="DefaultRoute", description="Handle all numbers", number_pattern="^\\+\\d+$", trunks=["sbc.us.contoso.com","sbc.eu.contoso.com"])
new_routes = [us_route, def_route]
sip_routing_client.set_routes(new_routes)
Update a direct routing configuration
You can update the properties of a specific trunk by overwriting the record with the same FQDN. For example, you can set a new SBC port value:
new_trunk = SipTrunk(fqdn="sbc.us.contoso.com", sip_signaling_port=5063)
sip_routing_client.set_trunk(new_trunk)
You use the same method to create and update routing rules. When you update routes, send all of them in a single update. The new routing configuration fully overwrites the former one.
Remove a direct routing configuration
You can't edit or remove a single voice route. You should overwrite the entire voice routing configuration. Here's an example of an empty list that removes all the routes and trunks:
#delete all configured voice routes
print('Deleting all routes...')
sip_routing_client.set_routes([])

#delete all trunks
print('Deleting all trunks...')
sip_routing_client.set_trunks([])
You can use the following example to delete a single trunk (SBC), if no voice routes are using it. If the SBC is listed in any voice route, delete that route first.
sip_routing_client.delete_trunk("sbc.us.contoso.com")
Run the code
From a console prompt, go to the directory that contains the direct_routing_sample.py file. Then run the following Python command to run the app:
python direct_routing_sample.py
Clean up resources
If you want to clean up and remove a Communication Services subscription, you can delete the resource or resource group. Deleting the resource group also deletes any other resources associated with it. Learn more about cleaning up resources.
Next steps
For more information, see the following articles:
- Learn about call automation to build workflows that route and manage calls to Communication Services.
- Learn about Calling SDK capabilities.
- Learn more about how calling works.
- Call to a telephone number by following a quickstart.