Bemærk
Adgang til denne side kræver godkendelse. Du kan prøve at logge på eller ændre mapper.
Adgang til denne side kræver godkendelse. Du kan prøve at ændre mapper.
Azure Container Apps exposes each container app through a domain name if ingress is enabled. Ingress endpoints for container apps within an external environment can be either publicly accessible or only available to other container apps in the same environment.
Once you know the fully qualified domain name for a given container app, you can make direct calls to the service from other container apps within the shared environment.
In this tutorial, you deploy a second container app that makes a direct service call to the API deployed in the Deploy your code to Azure Container Apps quickstart.
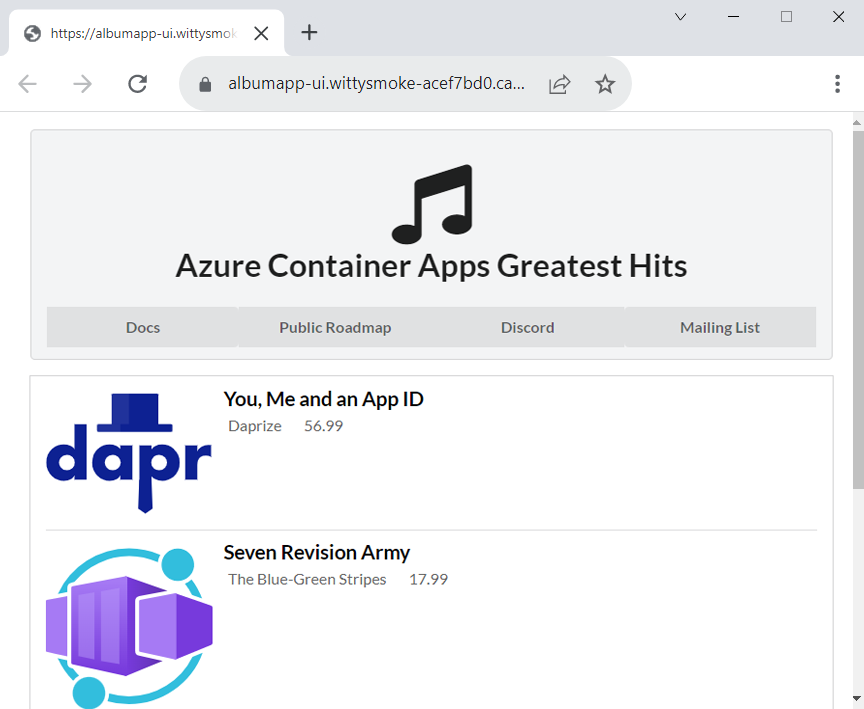
The following screenshot shows the UI microservice deploys to container apps at the end of this article.

In this tutorial, you learn to:
- Deploy a front end application to Azure Container Apps
- Link the front end app to the API endpoint deployed in the previous quickstart
- Verify the frontend app can communicate with the back end API
Prerequisites
In the code to cloud quickstart, a back end web API is deployed to return a list of music albums. If you didn't deploy the album API microservice, return to Quickstart: Deploy your code to Azure Container Apps to continue.
Setup
Define the following variables in your bash shell.
RESOURCE_GROUP="album-containerapps"
LOCATION="canadacentral"
ENVIRONMENT="env-album-containerapps"
API_NAME="album-api"
FRONTEND_NAME="album-ui"
GITHUB_USERNAME="<YOUR_GITHUB_USERNAME>"
Before you run this command, make sure to replace <YOUR_GITHUB_USERNAME> with your GitHub username.
Next, define a container registry name unique to you.
ACR_NAME="acaalbums"$GITHUB_USERNAME
Sign in to the Azure CLI.
az login
az acr login --name $ACR_NAME
Prepare the GitHub repository
In a new browser tab, navigate to the repository for the UI application and select the Fork button at the top of the page to fork the repo to your account.
Follow the prompts from GitHub to fork the repository and return here once the operation is complete.
Navigate to the parent of the code-to-cloud folder. If you're still in the code-to-cloud/src directory, you can use the below command to return to the parent folder.
cd ../..Use the following git command to clone your forked repo into the code-to-cloud-ui folder:
git clone https://github.com/$GITHUB_USERNAME/containerapps-albumui.git code-to-cloud-uiNote
If the
clonecommand fails, check that you have successfully forked the repository.Next, change the directory into the src folder of the cloned repo.
cd code-to-cloud-ui/src
Build the front end application
az acr build --registry $ACR_NAME --image albumapp-ui .
Output from the az acr build command shows the upload progress of the source code to Azure and the details of the docker build operation.
The following command builds a container image for the album UI and tags it with the fully qualified name of the ACR login server. The
.at the end of the command represents the docker build context, meaning this command should be run within the src folder where the Dockerfile is located.docker build --tag "$ACR_NAME.azurecr.io/albumapp-ui" .
Push the image to your ACR registry
First, sign in to your Azure Container Registry.
az acr login --name $ACR_NAMENow, push the image to your registry.
docker push "$ACR_NAME.azurecr.io/albumapp-ui"
Communicate between container apps
In the previous quickstart, the album API was deployed by creating a container app and enabling external ingress. Setting the container app's ingress to external made its HTTP endpoint URL publicly available.
Now you can configure the front end application to call the API endpoint by going through the following steps:
- Query the API application for its fully qualified domain name (FQDN).
- Pass the API FQDN to
az containerapp createas an environment variable so the UI app can set the base URL for the album API call within the code.
The UI application uses the endpoint provided to invoke the album API. The following code is an excerpt from the code used in the routes > index.js file.
const api = axios.create({
  baseURL: process.env.API_BASE_URL,
  params: {},
  timeout: process.env.TIMEOUT || 5000,
});
Notice how the baseURL property gets its value from the API_BASE_URL environment variable.
Run the following command to query for the API endpoint address.
API_BASE_URL=$(az containerapp show --resource-group $RESOURCE_GROUP --name $API_NAME --query properties.configuration.ingress.fqdn -o tsv)
Now that you set the API_BASE_URL variable with the FQDN of the album API, you can provide it as an environment variable to the frontend container app.
Deploy front end application
Create and deploy your container app with the following command.
az containerapp create \
  --name $FRONTEND_NAME \
  --resource-group $RESOURCE_GROUP \
  --environment $ENVIRONMENT \
  --image $ACR_NAME.azurecr.io/albumapp-ui  \
  --target-port 3000 \
  --env-vars API_BASE_URL=https://$API_BASE_URL \
  --ingress external \
  --registry-server $ACR_NAME.azurecr.io \
  --query properties.configuration.ingress.fqdn
By adding the argument --env-vars "API_BASE_URL=https://$API_ENDPOINT" to az containerapp create, you define an environment variable for your front end application. With this syntax, the environment variable named API_BASE_URL is set to the API's FQDN.
The output from the az containerapp create command shows the URL of the front end application.
View website
Use the container app's FQDN to view the website. The page resembles the following screenshot.

Clean up resources
If you're not going to continue to use this application, run the following command to delete the resource group along with all the resources created in this quickstart.
Caution
This command deletes the specified resource group and all resources contained within it. If resources outside the scope of this tutorial exist in the specified resource group, they will also be deleted.
az group delete --name $RESOURCE_GROUP
Tip
Having issues? Let us know on GitHub by opening an issue in the Azure Container Apps repo.