Navigate Test Plans
Azure DevOps Services | Azure DevOps Server 2022 | Azure DevOps Server 2020
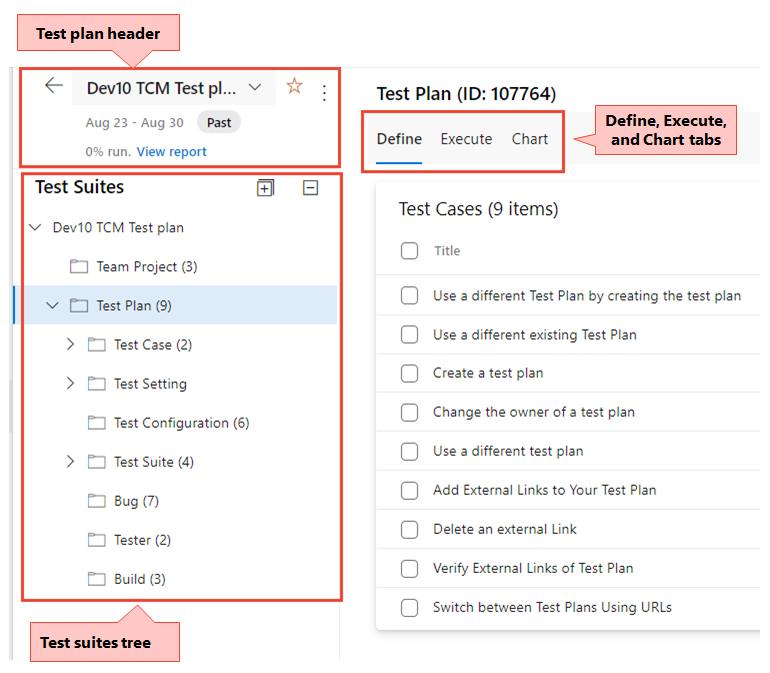
Learn how to navigate Test Plans to support your test goals and operations. Use the following sections of the Test Plans page to accomplish the corresponding tasks.
- Mine: View list of test plans that you created or are of interest to you.
- All: View a list of all the test plans defined for the project.
- Test plan header: Locate, favorite, edit, copy or clone a test plan.
- Test suites tree: Add, manage, export, or order test suites. Also use to assign configurations and perform user acceptance testing.
- Define tab: Collate, add, and manage test cases in a test suite of choice via this tab. This tab doesn't appear for users with Basic access.
- Execute tab: Assign and execute tests via this tab or locate a test result to drill into.
- Chart tab: Track test execution and status via charts, which can also be copied to dashboards.
For more information, see the following articles:
Prerequisites
- You must connect to a project. If you don't have a project yet, create one.
- You must be added to a project. To get added, Add users to a project or team.
- To view test-related work items or run test cases, you must have Basic access or higher. Users with Stakeholder access have no access to Test Plans.
- To exercise the full range of test-related features, you must have been granted Basic + Test Plans access level or have one of the following subscriptions:
- To add or edit test-related artifacts, you must have the following permissions:
- To add or modify test plans, test suites, test cases, or other test-based work item types, you must have Edit work items in this node permission set to Allow under the corresponding Area Path.
- To modify test plan properties such as build and test settings, you must have Manage test plans permission set to Allow under the corresponding Area Path.
- To create and delete test suites; add, and remove test cases from test suites; change test configurations associated with test suites—you must have Manage test suites permission set to Allow under the corresponding Area Path.
- Project-level permissions that you may need include:
- To view, create, or delete test runs, you must be granted the corresponding permissions: View test runs, Create test runs, and Delete test runs.
- To manage test configurations or test environments, you must be granted the corresponding permissions: Manage test configurations and Manage test environments.
- To add new tags to test-based work items, you must have the Create tag definition permission set to Allow.
- To move test-based work items out of a project, you must have the Move work items out of this project permission set to Allow.
- To delete or restore test-based work items, you must have the Delete and restore work items permission set to Allow.
- To permanently delete test-based work items, you must have the Permanently delete work items permission set to Allow.
For more information, see Manual test access and permissions.
Note
Most operations under the Define tab are only available to users with Basic + Test Plans access level or equivalent. Most operations under the Execute tab can be exercised by users granted a Basic access level.
The "Mine" page
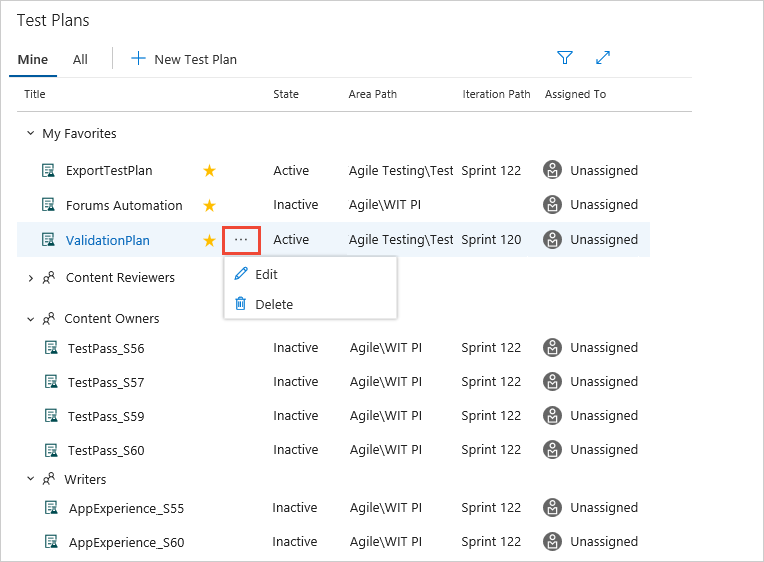
The Mine page shows a list of test plans that are of interest to you, which includes plans for teams you're a member of and test plans marked as favorites. You can expand and hide the plans for each team to make it easier to locate or review specific team plans. Use the shortcut menu to edit or delete the selected plan.
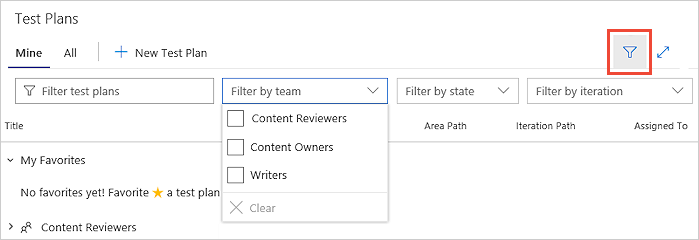
Show the filter controls to help you find plans if you have a large number of plans in the list. Filter the plans by name, team, state, or iteration.
The "All" page
The All page shows a list of all test plans. Filter test plans, and edit and delete plans using the shortcut menu, in the same way as in the Mine page. Use this page to add any test plan to your favorites list.
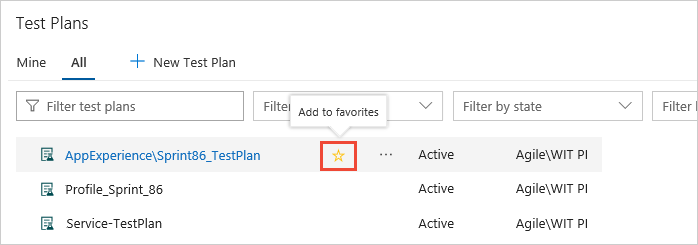
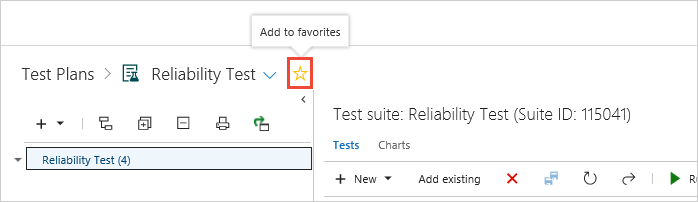
You can also add a plan to your favorites list while you view it.
Test plan header
Test plan tasks
Use the Test Plan header, to do one of the following tasks:
- Mark or unmark a test plan as a favorite
- Easily navigate among your favorite test plans
- View the iteration path of the test plan, which clearly indicates if the test plan is Current or Past
- Navigate to the Test Progress report via the View report link
- Navigate back to the All/Mine Test Plans page by choosing
 All test plans.
Test plan context menu options
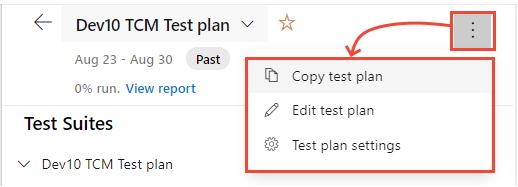
Choose the ![]() More options to open the context menu for the Test Plan to perform one of the following actions:
More options to open the context menu for the Test Plan to perform one of the following actions:
- Copy test plan: Quickly copy the current test plan.
- Edit test plan: Edit the Test Plan work item form to define work item fields or add to the description or discussion.
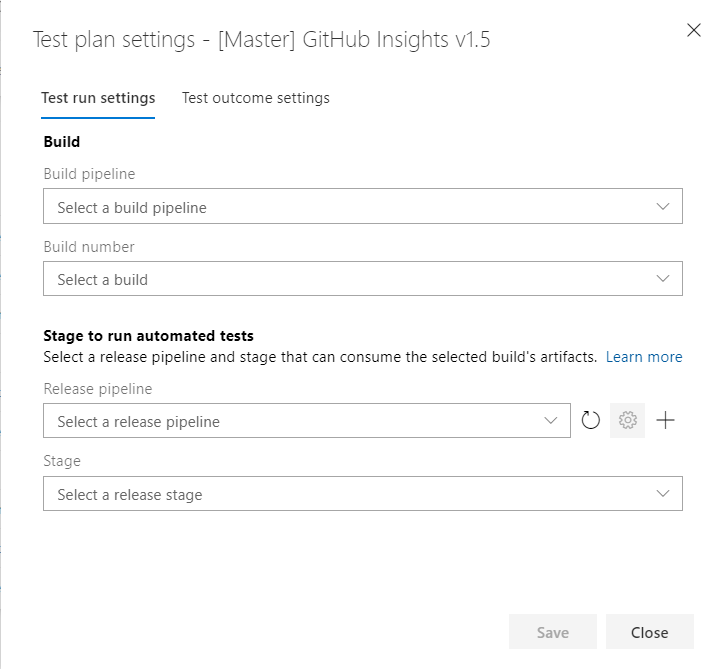
- Test plan settings: Configure the Test Run settings (to associate build or release pipelines) and the Test Outcome settings.
Configure test plan settings
Choose Test plan settings to configure test runs or test outcomes.
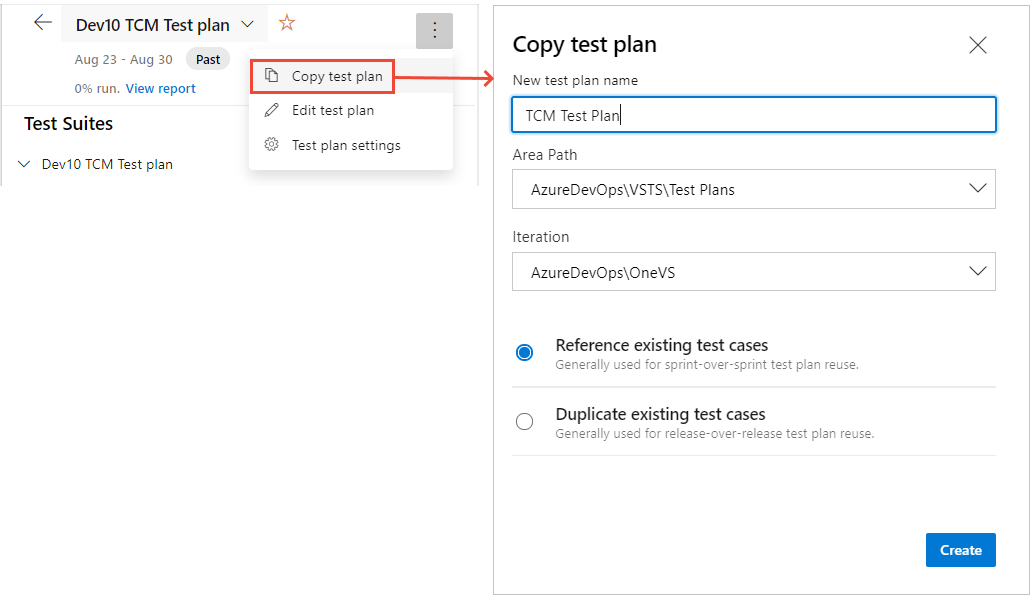
Copy test plan
We recommend creating a new Test Plan per sprint/release. When doing so, generally you can copy the Test Plan for the prior cycle and with few changes the copied test plan is ready for the new cycle. Use the Copy test plan menu option. This option lets you copy or clone test plans within a project.
Test suites header and tree
Test suites header tasks
The Test suite header allows you to perform the following tasks:
- Expand/collapse: Choose the
 Expand All/Collapse All toolbar options to expand or collapse the suite hierarchy tree.
 - Show test points from child suites: Choose the
 Show test points from child suites toolbar option, which is only visible when you are in the Execute tab, to view all the test points for the given suite and its children in one view for easier management of test points without having to navigate to individual suites one at a time.
 - Order suites: Drag/drop suites to either reorder the hierarchy of suites or move them from one suite hierarchy to another within the test plan.
Test suites context menu options
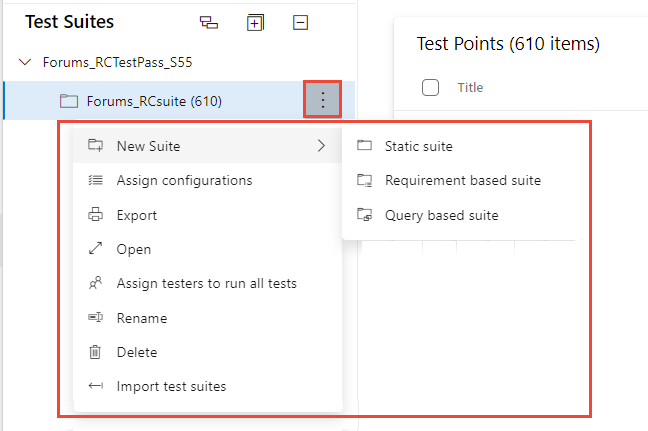
Choose the ![]() More options to open the context menu for the Test Suite and perform one of the following actions:
More options to open the context menu for the Test Suite and perform one of the following actions:
- Create new suites: You can create one of three different types of suites:
- Choose Static suite to organize your tests within a folder suite.
- Choose Requirement-based suite to directly link to the requirements/user stories for seamless traceability.
- Choose Query-based suite to dynamically organize test cases that meet a query criteria.
- Assign configurations: Assign configurations for the suite. For example, assign Chrome, Firefox, EdgeChromium, which then become applicable to all existing or new test cases that you add later to the suite.
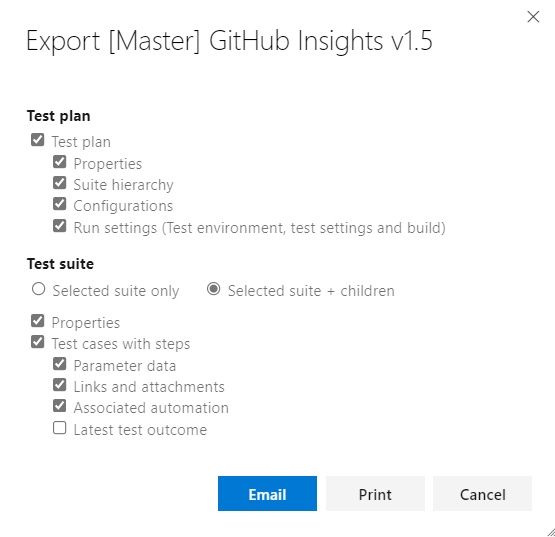
- Export: Export the test plan and test suite properties and details as either an email or print to pdf.
- Open test suite work item: This option allows you to edit the Test suite work item form to manage the work item fields.
- Assign testers to run all tests: This option is useful for User Acceptance testing (UAT) scenarios where the same test gets executed by multiple testers, generally belonging to different departments.
- Rename/Delete: These options allow you to manage the suite name or remove the suite and its content from the test plan.
- Import test suites: Use this option to import test cases present in other suites from other test plans in the same project or even across projects.
Export test suite dialog
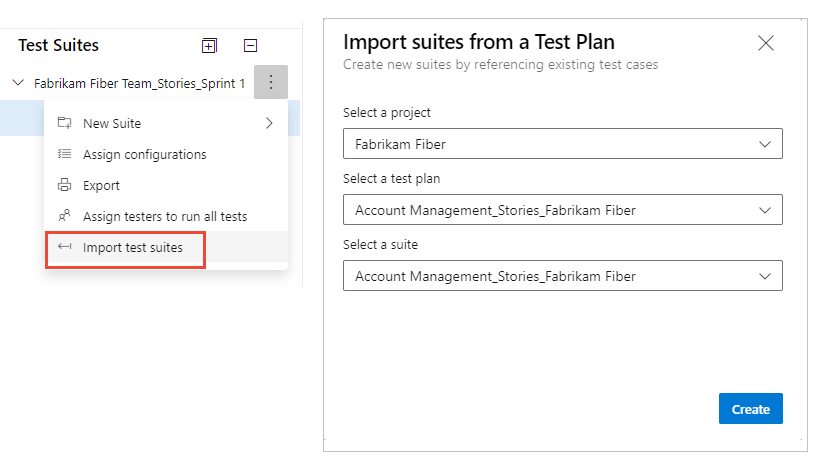
Import test suites
Reuse the suites you created and import them into the current suite/plan. You can select the Project, Test Plan, and Test Suite from which you want to import the tests. Depending upon the suite you select, the entire hierarchy of that suite and corresponding test cases is imported into the current plan. The test cases are added as a reference and not a clone or copy. Also note that we can't import test suites from the same test plan.
Define and organize test cases
From the Define tab, you can collate, add, and manage test cases for a test suite. Whereas you use the Execute tab for assigning test points and executing them.
Define test case tasks
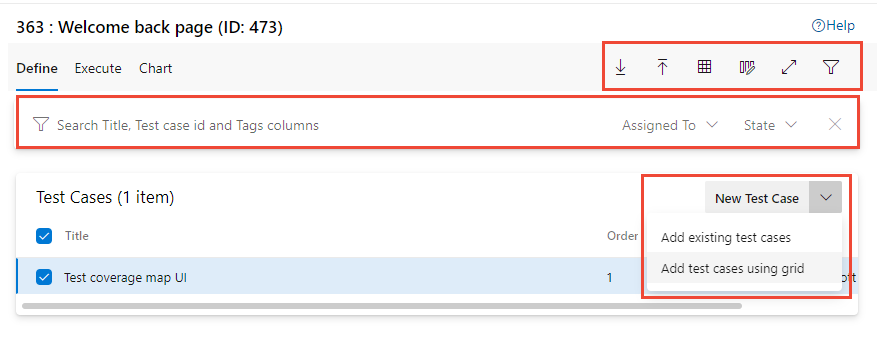
From the Define tab, you can do the following tasks.
- New Test Case:
- Add Test Case: Create a new test case using the work item form and automatically add it to the suite.
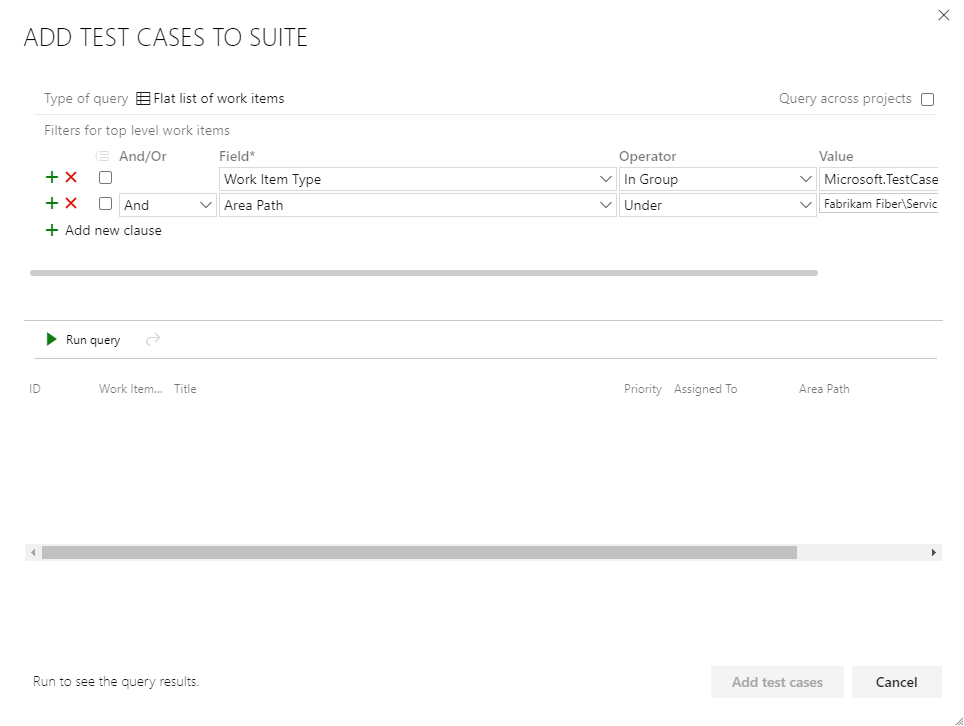
- Add existing test cases: Open a dialog to query for existing test cases that you can select from and add to the test suite.
- Add New test case using grid: Create one or more test cases using the test cases grid view and automatically add them to the suite.
- Order test cases: Reorder test cases by dragging/dropping one or more test cases within a given suite. The order of test cases only applies to manual test cases and not to automated tests.
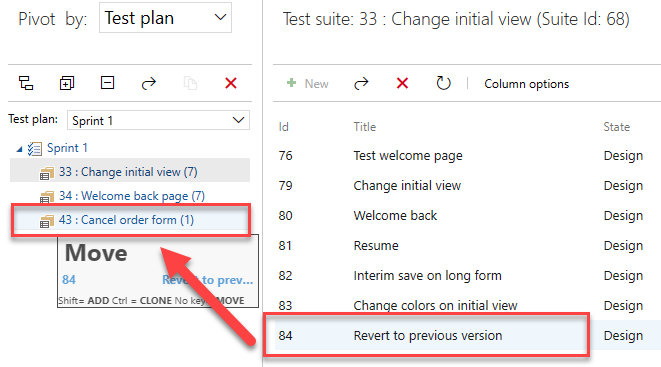
- Move test cases from one suite to another: Using drag/drop, move test cases from one test suite to another.
Drag and drop a test case from one suite to another
Add existing test cases to a test suite dialog
Define tab toolbar options

From the Define tab, toolbar, you can exercise the following options:
- Export test cases to CSV: Export existing test cases to a CSV file and make changes using Excel.
- Import test cases from CSV: Import changes made to test cases from a CSV file.
- Grid View: Use the grid mode for viewing or editing multiple test cases along with test steps.
- Toggle full screen mode: Expand the view by choosing full screen mode.
- Filter: Choose
 Filter to toggle the filter toolbar to filter the list of test cases.
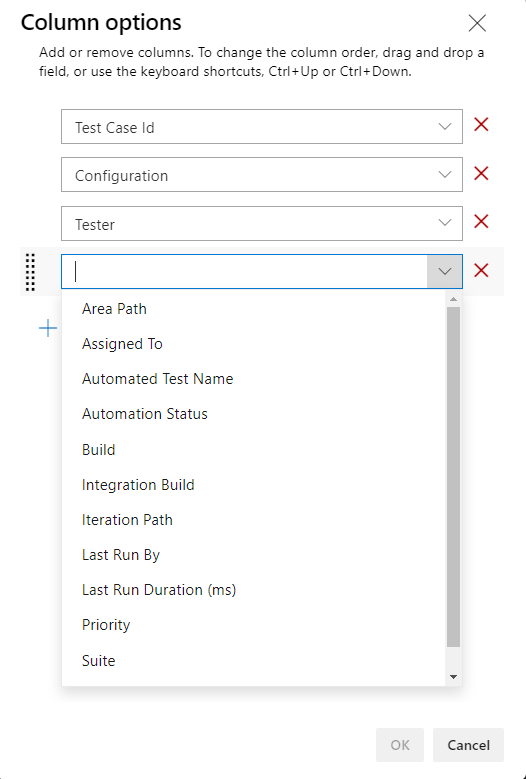
 - Column options: Add or remove fields to display and sort on. The list of columns available for selection are primarily the fields from the test case work item form.
Define test case context menu options
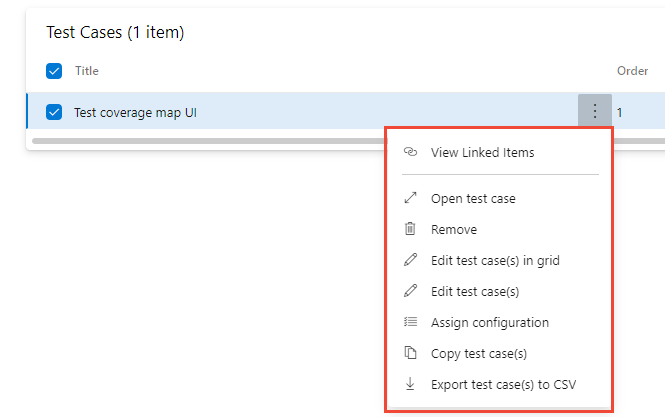
The context menu on the Test case node within the Define tab provides the following options:
- Open/edit test case work item form: This option allows you to edit a Test case using the work item form wherein you edit the work item fields including test steps.
- Edit test cases: This option allows you to bulk edit Test case work item fields. However, you can't use this option to bulk edit test steps.
- Edit test cases in grid: This option allows you to bulk edit the selected test cases including test steps using the grid view.
- Assign configurations: This option allows you to override the suite level configurations with test case level configurations.
- Remove test cases: This option allows you to remove the test cases from the given suite. It doesn't change the underlying test case work item though.
- Create a copy/clone of test cases: Create a copy or clone selected test cases.
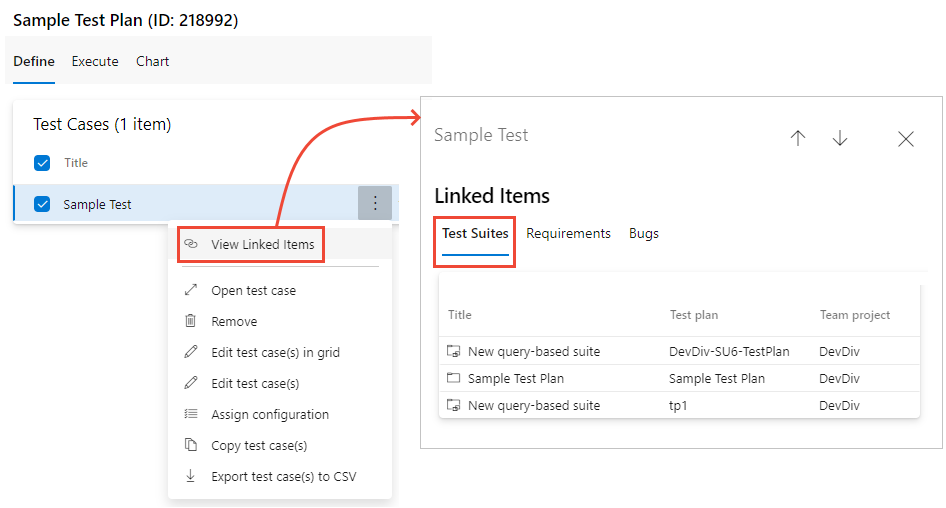
- View linked items: Review items linked to a test case.
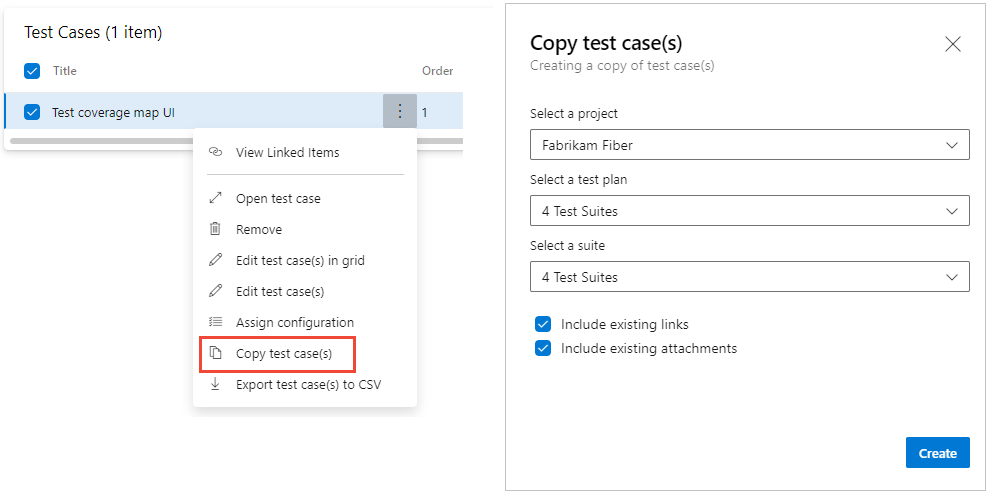
Copy or clone test cases
Choose Copy test case to copy or clone a test case. Specify the destination project, destination test plan and destination test suite in which to create the copy/cloned test case. In addition, you can also specify whether you want to include existing links/attachments to flow into the cloned copy.
View linked item
Use View linked items option, to review objects linked to the test case. Choose each tab to view the links listed under the linked object type:
- Test Suites
- Requirements: Includes any work item that belongs to the Requirements Category, such as User Stories (Agile), Product Backlog Items (Scrum), Requirements (CMMI), or a custom work item type.
- Bugs: Includes bugs filed as part of test execution and any work items that belong to the bug Category that links to the test case.
Bulk update using the Grid view
Choose the ![]() Grid View to perform bulk updates to the test cases.
Grid View to perform bulk updates to the test cases.
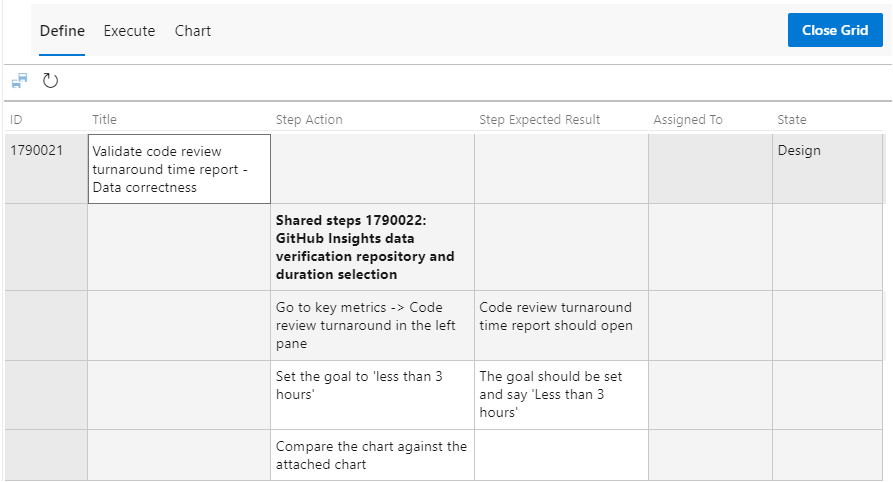
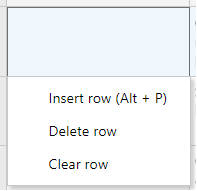
Select within a cell to edit the text in that cell. Right-click within a cell to choose an option to Insert row, Delete row, or Clear row. Choose ![]() Save test cases to perform a bulk save of your changes. Or, choose
Save test cases to perform a bulk save of your changes. Or, choose  Refresh to clear your changes. When complete, choose Close Grid.
Execute tests
Use the Execute tab to assign test points or run tests.
What is a test point? Test cases by themselves aren't executable. Add a test case to a test suite, and then test point(s) generate. A test point is a unique combination of test case, test suite, configuration, and tester.
For example, if you have a test case named Test sign in functionality and you add two configurations for the Microsoft Edge and Google Chrome browsers, you have two test points. You can execute or run each of these test points. On execution, test results are generated. Through the test results view, or execution history, you can see all executions of a test point. The latest execution for the test point is what you see in the Execute tab.
Test cases are reusable entities. By including them in a test plan or suite, test points are generated. By executing test points, you determine the quality of the product or service under development.
Execute tasks
From the Execute tab, you can do the following tasks.
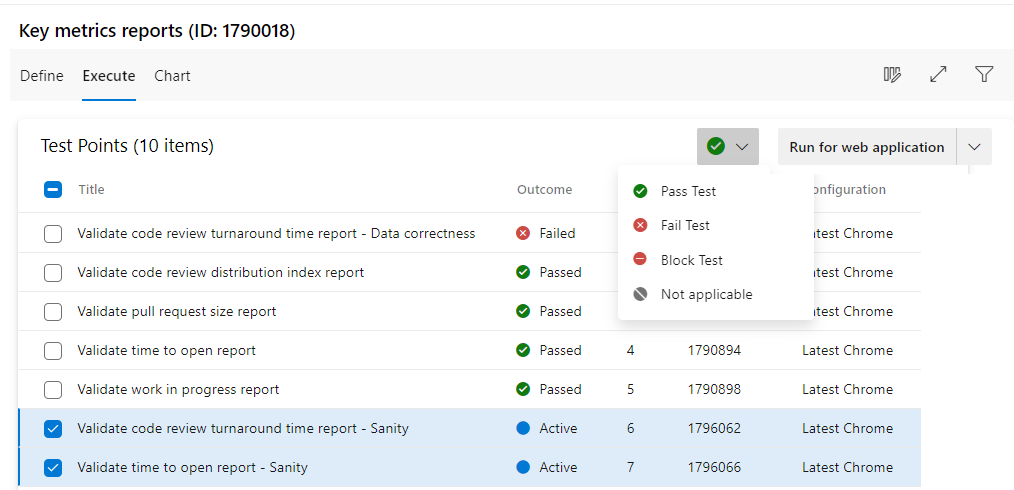
- Bulk mark test points: Quickly mark the outcome of or more test points—Passed, Failed, Blocked or Not Applicable—without having to run the test case via the Test runner.
- Run test points:Run the test cases by individually going through each test step and marking them pass/fail using a Test runner. Depending upon the application you're testing, you can use the Web Runner for testing a "web application" or the Desktop Runner for testing desktop or web applications. Invoke Run with options to specify a Build against which the testing you want to perform.
- Column options: Add or remove columns. The list of columns available for selection are associated with test points, such as Run by, Assigned Tester, Configuration, etc.
- Toggle Full screen view: View the contents of the page in a full screen mode.
- Filter: Filter the list of test points using the fields of a test case Title, ID, Outcome, Tester, Configuration, Assigned To, or State. You can also sort the list by choosing a column header.
Change column options
Choose ![]() Column options to open the Column options dialog. Add or remove columns and drag and drop them in the order you want.
Column options to open the Column options dialog. Add or remove columns and drag and drop them in the order you want.
Test Points context menu options
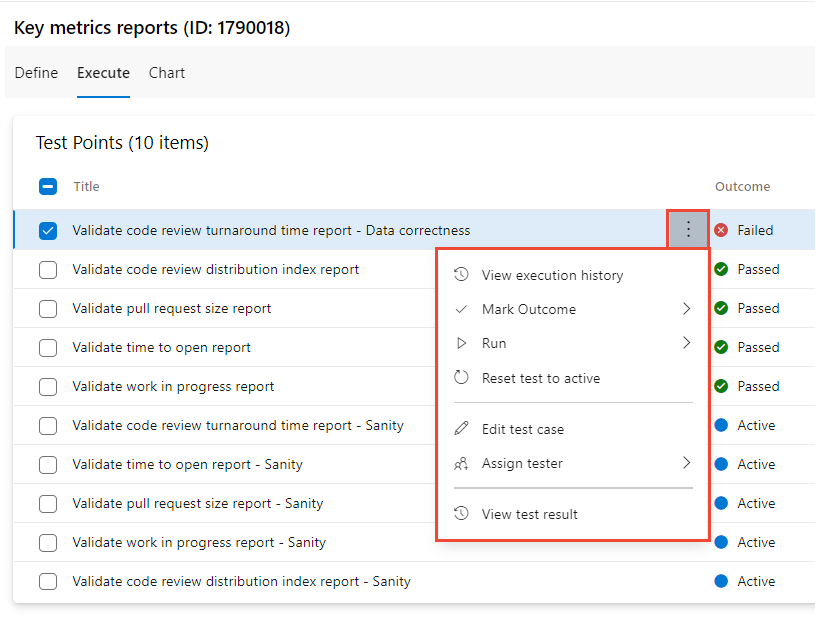
Choose the ![]() More options to open the context menu for a Test Point node to perform one of the following actions:
More options to open the context menu for a Test Point node to perform one of the following actions:
- View execution history: View the execution history for the test case in a side pane. You can move across the test points or open the detailed execution history from the pane.
- Mark Outcome: Quickly mark the outcome of the test points—Passed, Failed, Blocked or Not Applicable.
- Run - Initiate a test runner with options to Run for web application, Run for desktop, Run with options.
- Reset test to active: Reset the test outcome to Active, ignoring the last outcome of the test point.
- Edit test case: Open the work item form, optionally edit work item fields including test steps.
- Assign tester: Assign the test points to a tester for test execution.
For more information about executing tests, see Run manual tests and Run automated tests from test plans.
Chart test cases and test results
From the Chart tab, you can create various test case or test result charts. For more information, see Track test status, Charts.
Next steps
Related articles
- Run manual tests
- Run automated tests from test plans
- Track test status.
- About pipeline tests
- What are extensions?
- Test Planning and Management Guide.