Tutorial: Bi-directional MQTT bridge to Azure Event Grid
Important
Azure IoT Operations Preview – enabled by Azure Arc is currently in preview. You shouldn't use this preview software in production environments.
You'll need to deploy a new Azure IoT Operations installation when a generally available release is made available. You won't be able to upgrade a preview installation.
See the Supplemental Terms of Use for Microsoft Azure Previews for legal terms that apply to Azure features that are in beta, preview, or otherwise not yet released into general availability.
In this tutorial, you set up a bi-directional MQTT bridge between an Azure IoT Operations MQTT broker and Azure Event Grid. To keep the tutorial simple, use the default settings for the Azure IoT Operations MQTT broker and Azure Event Grid endpoints, and no transformation is applied.
Prerequisites
- Azure IoT Operations. See Deploy Azure IoT Operations Preview.
- Dataflow profile. See Configure dataflow profile.
Set environment variables
Sign in with Azure CLI:
az login
Set environment variables for the rest of the setup. Replace values in <> with valid values or names of your choice. A new Azure Event Grid namespace and topic space are created in your Azure subscription based on the names you provide:
# For this tutorial, the steps assume the IoT Operations cluster and the Event Grid
# are in the same subscription, resource group, and location.

# Name of the resource group of Azure Event Grid and IoT Operations cluster
export RESOURCE_GROUP=<RESOURCE_GROUP_NAME>

# Azure region of Azure Event Grid and IoT Operations cluster
export LOCATION=<LOCATION>

# Name of the Azure Event Grid namespace
export EVENT_GRID_NAMESPACE=<EVENT_GRID_NAMESPACE>

# Name of the Arc-enabled IoT Operations cluster
export CLUSTER_NAME=<CLUSTER_NAME>

# Subscription ID of Azure Event Grid and IoT Operations cluster
export SUBSCRIPTION_ID=<SUBSCRIPTION_ID>
Create Event Grid namespace with MQTT broker enabled
Create Event Grid namespace with Azure CLI. The location should be the same as the one you used to deploy Azure IoT Operations.
az eventgrid namespace create \
  --namespace-name $EVENT_GRID_NAMESPACE \
  --resource-group $RESOURCE_GROUP \
  --location $LOCATION \
  --topic-spaces-configuration "{state:Enabled,maximumClientSessionsPerAuthenticationName:3}"
By setting the topic-spaces-configuration, this command creates a namespace with:
- MQTT broker enabled
- Maximum client sessions per authentication name as 3.
The max client sessions option allows Azure IoT Operations MQTT to spawn multiple instances and still connect. To learn more, see multi-session support.
Create a topic space
In the Event Grid namespace, create a topic space named tutorial with a topic template telemetry/#.
az eventgrid namespace topic-space create \
  --resource-group $RESOURCE_GROUP \
  --namespace-name $EVENT_GRID_NAMESPACE \
  --name tutorial \
  --topic-templates "telemetry/#"
By using the # wildcard in the topic template, you can publish to any topic under the telemetry topic space. For example, telemetry/temperature or telemetry/humidity.
Give Azure IoT Operations access to the Event Grid topic space
Using Azure CLI, find the principal ID for the Azure IoT Operations Arc extension. The command stores the principal ID in a variable for later use.
export PRINCIPAL_ID=$(az k8s-extension list \
  --resource-group $RESOURCE_GROUP \
  --cluster-name <CLUSTER-NAME> \
  --cluster-type connectedClusters \
  --query "[?extensionType=='microsoft.iotoperations'].identity.principalId | [0]" -o tsv)
echo $PRINCIPAL_ID
Take note of the output value for identity.principalId, which is a GUID value with the following format:
d84481ae-9181-xxxx-xxxx-xxxxxxxxxxxx
Then, use Azure CLI to assign publisher and subscriber roles to Azure IoT Operations MQTT for the topic space you created.
Assign the publisher role:
az role assignment create \
  --assignee $PRINCIPAL_ID \
  --role "EventGrid TopicSpaces Publisher" \
  --scope /subscriptions/$SUBSCRIPTION_ID/resourceGroups/$RESOURCE_GROUP/providers/Microsoft.EventGrid/namespaces/$EVENT_GRID_NAMESPACE/topicSpaces/tutorial
Assign the subscriber role:
az role assignment create \
  --assignee $PRINCIPAL_ID \
  --role "EventGrid TopicSpaces Subscriber" \
  --scope /subscriptions/$SUBSCRIPTION_ID/resourceGroups/$RESOURCE_GROUP/providers/Microsoft.EventGrid/namespaces/$EVENT_GRID_NAMESPACE/topicSpaces/tutorial
Tip
The scope matches the id of the topic space you created with az eventgrid namespace topic-space create in the previous step, and you can find it in the output of the command.
Event Grid MQTT broker hostname
Use Azure CLI to get the Event Grid MQTT broker hostname.
az eventgrid namespace show \
  --resource-group $RESOURCE_GROUP \
  --namespace-name $EVENT_GRID_NAMESPACE \
  --query topicSpacesConfiguration.hostname \
  -o tsv
Take note of the output value for topicSpacesConfiguration.hostname that is a hostname value that looks like:
example.region-1.ts.eventgrid.azure.net
Create an Azure IoT Operations MQTT broker dataflow endpoint
The dataflow and dataflow endpoints for MQTT broker and Azure Event Grid can be deployed as standard Azure resources since they have Azure Resource Provider (RPs) implementations. This Bicep template file from Bicep File for MQTT-bridge dataflow Tutorial deploys the necessary dataflow and dataflow endpoints.
Download the file to your local, and make sure to replace the values for customLocationName, aioInstanceName, eventGridHostName with yours.
Next, execute the following command in your terminal:
az stack group create --name MyDeploymentStack --resource-group $RESOURCE_GROUP --template-file /workspaces/explore-iot-operations/mqtt-bridge.bicep --action-on-unmanage 'deleteResources' --deny-settings-mode 'none' --yes
This endpoint is the source for the dataflow that sends messages to Azure Event Grid.
resource MqttBrokerDataflowEndpoint 'Microsoft.IoTOperations/instances/dataflowEndpoints@2024-08-15-preview' = {
  parent: aioInstance
  name: 'aiomq'
  extendedLocation: {
    name: customLocation.id
    type: 'CustomLocation'
  }
  properties: {
    endpointType: 'Mqtt'
    mqttSettings: {
      authentication: {
        method: 'ServiceAccountToken'
        serviceAccountTokenSettings: {
          audience: 'aio-internal'
        }
      }
      host: 'aio-broker:18883'
      tls: {
        mode: 'Enabled'
        trustedCaCertificateConfigMapRef: 'azure-iot-operations-aio-ca-trust-bundle'
      }
    }
  }
}
This is the default configuration for the Azure IoT Operations MQTT broker endpoint. The authentication method is set to ServiceAccountToken to use the built-in service account token for authentication.
Create an Azure Event Grid dataflow endpoint
Since you already deployed the resources in the previous section, there's no additional deployment needed. However, this endpoint is the destination for the dataflow that sends messages to Azure Event Grid. Replace <EVENT-GRID-HOSTNAME> with the hostname you got from the previous step. Include the port number 8883.
resource remoteMqttBrokerDataflowEndpoint 'Microsoft.IoTOperations/instances/dataflowEndpoints@2024-08-15-preview' = {
  parent: aioInstance
  name: 'eventgrid'
  extendedLocation: {
    name: customLocation.id
    type: 'CustomLocation'
  }
  properties: {
    endpointType: 'Mqtt'
    mqttSettings: {
      authentication: {
        method: 'SystemAssignedManagedIdentity'
        systemAssignedManagedIdentitySettings: {}
      }
      host: '<NAMESPACE>.<REGION>-1.ts.eventgrid.azure.net:8883'
      tls: {
        mode: 'Enabled'
      }
    }
  }
}
Here, the authentication method is set to SystemAssignedManagedIdentity to use the managed identity of the Azure IoT Operations extension to authenticate with the Event Grid MQTT broker. This setting works because the Azure IoT Operations extension has the necessary permissions to publish and subscribe to the Event Grid topic space configured through Azure RBAC roles. Notice that no secrets, like username or password, are needed in the configuration.
Since the Event Grid MQTT broker requires TLS, the tls setting is enabled. No need to provide a trusted CA certificate, as the Event Grid MQTT broker uses a widely trusted certificate authority.
Create dataflows
In this example, there are two dataflows with the Azure IoT Operations MQTT broker endpoint as the source and the Azure Event Grid endpoint as the destination, and vice versa. No need to configure transformation.
resource dataflow_1 'Microsoft.IoTOperations/instances/dataflowProfiles/dataflows@2024-08-15-preview' = {
  parent: defaultDataflowProfile
  name: 'local-to-remote'
  extendedLocation: {
    name: customLocation.id
    type: 'CustomLocation'
  }
  properties: {
    mode: 'Enabled'
    operations: [
      {
        operationType: 'Source'
        sourceSettings: {
          endpointRef: MqttBrokerDataflowEndpoint.name
          dataSources: array('tutorial/local')
        }
      }
      {
        operationType: 'Destination'
        destinationSettings: {
          endpointRef: remoteMqttBrokerDataflowEndpoint.name
          dataDestination: 'telemetry/iot-mq'
        }
      }
    ]
  }
}
resource dataflow_2 'Microsoft.IoTOperations/instances/dataflowProfiles/dataflows@2024-08-15-preview' = {
  parent: defaultDataflowProfile
  name: 'remote-to-local'
  extendedLocation: {
    name: customLocation.id
    type: 'CustomLocation'
  }
  properties: {
    mode: 'Enabled'
    operations: [
      {
        operationType: 'Source'
        sourceSettings: {
          endpointRef: remoteMqttBrokerDataflowEndpoint.name
          dataSources: array('telemetry/#')
        }
      }
      {
        operationType: 'Destination'
        destinationSettings: {
          endpointRef: MqttBrokerDataflowEndpoint.name
          dataDestination: 'tutorial/cloud'
        }
      }
    ]
  }
}
Together, the two dataflows form an MQTT bridge, where you:
- Use the Event Grid MQTT broker as the remote broker
- Use the local Azure IoT Operations MQTT broker as the local broker
- Use TLS for both remote and local brokers
- Use system-assigned managed identity for authentication to the remote broker
- Use Kubernetes service account for authentication to the local broker
- Use the topic map to map the
tutorial/localtopic to thetelemetry/iot-mqtopic on the remote broker - Use the topic map to map the
telemetry/#topic on the remote broker to thetutorial/cloudtopic on the local broker
When you publish to the tutorial/local topic on the local Azure IoT Operations MQTT broker, the message is bridged to the telemetry/iot-mq topic on the remote Event Grid MQTT broker. Then, the message is bridged back to the tutorial/cloud topic (because the telemetry/# wildcard topic captures it) on the local Azure IoT Operations MQTT broker. Similarly, when you publish to the telemetry/iot-mq topic on the remote Event Grid MQTT broker, the message is bridged to the tutorial/cloud topic on the local Azure IoT Operations MQTT broker.
Deploy MQTT client
To verify the MQTT bridge is working, deploy an MQTT client to the same namespace as Azure IoT Operations. In a new file named client.yaml, specify the client deployment:
Currently, bicep doesn't apply to deploy MQTT client.
Start a subscriber
Use kubectl exec to start a shell in the mosquitto client pod.
kubectl exec --stdin --tty mqtt-client -n azure-iot-operations -- sh
Inside the shell, start a subscriber to the Azure IoT Operations broker on the tutorial/# topic space with mosquitto_sub.
mosquitto_sub --host aio-broker --port 18883 \
  -t "tutorial/#" \
  --debug --cafile /var/run/certs/ca.crt \
  -D CONNECT authentication-method 'K8S-SAT' \
  -D CONNECT authentication-data $(cat /var/run/secrets/tokens/mq-sat)
Leave the command running and open a new terminal window.
Publish MQTT messages to the cloud via the bridge
In a new terminal window, start another shell in the mosquitto client pod.
kubectl exec --stdin --tty mqtt-client -n azure-iot-operations -- sh
Inside the shell, use mosquitto to publish five messages to the tutorial/local topic.
mosquitto_pub -h aio-broker -p 18883 \
  -m "This message goes all the way to the cloud and back!" \
  -t "tutorial/local" \
  --repeat 5 --repeat-delay 1 -d \
  --debug --cafile /var/run/certs/ca.crt \
  -D CONNECT authentication-method 'K8S-SAT' \
  -D CONNECT authentication-data $(cat /var/run/secrets/tokens/mq-sat)
View the messages in the subscriber
In the subscriber shell, you see the messages you published.
Here, you see the messages are published to the local Azure IoT Operations broker to the tutorial/local topic, bridged to Event Grid MQTT broker, and then bridged back to the local Azure IoT Operations broker again on the tutorial/cloud topic. The messages are then delivered to the subscriber. In this example, the round trip time is about 80 ms.
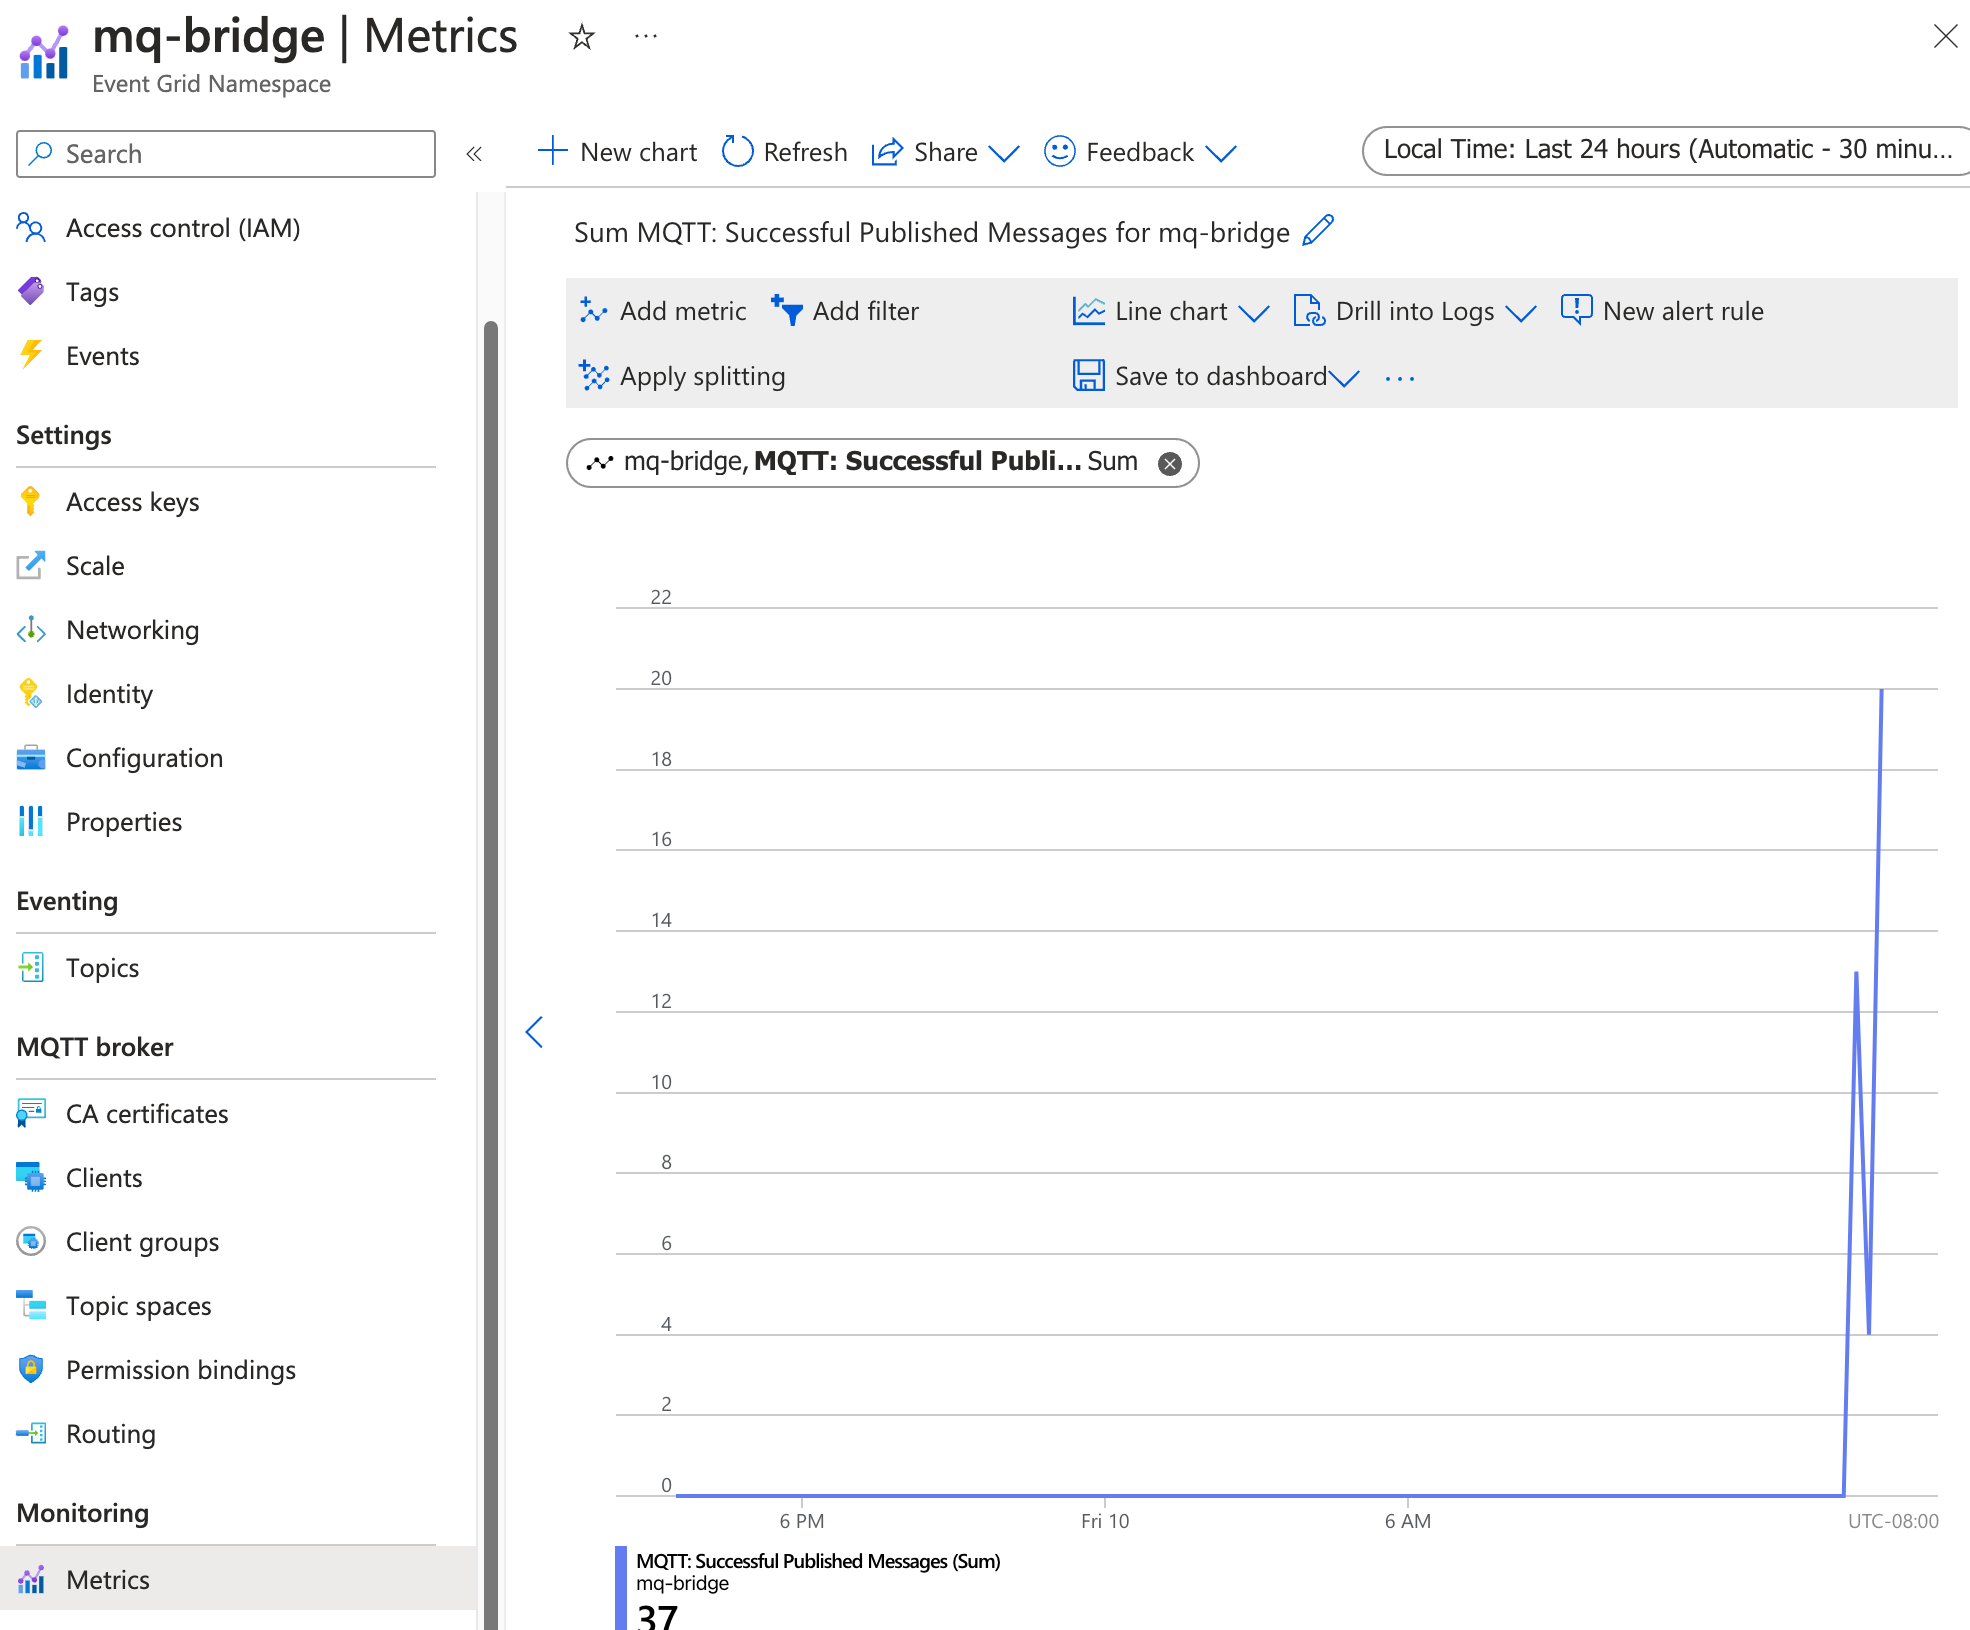
Check Event Grid metrics to verify message delivery
You can also check the Event Grid metrics to verify the messages are delivered to the Event Grid MQTT broker. In the Azure portal, go to the Event Grid namespace you created. Under Metrics > MQTT: Successful Published Messages. You should see the number of messages published and delivered increase as you publish messages to the local Azure IoT Operations broker.
Tip
You can check the configurations of dataflows, QoS, and message routes with the CLI extension az iot ops check --detail-level 2.
Next steps
In this tutorial, you learned how to configure Azure IoT Operations for bi-directional MQTT bridge with Azure Event Grid MQTT broker. As next steps, explore the following scenarios:
- To use an MQTT client to publish messages directly to the Event Grid MQTT broker, see Publish MQTT messages to Event Grid MQTT broker. Give the client a publisher permission binding to the topic space you created, and you can publish messages to any topic under the
telemetry, liketelemetry/temperatureortelemetry/humidity. All of these messages are bridged to thetutorial/cloudtopic on the local Azure IoT Operations broker. - To set up routing rules for the Event Grid MQTT broker, see Configure routing rules for Event Grid MQTT broker. You can use routing rules to route messages to different topics based on the topic name, or to filter messages based on the message content.