Connect a lab plan to a virtual network with advanced networking
Important
Azure Lab Services will be retired on June 28, 2027. For more information, see the retirement guide.
This article describes how to connect a lab plan to a virtual network with Azure Lab Services advanced networking. With advanced networking, you have more control over the virtual network configuration of your labs. For example, to connect to on-premises resources such as licensing servers, or to use user-defined routes (UDRs). Learn more about the supported networking scenarios and topologies for advanced networking.
Advanced networking for lab plans replaces Azure Lab Services virtual network peering that is used with lab accounts.
Follow these steps to configure advanced networking for your lab plan:
- Delegate the virtual network subnet to Azure Lab Services lab plans. Delegation allows Azure Lab Services to create the lab template and lab virtual machines in the virtual network.
- Configure the network security group to allow inbound RDP or SSH traffic to the lab template virtual machine and lab virtual machines.
- Create a lab plan with advanced networking to associate it with the virtual network subnet.
- (Optional) Configure your virtual network.
Advanced networking can only be enabled when creating a lab plan. Advanced networking is not a setting that can be updated later.
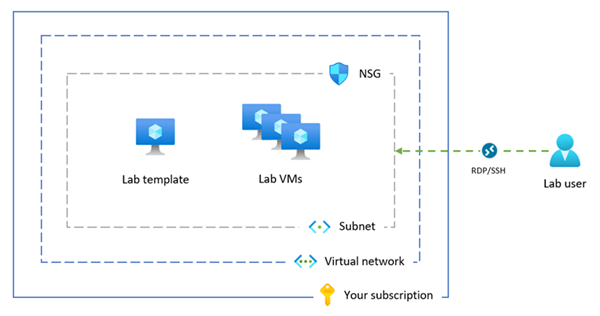
The following diagram shows an overview of the Azure Lab Services advanced networking configuration. The lab template and lab virtual machines are assigned an IP address in your subnet, and the network security group allows lab users to connect to the lab VMs by using RDP or SSH.
Note
If your organization needs to perform content filtering, such as for compliance with the Children's Internet Protection Act (CIPA), you will need to use 3rd party software. For more information, read guidance on content filtering in the supported networking scenarios.
Prerequisites
- An Azure account with an active subscription. Create an account for free.
- Your Azure account has the Network Contributor role, or a parent of this role, on the virtual network.
- An Azure virtual network and subnet in the same Azure region as where you create the lab plan. Learn how to create a virtual network and subnet.
- The subnet has enough free IP addresses for the template VMs and lab VMs for all labs (each lab uses 512 IP addresses) in the lab plan.
1. Delegate the virtual network subnet
To use your virtual network subnet for advanced networking in Azure Lab Services, you need to delegate the subnet to Azure Lab Services lab plans. Subnet delegation gives explicit permissions to Azure Lab Services to create service-specific resources, such as lab virtual machines, in the subnet.
You can delegate only one lab plan at a time for use with one subnet.
Follow these steps to delegate your subnet for use with a lab plan:
Sign in to the Azure portal.
Go to your virtual network, and select Subnets.
Select a dedicated subnet you wish to delegate to Azure Lab Services.
Important
The subnet you use for Azure Lab Services should not already be used for a VNET gateway or Azure Bastion.
In Delegate subnet to a service, select Microsoft.LabServices/labplans, and then select Save.
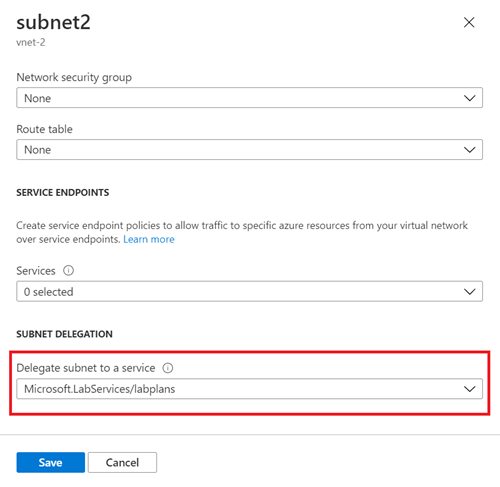
Verify that Microsoft.LabServices/labplans appears in the Delegated to column for your subnet.


2. Configure a network security group
When you connect your lab plan to a virtual network, you need to configure a network security group (NSG) to allow inbound RDP/SSH traffic from the user's computer to the template virtual machine and the lab virtual machines. An NSG contains access control rules that allow or deny traffic based on traffic direction, protocol, source address and port, and destination address and port.
The rules of an NSG can be changed at any time, and changes are applied to all associated instances. It might take up to 10 minutes for the NSG changes to be effective.
Important
If you don't configure a network security group, you won't be able to access the lab template VM and lab VMs via RDP or SSH.
The network security group configuration for advanced networking consists of two steps:
- Create a network security group that allows RDP/SSH traffic
- Associate the network security group with the virtual network subnet
You can use an NSG to control traffic to one or more virtual machines (VMs), role instances, network adapters (NICs), or subnets in your virtual network. An NSG contains access control rules that allow or deny traffic based on traffic direction, protocol, source address and port, and destination address and port. The rules of an NSG can be changed at any time, and changes are applied to all associated instances.
For more information about NSGs, visit what is an NSG.
Create a network security group to allow traffic
Follow these steps to create an NSG and allow inbound RDP or SSH traffic:
If you don't have a network security group yet, follow these steps to create a network security group (NSG).
Make sure to create the network security group in the same Azure region as the virtual network and lab plan.
Create an inbound security rule to allow RDP and SSH traffic.
Go to your network security group in the Azure portal.
Select Inbound security rules, and then select + Add.
Enter the details for the new inbound security rule:
Setting Value Source Select Any. Source port ranges Enter *. Destination Select IP Addresses. Destination IP addresses/CIDR ranges Select the range of your virtual network subnet. Service Select Custom. Destination port ranges Enter 22, 3389. Port 22 is for Secure Shell protocol (SSH). Port 3389 is for Remote Desktop Protocol (RDP). Protocol Select Any. Action Select Allow. Priority Enter 1000. The priority must be higher than other Deny rules for RDP or SSH. Name Enter AllowRdpSshForLabs. Select Add to add the inbound security rule to the NSG.
Associate the subnet with the network security group
Next, associate the NSG with the virtual network subnet to apply the traffic rules to the virtual network traffic.
Go to your network security group, and select Subnets.
Select + Associate from the top menu bar.
For Virtual network, select your virtual network.
For Subnet, select your virtual network subnet.

Select OK to associate the virtual network subnet with the network security group.

3. Create a lab plan with advanced networking
Now that you've configured the subnet and network security group, you can create the lab plan with advanced networking. When you create a new lab on the lab plan, Azure Lab Services creates the lab template and lab virtual machines in the virtual network subnet.
Important
You must configure advanced networking when you create a lab plan. You can't enable advanced networking at a later stage.
To create a lab plan with advanced networking in the Azure portal:
Sign in to the Azure portal.
Select Create a resource in the upper left-hand corner of the Azure portal, and search for lab plan.
Enter the information on the Basics tab of the Create a lab plan page.
For more information, see Create a lab plan with Azure Lab Services.
In the Networking tab, select Enable advanced networking to configure the virtual network subnet.
For Virtual network, select your virtual network. For Subnet, select your virtual network subnet.
If your virtual network doesn't appear in the list, verify that the lab plan is in the same Azure region as the virtual network, that you've delegated the subnet to Azure Lab Services, and that your Azure account has the necessary permissions.
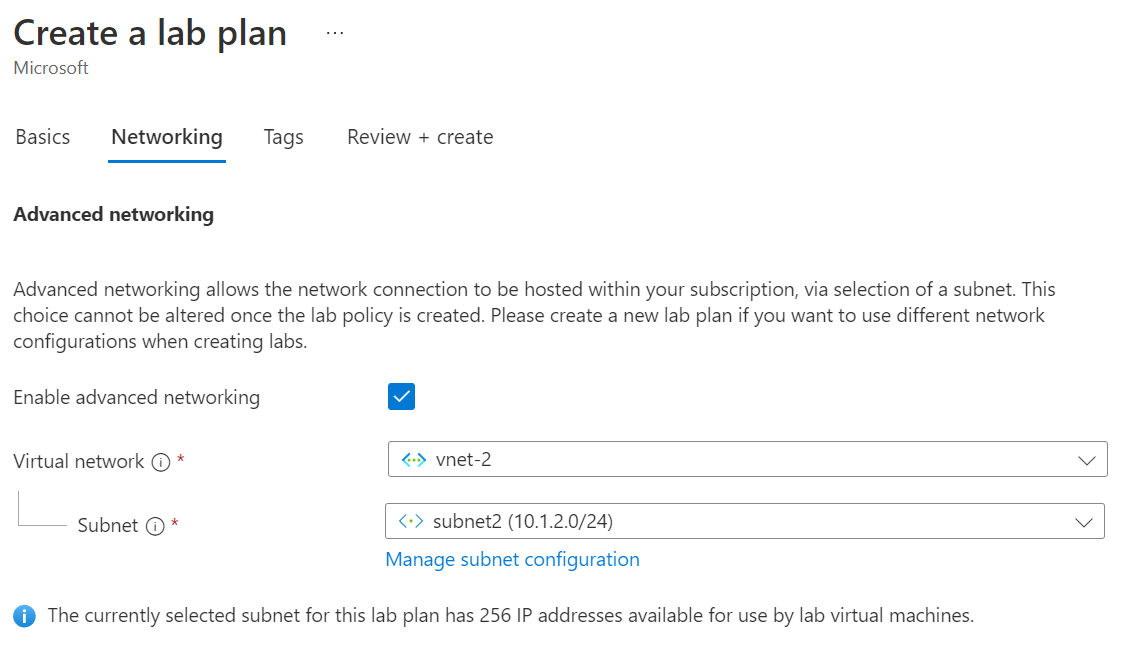
Select Review + Create to create the lab plan with advanced networking.
Lab users and lab managers can now connect to their lab virtual machines or lab template virtual machine by using RDP or SSH.
When you create a new lab, all virtual machines are created in the virtual network and assigned an IP address within the subnet range.
4. (Optional) Update the networking configuration settings
It's recommended that you use the default configuration settings for the virtual network and subnet when you use advanced networking in Azure Lab Services.
For specific networking scenarios, you might need to update the networking configuration. Learn more about the supported networking architectures and topologies in Azure Lab Services and the corresponding network configuration.
You can modify the virtual network settings after you create the lab plan with advanced networking. However, when you change the DNS settings on the virtual network, you need to restart any running lab virtual machines. If the lab VMs are stopped, they'll automatically receive the updated DNS settings when they start.
Caution
The following networking configuration changes are not supported after you've configured advanced networking :
- Delete the virtual network or subnet associated with the lab plan. This causes the labs to stop working.
- Change the subnet address range when there are virtual machines created (template VM or lab VMs).
- Change the DNS label on the public IP address. This causes the Connect button for lab VMs to stop working.
- Change the frontend IP configuration on the Azure load balancer. This causes the Connect button for lab VMs to stop working.
- Change the FQDN on the public IP address.
- Use a route table with a default route for the subnet (forced-tunneling). This causes users to lose connectivity to their lab.
- The use of Azure Firewall or Azure Bastion is not supported.