Introduction to the quantum programming language Q#
Q# is a high-level, open-source programming language for developing and running quantum algorithms. Q# is included in the Quantum Development Kit (QDK). For more information, see Set up the Quantum Development Kit.
As a quantum programming language, Q# meets the following language, compiler, and runtime requirements:
- Hardware agnostic: Qubits in quantum algorithms aren't tied to a specific quantum hardware or layout. The Q# compiler and runtime handle the mapping from program qubits to physical qubits.
- Integrates quantum and classical computing: The ability to perform classical and quantum computations is essential in a universal quantum computer.
- Respects the laws of physics: Q# and quantum algorithms follow the rules of quantum physics. For example, you can't directly copy or access the qubit state in Q#.
Structure of a Q# program
Before you start writing quantum programs, it's important to understand their structure and components. Consider the following Q# program that creates a superposition state:
namespace Superposition {
    @EntryPoint()
    operation MeasureOneQubit() : Result {
        // Allocate a qubit. By default, it's in the 0 state.
        use q = Qubit();
        // Apply the Hadamard operation, H, to the state.
        // It now has a 50% chance of being measured as 0 or 1.
        H(q);
        // Measure the qubit in the Z-basis.
        let result = M(q);
        // Reset the qubit before releasing it.
        Reset(q);
        // Return the result of the measurement.
        return result;
    }
}
Based on the comments (//), the Superposition program first allocates a qubit, applies an operation to put the qubit in superposition, measures the qubit state, resets the qubit, and finally returns the result. Let's break this program down into its components.
User namespaces
Q# programs start with a user-defined namespace, such as:
namespace Superposition {
    // Your code goes here.
}
Namespaces help you organize related functionality. Each Q# program can have only one namespace.
The Q# standard library has predefined namespaces that contain functions and operations you can use in quantum programs. For more information, see Built-in namespaces.
Entry points
The @EntryPoint() attribute tells the Q# compiler where to start executing the program. In a program with multiple functions and operations, you can place @EntryPoint() before any of them to make the program start there and continue sequentially.
@EntryPoint()
operation MeasureOneQubit() : Result {
    ...
Types
Q# provides built-in types that are common to most languages, including Int, Double, Bool, and String, and types that are specific to quantum computing. For example, the Result type represents the result of a qubit measurement and can have one of two values: Zero or One.
In the Superposition program, the MeasureOneQubit() operation returns a Result type, which corresponds to the return type of the M operation. The measurement result is stored in a new variable that's defined using the let statement:
// The operation definition returns a Result type.
operation MeasureOneQubit() : Result {
    ...
    // Measure the qubit in the Z-basis, returning a Result type.
    let result = M(q);
    ...
Q# also provides types that define ranges, arrays, and tuples. You can even define your own custom types.
Allocating qubits
In Q#, you allocate qubits using the use keyword. Qubits are always allocated in the $\ket{0}$ state.
The Superposition program defines a single qubit:
// Allocate a qubit.
use q = Qubit();
You can also allocate multiple qubits and access each one through its index:
use qubits = Qubit[2]; // Allocate two qubits.
H(qubits[0]); // Apply H to the first qubit.
X(qubits[1]); // Apply X to the second qubit.
For more information, see Use statement.
Quantum operations
After allocating a qubit, you can pass it to operations and functions, also known as callables. Operations are the basic building blocks of a Q# program. A Q# operation is a quantum subroutine, or a callable routine that contains quantum operations that change the state of the qubit register.
To define a Q# operation, you specify a name for the operation, its inputs, and its output. In the Superposition program, the MeasureOneQubit() operation is essentially the entire program. It takes no parameters and returns a Result type:
operation MeasureOneQubit() : Result {
    ...
}
Here's a basic example that takes no parameters and expects no return value. The Unit value is equivalent to NULL in other languages:
operation SayHelloQ() : Unit {
    Message("Hello quantum world!");
}
The Q# standard library also provides operations you can use in quantum programs, such as the Hadamard operation, H, in the Superposition program. Given a qubit in the Z-basis, H puts the qubit into an even superposition, where it has a 50% chance of being measured as Zero or One.
Measuring qubits
While there are many types of quantum measurements, Q# focuses on projective measurements on single qubits, also known as Pauli measurements.
In Q#, the Measure operation measures one or more qubits in the specified Pauli basis, which can be PauliX, PauliY, or PauliZ. Measure returns a Result type of either Zero or One.
To implement a measurement in the computational basis $\lbrace\ket{0},\ket{1}\rbrace$, you can also use the M operation, which measures a qubit in the Pauli Z-basis. This makes M equivalent to Measure([PauliZ], [qubit]).
The Superposition program uses the M operation:
// Measure the qubit in the Z-basis.
let result = M(q);
Resetting qubits
In Q#, qubits must be in the $\ket{0}$ state when they're released. Use the Reset operation to reset each qubit to the $\ket{0}$ state before releasing it at the end of the program. Failure to reset a qubit results in a runtime error.
// Reset a qubit.
Reset(q);
Built-in namespaces
The Q# standard library has built-in namespaces that contain functions and operations you can use in quantum programs. For example, the Microsoft.Quantum.Intrinsic namespace contains commonly used operations and functions, such as M to measure results and Message to display user messages anywhere in the program.
To call a function or operation, you can specify the full namespace or use an open statement, which makes all the functions and operations for that namespace available and makes your code more readable. The following examples call the same operation:
Microsoft.Quantum.Intrinsic.Message("Hello quantum world!");
open Microsoft.Quantum.Intrinsic;
Message("Hello quantum world!");
The Superposition program doesn't have any open statements or calls with full namespaces. That's because the Q# development environment automatically loads two namespaces: Microsoft.Quantum.Core and Microsoft.Quantum.Intrinsic, which contain commonly used functions and operations.
You can take advantage of the Microsoft.Quantum.Measurement namespace by using the MResetZ operation to optimize the Superposition program. MResetZ combines the measurement and reset operations into one step, as in the following example:
namespace Superposition {
    // Open the namespace for the MResetZ operation.
    open Microsoft.Quantum.Measurement;

    @EntryPoint()
    operation MeasureOneQubit() : Result {
        // Allocate a qubit. By default, it's in the 0 state.
        use q = Qubit();
        // Apply the Hadamard operation, H, to the state.
        // It now has a 50% chance of being measured as 0 or 1.
        H(q);
        // Measure and reset the qubit, and then return the result value.
        return MResetZ(q);
    }
}
Develop quantum programs with Q# and Azure Quantum
Q# and Azure Quantum are a powerful combination for developing and running quantum programs. With Q# and Azure Quantum, you can write quantum programs, simulate their behavior, estimate resource requirements, and run them on real quantum hardware. This integration allows you to explore the potential of quantum computing and develop innovative solutions for complex problems. Whether you are a beginner or an experienced quantum developer, Q# and Azure Quantum provide the tools and resources you need to unlock the power of quantum computing.
The following diagram shows the stages through which a quantum program passes when you develop it with Q# and Azure Quantum. Your program starts with the development environment and ends with the submission of the job to real quantum hardware.

Let's break down the steps in the diagram.
Choose your development environment
Run your quantum programs in your preferred development environment. You can use the online code editor in the Azure Quantum website, the hosted Jupyter Notebooks in your Azure Quantum workspace in the Azure portal, or a local development environment with Visual Studio Code. For more information, see Different ways to run Q# programs.
Write your quantum program
You can write quantum programs in Q# using the Quantum Development Kit (QDK). To get started, see Quickstart: Create your first Q# program.
Besides Q#, the QDK offers support for other languages for quantum computing, such as Qiskit and Cirq.
Integrate with Python
You can use Q# by itself or together with Python in various IDEs. For example, you can use a Q# project with a Python host program to call Q# operations. You can also integrate Q# with Python in Jupyter Notebooks. For more information, see Different ways to run Q# programs.
The %%qsharp command
By default, Q# programs in Jupyter Notebooks use the ipykernel Python package. To add Q# code to a notebook cell, use the %%qsharp command, which is enabled with the qsharp Python package, followed by your Q# code.
When using %%qsharp, keep the following in mind:
- You must first run
import qsharpto enable%%qsharp. %%qsharpscopes to the notebook cell in which it appears and changes the cell type from Python to Q#.- You can't put a Python statement before or after
%%qsharp. - Q# code that follows
%%qsharpmust adhere to Q# syntax. For example, use//instead of#to denote comments and;to end code lines.
Note
Azure notebooks in the Azure portal include the latest versions of the qsharp and azure-quantum Python packages, so you don't need to install anything. For more information, see Get started with Q# and Azure Quantum notebooks.
Estimate resources
Before running on real quantum hardware, you’ll need to figure out whether your program can run on existing hardware, and how many resources it'll consume.
The Azure Quantum Resource Estimator allows you to assess architectural decisions, compare qubit technologies, and determine the resources needed to execute a given quantum algorithm. You can choose from pre-defined fault-tolerant protocols and specify assumptions of the underlying physical qubit model.
For more information, see Run your first resource estimate.
Note
The Azure Quantum Resources Estimator is free of charge and doesn't require an Azure account.
Run your program in simulation
When you compile and run a quantum program, the QDK creates an instance of the quantum simulator and passes the Q# code to it. The simulator uses the Q# code to create qubits (simulations of quantum particles) and apply transformations to modify their state. The results of the quantum operations in the simulator are then returned to the program. Isolating the Q# code in the simulator ensures that the algorithms follow the laws of quantum physics and can run correctly on quantum computers.
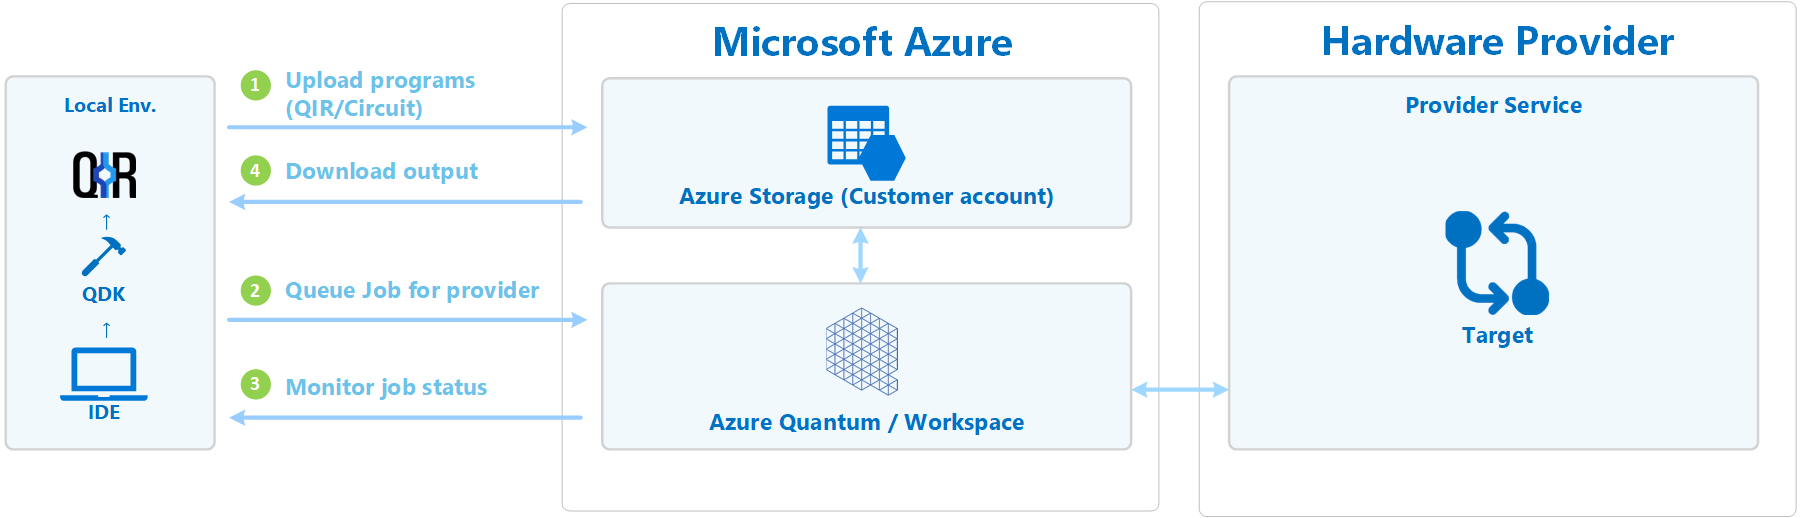
Submit your program to real quantum hardware
You can submit your Q# programs (also known as jobs) to Azure Quantum through your preferred development environment, both locally and online. For more information, see how to submit Q# jobs. You can also run and submit quantum circuits written in Qiskit and Cirq languages.
Azure Quantum offers some of the most compelling and diverse quantum hardware available today from industry leaders. See Quantum computing providers for the current list of supported hardware providers.
Note
The cloud-based Quantinuum H-Series Emulator target is available without an Azure account. To submit a job to the rest of the Azure Quantum providers, you need an Azure account and quantum workspace. If you don't have a quantum workspace, see Create an Azure Quantum workspace.
The following diagram shows the basic workflow after you submit your job: