Bemærk
Adgang til denne side kræver godkendelse. Du kan prøve at logge på eller ændre mapper.
Adgang til denne side kræver godkendelse. Du kan prøve at ændre mapper.
Azure role-based access control (Azure RBAC) is the authorization system you use to manage access to Azure resources. To grant access, you assign roles to users, groups, service principals, or managed identities at a particular scope. This article describes the high-level steps to assign Azure roles using the Azure portal, Azure PowerShell, Azure CLI, or the REST API.
Step 1: Determine who needs access
You first need to determine who needs access. You can assign a role to a user, group, service principal, or managed identity. This is also called a security principal.
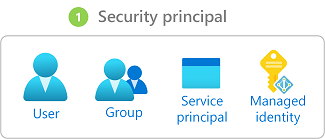
- User - An individual who has a profile in Microsoft Entra ID. You can also assign roles to users in other tenants. For information about users in other organizations, see Microsoft Entra B2B.
- Group - A set of users created in Microsoft Entra ID. When you assign a role to a group, all users within that group have that role.
- Service principal - A security identity used by applications or services to access specific Azure resources. You can think of it as a user identity (username and password or certificate) for an application.
- Managed identity - An identity in Microsoft Entra ID that is automatically managed by Azure. You typically use managed identities when developing cloud applications to manage the credentials for authenticating to Azure services.
Step 2: Select the appropriate role
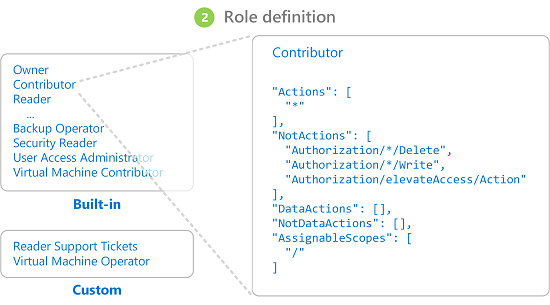
Permissions are grouped together into a role definition. It's typically just called a role. You can select from a list of several built-in roles. If the built-in roles don't meet the specific needs of your organization, you can create your own custom roles.
Roles are organized into job function roles and privileged administrator roles.
Job function roles
Job function roles allow management of specific Azure resources. For example, the Virtual Machine Contributor role allows a user to create and manage virtual machines. To select the appropriate job function role, use these steps:
Begin with the comprehensive article, Azure built-in roles. The table at the top of the article is an index into the details later in the article.
In that article, navigate to the service category (such as compute, storage, and databases) for the resource to which you want to grant permissions. The easiest way to find what your looking for is typically to search the page for a relevant keyword, like "blob", "virtual machine", and so on.
Review the roles listed for the service category and identify the specific actions you need. Again, always start with the most restrictive role.
For example, if a security principal needs to read blobs in an Azure storage account, but doesn't need write access, then choose Storage Blob Data Reader rather than Storage Blob Data Contributor (and definitely not the administrator-level Storage Blob Data Owner role). You can always update the role assignments later as needed.
If you don't find a suitable role, you can create a custom role.
Privileged administrator roles
Privileged administrator roles are roles that grant privileged administrator access, such as the ability to manage Azure resources or assign roles to other users. The following roles are considered privileged and apply to all resource types.
| Azure role | Permissions |
|---|---|
| Owner |
|
| Contributor |
|
| Reservations Administrator |
|
| Role Based Access Control Administrator |
|
| User Access Administrator |
|
For best practices when using privileged administrator role assignments, see Best practices for Azure RBAC. For more information, see Privileged administrator role definition.
Step 3: Identify the needed scope
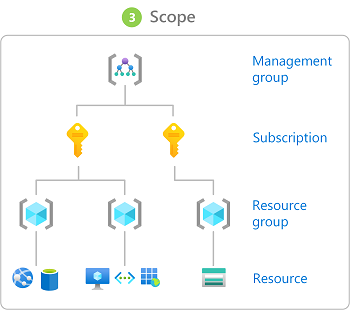
Scope is the set of resources that the access applies to. In Azure, you can specify a scope at four levels: management group, subscription, resource group, and resource. Scopes are structured in a parent-child relationship. Each level of hierarchy makes the scope more specific. You can assign roles at any of these levels of scope. The level you select determines how widely the role is applied. Lower levels inherit role permissions from higher levels.
When you assign a role at a parent scope, those permissions are inherited to the child scopes. For example:
- If you assign the Reader role to a user at the management group scope, that user can read everything in all subscriptions in the management group.
- If you assign the Billing Reader role to a group at the subscription scope, the members of that group can read billing data for every resource group and resource in the subscription.
- If you assign the Contributor role to an application at the resource group scope, it can manage resources of all types in that resource group, but not other resource groups in the subscription.
It's a best practice to grant security principals the least privilege they need to perform their job. Avoid assigning broader roles at broader scopes even if it initially seems more convenient. By limiting roles and scopes, you limit what resources are at risk if the security principal is ever compromised. For more information, see Understand scope.
Step 4: Check your prerequisites
To assign roles, you must be signed in with a user that is assigned a role that has role assignments write permission, such as Role Based Access Control Administrator at the scope you are trying to assign the role. Similarly, to remove a role assignment, you must have the role assignments delete permission.
Microsoft.Authorization/roleAssignments/writeMicrosoft.Authorization/roleAssignments/delete
If your user account doesn't have permission to assign a role within your subscription, you see an error message that your account "does not have authorization to perform action 'Microsoft.Authorization/roleAssignments/write'." In this case, contact the administrators of your subscription as they can assign the permissions on your behalf.
If you are using a service principal to assign roles, you might get the error "Insufficient privileges to complete the operation." This error is likely because Azure is attempting to look up the assignee identity in Microsoft Entra ID and the service principal cannot read Microsoft Entra ID by default. In this case, you need to grant the service principal permissions to read data in the directory. Alternatively, if you are using Azure CLI, you can create the role assignment by using the assignee object ID to skip the Microsoft Entra lookup. For more information, see Troubleshoot Azure RBAC.
Step 5: Assign role
Once you know the security principal, role, and scope, you can assign the role. You can assign roles using the Azure portal, Azure PowerShell, Azure CLI, Azure SDKs, or REST APIs.
You can have up to 4000 role assignments in each subscription. This limit includes role assignments at the subscription, resource group, and resource scopes. Eligible role assignments and role assignments scheduled in the future do not count towards this limit. You can have up to 500 role assignments in each management group. For more information, see Troubleshoot Azure RBAC limits.
Check out the following articles for detailed steps for how to assign roles.
- Assign Azure roles using the Azure portal
- Assign Azure roles using Azure PowerShell
- Assign Azure roles using Azure CLI
- Assign Azure roles using the REST API