Hyper-V to Azure disaster recovery architecture
This article describes the architecture and processes used when you replicate, fail over, and recover Hyper-V virtual machines (VMs) between on-premises Hyper-V hosts and Azure, using the Azure Site Recovery service.
Hyper-V hosts can optionally be managed in System Center Virtual Machine Manager (VMM) private clouds.
Architectural components - Hyper-V without VMM
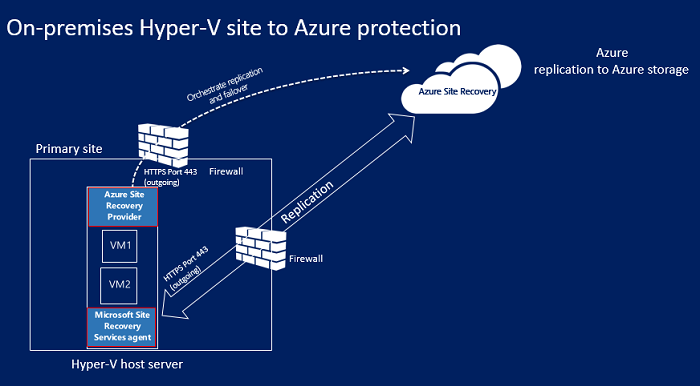
The following table and graphic provide a high-level view of the components used for Hyper-V replication to Azure, when Hyper-V hosts aren't managed by VMM.
| Component | Requirement | Details |
|---|---|---|
| Azure | An Azure subscription, Azure storage account, and Azure network. | Replicated data from on-premises virtual machine workloads is stored in the storage account. Azure virtual machines are created with the replicated workload data when failover from your on-premises site occurs. The Azure virtual machines connect to the Azure virtual network when they're created. |
| Hyper-V | During Site Recovery deployment, you gather Hyper-V hosts and clusters into Hyper-V sites. You install the Azure Site Recovery Provider and Recovery Services agent on each standalone Hyper-V host, or on each Hyper-V cluster node. | The Provider orchestrates replication with Site Recovery over the internet. The Recovery Services agent handles data replication. Communications from both the Provider and the agent are secure and encrypted. Replicated data in Azure storage is also encrypted. |
| Hyper-V VMs | One or more virtual machines running on Hyper-V. | Nothing needs to be explicitly installed on VMs. |
Hyper-V to Azure architecture (without VMM)
Architectural components - Hyper-V with VMM
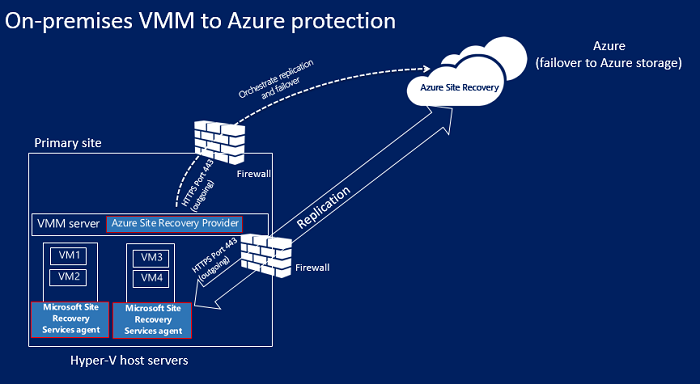
The following table and graphic provide a high-level view of the components used for Hyper-V replication to Azure, when Hyper-V hosts are managed in VMM clouds.
| Component | Requirement | Details |
|---|---|---|
| Azure | An Azure subscription, Azure storage account, and Azure network. | Replicated data from on-premises virtual machine workloads is stored in the storage account. Azure virtual machines are created with the replicated data when failover from your on-premises site occurs. The Azure virtual machines connect to the Azure virtual network when they're created. |
| VMM server | The VMM server has one or more clouds containing Hyper-V hosts. | You install the Site Recovery Provider on the VMM server, to orchestrate replication with Site Recovery, and register the server in the Recovery Services vault. |
| Hyper-V host | One or more Hyper-V hosts/clusters managed by VMM. | You install the Recovery Services agent on each Hyper-V host or cluster node. |
| Hyper-V VMs | One or virtual machines running on a Hyper-V host server. | Nothing needs to explicitly installed on virtual machines. |
| Networking | Logical and virtual machine networks set up on the VMM server. The virtual machine network should be linked to a logical network that's associated with the cloud. | virtual machine networks are mapped to Azure virtual networks. When Azure virtual machines are created after failover, they are added to the Azure network that's mapped to the virtual machine network. |
Hyper-V to Azure architecture (with VMM)
Set up outbound network connectivity
For Site Recovery to work as expected, you need to modify outbound network connectivity to allow your environment to replicate.
Note
Site Recovery doesn't support using an authentication proxy to control network connectivity.
Outbound connectivity for URLs
If you're using a URL-based firewall proxy to control outbound connectivity, allow access to these URLs:
| Name | Commercial | Government | Description |
|---|---|---|---|
| Storage | *.blob.core.windows.net |
*.blob.core.usgovcloudapi.net |
Allows data to be written from the virtual machine to the cache storage account in the source region. |
| Microsoft Entra ID | login.microsoftonline.com |
login.microsoftonline.us |
Provides authorization and authentication to Site Recovery service URLs. |
| Replication | *.hypervrecoverymanager.windowsazure.com |
*.hypervrecoverymanager.windowsazure.com |
Allows the virtual machine to communicate with the Site Recovery service. |
| Service Bus | *.servicebus.windows.net |
*.servicebus.usgovcloudapi.net |
Allows the virtual machine to write Site Recovery monitoring and diagnostics data. |
Replication process
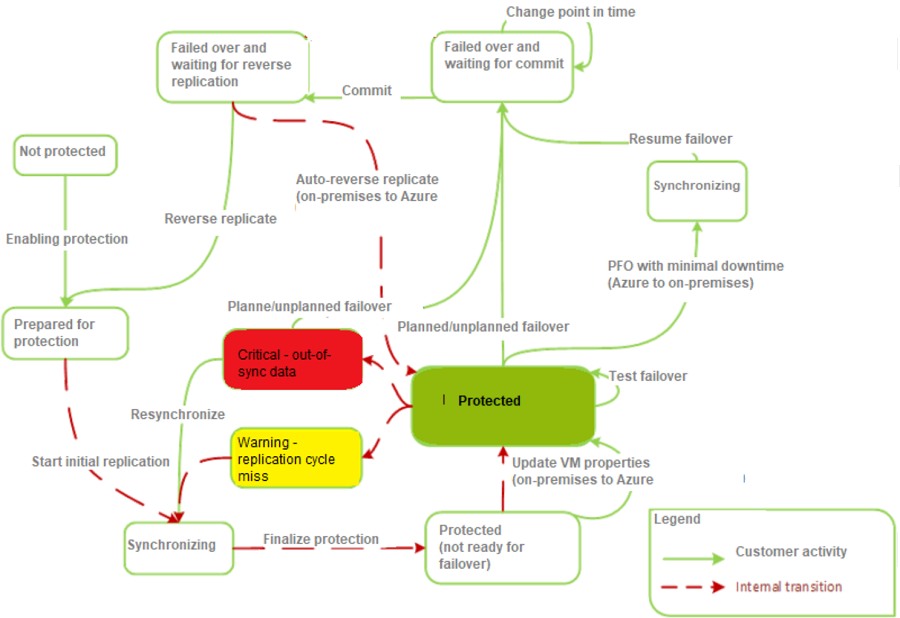
Replication and recovery process
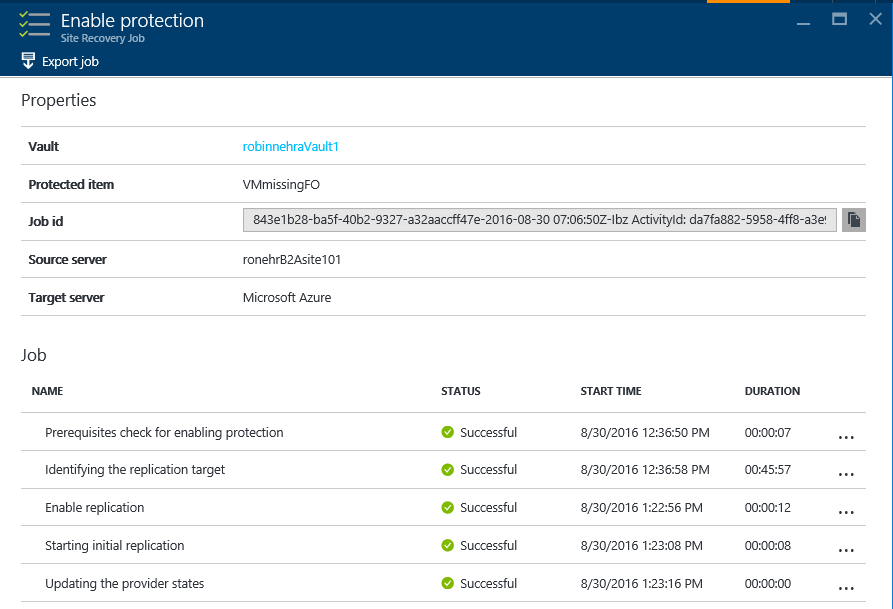
Enable protection
- After you enable protection for a Hyper-V virtual machine, in the Azure portal or on-premises, the Enable protection starts.
- The job checks that the machine complies with prerequisites, before invoking the CreateReplicationRelationship, to set up replication with the settings you've configured.
- The job starts initial replication by invoking the StartReplication method, to initialize a full virtual machine replication, and send the virtual machine's virtual disks to Azure.
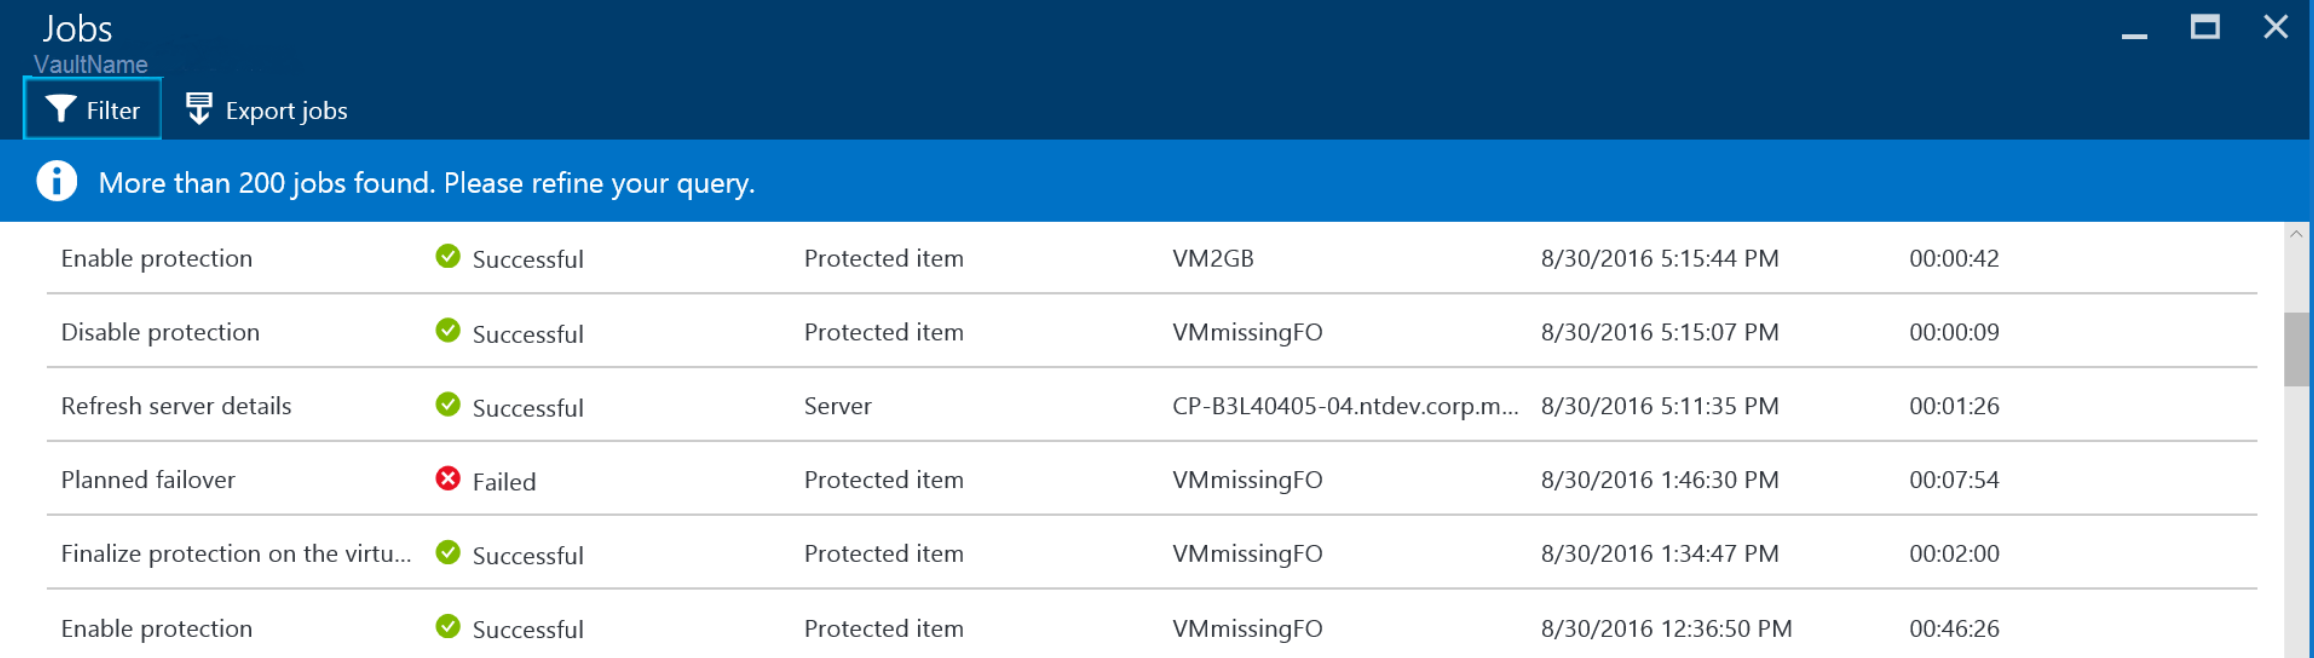
- You can monitor the job in the Jobs tab.
Initial data replication
- When initial replication is triggered, a Hyper-V virtual machine snapshot snapshot is taken.
- Virtual hard disks on the virtual machine are replicated one by one, until they're all copied to Azure. This might take a while, depending on the virtual machine size, and network bandwidth. Learn how to increase network bandwidth.
- If disk changes occur while initial replication is in progress, the Hyper-V Replica Replication Tracker tracks the changes as Hyper-V replication logs (.hrl). These log files are located in the same folder as the disks. Each disk has an associated .hrl file that's sent to secondary storage. The snapshot and log files consume disk resources while initial replication is in progress.
- When the initial replication finishes, the virtual machine snapshot is deleted.
- Delta disk changes in the log are synchronized and merged to the parent disk.
Finalize protection process
- After the initial replication finishes, the Finalize protection on the virtual machine job runs. It configures network and other post-replication settings, so that the virtual machine is protected.
- At this stage you can check the virtual machine settings to make sure that it's ready for failover. You can run a disaster recovery drill (test failover) for the virtual machine, to check that it fails over as expected.
Delta replication
- After the initial replication, delta replication begins, in accordance with the replication policy.
- The Hyper-V Replica Replication Tracker tracks changes to a virtual hard disk as .hrl files. Each disk that's configured for replication has an associated .hrl file.
- The log is sent to the customer's storage account. When a log is in transit to Azure, the changes in the primary disk are tracked in another log file, in the same folder.
- During initial and delta replication, you can monitor the virtual machine in the Azure portal.
Resynchronization process
If delta replication fails, and a full replication would be costly in terms of bandwidth or time, then a virtual machine is marked for resynchronization.
- For example, if the .hrl files reach 50% of the disk size, then the virtual machine will be marked for resynchronization.
- By default resynchronization is scheduled to run automatically outside office hours.
Resynchronization sends delta data only.
- It minimizes the amount of data sent by computing checksums of the source and target virtual machines.
- It uses a fixed-block chunking algorithm where source and target files are divided into fixed chunks.
- Checksums for each chunk are generated. These are compared to determine which blocks from the source need to be applied to the target.
After resynchronization finishes, normal delta replication should resume.
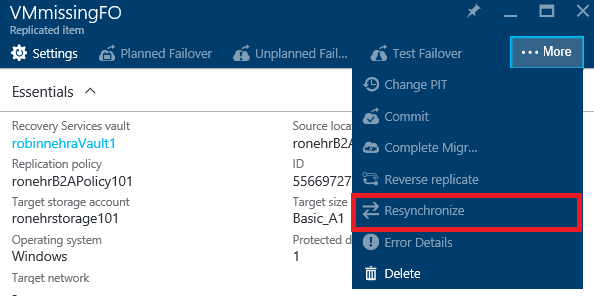
If you don't want to wait for default resynchronization outside hours, you can resynchronize a virtual machine manually. For example, if an outage occurs. To do this, in the Azure portal, select the virtual machine > Resynchronize.
Retry process
If a replication error occurs, there's a built-in retry. Retry is classified as described in the table.
| Category | Details |
|---|---|
| Non-recoverable errors | No retry is attempted. virtual machine status will be Critical, and administrator intervention is required. Examples of these errors include a broken VHD chain, an invalid state for the replica virtual machine, network authentication errors, authorization errors, and virtual machine not found errors (for standalone Hyper-V servers. |
| Recoverable errors | Retries occur every replication interval, using an exponential back-off that increases the retry interval from the start of the first attempt by 1, 2, 4, 8, and 10 minutes. If an error persists, retry every 30 minutes. Examples of these include network errors, low disk errors, and low memory conditions. |
Failover and failback process
- You can run a planned or unplanned failover from on-premises Hyper-V virtual machines to Azure. If you run a planned failover, then source virtual machines are shut down to ensure no data loss. Run an unplanned failover if your primary site isn't accessible.
- You can fail over a single machine, or create recovery plans, to orchestrate failover of multiple machines.
- You run a failover. After the first stage of failover completes, you should be able to see the created replica virtual machines in Azure. You can assign a public IP address to the virtual machine if required.
- You then commit the failover, to start accessing the workload from the replica Azure virtual machine.
After your on-premises infrastructure is up and running again, you can fail back. Failback occurs in three stages:
Kick off a planned failover from Azure to the on-premises site:
- Minimize downtime: If you use this option Site Recovery synchronizes data before failover. It checks for changed data blocks and downloads them to the on-premises site, while the Azure virtual machine keeps running, minimizing downtime. When you manually specify that the failover should complete, the Azure virtual machine is shut down, any final delta changes are copied, and the failover starts.
- Full download: With this option data is synchronized during failover. This option downloads the entire disk. It's faster because no checksums are calculated, but there's more downtime. Use this option if you've been running the replica Azure virtual machines for some time, or if the on-premises virtual machine was deleted.
- Create virtual machine: You can select to fail back to the same virtual machine or to an alternate virtual machine. You can specify that Site Recovery should create the virtual machine if it doesn't already exist.
After initial synchronization finishes, you select to complete the failover. After it completes, you can log onto the on-premises virtual machine to check everything's working as expected. In the Azure portal, you can see that the Azure virtual machines have been stopped.
Then, you commit the failover to finish up, and start accessing the workload from the on-premises virtual machine again.
After workloads have failed back, you enable reverse replication, so that the on-premises virtual machines replicate to Azure again.
Next steps
Follow this tutorial to get started with Hyper-V to Azure replication.