Migrate files from one Azure file share to another when using Azure File Sync
This article describes how to migrate files from one SMB Azure file share to another when using Azure File Sync, even if the file shares are in different storage accounts. This process is different depending on whether you have cloud tiering enabled or not.
You can check the status of cloud tiering from the Azure portal under server endpoint properties. If cloud tiering is off, see Migrate files when cloud tiering is off. If cloud tiering is on, see Migrate files when cloud tiering is on.
Migrate files when cloud tiering is off
If you're not using cloud tiering, then all your data is local on your Azure File Sync server, and you can use Azure File Sync to upload the data to another share.
The following instructions assume you have one Azure File Sync server in your sync group. If you have more than one Azure File Sync server connected to the existing share, you should remove all the other server endpoints first. Perform the full migration on one endpoint, and then reconnect the other server endpoints to the new sync group.
Make sure that cloud tiering is off on the server endpoint. You can check and change the status from the Azure portal under server endpoint properties.
Run the Invoke-StorageSyncFileRecall cmdlet and use the -PerFileRetryCount parameter to ensure that any files that fail to recall are retried. Because there could be an active cloud tiering session when you first run this cmdlet, it's a good idea to run it twice and examine the summary output to ensure that all files are fully recalled and local on the server before you continue.
Create a new SMB Azure file share as the target.
Create a new sync group and associate the cloud endpoint to the Azure file share you created. The sync group must be in a storage sync service in the same region as the new target Azure file share.
Now you have two options: You can either sync your data to the new Azure file share using the same local file server (recommended), or move to a new Azure File Sync server.
Move to a new Azure File Sync server (optional)
If you plan to use the same local file server, you can skip this section and proceed to Connect to the new Azure file share.
If you want to move to a new local Azure File Sync server, you can use Storage Migration Service (SMS) to:
- Copy over all your share-level permissions
- Make several passes to catch up with changes that happened during migration
- Orchestrate the cutover to the new server
All you need to do is set up a new on-premises file server, and then connect the new server to Azure File Sync and the new cloud endpoint. Then use SMS to migrate from the source server to the target server.
Optionally, you can manually copy the source share to another share on the existing file server.
Connect to the new Azure file share
Follow these instructions to connect to the new Azure file share.
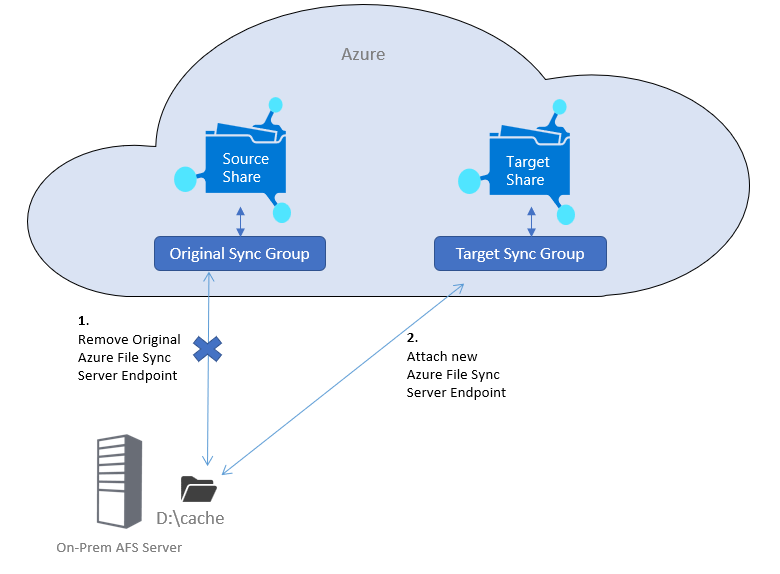
Remove the existing sever endpoint. This will keep all the data, but will remove the association with the existing sync group and existing file share.
If the new sync group isn't in the same storage sync service, you'll need to unregister the server from that storage sync service and register it with the new service. Keep in mind that a server can only be registered with one storage sync service.
Create a new server endpoint in the sync group you created and connect it to the same local data.
Migrate files when cloud tiering is on
If you're using the cloud tiering feature of Azure File Sync, we recommend copying the data from within Azure to prevent unnecessary cloud recalls through the source. The process will differ slightly depending on whether you're migrating within the same region or across regions. The migration process always requires some downtime during the cutover.
An Azure File Sync registered server can only join one storage sync service, and the storage sync service must be in the same region as the share. Therefore, if you're moving between regions, you'll need to migrate to a new Azure File Sync server connected to the target share. If you're moving within the same region, you can use the existing AFS server.
Important
When mounting Azure file shares in a migration scenario, be sure to use the storage account key to make sure the VM has access to all the files. Don't use a domain identity.
Migrate within the same region
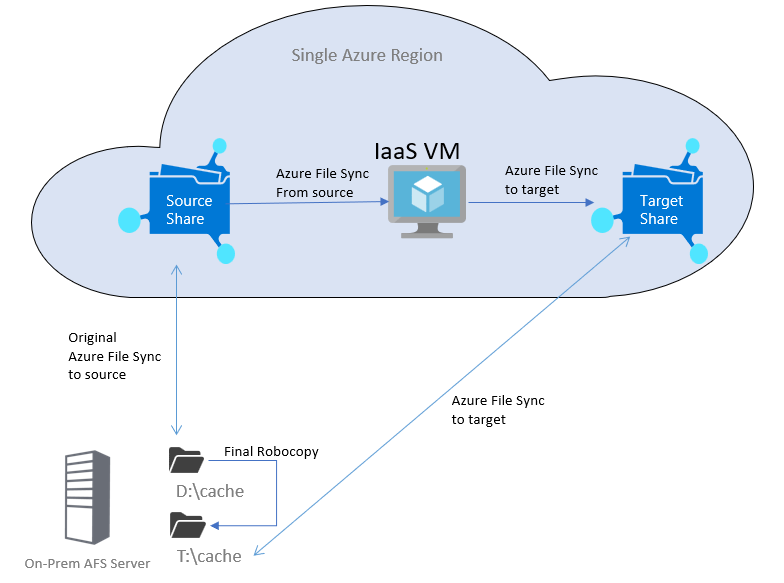
Follow these instructions if cloud tiering is on and you're migrating within the same region. You can use your existing Azure File Sync server (see diagram), or optionally create a new server if you're concerned about impacting the existing share.
Create a new SMB Azure file share as the target share.
Create a new sync group in the existing storage sync service and associate the cloud endpoint to the target share. Don't connect your existing Azure File Sync server to the new sync group yet.
Deploy a Windows Server VM (IaaS VM) in the same Azure region as your source and target file shares. To ensure good performance we recommend a multi-core VM type with at least 56 GiB of memory and premium storage, such as standard_DS5_v2.
In your IaaS VM, use different disks for source and target file shares. Use one small disk for your source data connected to the existing sync group and one larger disk that can hold your entire data set.
Install the Azure File Sync agent on the IaaS VM and register the server.
In the Azure portal, go to your original sync group (source share) and create a server endpoint on the IaaS VM (use the small disk). Enable cloud tiering on this server endpoint.
In the Azure portal, go to your new sync group (target share) and create a server endpoint on the IaaS VM (use the larger disk).
You can now go to the IaaS VM and start the initial copy between the source and target shares.
Migrate across regions
Follow these instructions if cloud tiering is on and you're migrating to a file share in another Azure region. To migrate across regions, you need to migrate to a new Azure File Sync server connected to the target share (see diagram).
Create a new SMB Azure file share in the new region as the target share.
Create a Storage Sync Service in the target region and a sync group attached to your target share.
Create a new on-premises Azure File Sync file server that will sync to the target share in the new region. Don't connect your new server to the target sync group yet.
Deploy a source Azure File Sync VM with a small disk for your source data. Create a server endpoint in the source share sync group. Enable cloud tiering on this server endpoint.
In the same region as the source share, deploy a target Azure File Sync VM and register this server with the Storage Sync Service in the new region. Use a large disk that can hold your entire data set.
In the Azure portal, navigate to the new Storage Sync Service, go to the sync group for your target share and create a server endpoint on the target Azure File Sync VM.
On the target Azure File Sync VM, mount a drive to the source share on the source Azure File Sync VM.
You can now start the initial copy between the source and target shares on the target Azure File Sync VM.
Initial copy
Use Robocopy, a tool that's built into Windows, to copy the files from source to target shares.
Run this command at the Windows command prompt. Optionally, you can include flags for logging features as a best practice (/NP, /NFL, /NDL, /UNILOG).
robocopy <source> <target> /MIR /COPYALL /MT:16 /R:2 /W:1 /B /IT /DCOPY:DATIf your source share was mounted as s:\ and target was t:\ then the command looks like this:
robocopy s:\ t:\ /MIR /COPYALL /MT:16 /R:2 /W:1 /B /IT /DCOPY:DATWhile the Robocopy is in progress, connect the on-premises Azure File Sync server to the target sync group. Configure your new server endpoint location with a high free space policy at first, because you'll be copying in the latest changes and need to ensure that you have enough room. For example, if your current cache location is D:\cache, use T:\cache for the new server endpoint. If you're using the existing Azure File Sync server (for migrations within the same region), place the local cache on a separate volume from the existing endpoint. Using the same volume is okay as long as the directory isn't the same directory or a sub-directory of the server endpoint that's connected to the source share. Enable cloud tiering on this endpoint so that none of the data will automatically download to the on-premises server. Once the server endpoint is created to the target sync group, allow some time for it to sync the namespace data.
Wait for the initial Robocopy run to complete successfully and for the sync from source to target to complete. We recommend waiting for one additional hour to make sure all remaining changes are synced. To check that all changes have been synced, see How do I monitor the progress of a current sync session?
Sync final changes
Before syncing the final changes, turn off SMB sharing for the existing share or at least make it read-only. After turning off SMB sharing, wait one hour to make sure all remaining changes are synced to Azure.
If you have connectivity between the source file share and the target, you can Robocopy recent changes over to the target:
robocopy s:\ t:\ /mir /copyall /mt:16 /DCOPY:DAT /XD S:\$RECYCLE.BIN /XD "S:\System Volume Information"
If you can't copy the latest changes directly to the new file share, run the Robocopy mirror command again on the IaaS VM. This will sync over all the changes that happened since the initial run, skipping anything that's already copied over.
robocopy s:\ t:\target /mir /copyall /mt:16 /DCOPY:DAT
Once your IaaS VM sync completes, the local target agent will also be up to date.
Enable sharing on the new server endpoint
If you're migrating to a new Azure File Sync server, you should rename the old server to a random name, then rename the new server to the same name as the old server. This way, the file share URL will be the same for your end users.
Enable the new share T:\cache. All the same file ACLs will be there. You'll need to recreate any share-level permissions that existed on the old share.
Remove the old server endpoint and sync group
Once you've confirmed everything is working correctly with the new sync group, you can deprovision the old sync group. Remove the server endpoints first. You don't need to recall all the data to the old server before removing the server endpoint.
See also
Feedback
Kommer snart: I hele 2024 udfaser vi GitHub-problemer som feedbackmekanisme for indhold og erstatter det med et nyt feedbacksystem. Du kan få flere oplysninger under: https://aka.ms/ContentUserFeedback.
Indsend og få vist feedback om


