Quickstart: Ingest data using Azure Synapse Pipelines (Preview)
In this quickstart, you learn how to load data from a data source into Azure Synapse Data Explorer pool.
Prerequisites
An Azure subscription. Create a free Azure account.
Create a Data Explorer pool using Synapse Studio or the Azure portal
Create a Data Explorer database.
In Synapse Studio, on the left-side pane, select Data.
Select + (Add new resource) > Data Explorer pool, and use the following information:
Setting Suggested value Description Pool name contosodataexplorer The name of the Data Explorer pool to use Name TestDatabase The database name must be unique within the cluster. Default retention period 365 The time span (in days) for which it's guaranteed that the data is kept available to query. The time span is measured from the time that data is ingested. Default cache period 31 The time span (in days) for which to keep frequently queried data available in SSD storage or RAM, rather than in longer-term storage. Select Create to create the database. Creation typically takes less than a minute.
Create a table
- In Synapse Studio, on the left-side pane, select Develop.
- Under KQL scripts, Select + (Add new resource) > KQL script. On the right-side pane, you can name your script.
- In the Connect to menu, select contosodataexplorer.
- In the Use database menu, select TestDatabase.
- Paste in the following command, and select Run to create the table.
.create table StormEvents (StartTime: datetime, EndTime: datetime, EpisodeId: int, EventId: int, State: string, EventType: string, InjuriesDirect: int, InjuriesIndirect: int, DeathsDirect: int, DeathsIndirect: int, DamageProperty: int, DamageCrops: int, Source: string, BeginLocation: string, EndLocation: string, BeginLat: real, BeginLon: real, EndLat: real, EndLon: real, EpisodeNarrative: string, EventNarrative: string, StormSummary: dynamic)Tip
Verify that the table was successfully created. On the left-side pane, select Data, select the contosodataexplorer more menu, and then select Refresh. Under contosodataexplorer, expand Tables and make sure that the StormEvents table appears in the list.
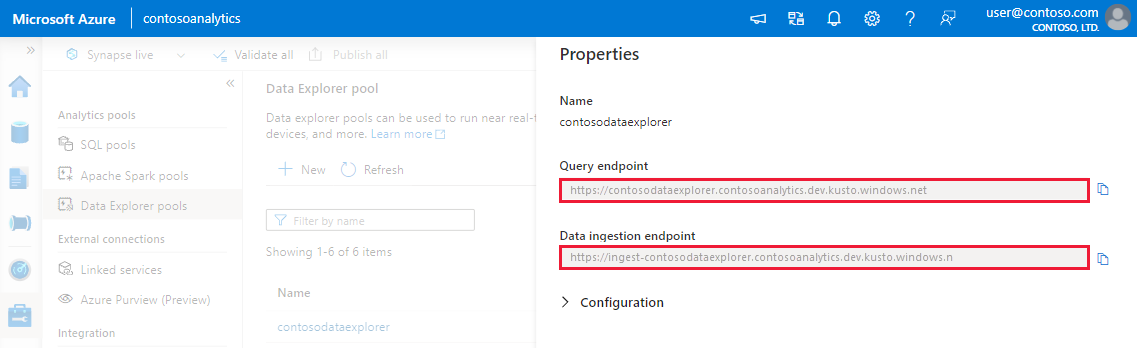
Get the Query and Data Ingestion endpoints. You'll need the query endpoint to configure your linked service.
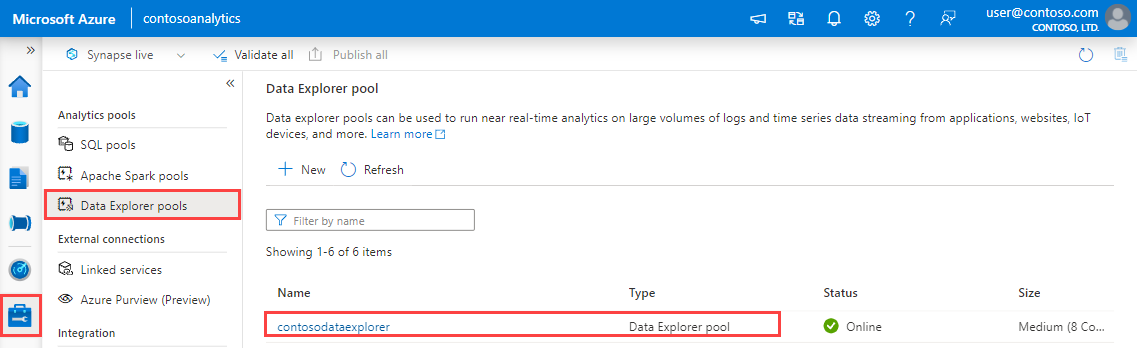
In Synapse Studio, on the left-side pane, select Manage > Data Explorer pools.
Select the Data Explorer pool you want to use to view its details.
Make a note of the Query and Data Ingestion endpoints. Use the Query endpoint as the cluster when configuring connections to your Data Explorer pool. When configuring SDKs for data ingestion, use the data ingestion endpoint.
Create a linked service
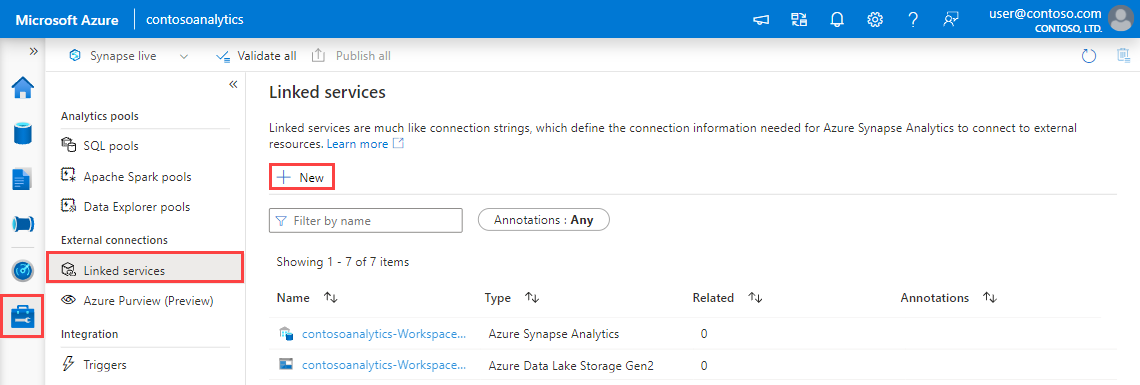
In Azure Synapse Analytics, a linked service is where you define your connection information to other services. In this section, you'll create a linked service for Azure Data Explorer.
In Synapse Studio, on the left-side pane, select Manage > Linked services.
Select + New.
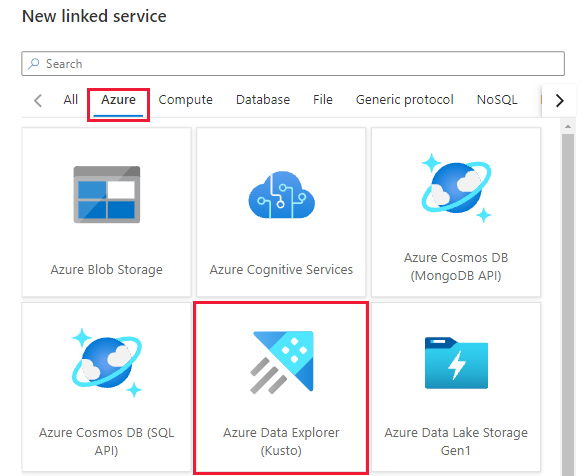
Select the Azure Data Explorer service from the gallery, and then select Continue.
In the New Linked Services page, use the following information:
Setting Suggested value Description Name contosodataexplorerlinkedservice The name for the new Azure Data Explorer linked service. Authentication method Managed Identity The authentication method for the new service. Account selection method Enter manually The method for specifying the Query endpoint. Endpoint https://contosodataexplorer.contosoanalytics.dev.kusto.windows.net The Query endpoint you made a note of earlier. Database TestDatabase The database where you want to ingest data. 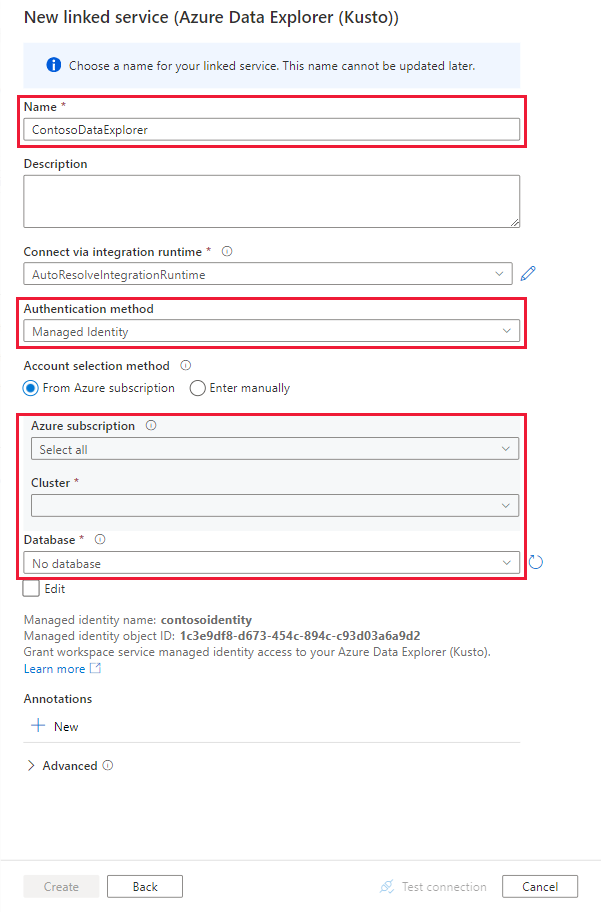
Select Test connection to validate the settings, and then select Create.
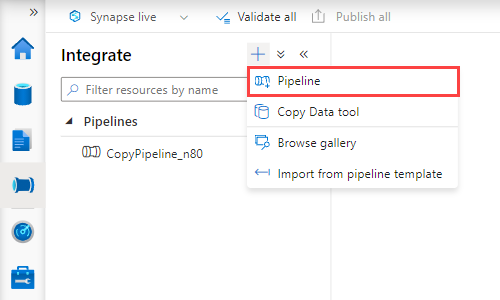
Create a pipeline to ingest data
A pipeline contains the logical flow for an execution of a set of activities. In this section, you'll create a pipeline containing a copy activity that ingests data from your preferred source into a Data Explorer pool.
In Synapse Studio, on the left-side pane, select Integrate.
Select + > Pipeline. On the right-side pane, you can name your pipeline.
Under Activities > Move & transform, drag Copy data onto the pipeline canvas.
Select the copy activity and go to the Source tab. Select or create a new source dataset as the source to copy data from.
Go to the Sink tab. Select New to create a new sink dataset.
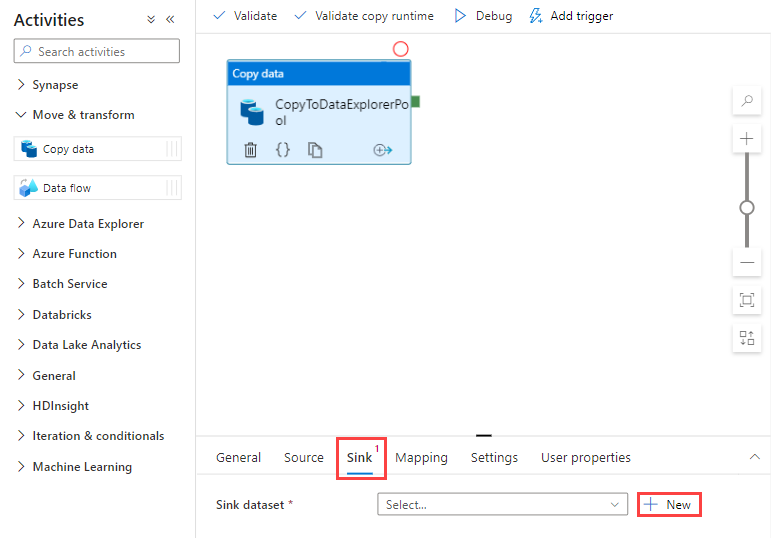
Select the Azure Data Explorer dataset from the gallery, and then select Continue.
In the Set properties pane, use the following information, and then select OK.
Setting Suggested value Description Name AzureDataExplorerTable The name for the new pipeline. Linked service contosodataexplorerlinkedservice The linked service you created earlier. Table StormEvents The table you created earlier. 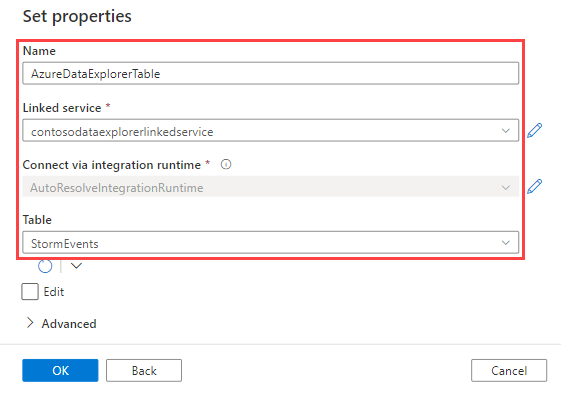
To validate the pipeline, select Validate on the toolbar. You see the result of the Pipeline validation output on the right side of the page.
Debug and publish the pipeline
Once you've finished configuring your pipeline, you can execute a debug run before you publish your artifacts to verify everything is correct.
Select Debug on the toolbar. You see the status of the pipeline run in the Output tab at the bottom of the window.
Once the pipeline run succeeds, in the top toolbar, select Publish all. This action publishes entities (datasets and pipelines) you created to the Synapse Analytics service.
Wait until you see the Successfully published message. To see notification messages, select the bell button in the top-right.
Trigger and monitor the pipeline
In this section, you manually trigger the pipeline published in the previous step.
Select Add Trigger on the toolbar, and then select Trigger Now. On the Pipeline Run page, select OK.
Go to the Monitor tab located in the left sidebar. You see a pipeline run that is triggered by a manual trigger.
When the pipeline run completes successfully, select the link under the Pipeline name column to view activity run details or to rerun the pipeline. In this example, there's only one activity, so you see only one entry in the list.
For details about the copy operation, select the Details link (eyeglasses icon) under the Activity name column. You can monitor details like the volume of data copied from the source to the sink, data throughput, execution steps with corresponding duration, and used configurations.
To switch back to the pipeline runs view, select the All pipeline runs link at the top. Select Refresh to refresh the list.
Verify your data is correctly written in the Data Explorer pool.
Next steps
Feedback
Kommer snart: I hele 2024 udfaser vi GitHub-problemer som feedbackmekanisme for indhold og erstatter det med et nyt feedbacksystem. Du kan få flere oplysninger under: https://aka.ms/ContentUserFeedback.
Indsend og få vist feedback om