Custom layouts
.NET Multi-platform App UI (.NET MAUI) defines multiple layouts classes that each arrange their children in a different way. A layout can be thought of as list of views with rules and properties that define how to arrange those views within the layout. Examples of layouts include Grid, AbsoluteLayout, and VerticalStackLayout.
.NET MAUI layout classes derive from the abstract Layout class. This class delegates cross-platform layout and measurement to a layout manager class. The Layout class also contains an overridable CreateLayoutManager() method that derived layouts can use to specify the layout manager.
Each layout manager class implements the ILayoutManager interface, which specifies that Measure and ArrangeChildren implementations must be provided:
- The Measure implementation calls IView.Measure on each view in the layout, and returns the total size of the layout given the constraints.
- The ArrangeChildren implementation determines where each view should be placed within the bounds of the layout, and calls Arrange on each view with its appropriate bounds. The return value is the actual size of the layout.
.NET MAUI's layouts have pre-defined layout managers to handle their layout. However, sometimes it's necessary to organize page content using a layout that isn't provided by .NET MAUI. This can be achieved by producing your own custom layout, which requires you to have an understanding of how .NET MAUI's cross-platform layout process works.
Layout process
.NET MAUI's cross-platform layout process builds on top of the native layout process on each platform. Generally, the layout process is initiated by the native layout system. The cross-platform process runs when a layout or content control initiates it as a result of being measured or arranged by the native layout system.
Note
Each platform handles layout slightly differently. However, .NET MAUI's cross-platform layout process aims to be as platform-agnostic as possible.
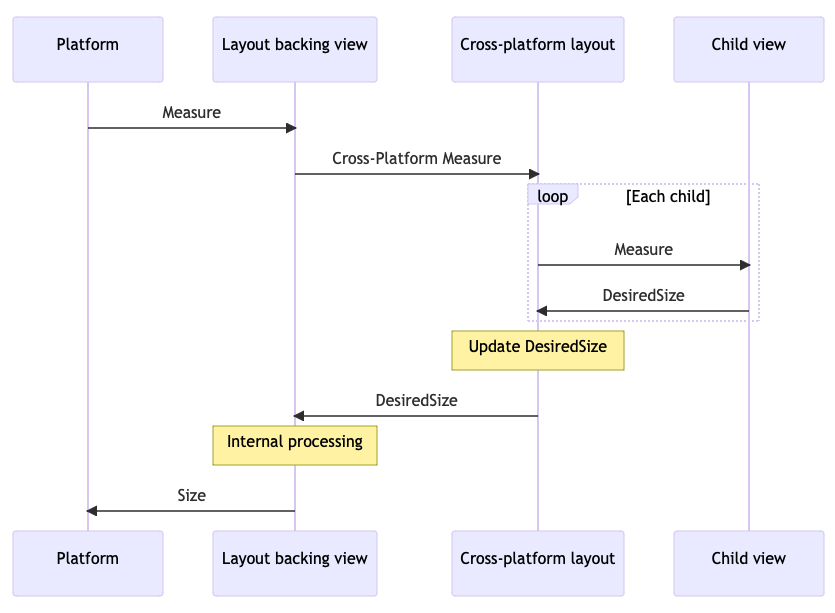
The following diagram shows the process when a native layout system initiates layout measurement:

All .NET MAUI layouts have a single backing view on each platform:
- On Android, this backing view is
LayoutViewGroup. - On iOS and Mac Catalyst, this backing view is
LayoutView. - On Windows, this backing view is
LayoutPanel.
When the native layout system for a platform requests the measurement of one of these backing views, the backing view calls the Layout.CrossPlatformMeasure method. This is the point at which control is passed from the native layout system to .NET MAUI's layout system. Layout.CrossPlatformMeasure calls the layout managers' Measure method. This method is responsible for measuring child views by calling IView.Measure on each view in the layout. The view measures its native control, and updates its DesiredSize property based on that measurement. This value is returned to the backing view as the result of the CrossPlatformMeasure method. The backing view performs whatever internal processing it needs to do, and returns its measured size to the platform.
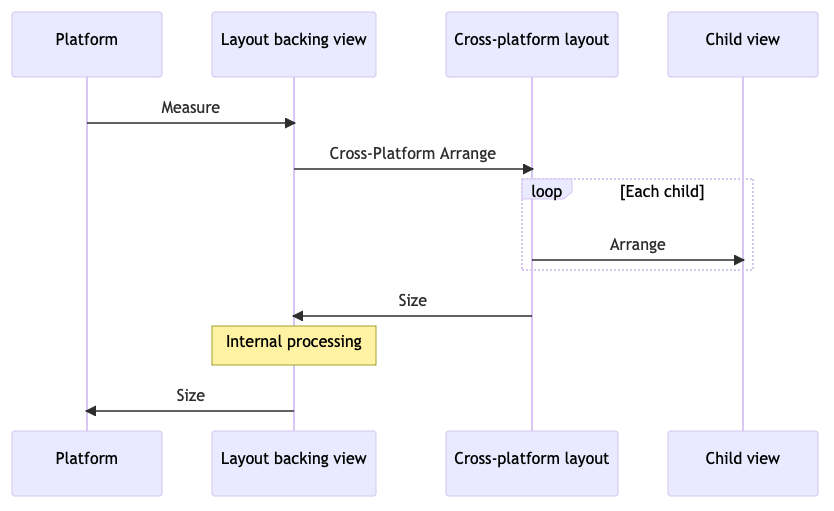
The following diagram shows the process when a native layout system initiates layout arrangement:

When the native layout system for a platform requests the arrangement, or layout, of one of these backing views, the backing view calls the Layout.CrossPlatformArrange method. This is the point at which control is passed from the native layout system to .NET MAUI's layout system. Layout.CrossPlatformArrange calls the layout managers' ArrangeChildren method. This method is responsible for determining where each view should be placed within the bounds of the layout, and calls Arrange on each view to set its location. The size of the layout is returned to the backing view as the result of the CrossPlatformArrange method. The backing view performs whatever internal processing it needs to do, and returns the actual size to the platform.
Note
ILayoutManager.Measure may be called multiple times before ArrangeChildren is called, because a platform may need to perform some speculative measurements before arranging views.
Custom layout approaches
There are two main approaches to creating a custom layout:
- Create a custom layout type, which is usually a subclass of an existing layout type or of Layout, and override CreateLayoutManager() in your custom layout type. Then, provide an ILayoutManager implementation that contains your custom layout logic. For more information, see Create a custom layout type.
- Modify the behavior of an existing layout type by creating a type that implements ILayoutManagerFactory. Then, use this layout manager factory to replace .NET MAUI's default layout manager for the existing layout with your own ILayoutManager implementation that contains your custom layout logic. For more information, see Modify the behavior of an existing layout.
Create a custom layout type
The process for creating a custom layout type is to:
Create a class that subclasses an existing layout type or the Layout class, and override CreateLayoutManager() in your custom layout type. For more information, see Subclass a layout.
Create a layout manager class that derives from an existing layout manager, or that implements the ILayoutManager interface directly. In your layout manager class, you should:
- Override, or implement, the Measure method to calculate the total size of the layout given its constraints.
- Override, or implement, the ArrangeChildren method to size and position all the children within the layout.
For more information, see Create a layout manager.
Consume your custom layout type by adding it to a Page, and by adding children to the layout. For more information, see Consume the layout type.
An orientation-sensitive HorizontalWrapLayout is used to demonstrate this process. HorizontalWrapLayout is similar to a HorizontalStackLayout in that it arranges its children horizontally across the page. However, it wraps the display of children to a new row when it encounters the right edge of its container
Note
The sample defines additional custom layouts that can be used to understand how to produce a custom layout.
Subclass a layout
To create a custom layout type you must first subclass an existing layout type, or the Layout class. Then, override CreateLayoutManager() in your layout type and return a new instance of the layout manager for your layout type:
using Microsoft.Maui.Layouts;

public class HorizontalWrapLayout : HorizontalStackLayout
{
    protected override ILayoutManager CreateLayoutManager()
    {
        return new HorizontalWrapLayoutManager(this);
    }
}
HorizontalWrapLayout derives from HorizontalStackLayout to use its layout functionality. .NET MAUI layouts delegate cross-platform layout and measurement to a layout manager class. Therefore, the CreateLayoutManager() override returns a new instance of the HorizontalWrapLayoutManager class, which is the layout manager that's discussed in the next section.
Create a layout manager
A layout manager class is used to perform cross-platform layout and measurement for your custom layout type. It should derive from an existing layout manager, or it should directly implement the ILayoutManager interface. HorizontalWrapLayoutManager derives from HorizontalStackLayoutManager so that it can use its underlying functionality and access members in its inheritance hierarchy:
using Microsoft.Maui.Layouts;
using HorizontalStackLayoutManager = Microsoft.Maui.Layouts.HorizontalStackLayoutManager;

public class HorizontalWrapLayoutManager : HorizontalStackLayoutManager
{
    HorizontalWrapLayout _layout;

    public HorizontalWrapLayoutManager(HorizontalWrapLayout horizontalWrapLayout) : base(horizontalWrapLayout)
    {
        _layout = horizontalWrapLayout;
    }

    public override Size Measure(double widthConstraint, double heightConstraint)
    {
    }

    public override Size ArrangeChildren(Rect bounds)
    {
    }
}
The HorizontalWrapLayoutManager constructor stores an instance of the HorizontalWrapLayout type in a field, so that it can be accessed throughout the layout manager. The layout manager also overrides the Measure and ArrangeChildren methods from the HorizontalStackLayoutManager class. These methods are where you'll define the logic to implement your custom layout.
Measure the layout size
The purpose of the ILayoutManager.Measure implementation is to calculate the total size of the layout. It should do this by calling IView.Measure on each child in the layout. It should then use this data to calculate and return the total size of the layout given its constraints.
The following example shows the Measure implementation for the HorizontalWrapLayoutManager class:
public override Size Measure(double widthConstraint, double heightConstraint)
{
    var padding = _layout.Padding;

    widthConstraint -= padding.HorizontalThickness;

    double currentRowWidth = 0;
    double currentRowHeight = 0;
    double totalWidth = 0;
    double totalHeight = 0;

    for (int n = 0; n < _layout.Count; n++)
    {
        var child = _layout[n];
        if (child.Visibility == Visibility.Collapsed)
        {
            continue;
        }

        var measure = child.Measure(double.PositiveInfinity, heightConstraint);

        // Will adding this IView put us past the edge?
        if (currentRowWidth + measure.Width > widthConstraint)
        {
            // Keep track of the width so far
            totalWidth = Math.Max(totalWidth, currentRowWidth);
            totalHeight += currentRowHeight;

            // Account for spacing
            totalHeight += _layout.Spacing;

            // Start over at 0
            currentRowWidth = 0;
            currentRowHeight = measure.Height;
        }
        currentRowWidth += measure.Width;
        currentRowHeight = Math.Max(currentRowHeight, measure.Height);

        if (n < _layout.Count - 1)
        {
            currentRowWidth += _layout.Spacing;
        }
    }

    // Account for the last row
    totalWidth = Math.Max(totalWidth, currentRowWidth);
    totalHeight += currentRowHeight;

    // Account for padding
    totalWidth += padding.HorizontalThickness;
    totalHeight += padding.VerticalThickness;

    // Ensure that the total size of the layout fits within its constraints
    var finalWidth = ResolveConstraints(widthConstraint, Stack.Width, totalWidth, Stack.MinimumWidth, Stack.MaximumWidth);
    var finalHeight = ResolveConstraints(heightConstraint, Stack.Height, totalHeight, Stack.MinimumHeight, Stack.MaximumHeight);

    return new Size(finalWidth, finalHeight);
}
The Measure(Double, Double) method enumerates through all of the visible children in the layout, invoking the IView.Measure method on each child. It then returns the total size of the layout, taking into account the constraints and the values of the Padding and Spacing properties. The ResolveConstraints method is called to ensure that the total size of the layout fits within its constraints.
Important
When enumerating children in the ILayoutManager.Measure implementation, skip any child whose Visibility property is set to Collapsed. This ensures that the custom layout won't leave space for invisible children.
Arrange children in the layout
The purpose of the ArrangeChildren implementation is to size and position all of the children within the layout. To determine where each child should be placed within the bounds of the layout, it should call Arrange on each child with its appropriate bounds. It should then return a value that represents the actual size of the layout.
Warning
Failure to invoke the ArrangeChildren method on each child in the layout will result in the child never receiving a correct size or position, and hence the child won't become visible on the page.
The following example shows the ArrangeChildren implementation for the HorizontalWrapLayoutManager class:
public override Size ArrangeChildren(Rect bounds)
{
    var padding = Stack.Padding;
    double top = padding.Top + bounds.Top;
    double left = padding.Left + bounds.Left;

    double currentRowTop = top;
    double currentX = left;
    double currentRowHeight = 0;

    double maxStackWidth = currentX;

    for (int n = 0; n < _layout.Count; n++)
    {
        var child = _layout[n];
        if (child.Visibility == Visibility.Collapsed)
        {
            continue;
        }

        if (currentX + child.DesiredSize.Width > bounds.Right)
        {
            // Keep track of our maximum width so far
            maxStackWidth = Math.Max(maxStackWidth, currentX);

            // Move down to the next row
            currentX = left;
            currentRowTop += currentRowHeight + _layout.Spacing;
            currentRowHeight = 0;
        }

        var destination = new Rect(currentX, currentRowTop, child.DesiredSize.Width, child.DesiredSize.Height);
        child.Arrange(destination);

        currentX += destination.Width + _layout.Spacing;
        currentRowHeight = Math.Max(currentRowHeight, destination.Height);
    }

    var actual = new Size(maxStackWidth, currentRowTop + currentRowHeight);

    // Adjust the size if the layout is set to fill its container
    return actual.AdjustForFill(bounds, Stack);
}
The ArrangeChildren method enumerates through all the visible children in the layout to size and position them within the layout. It does this by invoking Arrange on each child with appropriate bounds, that take into account the Padding and Spacing of the underlying layout. It then returns the actual size of the layout. The AdjustForFill method is called to ensure that the size takes into account whether the the layout has its HorizontalLayoutAlignment and VerticalLayoutAlignment properties set to LayoutOptions.Fill.
Important
When enumerating children in the ArrangeChildren implementation, skip any child whose Visibility property is set to Collapsed. This ensures that the custom layout won't leave space for invisible children.
Consume the layout type
The HorizontalWrapLayout class can be consumed by placing it in a Page derived type:
<ContentPage xmlns="http://schemas.microsoft.com/dotnet/2021/maui"
             xmlns:x="http://schemas.microsoft.com/winfx/2009/xaml"
             xmlns:layouts="clr-namespace:CustomLayoutDemos.Layouts"
             x:Class="CustomLayoutDemos.Views.HorizontalWrapLayoutPage"
             Title="Horizontal wrap layout">
    <ScrollView Margin="20">
        <layouts:HorizontalWrapLayout Spacing="20">
            <Image Source="img_0074.jpg"
                   WidthRequest="150" />
            <Image Source="img_0078.jpg"
                   WidthRequest="150" />
            <Image Source="img_0308.jpg"
                   WidthRequest="150" />
            <Image Source="img_0437.jpg"
                   WidthRequest="150" />
            <Image Source="img_0475.jpg"
                   WidthRequest="150" />
            <Image Source="img_0613.jpg"
                   WidthRequest="150" />
            <!-- More images go here -->
        </layouts:HorizontalWrapLayout>
    </ScrollView>
</ContentPage>
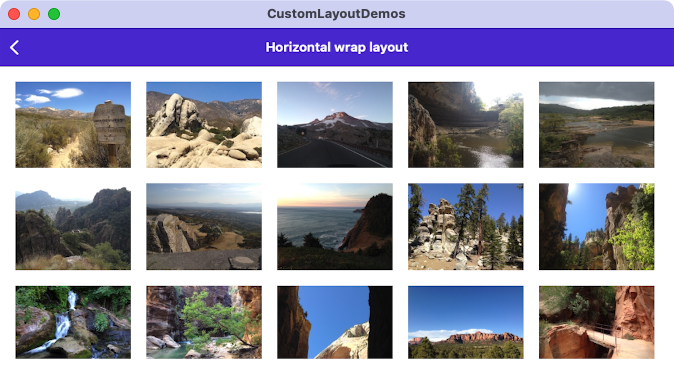
Controls can be added to the HorizontalWrapLayout as required. In this example, when the page containing the HorizontalWrapLayout appears, the Image controls are displayed:

The number of columns in each row depends on the image size, the width of the page, and the number of pixels per device-independent unit:

Note
Scrolling is supported by wrapping the HorizontalWrapLayout in a ScrollView.
Modify the behavior of an existing layout
In some scenarios you may want to change the behavior of an existing layout type without having to create a custom layout type. For these scenarios you can create a type that implements ILayoutManagerFactory and use it to replace .NET MAUI's default layout manager for the existing layout with your own ILayoutManager implementation. This enables you to define a new layout manager for an existing layout, such as providing a custom layout manager for Grid. This can be useful for scenarios where you want to add a new behavior to a layout but don't want to update the type of an existing widely-used layout in your app.
The process for modifying the behavior of an existing layout, with a layout manager factory, is to:
- Create a layout manager that derives from one of .NET MAUI's layout manager types. For more information, see Create a custom layout manager.
- Create a type that implements ILayoutManagerFactory. For more information, see Create a layout manager factory.
- Register your layout manager factory with the app's service provider. For more information, see Register the layout manager factory.
Create a custom layout manager
A layout manager is used to perform cross-platform layout and measurement for a layout. To change the behavior of an existing layout you should create a custom layout manager that derives from the layout manager for the layout:
using Microsoft.Maui.Layouts;

public class CustomGridLayoutManager : GridLayoutManager
{
    public CustomGridLayoutManager(IGridLayout layout) : base(layout)
    {
    }

    public override Size Measure(double widthConstraint, double heightConstraint)
    {
        EnsureRows();
        return base.Measure(widthConstraint, heightConstraint);
    }

    void EnsureRows()
    {
        if (Grid is not Grid grid)
        {
            return;
        }

        // Find the maximum row value from the child views
        int maxRow = 0;
        foreach (var child in grid)
        {
            maxRow = Math.Max(grid.GetRow(child), maxRow);
        }

        // Add more rows if we need them
        for (int n = grid.RowDefinitions.Count; n <= maxRow; n++)
        {
            grid.RowDefinitions.Add(new RowDefinition(GridLength.Star));
        }
    }
}
In this example, CustomGridLayoutManager derives from .NET MAUI's GridLayoutManager class, and overrides its Measure method. This custom layout manager ensures that at runtime the RowDefinitions for the Grid includes enough rows to account for each Grid.Row attached property set in a child view. Without this modification, the RowDefinitions for the Grid would need to be specified at design time.
Important
When modifying the behavior of an existing layout manager, don't forget to ensure that you call the base.Measure method from your Measure implementation.
Create a layout manager factory
The custom layout manager should be created in a layout manager factory. This is achieved by creating a type that implements the ILayoutManagerFactory interface:
using Microsoft.Maui.Layouts;

public class CustomLayoutManagerFactory : ILayoutManagerFactory
{
    public ILayoutManager CreateLayoutManager(Layout layout)
    {
        if (layout is Grid)
        {
            return new CustomGridLayoutManager(layout as IGridLayout);
        }
        return null;
    }
}
In this example, a CustomGridLayoutManager instance is returned if the layout is a Grid.
Register the layout manager factory
The layout manager factory should be registered with your app's service provider in your MauiProgram class:
public static class MauiProgram
{
    public static MauiApp CreateMauiApp()
    {
        var builder = MauiApp.CreateBuilder();
        builder
            .UseMauiApp<App>()
            .ConfigureFonts(fonts =>
            {
                fonts.AddFont("OpenSans-Regular.ttf", "OpenSansRegular");
                fonts.AddFont("OpenSans-Semibold.ttf", "OpenSansSemibold");
            });

        // Setup a custom layout manager so the default manager for the Grid can be replaced.
        builder.Services.Add(new ServiceDescriptor(typeof(ILayoutManagerFactory), new CustomLayoutManagerFactory()));

        return builder.Build();
    }
}
Then, when the app renders a Grid it will use the custom layout manager to ensure that at runtime the RowDefinitions for the Grid includes enough rows to account for each Grid.Row attached property set in child views.
The following example shows a Grid that sets the Grid.Row attached property in child views, but doesn't set the RowDefinitions property:
<Grid>
    <Label Text="This Grid demonstrates replacing the LayoutManager for an existing layout type." />
    <Label Grid.Row="1"
           Text="In this case, it's a LayoutManager for Grid which automatically adds enough rows to accommodate the rows specified in the child views' attached properties." />
    <Label Grid.Row="2"
           Text="Notice that the Grid doesn't explicitly specify a RowDefinitions collection." />
    <Label Grid.Row="3"
           Text="In MauiProgram.cs, an instance of an ILayoutManagerFactory has been added that replaces the default GridLayoutManager. The custom manager will automatically add the necessary RowDefinitions at runtime." />
    <Label Grid.Row="5"
           Text="We can even skip some rows, and it will add the intervening ones for us (notice the gap between the previous label and this one)." />
</Grid>
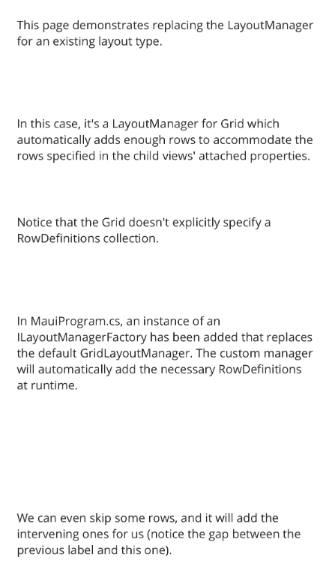
The layout manager factory uses the custom layout manager to ensure that the Grid in this example displays correctly, despite the RowDefinitions property not being set:

.NET MAUI
 Browse the sample