Bemærk
Adgang til denne side kræver godkendelse. Du kan prøve at logge på eller ændre mapper.
Adgang til denne side kræver godkendelse. Du kan prøve at ændre mapper.
Overview
There are occasions when a user must input data into an Android
application. To assist with this, the Android framework provides the
DatePicker widget and the
DatePickerDialog . The
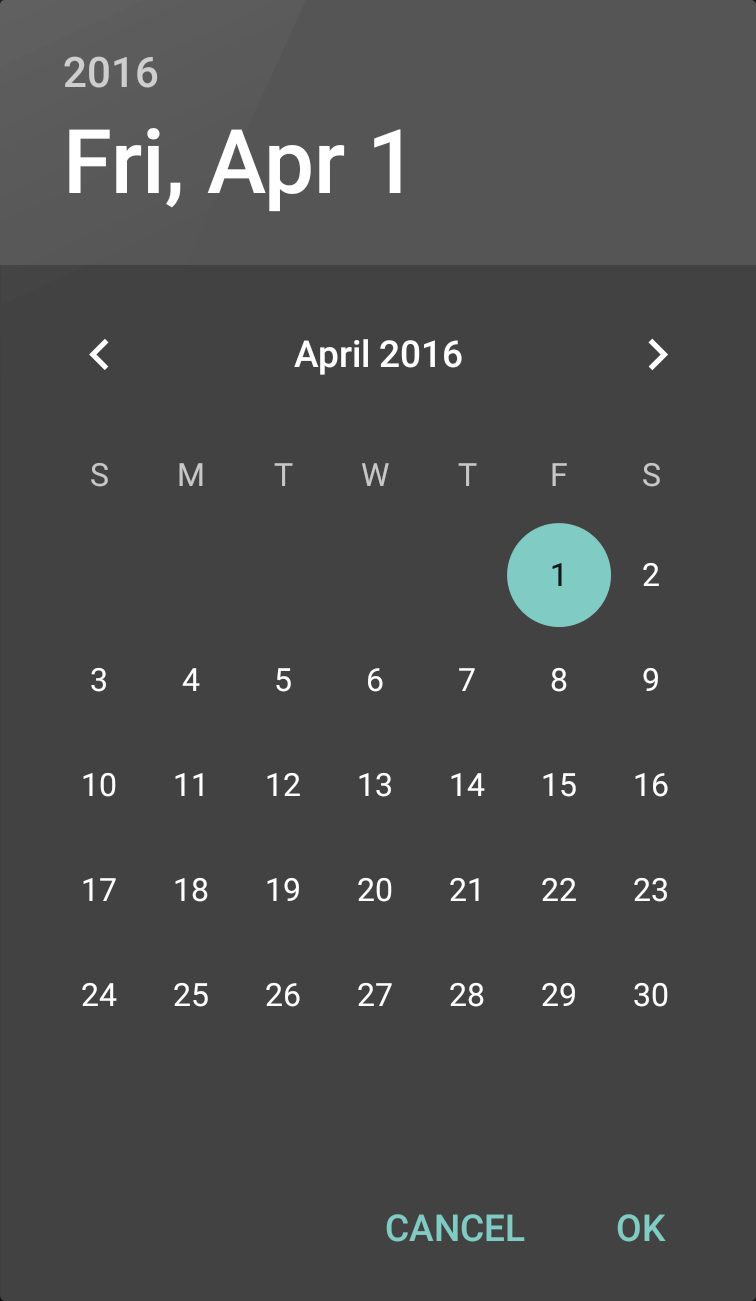
DatePicker allows users to select the year, month, and day in a
consistent interface across devices and applications. The
DatePickerDialog is a helper class that encapsulates the DatePicker
in a dialog.
Modern Android applications should display the DatePickerDialog in a
DialogFragment. This will
allow an application to display the DatePicker as a popup dialog or
embedded in an Activity. In addition, the DialogFragment will manage
the lifecycle and display of the dialog, reducing the amount of code
that must be implemented.
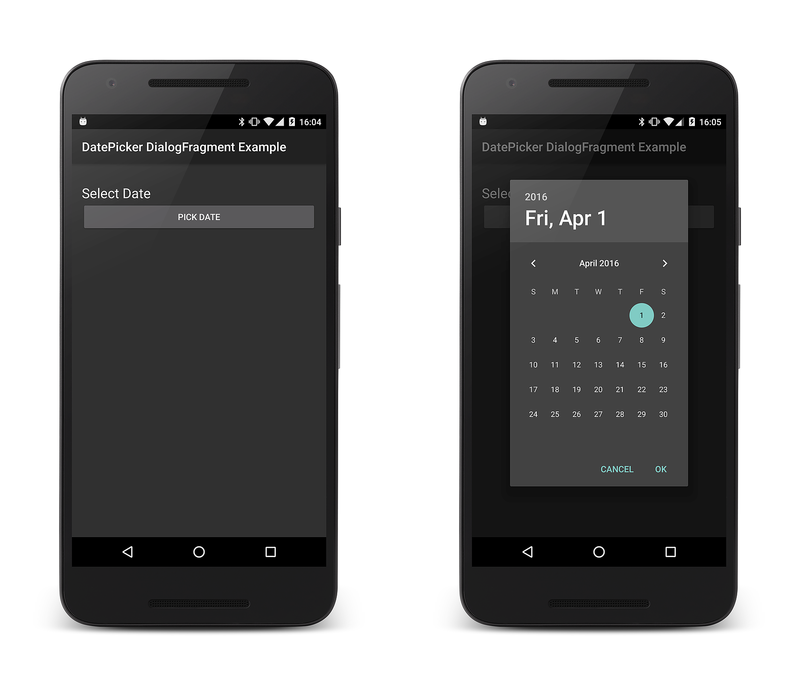
This guide will demonstrate how to use the DatePickerDialog, wrapped
in a DialogFragment. The sample application will display the
DatePickerDialog as a modal dialog when the user clicks a button on
an Activity. When the date is set by the user, a TextView will update
with the date that was selected.
Requirements
The sample application for this guide targets Android 4.1 (API level 16) or higher, but is applicable to Android 3.0 (API level 11 or higher). It is possible to support older versions of Android with the addition of the Android Support Library v4 to the project and some code changes.
Using the DatePicker
This sample will extend DialogFragment. The subclass will host and
display a DatePickerDialog:

When the user selects a date and clicks the OK button, the
DatePickerDialog will call the method
IOnDateSetListener.OnDateSet.
This interface is implemented by the hosting DialogFragment. If the
user clicks the Cancel button, then fragment and dialog will
dismiss themselves.
There are several ways the DialogFragment can return the selected
date to the hosting activity:
Invoke a method or set a property – The Activity can provide a property or method specifically for setting this value.
Raise an event – The
DialogFragmentcan define an event that will be raised whenOnDateSetis invoked.Use an
Action– TheDialogFragmentcan invoke anAction<DateTime>to display the date in the Activity. The Activity will provide theAction<DateTimewhen instantiating theDialogFragment. This sample will use the third technique, and require that the Activity supply anAction<DateTime>to theDialogFragment.
Extending DialogFragment
The first step in displaying a DatePickerDialog is to subclass
DialogFragment and have it implement the IOnDateSetListener
interface:
public class DatePickerFragment : DialogFragment,
                                  DatePickerDialog.IOnDateSetListener
{
    // TAG can be any string of your choice.
    public static readonly string TAG = "X:" + typeof (DatePickerFragment).Name.ToUpper();

    // Initialize this value to prevent NullReferenceExceptions.
    Action<DateTime> _dateSelectedHandler = delegate { };

    public static DatePickerFragment NewInstance(Action<DateTime> onDateSelected)
    {
        DatePickerFragment frag = new DatePickerFragment();
        frag._dateSelectedHandler = onDateSelected;
        return frag;
    }

    public override Dialog OnCreateDialog(Bundle savedInstanceState)
    {
        DateTime currently = DateTime.Now;
        DatePickerDialog dialog = new DatePickerDialog(Activity,
                                                       this,
                                                       currently.Year,
                                                       currently.Month - 1,
                                                       currently.Day);
        return dialog;
    }

    public void OnDateSet(DatePicker view, int year, int monthOfYear, int dayOfMonth)
    {
        // Note: monthOfYear is a value between 0 and 11, not 1 and 12!
        DateTime selectedDate = new DateTime(year, monthOfYear + 1, dayOfMonth);
        Log.Debug(TAG, selectedDate.ToLongDateString());
        _dateSelectedHandler(selectedDate);
    }
}
The NewInstance method is invoked to instantiate a new
DatePickerFragment. This method takes an Action<DateTime> that will
be invoked when the user clicks on the OK button in the
DatePickerDialog.
When the fragment is to be displayed, Android will call the method
OnCreateDialog. This method will create a new DatePickerDialog
object and initialize it with the current date and the callback object
(which is the current instance of the DatePickerFragment).
Note
Be aware that the value of the month
when IOnDateSetListener.OnDateSet is invoked is in the
range of 0 to 11, and not 1 to 12. The day of the month
will be in the range of 1 to 31 (depending on which month was selected).
Showing the DatePickerFragment
Now that the DialogFragment has been implemented, this section will
examine how to use the fragment in an Activity. In the sample app that
accompanies this guide, the Activity will instantiate the
DialogFragment using the NewInstance factory method and then
display it invoke DialogFragment.Show. As a part of instantiating the
DialogFragment, the Activity passes an Action<DateTime>, which will
display the date in a TextView that is hosted by the Activity:
[Activity(Label = "@string/app_name", MainLauncher = true, Icon = "@drawable/icon")]
public class MainActivity : Activity
{
    TextView _dateDisplay;
    Button _dateSelectButton;

    protected override void OnCreate(Bundle bundle)
    {
        base.OnCreate(bundle);
        SetContentView(Resource.Layout.Main);

        _dateDisplay = FindViewById<TextView>(Resource.Id.date_display);
        _dateSelectButton = FindViewById<Button>(Resource.Id.date_select_button);
        _dateSelectButton.Click += DateSelect_OnClick;
    }

    void DateSelect_OnClick(object sender, EventArgs eventArgs)
    {
        DatePickerFragment frag = DatePickerFragment.NewInstance(delegate(DateTime time)
                                                                 {
                                                                     _dateDisplay.Text = time.ToLongDateString();
                                                                 });
        frag.Show(FragmentManager, DatePickerFragment.TAG);
    }
}
Summary
This sample discussed how to display a DatePicker widget as a popup
modal dialog as a part of an Android Activity. It provided a sample
DialogFragment implementation and discussed the IOnDateSetListener
interface. This sample also demonstrated how the DialogFragment may
interact with the host Activity to display the selected date.
