Bemærk
Adgang til denne side kræver godkendelse. Du kan prøve at logge på eller ændre mapper.
Adgang til denne side kræver godkendelse. Du kan prøve at ændre mapper.
Materials in Windows 11 are visual effects applied to UX surfaces that resemble real life artifacts. Occluding materials, like Mica and Acrylic, are used as base layers beneath interactive UI controls.
Mica is an opaque material that incorporates the user's theme and desktop wallpaper to create a highly personalized appearance. Mica is designed for performance as it only captures the background wallpaper once to create its visualization, so we recommend it for the foundation layer of your app, especially in the title bar area.
Acrylic is a semi-transparent material that replicates the effect of frosted glass. It's used only for transient, light-dismiss surfaces such as flyouts and context menus.
This article describes how to apply Mica or Acrylic as the base layer of your Windows App SDK/WinUI XAML app.
Note
- To use backdrop materials in a Win32 app, see Apply Mica in Win32 desktop apps for Windows 11.
How to use a backdrop material
The WinUI 3 Gallery app includes interactive examples of most WinUI 3 controls, features, and functionality. Get the app from the Microsoft Store or get the source code on GitHub
To apply Mica or Acrylic material to your app, you set the SystemBackdrop property to a XAML SystemBackdrop (typically, one of the built-in backdrops, MicaBackdrop or DesktopAcrylicBackdrop).
These elements have a SystemBackdrop property:
- CommandBarFlyoutCommandBar.SystemBackdrop
- ContentIsland.SystemBackdrop
- DesktopWindowXamlSource.SystemBackdrop
- FlyoutBase.SystemBackdrop
- MenuFlyoutPresenter.SystemBackdrop
- Popup.SystemBackdrop
- Window.SystemBackdrop
These examples show how to set the system backdrop in XAML and in code.
Mica
Mica is typically used as the backdrop for an app Window.
<Window
    ... >

    <Window.SystemBackdrop>
        <MicaBackdrop Kind="BaseAlt"/>
    </Window.SystemBackdrop>

</Window>
public MainWindow()
{
    this.InitializeComponent();

    SystemBackdrop = new MicaBackdrop()
                        { Kind = MicaKind.BaseAlt };
}
Acrylic
Acrylic is typically used as the backdrop for transient UI, like a flyout.
<Flyout
    ... >

    <Flyout.SystemBackdrop>
        <DesktopAcrylicBackdrop/>
    </Flyout.SystemBackdrop>
</Flyout>
Flyout flyout = new Flyout()
{
    SystemBackdrop = new DesktopAcrylicBackdrop()
};
In-app acrylic
You can apply in-app acrylic to your app's surfaces using a XAML AcrylicBrush or predefined AcrylicBrush theme resources.
WinUI includes a collection of brush theme resources that respect the app's theme and fall back to solid colors as needed. To paint a specific surface, apply one of the theme resources to element backgrounds just as you would apply any other brush resource.
<Grid Background="{ThemeResource AcrylicInAppFillColorDefaultBrush}">
Note
You can view these resources in the AcrylicBrush theme resources file, in the microsoft-ui-xaml GitHub repo.
Custom acrylic brush
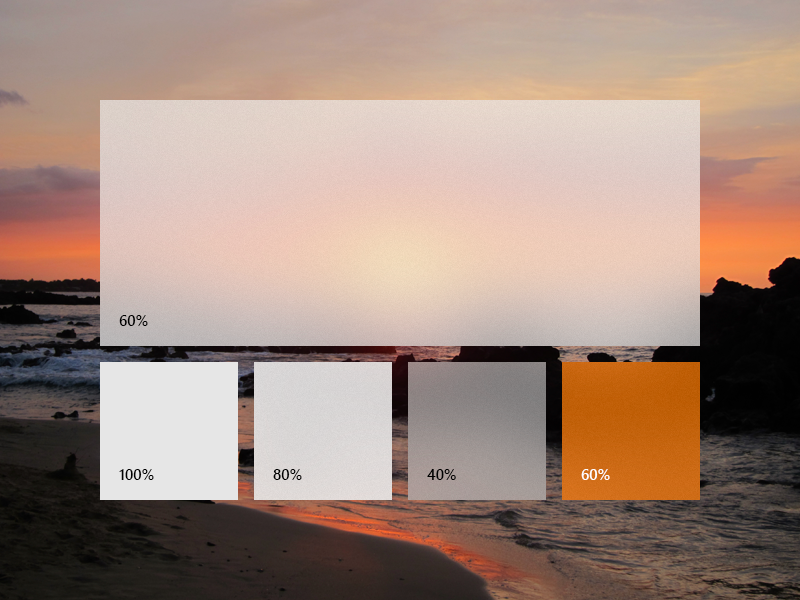
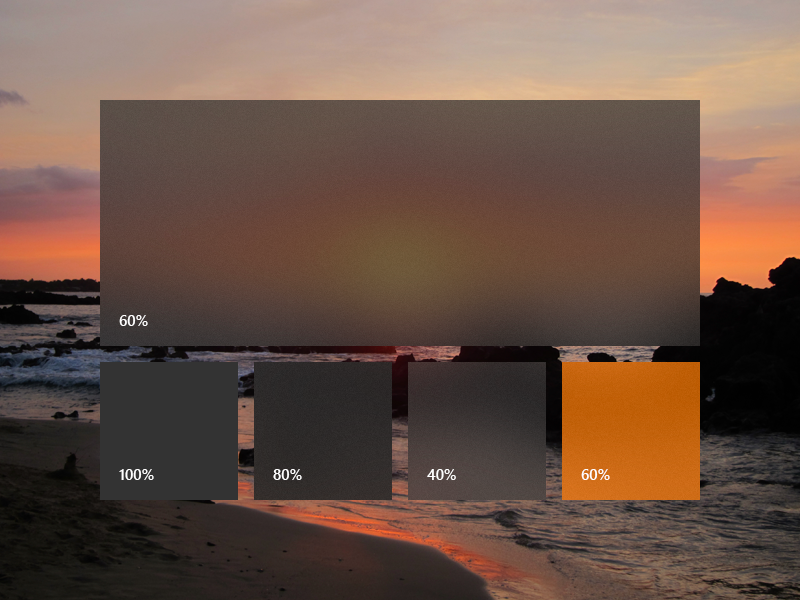
You may choose to add a color tint to your app's acrylic to show branding or provide visual balance with other elements on the page. To show color rather than grayscale, you need to define your own acrylic brushes using the following properties.
- TintColor: the color/tint overlay layer.
- TintOpacity: the opacity of the tint layer.
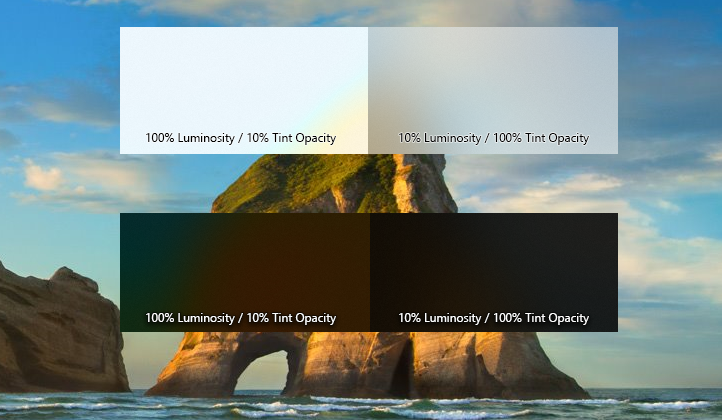
- TintLuminosityOpacity: controls the amount of saturation that is allowed through the acrylic surface from the background.
- FallbackColor: the solid color that replaces acrylic in Battery Saver. For background acrylic, fallback color also replaces acrylic when your app isn't in the active desktop window.
To add an acrylic brush, define the three resources for dark, light, and high contrast themes. In high contrast, we recommend that you use a SolidColorBrush with the same x:Key as the dark/light AcrylicBrush.
Note
If you don't specify a TintLuminosityOpacity value, the system will automatically adjust its value based on your TintColor and TintOpacity.
<ResourceDictionary.ThemeDictionaries>
    <ResourceDictionary x:Key="Default">
        <AcrylicBrush x:Key="MyAcrylicBrush"
            TintColor="#FFFF0000"
            TintOpacity="0.8"
            TintLuminosityOpacity="0.5"
            FallbackColor="#FF7F0000"/>
    </ResourceDictionary>

    <ResourceDictionary x:Key="HighContrast">
        <SolidColorBrush x:Key="MyAcrylicBrush"
            Color="{ThemeResource SystemColorWindowColor}"/>
    </ResourceDictionary>

    <ResourceDictionary x:Key="Light">
        <AcrylicBrush x:Key="MyAcrylicBrush"
            TintColor="#FFFF0000"
            TintOpacity="0.8"
            TintLuminosityOpacity="0.5"
            FallbackColor="#FFFF7F7F"/>
    </ResourceDictionary>
</ResourceDictionary.ThemeDictionaries>
The following sample shows how to declare an AcrylicBrush in code.
AcrylicBrush myBrush = new AcrylicBrush();
myBrush.TintColor = Color.FromArgb(255, 202, 24, 37);
myBrush.FallbackColor = Color.FromArgb(255, 202, 24, 37);
myBrush.TintOpacity = 0.6;

grid.Fill = myBrush;
How to use a system backdrop controller
Note
Starting with Windows App SDK 1.3, you can apply material by setting the Window.SystemBackdrop property to a XAML SystemBackdrop as described in the previous section. This is the recommended way to apply a material.
The remainder of this article shows how to use the Composition MicaController and DesktopAcrylicController APIs.
To use a backdrop material in your app, you can use one of the controllers that implements the ISystemBackdropController interface (MicaController or DesktopAcrylicController). These classes manage both the rendering of the system backdrop material as well as the handling of system policy for the material.
To use Mica as your backdrop material, create a MicaController object. To use Acrylic, create a DesktopAcrylicController object. The set up and supporting code is the same for each type of system backdrop material.
This code shows how to create a MicaController.
MicaController m_backdropController;

bool TrySetSystemBackdrop()
{
    if (MicaController.IsSupported())
    {
        ...
        m_backdropController = new MicaController();
        ...
    }
}
// namespace MUCSB = Microsoft::UI::Composition::SystemBackdrops;

winrt::MUCSB::MicaController m_backdropController{ nullptr };

void SetBackground()
{
    if (winrt::MUCSB::MicaController::IsSupported())
    {
        ...
        m_backdropController = winrt::MUCSB::MicaController();
        ...
    }
}
To use the Mica Alt variant of Mica, create a MicaController object and set the Kind property to MicaKind.BaseAlt.
MicaController m_backdropController;

bool TrySetSystemBackdrop()
{
    if (MicaController.IsSupported())
    {
        ...
        m_backdropController = new MicaController()
        {
            Kind = MicaKind.BaseAlt
        };
        ...
    }
}
// namespace MUCSB = Microsoft::UI::Composition::SystemBackdrops;

winrt::MUCSB::MicaController m_backdropController{ nullptr };

void SetBackground()
{
    if (winrt::MUCSB::MicaController::IsSupported())
    {
        ...
        m_backdropController = winrt::MUCSB::MicaController();
        m_backdropController.Kind(winrt::MUCSB::MicaKind::BaseAlt);
        ...
    }
}
This code shows how to create a DesktopAcrylicController.
DesktopAcrylicController m_backdropController;

bool TrySetSystemBackdrop()
{
    if (DesktopAcrylicController.IsSupported())
    {
        ...
        m_backdropController = new DesktopAcrylicController();
        ...
    }
}
// namespace MUCSB = Microsoft::UI::Composition::SystemBackdrops;

winrt::MUCSB::DesktopAcrylicController m_backdropController{ nullptr };

void SetBackground()
{
    if (winrt::MUCSB::DesktopAcrylicController::IsSupported())
    {
        ...
        m_backdropController = winrt::MUCSB::DesktopAcrylicController();
        ...
    }
}
The controller reacts to the system Light and Dark themes by default. To override this behavior, you can set the following properties on the controller:
Note
After customizing any of the controller’s four properties, it no longer applies default Light or Dark values when the associated SystemBackdropConfiguration.Theme changes. You need to manually update those properties to match the new theme.
In order to use the backdrop material in your app, the following items are required:
System support
The system where the app runs must support the backdrop material. Call the MicaController.IsSupported or DesktopAcrylicController.IsSupported method to ensure the backdrop material is supported at runtime.
A valid target
You must provide a target that implements the ICompositionSupportsSystemBackdrop interface. In a XAML app, the XAML Window implements this interface and is used as the backdrop target.
A SystemBackdropConfiguration object
The SystemBackdropConfiguration provides the system backdrop controller with app-specific policy information to properly configure the system backdrop material.
A DispatcherQueue object.
You need an available Windows.System.DispatcherQueue on the main XAML thread. See the
WindowsSystemDispatcherQueueHelperclass in the example code, or in the WinUI Gallery sample.
Example: Use Mica in a Windows AppSDK/WinUI app
This example shows how to set up the Mica backdrop material in a XAML app.
Tip
Also, see these example projects on GitHub:
C#: SampleSystemBackdropsWindow in the WinUI3 Gallery.
C++/WinRT: Windows App SDK Mica sample.
using Microsoft.UI.Composition.SystemBackdrops;
using Microsoft.UI.Xaml;
using System.Runtime.InteropServices; // For DllImport
using WinRT; // required to support Window.As<ICompositionSupportsSystemBackdrop>()

public sealed partial class MainWindow : Window
{
    WindowsSystemDispatcherQueueHelper m_wsdqHelper; // See below for implementation.
    MicaController m_backdropController;
    SystemBackdropConfiguration m_configurationSource;

    public MainWindow()
    {
        this.InitializeComponent();

        TrySetSystemBackdrop();
    }

    bool TrySetSystemBackdrop()
    {
        if (Microsoft.UI.Composition.SystemBackdrops.MicaController.IsSupported())
        {
            m_wsdqHelper = new WindowsSystemDispatcherQueueHelper();
            m_wsdqHelper.EnsureWindowsSystemDispatcherQueueController();

            // Create the policy object.
            m_configurationSource = new SystemBackdropConfiguration();
            this.Activated += Window_Activated;
            this.Closed += Window_Closed;
            ((FrameworkElement)this.Content).ActualThemeChanged += Window_ThemeChanged;

            // Initial configuration state.
            m_configurationSource.IsInputActive = true;
            SetConfigurationSourceTheme();

            m_backdropController = new Microsoft.UI.Composition.SystemBackdrops.MicaController();

            // Enable the system backdrop.
            // Note: Be sure to have "using WinRT;" to support the Window.As<...>() call.
            m_backdropController.AddSystemBackdropTarget(this.As<Microsoft.UI.Composition.ICompositionSupportsSystemBackdrop>());
            m_backdropController.SetSystemBackdropConfiguration(m_configurationSource);
            return true; // succeeded
        }

        return false; // Mica is not supported on this system
    }

    private void Window_Activated(object sender, WindowActivatedEventArgs args)
        {
            m_configurationSource.IsInputActive = args.WindowActivationState != WindowActivationState.Deactivated;
        }

    private void Window_Closed(object sender, WindowEventArgs args)
        {
            // Make sure any Mica/Acrylic controller is disposed
            // so it doesn't try to use this closed window.
            if (m_backdropController != null)
            {
                m_backdropController.Dispose();
                m_backdropController = null;
            }
            this.Activated -= Window_Activated;
            m_configurationSource = null;
        }

    private void Window_ThemeChanged(FrameworkElement sender, object args)
        {
            if (m_configurationSource != null)
            {
                SetConfigurationSourceTheme();
            }
        }

    private void SetConfigurationSourceTheme()
        {
            switch (((FrameworkElement)this.Content).ActualTheme)
            {
                case ElementTheme.Dark: m_configurationSource.Theme = Microsoft.UI.Composition.SystemBackdrops.SystemBackdropTheme.Dark; break;
                case ElementTheme.Light: m_configurationSource.Theme = Microsoft.UI.Composition.SystemBackdrops.SystemBackdropTheme.Light; break;
                case ElementTheme.Default: m_configurationSource.Theme = Microsoft.UI.Composition.SystemBackdrops.SystemBackdropTheme.Default; break;
            }
        }
}

class WindowsSystemDispatcherQueueHelper
{
    [StructLayout(LayoutKind.Sequential)]
    struct DispatcherQueueOptions
    {
        internal int dwSize;
        internal int threadType;
        internal int apartmentType;
    }

    [DllImport("CoreMessaging.dll")]
    private static extern int CreateDispatcherQueueController([In] DispatcherQueueOptions options, [In, Out, MarshalAs(UnmanagedType.IUnknown)] ref object dispatcherQueueController);

    object m_dispatcherQueueController = null;
    public void EnsureWindowsSystemDispatcherQueueController()
    {
        if (Windows.System.DispatcherQueue.GetForCurrentThread() != null)
        {
            // one already exists, so we'll just use it.
            return;
        }

        if (m_dispatcherQueueController == null)
        {
            DispatcherQueueOptions options;
            options.dwSize = Marshal.SizeOf(typeof(DispatcherQueueOptions));
            options.threadType = 2;    // DQTYPE_THREAD_CURRENT
            options.apartmentType = 2; // DQTAT_COM_STA

            CreateDispatcherQueueController(options, ref m_dispatcherQueueController);
        }
    }
}
// pch.h
...
#include <winrt/Microsoft.UI.Composition.SystemBackdrops.h>
#include <winrt/Windows.System.h>
#include <dispatcherqueue.h>

// MainWindow.xaml.h
...
namespace winrt
{
    namespace MUC = Microsoft::UI::Composition;
    namespace MUCSB = Microsoft::UI::Composition::SystemBackdrops;
    namespace MUX = Microsoft::UI::Xaml;
    namespace WS = Windows::System;
}
...
struct MainWindow : MainWindowT<MainWindow>
{
    winrt::MUCSB::SystemBackdropConfiguration m_configuration{ nullptr };
    winrt::MUCSB::MicaController m_backdropController{ nullptr };
    winrt::MUX::Window::Activated_revoker m_activatedRevoker;
    winrt::MUX::Window::Closed_revoker m_closedRevoker;
    winrt::MUX::FrameworkElement::ActualThemeChanged_revoker m_themeChangedRevoker;
    winrt::MUX::FrameworkElement m_rootElement{ nullptr };
    winrt::WS::DispatcherQueueController m_dispatcherQueueController{ nullptr };

    MainWindow::MainWindow()
    {
        InitializeComponent();

        SetBackground();

        m_closedRevoker = this->Closed(winrt::auto_revoke, [&](auto&&, auto&&)
        {
            if (nullptr != m_backdropController)
            {
                m_backdropController.Close();
                m_backdropController = nullptr;
            }

            if (nullptr != m_dispatcherQueueController)
            {
                m_dispatcherQueueController.ShutdownQueueAsync();
                m_dispatcherQueueController = nullptr;
            }
        });
    }

    void SetBackground()
    {
        if (winrt::MUCSB::MicaController::IsSupported())
        {
            // We ensure that there is a Windows.System.DispatcherQueue on the current thread.
            // Always check if one already exists before attempting to create a new one.
            if (nullptr == winrt::WS::DispatcherQueue::GetForCurrentThread() &&
                nullptr == m_dispatcherQueueController)
            {
                m_dispatcherQueueController = CreateSystemDispatcherQueueController();
            }

            // Setup the SystemBackdropConfiguration object.
            SetupSystemBackdropConfiguration();

            // Setup Mica on the current Window.
            m_backdropController = winrt::MUCSB::MicaController();
            m_backdropController.SetSystemBackdropConfiguration(m_configuration);
            m_backdropController.AddSystemBackdropTarget(
                this->m_inner.as<winrt::MUC::ICompositionSupportsSystemBackdrop>());
        }
        else
        {
            // The backdrop material is not supported.
        }
    }

    winrt::WS::DispatcherQueueController CreateSystemDispatcherQueueController()
    {
        DispatcherQueueOptions options
        {
            sizeof(DispatcherQueueOptions),
            DQTYPE_THREAD_CURRENT,
            DQTAT_COM_NONE
        };

        ::ABI::Windows::System::IDispatcherQueueController* ptr{ nullptr };
        winrt::check_hresult(CreateDispatcherQueueController(options, &ptr));
        return { ptr, take_ownership_from_abi };
    }

    void SetupSystemBackdropConfiguration()
    {
        m_configuration = winrt::MUCSB::SystemBackdropConfiguration();

        // Activation state.
        m_activatedRevoker = this->Activated(winrt::auto_revoke,
            [&](auto&&, MUX::WindowActivatedEventArgs const& args)
            {
                m_configuration.IsInputActive(
                    winrt::MUX::WindowActivationState::Deactivated != args.WindowActivationState());
            });

        // Initial state.
        m_configuration.IsInputActive(true);

        // Application theme.
        m_rootElement = this->Content().try_as<winrt::MUX::FrameworkElement>();
        if (nullptr != m_rootElement)
        {
            m_themeChangedRevoker = m_rootElement.ActualThemeChanged(winrt::auto_revoke,
                [&](auto&&, auto&&)
                {
                    m_configuration.Theme(
                        ConvertToSystemBackdropTheme(m_rootElement.ActualTheme()));
                });

            // Initial state.
            m_configuration.Theme(
                ConvertToSystemBackdropTheme(m_rootElement.ActualTheme()));
        }
    }

    winrt::MUCSB::SystemBackdropTheme ConvertToSystemBackdropTheme(
        winrt::MUX::ElementTheme const& theme)
    {
        switch (theme)
        {
        case winrt::MUX::ElementTheme::Dark:
            return winrt::MUCSB::SystemBackdropTheme::Dark;
        case winrt::MUX::ElementTheme::Light:
            return winrt::MUCSB::SystemBackdropTheme::Light;
        default:
            return winrt::MUCSB::SystemBackdropTheme::Default;
        }
    }
    ...
};
...
Related articles
Samarbejd med os på GitHub
Kilden til dette indhold kan findes på GitHub, hvor du også kan oprette og gennemse problemer og pullanmodninger. Du kan få flere oplysninger i vores vejledning til bidragydere.

Windows developer