Erstellen einer Datenquelle (Android SDK)
Daten werden vom Azure Maps Android SDK in Datenquellen gespeichert. Die Verwendung von Datenquellen optimiert die Datenvorgänge zum Abfragen und Rendern. Derzeit gibt es zwei Arten von Datenquellen:
- GeoJSON-Quelle: Dient für die lokale Verwaltung von Standortrohdaten im GeoJSON-Format. Sie ist geeignet für kleine bis mittlere Datasets (mit mehr als Hunderttausenden Formen).
- Vektorkachelquelle: Lädt Daten, die als Vektorkacheln für die aktuelle Kartenansicht formatiert sind, basierend auf dem Kartenkachelsystem. Sie eignet sich ideal für große bis sehr große Datasets (Millionen oder Milliarden Formen).
Hinweis
Auslauf des Azure Maps Android SDK
Das Azure Maps Native SDK für Android ist jetzt veraltet und wird am 31.03.2025 eingestellt. Um Dienstunterbrechungen zu vermeiden, migrieren Sie bis zum 31.03.2025 zum Azure Maps Web SDK. Weitere Informationen finden Sie im Migrationshandbuch zum Azure Maps iOS SDK.
GeoJSON-Datenquelle
Azure Maps verwendet GeoJSON als eines der primären Datenmodelle. GeoJSON ist eine offene standardmäßige Geomethode zum Darstellen räumlicher Daten im JSON-Format. Mit den im Azure Maps Android SDK verfügbaren GeoJSON-Klassen lassen sich GeoJSON-Daten auf einfache Weise erstellen und serialisieren. Laden und speichern Sie GeoJSON-Daten in der DataSource-Klasse, und rendern Sie diese mithilfe von Ebenen. Der folgende Code veranschaulicht, wie GeoJSON-Objekte in Azure Maps erstellt werden können.
/*
    Raw GeoJSON feature

    {
         "type": "Feature",
         "geometry": {
             "type": "Point",
             "coordinates": [-100, 45]
         },
         "properties": {
             "custom-property": "value"
         }
    }

*/

//Create a point feature.
Feature feature = Feature.fromGeometry(Point.fromLngLat(-100, 45));

//Add a property to the feature.
feature.addStringProperty("custom-property", "value");

//Add the feature to the data source.
source.add(feature);
/*
    Raw GeoJSON feature

    {
         "type": "Feature",
         "geometry": {
             "type": "Point",
             "coordinates": [-100, 45]
         },
         "properties": {
             "custom-property": "value"
         }
    }

*/

//Create a point feature.
val feature = Feature.fromGeometry(Point.fromLngLat(-100, 45))

//Add a property to the feature.
feature.addStringProperty("custom-property", "value")

//Add the feature to the data source.
source.add(feature)
Tipp
GeoJSON-Daten können einer DataSource-Instanz mit einer von drei Methoden hinzugefügt werden: add, importDataFromUrl und setShapes. Die setShapes-Methode bietet eine effiziente Möglichkeit, alle Daten in einer Datenquelle zu überschreiben. Wenn Sie die Methoden clear und add aufrufen, um alle Daten in einer Datenquelle zu ersetzen, werden zwei Renderaufrufe an die Karte gesendet. Die setShape-Methode löscht die Daten und fügt sie der Datenquelle mit einem einzigen Renderaufruf an die Karte hinzu.
Alternativ dazu können die Eigenschaften zuerst in ein JsonObject geladen und dann bei der Erstellung an das Feature übergeben werden, wie im folgenden Beispielcode gezeigt.
//Create a JsonObject to store properties for the feature.
JsonObject properties = new JsonObject();
properties.addProperty("custom-property", "value");

Feature feature = Feature.fromGeometry(Point.fromLngLat(-100, 45), properties);
//Create a JsonObject to store properties for the feature.
val properties = JsonObject()
properties.addProperty("custom-property", "value")

val feature = Feature.fromGeometry(Point.fromLngLat(-100, 45), properties)
Nachdem Sie ein GeoJSON-Feature erstellt haben, kann der Karte mithilfe der sources-Eigenschaft der Karte eine Datenquelle hinzugefügt werden. Der folgende Code zeigt, wie Sie eine Datenquelle (DataSource) erstellen, der Karte hinzufügen und dann der Datenquelle ein Feature hinzufügen.
//Create a data source and add it to the map.
DataSource source = new DataSource();
map.sources.add(source);

//Add GeoJSON feature to the data source.
source.add(feature);
Der folgende Code zeigt verschiedene Möglichkeiten, GeoJSON-Features, FeatureCollection und Geometrien zu erstellen.
//GeoJSON Point Geometry
Point point = Point.fromLngLat(LONGITUDE, LATITUDE);

//GeoJSON Point Geometry
LineString linestring = LineString.fromLngLats(PointList);

//GeoJSON Polygon Geometry
Polygon polygon = Polygon.fromLngLats(listOfPointList);

Polygon polygonFromOuterInner = Polygon.fromOuterInner(outerLineStringObject,innerLineStringObject);

//GeoJSON MultiPoint Geometry
MultiPoint multiPoint = MultiPoint.fromLngLats(PointList);

//GeoJSON MultiLineString Geometry
MultiLineString multiLineStringFromLngLat = MultiLineString.fromLngLats(listOfPointList);

MultiLineString multiLineString = MultiLineString.fromLineString(singleLineString);

//GeoJSON MultiPolygon Geometry
MultiPolygon multiPolygon = MultiPolygon.fromLngLats(listOflistOfPointList);

MultiPolygon multiPolygonFromPolygon = MultiPolygon.fromPolygon(polygon);

MultiPolygon multiPolygonFromPolygons = MultiPolygon.fromPolygons(PolygonList);

//GeoJSON Feature
Feature pointFeature = Feature.fromGeometry(Point.fromLngLat(LONGITUDE, LATITUDE));

//GeoJSON FeatureCollection
FeatureCollection featureCollectionFromSingleFeature = FeatureCollection.fromFeature(pointFeature);

FeatureCollection featureCollection = FeatureCollection.fromFeatures(listOfFeatures);
//GeoJSON Point Geometry
val point = Point.fromLngLat(LONGITUDE, LATITUDE)

//GeoJSON Point Geometry
val linestring = LineString.fromLngLats(PointList)

//GeoJSON Polygon Geometry
val polygon = Polygon.fromLngLats(listOfPointList)

val polygonFromOuterInner = Polygon.fromOuterInner(outerLineStringObject, innerLineStringObject)

//GeoJSON MultiPoint Geometry
val multiPoint = MultiPoint.fromLngLats(PointList)

//GeoJSON MultiLineString Geometry
val multiLineStringFromLngLat = MultiLineString.fromLngLats(listOfPointList)

val multiLineString = MultiLineString.fromLineString(singleLineString)

//GeoJSON MultiPolygon Geometry
val multiPolygon = MultiPolygon.fromLngLats(listOflistOfPointList)

val multiPolygonFromPolygon = MultiPolygon.fromPolygon(polygon)

val multiPolygonFromPolygons = MultiPolygon.fromPolygons(PolygonList)

//GeoJSON Feature
val pointFeature = Feature.fromGeometry(Point.fromLngLat(LONGITUDE, LATITUDE))

//GeoJSON FeatureCollection
val featureCollectionFromSingleFeature = FeatureCollection.fromFeature(pointFeature)

val featureCollection = FeatureCollection.fromFeatures(listOfFeatures)
Serialisieren und Deserialisieren von GeoJSON
Die FeatureCollection-, Feature- und Geometry-Klassen verfügen alle über eine statische fromJson()-Methode und toJson()-Methode, die die Serialisierung unterstützen. Die formatierte gültige JSON-Zeichenfolge, die über die fromJson()-Methode übergeben wird, erstellt das geometry-Objekt. Diese fromJson()-Methode bietet auch die Möglichkeit, Gson oder andere Serialisierungs-/Deserialisierungsstrategien zu verwenden. Der folgende Code zeigt, wie Sie ein in eine Zeichenfolge umgewandeltes GeoJSON-Feature in die Feature-Klasse deserialisieren und anschließend wieder in eine GeoJSON-Zeichenfolge serialisieren.
//Take a stringified GeoJSON object.
String GeoJSON_STRING = "{"
    + "      \"type\": \"Feature\","
    + "      \"geometry\": {"
    + "            \"type\": \"Point\""
    + "            \"coordinates\": [-100, 45]"
    + "      },"
    + "      \"properties\": {"
    + "            \"custom-property\": \"value\""
    + "      },"
    + "}";

//Deserialize the JSON string into a feature.
Feature feature = Feature.fromJson(GeoJSON_STRING);

//Serialize a feature collection to a string.
String featureString = feature.toJson();
//Take a stringified GeoJSON object.
val GeoJSON_STRING = ("{"
        + "      \"type\": \"Feature\","
        + "      \"geometry\": {"
        + "            \"type\": \"Point\""
        + "            \"coordinates\": [-100, 45]"
        + "      },"
        + "      \"properties\": {"
        + "            \"custom-property\": \"value\""
        + "      },"
        + "}")

//Deserialize the JSON string into a feature.
val feature = Feature.fromJson(GeoJSON_STRING)

//Serialize a feature collection to a string.
val featureString = feature.toJson()
Importieren von GeoJSON-Daten aus dem Web oder einem Ressourcenordner
Die meisten GeoJSON-Dateien enthalten FeatureCollection. GeoJSON-Dateien sollten als Zeichenfolgen gelesen und mit der FeatureCollection.fromJson-Methode deserialisiert werden.
Die DataSource-Klasse verfügt über eine integrierte Methode namens importDataFromUrl, die GeoJSON-Dateien über eine URL in eine Datei im Web oder im asset-Ordner laden kann. Diese Methode muss aufgerufen werden, bevor die Datenquelle zur Karte hinzugefügt wird.
zone_pivot_groups: azure-maps-android
//Create a data source and add it to the map.
DataSource source = new DataSource();

//Import the geojson data and add it to the data source.
source.importDataFromUrl("URL_or_FilePath_to_GeoJSON_data");

//Examples:
//source.importDataFromUrl("asset://sample_file.json");
//source.importDataFromUrl("https://example.com/sample_file.json");

//Add data source to the map.
map.sources.add(source);
//Create a data source and add it to the map.
var source = new DataSource()

//Import the geojson data and add it to the data source.
source.importDataFromUrl("URL_or_FilePath_to_GeoJSON_data")

//Examples:
//source.importDataFromUrl("asset://sample_file.json")
//source.importDataFromUrl("https://example.com/sample_file.json")

//Add data source to the map.
map.sources.add(source)
Die importDataFromUrl-Methode ist eine einfache Möglichkeit, einen GeoJSON-Feed in eine Datenquelle zu laden, bietet jedoch nur eingeschränkte Kontrolle darüber, wie die Daten geladen werden und was nach dem Laden der Daten geschieht. Der folgende Code stellt eine wiederverwendbare Klasse dar, mit der Daten aus dem Web oder aus dem Ressourcenordner importiert und über eine Rückruffunktion an den Benutzeroberflächenthread zurückgegeben werden können. Fügen Sie als Nächstes weitere Postload-Logik in den Callback ein, um die Daten zu verarbeiten, sie der Karte hinzuzufügen, ihren Begrenzungsrahmen zu berechnen und die Kamera der Karte zu aktualisieren.
import android.content.Context;
import android.os.Handler;
import android.os.Looper;
import android.webkit.URLUtil;

import java.io.BufferedReader;
import java.io.IOException;
import java.io.InputStream;
import java.io.InputStreamReader;
import java.net.URL;
import java.util.concurrent.ExecutorService;
import java.util.concurrent.Executors;

import javax.net.ssl.HttpsURLConnection;

public class Utils {

    interface SimpleCallback {
        void notify(String result);
    }

    /**
     * Imports data from a web url or asset file name and returns it to a callback.
     * @param urlOrFileName A web url or asset file name that points to data to load.
     * @param context The context of the app.
     * @param callback The callback function to return the data to.
     */
    public static void importData(String urlOrFileName, Context context, SimpleCallback callback){
        importData(urlOrFileName, context, callback, null);
    }

    /**
     * Imports data from a web url or asset file name and returns it to a callback.
     * @param urlOrFileName A web url or asset file name that points to data to load.
     * @param context The context of the app.
     * @param callback The callback function to return the data to.
     * @param error A callback function to return errors to.
     */
    public static void importData(String urlOrFileName, Context context, SimpleCallback callback, SimpleCallback error){
        if(urlOrFileName != null && callback != null) {
            ExecutorService executor = Executors.newSingleThreadExecutor();
            Handler handler = new Handler(Looper.getMainLooper());

            executor.execute(() -> {
                String data = null;

                try {

                    if(URLUtil.isNetworkUrl(urlOrFileName)){
                        data = importFromWeb(urlOrFileName);
                    } else {
                        //Assume file is in assets folder.
                        data = importFromAssets(context, urlOrFileName);
                    }

                    final String result = data;

                    handler.post(() -> {
                        //Ensure the resulting data string is not null or empty.
                        if (result != null && !result.isEmpty()) {
                            callback.notify(result);
                        } else {
                            error.notify("No data imported.");
                        }
                    });
                } catch(Exception e) {
                    if(error != null){
                        error.notify(e.getMessage());
                    }
                }
            });
        }
    }

    /**
     * Imports data from an assets file as a string.
     * @param context The context of the app.
     * @param fileName The asset file name.
     * @return
     * @throws IOException
     */
    private static String importFromAssets(Context context, String fileName) throws IOException {
        InputStream stream = null;

        try {
            stream = context.getAssets().open(fileName);

            if(stream != null) {
                return readStreamAsString(stream);
            }
        } catch (Exception e) {
            e.printStackTrace();
        } finally {
            // Close Stream and disconnect HTTPS connection.
            if (stream != null) {
                stream.close();
            }
        }

        return null;
    }

    /**
     * Imports data from the web as a string.
     * @param url URL to the data.
     * @return
     * @throws IOException
     */
    private static String importFromWeb(String url) throws IOException {
        InputStream stream = null;
        HttpsURLConnection connection = null;
        String result = null;

        try {
            connection = (HttpsURLConnection) new URL(url).openConnection();

            //For this use case, set HTTP method to GET.
            connection.setRequestMethod("GET");

            //Open communications link (network traffic occurs here).
            connection.connect();

            int responseCode = connection.getResponseCode();
            if (responseCode != HttpsURLConnection.HTTP_OK) {
                throw new IOException("HTTP error code: " + responseCode);
            }

            //Retrieve the response body as an InputStream.
            stream = connection.getInputStream();

            if (stream != null) {
                return readStreamAsString(stream);
            }
        } catch (Exception e) {
            e.printStackTrace();
        } finally {
            // Close Stream and disconnect HTTPS connection.
            if (stream != null) {
                stream.close();
            }
            if (connection != null) {
                connection.disconnect();
            }
        }

        return result;
    }

    /**
     * Reads an input stream as a string.
     * @param stream Stream to convert.
     * @return
     * @throws IOException
     */
    private static String readStreamAsString(InputStream stream) throws IOException {
        //Convert the contents of an InputStream to a String.
        BufferedReader in = new BufferedReader(new InputStreamReader(stream, "UTF-8"));

        String inputLine;
        StringBuffer response = new StringBuffer();

        while ((inputLine = in.readLine()) != null) {
            response.append(inputLine);
        }

        in.close();

        return response.toString();
    }
}
import android.content.Context
import android.os.Handler
import android.os.Looper
import android.webkit.URLUtil
import java.net.URL
import java.util.concurrent.ExecutorService
import java.util.concurrent.Executors

class Utils {
    companion object {

        /**
            * Imports data from a web url or asset file name and returns it to a callback.
            * @param urlOrFileName A web url or asset file name that points to data to load.
            * @param context The context of the app.
            * @param callback The callback function to return the data to.
            */
        fun importData(urlOrFileName: String?, context: Context, callback: (String?) -> Unit) {
            importData(urlOrFileName, context, callback, null)
        }

        /**
            * Imports data from a web url or asset file name and returns it to a callback.
            * @param urlOrFileName A web url or asset file name that points to data to load.
            * @param context The context of the app.
            * @param callback The callback function to return the data to.
            * @param error A callback function to return errors to.
            */
        public fun importData(urlOrFileName: String?, context: Context, callback: (String?) -> Unit, error: ((String?) -> Unit)?) {
            if (urlOrFileName != null && callback != null) {
                val executor: ExecutorService = Executors.newSingleThreadExecutor()
                val handler = Handler(Looper.getMainLooper())
                executor.execute {
                    var data: String? = null

                    try {
                        data = if (URLUtil.isNetworkUrl(urlOrFileName)) {
                            URL(urlOrFileName).readText()
                        } else { //Assume file is in assets folder.
                            context.assets.open(urlOrFileName).bufferedReader().use{
                                it.readText()
                            }
                        }

                        handler.post {
                            //Ensure the resulting data string is not null or empty.
                            if (data != null && !data.isEmpty()) {
                                callback(data)
                            } else {
                                error!!("No data imported.")
                            }
                        }
                    } catch (e: Exception) {
                        error!!(e.message)
                    }
                }
            }
        }
    }
}
Der folgende Code zeigt, wie Sie mit diesem Hilfsprogramm GeoJSON-Daten als Zeichenfolge importieren und über einen Rückruf an den Benutzeroberflächenthread zurückgeben. Im Rückruf können die Zeichenfolgendaten in eine GeoJSON-Featuresammlung serialisiert und der Datenquelle hinzugefügt werden. Aktualisieren Sie optional die Kartenkamera, um den Fokus auf die Daten zu richten.
//Create a data source and add it to the map.
DataSource source = new DataSource();
map.sources.add(source);

//Import the geojson data and add it to the data source.
Utils.importData("URL_or_FilePath_to_GeoJSON_data",
    this,
    (String result) -> {
        //Parse the data as a GeoJSON Feature Collection.
        FeatureCollection fc = FeatureCollection.fromJson(result);

        //Add the feature collection to the data source.
        source.add(fc);

        //Optionally, update the maps camera to focus in on the data.

        //Calculate the bounding box of all the data in the Feature Collection.
        BoundingBox bbox = MapMath.fromData(fc);

        //Update the maps camera so it is focused on the data.
        map.setCamera(
            bounds(bbox),
            padding(20));
    });
//Create a data source and add it to the map.
DataSource source = new DataSource();
map.sources.add(source);

//Import the GeoJSON data and add it to the data source.
Utils.importData("SamplePoiDataSet.json", this) {
    result: String? ->
        //Parse the data as a GeoJSON Feature Collection.
            val fc = FeatureCollection.fromJson(result!!)

        //Add the feature collection to the data source.
        source.add(fc)

        //Optionally, update the maps camera to focus in on the data.

        //Calculate the bounding box of all the data in the Feature Collection.
        val bbox = MapMath.fromData(fc);

        //Update the maps camera so it is focused on the data.
        map.setCamera(
            bounds(bbox),

            //Padding added to account for pixel size of rendered points.
            padding(20)
        )
    }
Aktualisieren eines Features
Die DataSource-Klasse vereinfacht das Hinzufügen und Entfernen von Features. Zum Aktualisieren der Geometrie oder Eigenschaften eines Features muss das Feature in der Datenquelle ersetzt werden. Es gibt zwei Methoden, die zum Aktualisieren von Features verwendet werden können:
- Erstellen Sie die neuen Features mit den gewünschten Aktualisierungen, und ersetzen Sie alle Features in der Datenquelle mithilfe der
setShapes-Methode. Diese Methode funktioniert gut, wenn Sie alle Features in einer Datenquelle aktualisieren möchten.
DataSource source;

private void onReady(AzureMap map) {
    //Create a data source and add it to the map.
    source = new DataSource();
    map.sources.add(source);

    //Create a feature and add it to the data source.
    Feature myFeature = Feature.fromGeometry(Point.fromLngLat(0,0));
    myFeature.addStringProperty("Name", "Original value");

    source.add(myFeature);
}

private void updateFeature(){
    //Create a new replacement feature with an updated geometry and property value.
    Feature myNewFeature = Feature.fromGeometry(Point.fromLngLat(-10, 10));
    myNewFeature.addStringProperty("Name", "New value");

    //Replace all features to the data source with the new one.
    source.setShapes(myNewFeature);
}
var source: DataSource? = null

private fun onReady(map: AzureMap) {
    //Create a data source and add it to the map.
    source = DataSource()
    map.sources.add(source)

    //Create a feature and add it to the data source.
    val myFeature = Feature.fromGeometry(Point.fromLngLat(0.0, 0.0))
    myFeature.addStringProperty("Name", "Original value")
    source!!.add(myFeature)
}

private fun updateFeature() {
    //Create a new replacement feature with an updated geometry and property value.
    val myNewFeature = Feature.fromGeometry(Point.fromLngLat(-10.0, 10.0))
    myNewFeature.addStringProperty("Name", "New value")

    //Replace all features to the data source with the new one.
    source!!.setShapes(myNewFeature)
}
- Verfolgen Sie die Featureinstanz in einer Variablen, und übergeben Sie sie an die Datenquellenmethode
remove, um sie zu entfernen. Erstellen Sie die neuen Features mit den gewünschten Aktualisierungen, aktualisieren Sie den Variablenverweis, und fügen Sie ihn der Datenquelle mithilfe deradd-Methode hinzu.
DataSource source;
Feature myFeature;

private void onReady(AzureMap map) {
    //Create a data source and add it to the map.
    source = new DataSource();
    map.sources.add(source);

    //Create a feature and add it to the data source.
    myFeature = Feature.fromGeometry(Point.fromLngLat(0,0));
    myFeature.addStringProperty("Name", "Original value");

    source.add(myFeature);
}

private void updateFeature(){
    //Remove the feature instance from the data source.
    source.remove(myFeature);

    //Get properties from original feature.
    JsonObject props = myFeature.properties();

    //Update a property.
    props.addProperty("Name", "New value");

    //Create a new replacement feature with an updated geometry.
    myFeature = Feature.fromGeometry(Point.fromLngLat(-10, 10), props);

    //Re-add the feature to the data source.
    source.add(myFeature);
}
var source: DataSource? = null
var myFeature: Feature? = null

private fun onReady(map: AzureMap) {
    //Create a data source and add it to the map.
    source = DataSource()
    map.sources.add(source)

    //Create a feature and add it to the data source.
    myFeature = Feature.fromGeometry(Point.fromLngLat(0.0, 0.0))
    myFeature.addStringProperty("Name", "Original value")
    source!!.add(myFeature)
}

private fun updateFeature() {
    //Remove the feature instance from the data source.
    source!!.remove(myFeature)

    //Get properties from original feature.
    val props = myFeature!!.properties()

    //Update a property.
    props!!.addProperty("Name", "New value")

    //Create a new replacement feature with an updated geometry.
    myFeature = Feature.fromGeometry(Point.fromLngLat(-10.0, 10.0), props)

    //Re-add the feature to the data source.
    source!!.add(myFeature)
}
Tipp
Wenn Sie einige Daten haben, die regelmäßig aktualisiert werden, und andere Daten, die selten geändert werden, sollten Sie diese in separate Datenquelleninstanzen aufteilen. Wenn eine Aktualisierung in einer Datenquelle auftritt, zwingt dies die Karte, alle Features in der Datenquelle neu zu zeichnen. Durch Aufteilen dieser Daten würden nur die Features, die regelmäßig aktualisiert werden, neu gezeichnet, wenn eine Aktualisierung in dieser einen Datenquelle auftritt, während die Features in der anderen Datenquelle nicht neu gezeichnet werden müssten. Dies verbessert die Leistung.
Vektorkachelquelle
Eine Vektorkachelquelle beschreibt, wie auf eine Vektorkachelebene zugegriffen wird. Verwenden Sie die VectorTileSource-Klasse, um eine Vektorkachelquelle zu instanziieren. Vektorkachelebenen ähneln Kachelebenen, sind aber nicht identisch. Eine Kachelebene ist ein Rasterbild. Vektorkachelebenen sind komprimierte Dateien und liegen im Format PBF vor. Diese komprimierte Datei enthält Vektorkartendaten und eine oder mehrere Ebenen. Die Datei kann auf dem Client gerendert und formatiert werden, basierend auf dem Stil jeder einzelnen Ebene. Die Daten in einer Vektorkachel enthalten geografische Merkmale in Form von Punkten, Linien und Polygonen. Vektorkachelebenen haben gegenüber Rasterkachelebenen mehrere Vorteile:
- Eine Dateigröße einer Vektorkachel ist in der Regel wesentlich kleiner als eine vergleichbare Rasterkachel. Somit wird auch weniger Bandbreite verwendet. Dies bedeutet geringere Wartezeiten, eine schnellere Karte und eine bessere Benutzererfahrung.
- Da Vektorkacheln auf dem Client gerendert werden, passen sie sich an die Auflösung des Geräts an, auf dem sie angezeigt werden. Hieraus resultiert, dass die gerenderten Karten definierter und mit sehr klaren Bezeichnungen dargestellt werden.
- Um den Stil der Daten in den Vektorkarten zu ändern, müssen Sie die Daten nicht erneut herunterladen, da der neue Stil auf den Client angewendet werden kann. Im Gegensatz dazu erfordert das Ändern des Stils einer Rasterkachelebene in der Regel das Laden von Kacheln vom Server und das anschließende Anwenden des neuen Stils.
- Da die Daten in Vektorform bereitgestellt werden, ist zur Aufbereitung der Daten weniger serverseitige Verarbeitung erforderlich. Als Folge hieraus können die neueren Daten schneller zur Verfügung gestellt werden.
Azure Maps hält den offenen Standard Mapbox Vector Tile Specification ein. Azure Maps bietet als Teil der Plattform die folgenden Dienste für Vektorkacheln an:
- Straßenkacheln
- Verkehrsstörungen
- Datenverkehrsfluss
- In Azure Maps Creator können Sie über die API Rendern – Kartenkachel abrufen auch benutzerdefinierte Vektorkacheln erstellen und auf diese zugreifen
Tipp
Wenn Sie Vektor- oder Rasterbildkacheln des Azure Maps-Renderdiensts mit dem Web-SDK verwenden, können Sie atlas.microsoft.com durch den Platzhalter azmapsdomain.invalid ersetzen. Dieser Platzhalter wird durch dieselbe Domäne ersetzt, die von der Karte verwendet wird, und automatisch an dieselben Authentifizierungsdetails angefügt. Dies vereinfacht die Authentifizierung beim Renderingdienst bei Verwendung der Microsoft Entra-Authentifizierung erheblich.
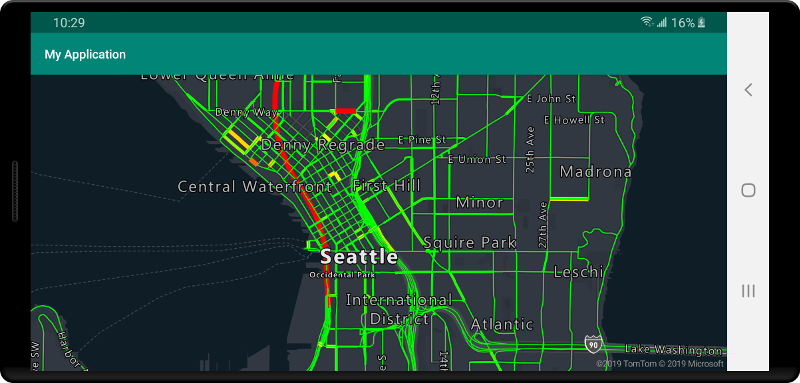
Um Daten aus einer Vektorkachelquelle auf der Karte anzuzeigen, verbinden Sie die Quelle mit einer der Datenrenderingebenen. Für alle Ebenen, die eine Vektorquelle verwenden, muss in den Optionen einen sourceLayer-Wert angegeben sein. Der folgende Code lädt den Azure Maps-Vektorkacheldienst für den Verkehrsfluss als Vektorkachelquelle und zeigt den Vektor dann auf einer Linienebene auf einer Karte an. Diese Vektorkachelquelle verfügt über einen einzigen Datensatz in der Quellebene namens „Verkehrsfluss“. Die Liniendaten in diesem Dataset besitzen eine Eigenschaft namens traffic_level, die in diesem Code zum Auswählen der Farbe und Skalieren der Linienstärke verwendet wird.
//Formatted URL to the traffic flow vector tiles, with the maps subscription key appended to it.
String trafficFlowUrl = "https://azmapsdomain.invalid/traffic/flow/tile/pbf?api-version=1.0&style=relative&zoom={z}&x={x}&y={y}";

//Create a vector tile source and add it to the map.
VectorTileSource source = new VectorTileSource(
    tiles(new String[] { trafficFlowUrl }),
    maxSourceZoom(22)
);
map.sources.add(source);

//Create a layer for traffic flow lines.
LineLayer layer = new LineLayer(source,
    //The name of the data layer within the data source to pass into this rendering layer.
    sourceLayer("Traffic flow"),

    //Color the roads based on the traffic_level property.
    strokeColor(
        interpolate(
            linear(),
            get("traffic_level"),
            stop(0, color(Color.RED)),
            stop(0.33, color(Color.YELLOW)),
            stop(0.66, color(Color.GREEN))
        )
    ),

    //Scale the width of roads based on the traffic_level property.
    strokeWidth(
        interpolate(
            linear(),
            get("traffic_level"),
            stop(0, 6),
            stop(1,1)
        )
    )
);

//Add the traffic flow layer below the labels to make the map clearer.
map.layers.add(layer, "labels");
//Formatted URL to the traffic flow vector tiles, with the maps subscription key appended to it.
val trafficFlowUrl = "https://azmapsdomain.invalid/traffic/flow/tile/pbf?api-version=1.0&style=relative&zoom={z}&x={x}&y={y}"

//Create a vector tile source and add it to the map.
val source = VectorTileSource(
    tiles(arrayOf(trafficFlowUrl)),
    maxSourceZoom(22)
)
map.sources.add(source)

//Create a layer for traffic flow lines.
val layer = LineLayer(
    source,  //The name of the data layer within the data source to pass into this rendering layer.
    sourceLayer("Traffic flow"),  //Color the roads based on the traffic_level property.
    strokeColor(
        interpolate(
            linear(),
            get("traffic_level"),
            stop(0, color(Color.RED)),
            stop(0.33, color(Color.YELLOW)),
            stop(0.66, color(Color.GREEN))
        )
    ),  //Scale the width of roads based on the traffic_level property.
    strokeWidth(
        interpolate(
            linear(),
            get("traffic_level"),
            stop(0, 6),
            stop(1, 1)
        )
    )
)

//Add the traffic flow layer below the labels to make the map clearer.
map.layers.add(layer, "labels")
Verbinden einer Datenquelle mit einer Ebene
Daten werden mithilfe von Renderebenen auf der Karte gerendert. Eine oder mehrere Renderingebenen können auf eine einzelne Datenquelle verweisen. Die folgenden Renderebenen erfordern eine Datenquelle:
- Blasenebene – Punktdaten werden als skalierte Kreise mit Pixelradius gerendert.
- Symbolebene – Punktdaten werden als Symbole oder Text gerendert.
- Wärmebildebene – Punktdaten werden als Dichtewärmebild gerendert.
- Linienebene – Rendert eine Linie und/oder die Kontur von Polygonen.
- Polygonebene – füllt den Bereich eines Polygons mit einer Volltonfarbe oder einem Bildmuster aus.
Der folgende Code zeigt, wie Sie eine Datenquelle erstellen, sie zur Karte hinzufügen und mit einer Blasenebene verbinden. Und dann importieren Sie GeoJSON-Punktdaten von einem Remoteort in die Datenquelle.
//Create a data source and add it to the map.
DataSource source = new DataSource();

//Import the geojson data and add it to the data source.
source.importDataFromUrl("URL_or_FilePath_to_GeoJSON_data");

//Add data source to the map.
map.sources.add(source);

//Create a layer that defines how to render points in the data source and add it to the map.
BubbleLayer layer = new BubbleLayer(source);
map.layers.add(layer);
//Create a data source and add it to the map.
val source = DataSource()

//Import the geojson data and add it to the data source.
source.importDataFromUrl("URL_or_FilePath_to_GeoJSON_data")

//Add data source to the map.
map.sources.add(source)
Es gibt zusätzliche Renderebenen, die keine Verbindung mit diesen Datenquellen herstellen, sondern die Daten zum Rendern direkt laden.
- Kachelebene – überlagert eine Rasterkachelebene oberhalb der Karte.
Eine Datenquelle mit mehreren Ebenen
Es können mehrere Ebenen mit einer Datenquelle verbunden sein. Es gibt viele verschiedene Szenarien, in denen diese Option nützlich ist. Nehmen wir als Beispiel ein Szenario, in dem ein Benutzer ein Polygon zeichnet. Wir sollten den Polygonbereich rendern und ausfüllen, während der Benutzer der Karte Punkte hinzufügt. Durch Hinzufügen einer formatierten Linie als Umriss des Polygons lassen sich die Kanten des Polygons besser erkennen, während der Benutzer ihn zeichnet. Um eine einzelne Position im Polygon bequem zu bearbeiten, können wir oberhalb von jeder Position einen Handle, z. B. eine Stecknadel oder einen Marker, hinzufügen.
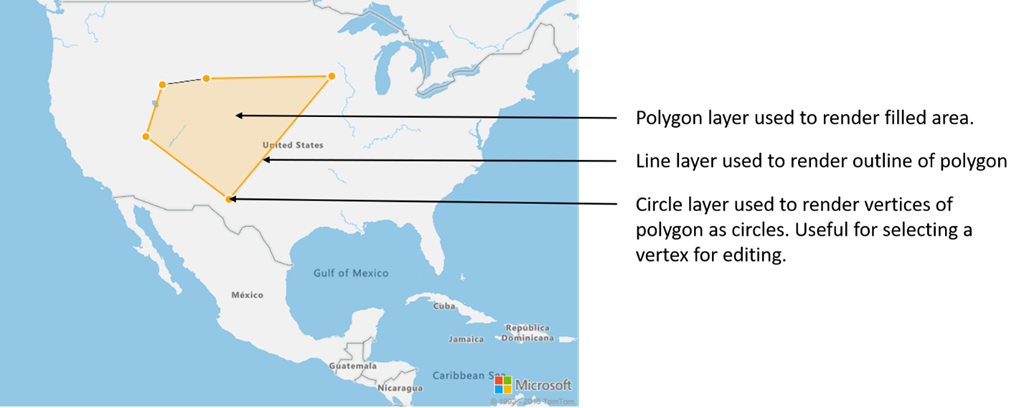
Auf den meisten Kartenplattformen müssten Sie ein Polygonobjekt, ein Linienobjekt und für jede Position auf dem Polygon eine Stecknadel erstellen. Wenn das Polygon verändert wird, müssen Sie die Linien und Pins manuell aktualisieren. Dies kann sehr schnell zu einem komplexen Vorgang werden.
Bei Azure Maps benötigen Sie nur ein einzelnes Polygon in einer Datenquelle, wie im folgenden Code gezeigt.
//Create a data source and add it to the map.
DataSource source = new DataSource();
map.sources.add(source);

//Create a polygon and add it to the data source.
source.add(Polygon.fromLngLats(/* List of points */));

//Create a polygon layer to render the filled in area of the polygon.
PolygonLayer polygonLayer = new PolygonLayer(source,
    fillColor("rgba(255,165,0,0.2)")
);

//Create a line layer for greater control of rendering the outline of the polygon.
LineLayer lineLayer = new LineLayer(source,
    strokeColor("orange"),
    strokeWidth(2f)
);

//Create a bubble layer to render the vertices of the polygon as scaled circles.
BubbleLayer bubbleLayer = new BubbleLayer(source,
    bubbleColor("orange"),
    bubbleRadius(5f),
    bubbleStrokeColor("white"),
    bubbleStrokeWidth(2f)
);

//Add all layers to the map.
map.layers.add(new Layer[] { polygonLayer, lineLayer, bubbleLayer });
//Create a data source and add it to the map.
val source = DataSource()
map.sources.add(source)

//Create a polygon and add it to the data source.
source.add(Polygon.fromLngLats())

//Create a polygon layer to render the filled in area of the polygon.
val polygonLayer = PolygonLayer(
    source,
    fillColor("rgba(255,165,0,0.2)")
)

//Create a line layer for greater control of rendering the outline of the polygon.
val lineLayer = LineLayer(
    source,
    strokeColor("orange"),
    strokeWidth(2f)
)

//Create a bubble layer to render the vertices of the polygon as scaled circles.
val bubbleLayer = BubbleLayer(
    source,
    bubbleColor("orange"),
    bubbleRadius(5f),
    bubbleStrokeColor("white"),
    bubbleStrokeWidth(2f)
)

//Add all layers to the map.
map.layers.add(arrayOf<Layer>(polygonLayer, lineLayer, bubbleLayer))
Tipp
Beim Hinzufügen von Ebenen zur Karte mithilfe der map.layers.add-Methode kann die ID oder Instanz einer vorhandenen Ebene als zweiter Parameter übergeben werden. Dadurch wird die Karte angewiesen, die neue Ebene unterhalb der vorhandenen Ebene hinzuzufügen. Mit dieser Methode wird nicht nur eine Ebenen-ID übergeben. Sie unterstützt zusätzlich die folgenden Werte.
"labels": Fügt die neue Ebene unterhalb der Kartenbezeichnungsebenen ein."transit": Fügt die neue Ebene unterhalb der Straßen- und Transitebene der Karte ein.
Nächste Schritte
In den folgenden Artikeln finden Sie weitere Codebeispiele, die Sie Ihren Karten hinzufügen können: