In dieser Schnellstartanleitung führen wir Sie durch die Einrichtung Ihrer lokalen Entwicklungsumgebung mit dem Azure AI Foundry SDK. Wir schreiben einen Prompt, führen ihn als Teil Ihres App-Codes aus, verfolgen die LLM-Aufrufe und führen eine grundlegende Auswertung der Ausgaben des LLM aus.
Tipp
Im restlichen Artikel wird gezeigt, wie Sie ein hubbasiertes Projekt verwenden. Wählen Sie das Foundry-Projekt oben in diesem Artikel aus, wenn Sie stattdessen ein Foundry-Projekt verwenden möchten.
Voraussetzungen
- Ein Azure-Abonnement. Wenn Sie kein Azure-Abonnement besitzen, können Sie ein kostenloses Konto erstellen, bevor Sie beginnen.
- Ein Hub-basiertes Projekt. Wenn Sie mit Azure AI Foundry noch nicht über ein Hub-basiertes Projekt verfügen, wählen Sie das Foundry-Projekt oben in diesem Artikel aus, um stattdessen ein Foundry-Projekt zu verwenden.
Einrichten Ihrer Entwicklungsumgebung
Einrichten Ihrer Entwicklungsumgebung
Stellen Sie sicher, dass Sie diese Pakete installieren:
pip install azure-ai-projects azure-ai-inference azure-identity
Bereitstellen eines Modells
Tipp
Da Sie den linken Bereich im Azure AI Foundry-Portal anpassen können, werden möglicherweise unterschiedliche Elemente angezeigt als in diesen Schritten. Wenn Sie nicht sehen, wonach Sie suchen, wählen Sie ... Mehr am unteren Rand des linken Bereichs.
Melden Sie sich bei Azure KI Foundry an.
Wählen Sie ein hubbasiertes Projekt aus. Wenn Sie kein Hub-basiertes Projekt haben, wählen Sie das Foundry-Projekt oben in diesem Artikel aus, um stattdessen ein Foundry-Projekt zu verwenden.
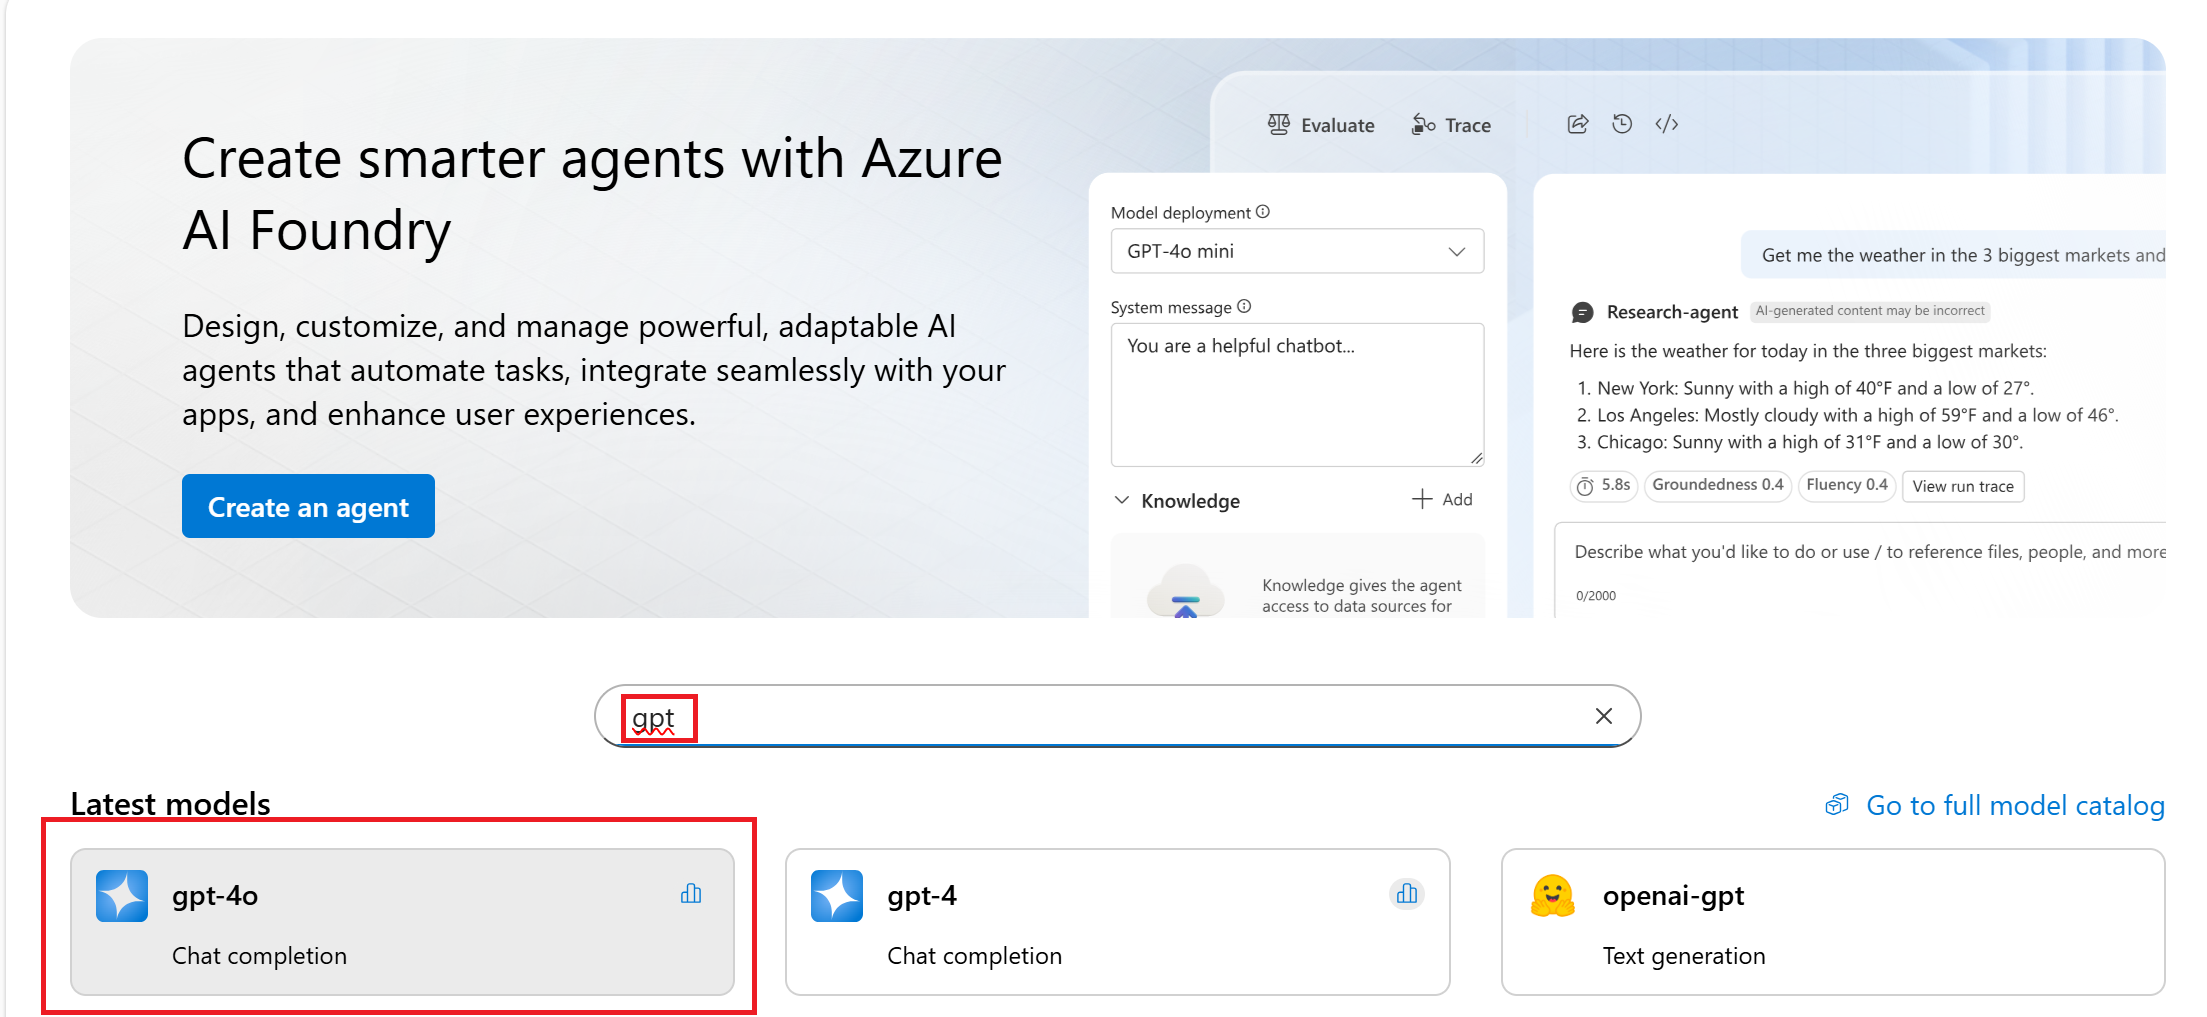
Wählen Sie im linken Bereich den Modellkatalog aus.
Wählen Sie das Modell gpt-4o-mini aus der Liste der Modelle aus. Sie können dazu die Suchleiste verwenden.
Wählen Sie auf der Modelldetailseite die Option Bereitstellen aus.
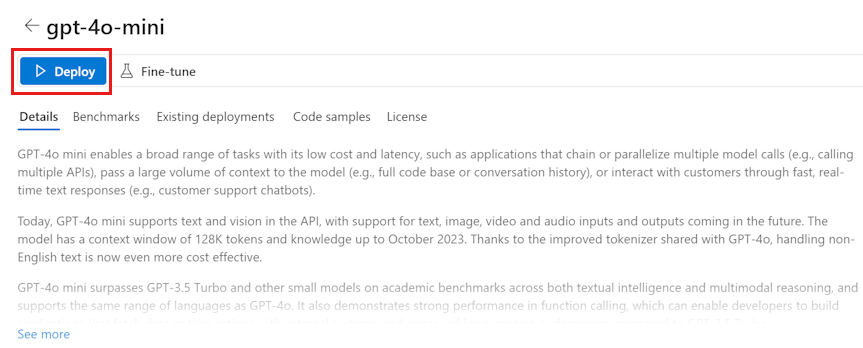
Behalten Sie den Standard-Bereitstellungsnamen bei. Klicken Sie auf Bereitstellen.
Nachdem das Modell bereitgestellt wurde, wählen Sie Im Playground öffnen aus, es zu testen.
Erstellen Ihrer Chat-App
Erstellen Sie eine Datei mit dem Namen chat.py. Kopieren Sie den folgenden Code, und fügen Sie ihn in die Datei ein:
from azure.ai.projects import AIProjectClient
from azure.identity import DefaultAzureCredential

project_connection_string = "<your-connection-string-goes-here>"

project = AIProjectClient.from_connection_string(
    conn_str=project_connection_string, credential=DefaultAzureCredential()
)

chat = project.inference.get_chat_completions_client()
response = chat.complete(
    model="gpt-4o-mini",
    messages=[
        {
            "role": "system",
            "content": "You are an AI assistant that speaks like a techno punk rocker from 2350. Be cool but not too cool. Ya dig?",
        },
        {"role": "user", "content": "Hey, can you help me with my taxes? I'm a freelancer."},
    ],
)

print(response.choices[0].message.content)
Einfügen Ihrer Verbindungszeichenfolge
Ihre Projektverbindungszeichenfolge ist erforderlich, um azure OpenAI in Azure AI Foundry Models aus Ihrem Code aufzurufen.
Suchen Sie Ihre Verbindungszeichenfolge in dem Azure KI Foundry-Projekt, das Sie im Azure KI Foundry-Playground-Schnellstart erstellt haben. Öffnen Sie das Projekt, und suchen Sie dann die Verbindungszeichenfolge auf der Seite Übersicht.
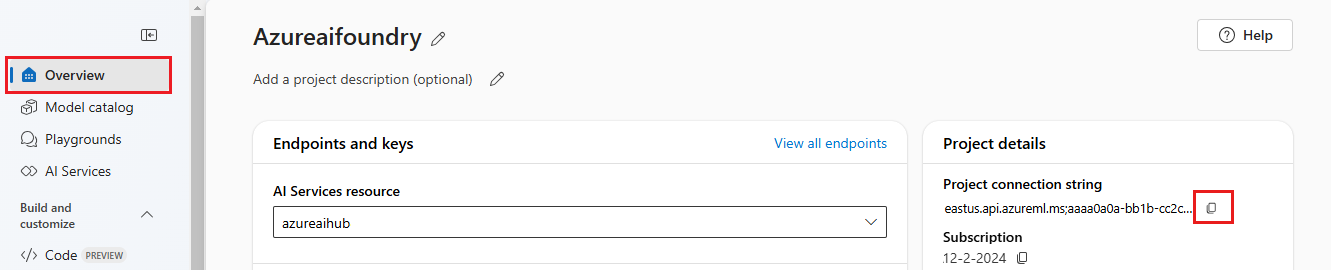
Kopieren Sie die Verbindungszeichenfolge, und ersetzen Sie <your-connection-string-goes-here> in der chat.py-Datei.
Ausführen Ihres Chatskripts
Führen Sie das Skript aus, um die Antwort des Modells anzuzeigen.
python chat.py
Das Skript verwendet hartcodierte Eingabe- und Ausgabemeldungen. In einer richtigen App verwenden Sie Eingaben aus einer Clientanwendung, generieren eine Systemmeldung mit internen Anweisungen für das Modell und rufen dann das LLM mit allen Meldungen auf.
Ändern Sie das Skript, um Eingaben aus einer Clientanwendung zu übernehmen und eine Systemmeldung mithilfe einer Promptvorlage zu generieren.
Entfernen Sie die letzte Zeile des Skripts, das eine Antwort ausgibt.
Definieren Sie nun eine get_chat_response-Funktion, die Nachrichten und Kontext übernimmt, eine Systemmeldung mithilfe einer Promptvorlage generiert und ein Modell aufruft. Fügen Sie diesen Code in Ihrer vorhandenen Datei chat.py hinzu:
from azure.ai.inference.prompts import PromptTemplate


def get_chat_response(messages, context):
    # create a prompt template from an inline string (using mustache syntax)
    prompt_template = PromptTemplate.from_string(
        prompt_template="""
        system:
        You are an AI assistant that speaks like a techno punk rocker from 2350. Be cool but not too cool. Ya dig? Refer to the user by their first name, try to work their last name into a pun.

        The user's first name is {{first_name}} and their last name is {{last_name}}.
        """
    )

    # generate system message from the template, passing in the context as variables
    system_message = prompt_template.create_messages(data=context)

    # add the prompt messages to the user messages
    return chat.complete(
        model="gpt-4o-mini",
        messages=system_message + messages,
        temperature=1,
        frequency_penalty=0.5,
        presence_penalty=0.5,
    )
Hinweis
In der Promptvorlage wird das Mustache-Format verwendet.
Die „get_chat_response“-Funktion kann einfach als Route zu einer FastAPI- oder Flask-App hinzugefügt werden, um das Aufrufen dieser Funktion über eine Front-End-Webanwendung zu ermöglichen.
Simulieren Sie nun das Übergeben von Informationen von einer Front-End-Anwendung an diese Funktion. Fügen Sie am Ende der chat.py-Datei den folgenden Code hinzu. Sie können die Meldung ändern und Ihren eigenen Namen hinzufügen.
if __name__ == "__main__":
    response = get_chat_response(
        messages=[{"role": "user", "content": "what city has the best food in the world?"}],
        context={"first_name": "Jessie", "last_name": "Irwin"},
    )
    print(response.choices[0].message.content)
Führen Sie das überarbeitete Skript aus, um die Antwort des Modells mit dieser neuen Eingabe anzuzeigen.
python chat.py
Nächster Schritt
In dieser Schnellstartanleitung verwenden Sie Azure AI Foundry für:
- Erstellen eines Projekts
- Bereitstellen eines Modells
- Ausführen einer Chatvervollständigung
- Erstellen und Ausführen eines Agents
- Hochladen von Dateien in den Agent
Das Azure AI Foundry SDK ist in mehreren Sprachen verfügbar, einschließlich Python, Java, JavaScript und C#. Diese Schnellstartanleitung enthält Anweisungen für jede dieser Sprachen.
Tipp
Der restliche Artikel zeigt, wie Sie ein Foundry-Projekt verwenden. Wählen Sie oben in diesem Artikel hubbasiertes Projekt aus, wenn Sie stattdessen ein hubbasiertes Projekt verwenden möchten.
Voraussetzungen
- Ein Azure-Abonnement. Wenn Sie kein Azure-Abonnement besitzen, können Sie ein kostenloses Konto erstellen, bevor Sie beginnen.
- Sie müssen Besitzer des Abonnements sein, um die entsprechende Zugriffssteuerung zu erhalten, die für die Verwendung Ihres Projekts erforderlich ist.
Von Bedeutung
Die in diesem Artikel markierten Elemente (Vorschau) sind aktuell als öffentliche Vorschau verfügbar. Diese Vorschauversion wird ohne Vereinbarung zum Servicelevel bereitgestellt und sollte nicht für Produktionsworkloads verwendet werden. Manche Features werden möglicherweise nicht unterstützt oder sind nur eingeschränkt verwendbar. Weitere Informationen finden Sie unter Zusätzliche Nutzungsbestimmungen für Microsoft Azure-Vorschauen.
Beginnen mit einem Projekt und Modell
Melden Sie sich beim Azure AI Foundry-Portal an.
Suchen Sie auf der Startseite, und wählen Sie dann das gpt-4o-Modell aus.
Wählen Sie auf der Seite mit den Modelldetails die Option "Dieses Modell verwenden" aus.
Geben Sie einen Namen ein, der für Ihr Projekt verwendet werden soll, und wählen Sie "Erstellen" aus.
Sobald Ihre Ressourcen erstellt wurden, befinden Sie sich im Chat-Playground.
Richten Sie Ihre Umgebung ein
Es ist keine Installation erforderlich, um das Azure AI Foundry-Portal zu verwenden.
Installieren von Python und Azure CLI
Installieren Sie diese Pakete:
pip install openai azure-ai-projects azure-identity
-
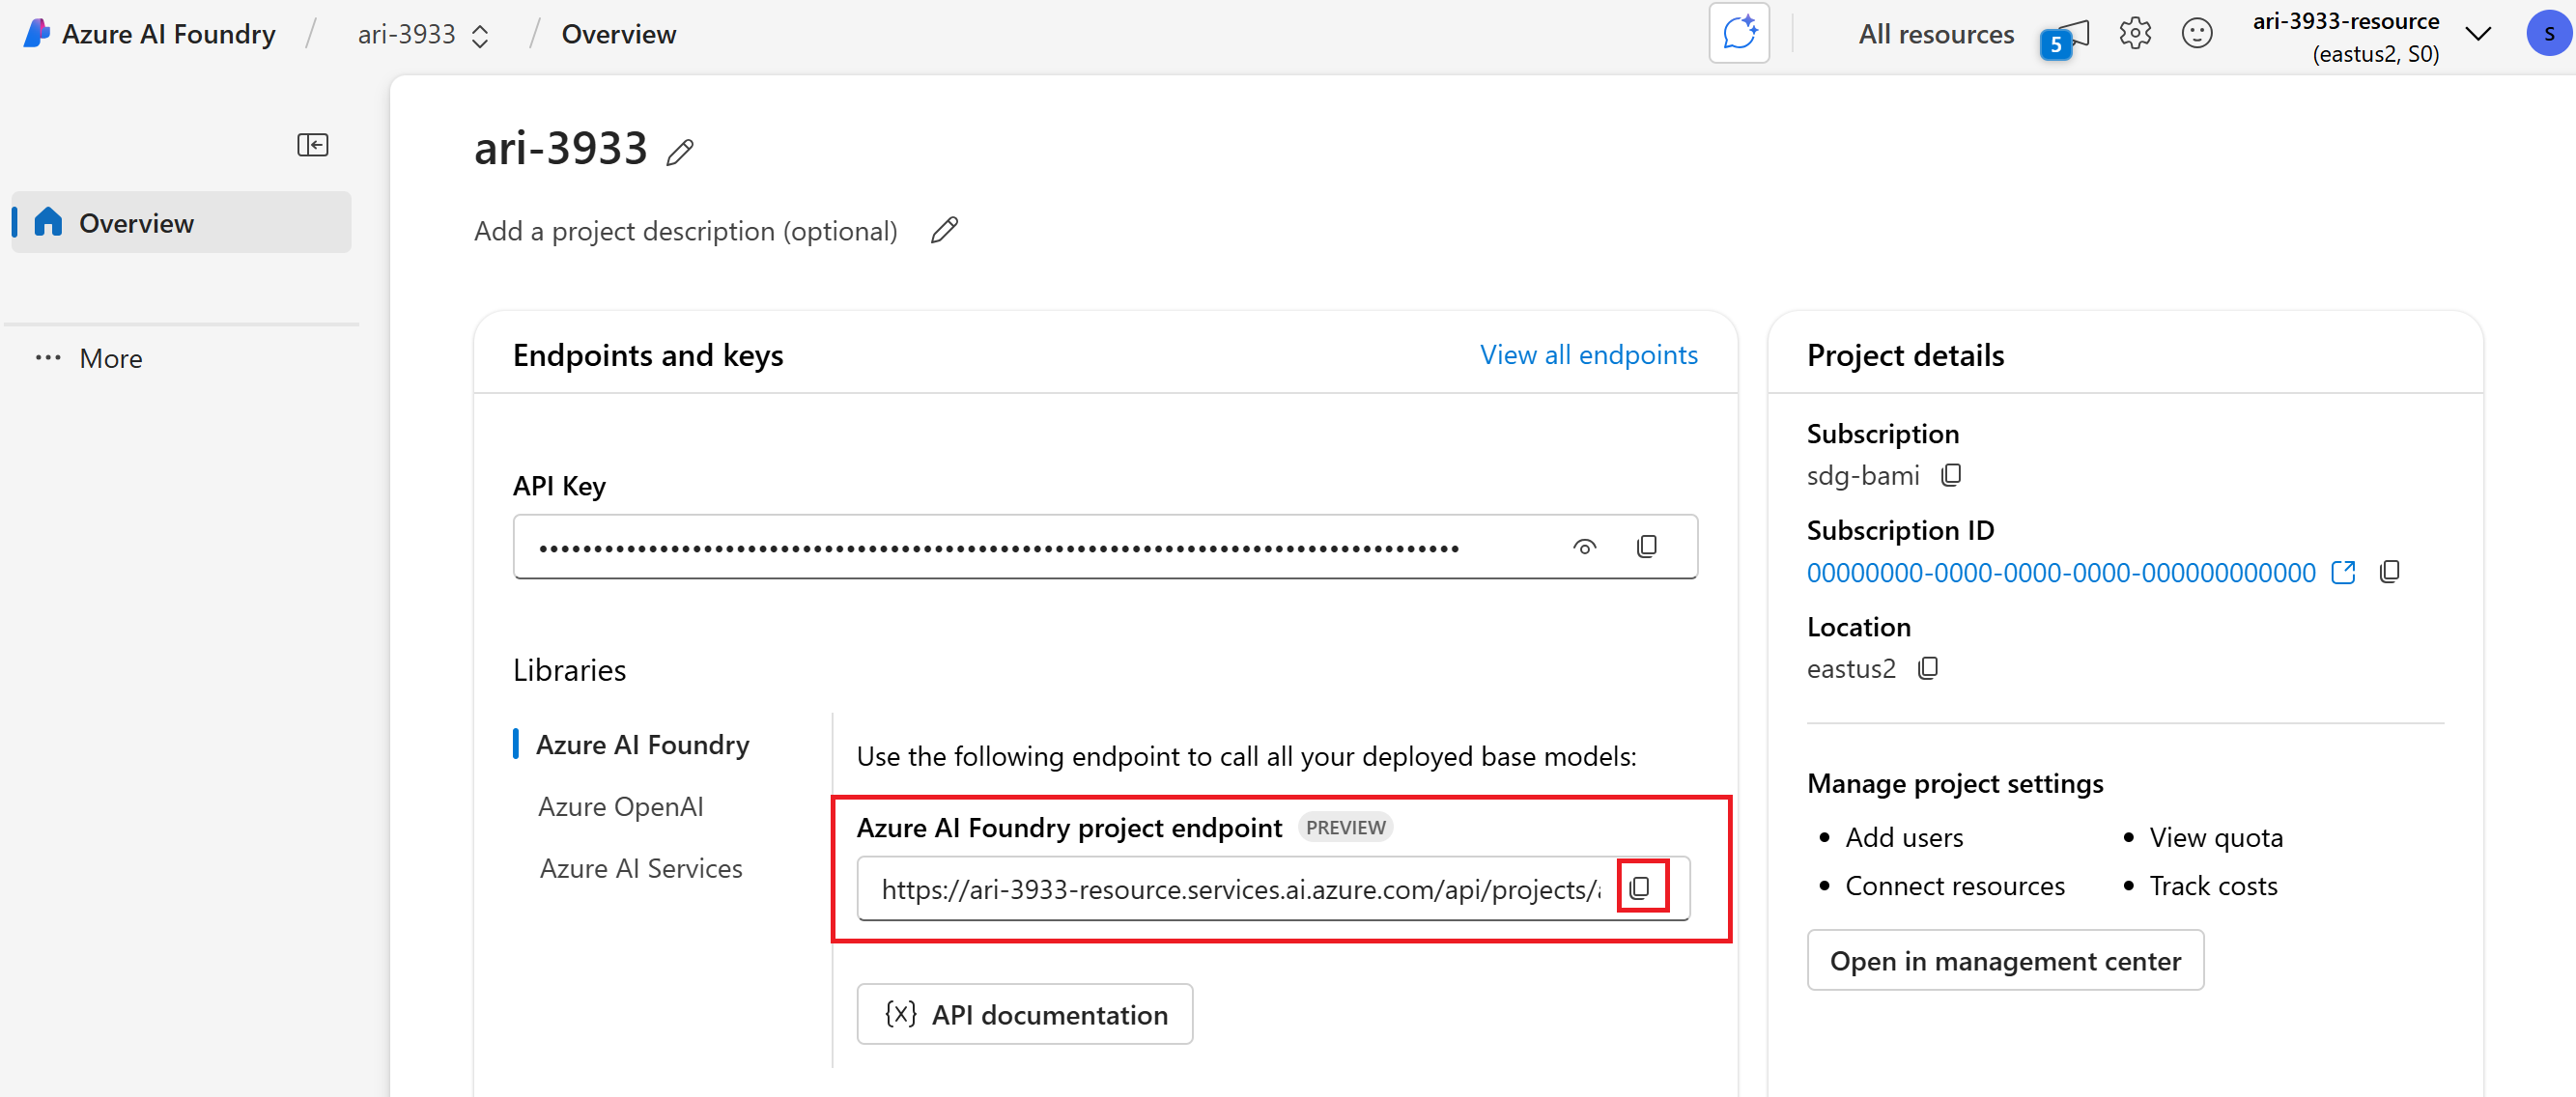
Kopieren Sie den Azure AI Foundry-Projektendpunkt im Abschnitt "Übersicht" Ihres Projekts. Sie verwenden sie in Kürze.
Tipp
Wenn der Azure AI Foundry-Projektendpunkt nicht angezeigt wird, verwenden Sie ein hubbasiertes Projekt. (Siehe Projekttypen). Wechseln Sie zu einem Foundry-Projekt, oder verwenden Sie die vorherigen Schritte, um ein Projekt zu erstellen.
Stellen Sie sicher, dass Sie sich mit dem CLI-Befehl az login (oder az login --use-device-code) anmelden, um sich zu authentifizieren, bevor Sie Ihre Python-Skripts ausführen.
Installieren Sie Java und Azure CLI.
-
Kopieren Sie den Azure AI Foundry-Projektendpunkt im Abschnitt "Übersicht" Ihres Projekts. Sie verwenden sie in Kürze.
Tipp
Wenn der Azure AI Foundry-Projektendpunkt nicht angezeigt wird, verwenden Sie ein hubbasiertes Projekt. (Siehe Projekttypen). Wechseln Sie zu einem Foundry-Projekt, oder verwenden Sie die vorherigen Schritte, um ein Projekt zu erstellen.
Legen Sie diese Umgebungsvariablen fest, die in Ihren Skripts verwendet werden sollen:
# Azure AI Foundry Endpoint
AZURE_ENDPOINT=your_endpoint_here

# Azure AI Foundry Model Deployment Name
AZURE_DEPLOYMENT=your_deployment_name_here

# Project ID (Optional - will be generated if not provided)
PROJECT_ID=your_project_id_here
MODEL_DEPLOYMENT_NAME=gpt-4o

# Note: This sample uses DefaultAzureCredential for authentication
# Please ensure you are logged in with Azure CLI using 'az login'
# For more authentication options, see: https://learn.microsoft.com/en-us/java/api/overview/azure/identity-readme?view=azure-java-stable
Stellen Sie sicher, dass Sie sich mit dem CLI-Befehl az login (oder az login --use-device-code) anmelden, um sich zu authentifizieren, bevor Sie Ihre Java-Skripts ausführen.
Laden Sie POM.XML auf Ihre Java-IDE herunter.
Installieren von Node.js und Azure CLI
Stellen Sie sicher, dass Sie sich mit dem CLI-Befehl az login (oder az login --use-device-code) anmelden, um sich zu authentifizieren, bevor Sie Ihre JavaScript-Skripts ausführen.
Herunterladen package.json.
Pakete installieren mit npm install
-
Kopieren Sie den Azure AI Foundry-Projektendpunkt im Abschnitt "Übersicht" Ihres Projekts. Sie verwenden sie in Kürze.
Tipp
Wenn der Azure AI Foundry-Projektendpunkt nicht angezeigt wird, verwenden Sie ein hubbasiertes Projekt. (Siehe Projekttypen). Wechseln Sie zu einem Foundry-Projekt, oder verwenden Sie die vorherigen Schritte, um ein Projekt zu erstellen.
Legen Sie diese Umgebungsvariablen fest, die in Ihren Skripts verwendet werden sollen:
MODEL_DEPLOYMENT_NAME=gpt-4o
PROJECT_ENDPOINT=https://<your-foundry-resource-name>.services.ai.azure.com/api/projects/<your-foundry-project-name>
Installieren von C# und Azure CLI
Installieren der Pakete:
Um mit Azure AI-Diensten in Ihrem .NET-Projekt zu arbeiten, müssen Sie mehrere NuGet-Pakete installieren. Fügen Sie NuGet-Pakete mithilfe der .NET CLI im integrierten Terminal hinzu:
# Add Azure AI SDK packages
dotnet add package Azure.Identity
dotnet add package Azure.AI.Projects
dotnet add package Azure.AI.Agents.Persistent
dotnet add package Azure.AI.Inference
-
Kopieren Sie den Azure AI Foundry-Projektendpunkt im Abschnitt "Übersicht" Ihres Projekts. Sie verwenden sie in Kürze.
Tipp
Wenn der Azure AI Foundry-Projektendpunkt nicht angezeigt wird, verwenden Sie ein hubbasiertes Projekt. (Siehe Projekttypen). Wechseln Sie zu einem Foundry-Projekt, oder verwenden Sie die vorherigen Schritte, um ein Projekt zu erstellen.
Legen Sie diese Umgebungsvariablen fest, die in Ihren Skripts verwendet werden sollen:
AZURE_AI_ENDPOINT=https://your.services.ai.azure.com/api/projects/project
AZURE_AI_MODEL=your_model_name
Stellen Sie sicher, dass Sie sich mit dem BEFEHL CLI az login (oder az login --use-device-code) anmelden, um sich zu authentifizieren, bevor Sie Ihre C#-Skripts ausführen.
Installieren der Azure-Befehlszeilenschnittstelle
Stellen Sie sicher, dass Sie sich mit dem CLI-Befehl az login (oder az login --use-device-code) anmelden, um sich zu authentifizieren, bevor Sie den nächsten Befehl ausführen.
Rufen Sie ein temporäres Zugriffstoken ab. Es läuft in 60-90 Minuten ab, du musst danach aktualisieren.
az account get-access-token --scope https://ai.azure.com/.default
Speichern Sie die Ergebnisse als Umgebungsvariable AZURE_AI_AUTH_TOKEN.
Ausführen einer Chatvervollständigung
Chatabschlusse sind der grundlegende Baustein von KI-Anwendungen. Mithilfe von Chatabschlüssen können Sie eine Liste von Nachrichten senden und eine Antwort vom Modell erhalten.
- Geben Sie im Chat-Playground die Eingabeaufforderung ein, und wählen Sie die Schaltfläche " Senden " aus.
- Das Modell gibt eine Antwort im Antwortbereich zurück.
Ersetzen Sie den endpoint in diesem Code durch Ihren Endpunkt:
from azure.ai.projects import AIProjectClient
from azure.identity import DefaultAzureCredential

project = AIProjectClient(
    endpoint="https://your-foundry-resource-name.ai.azure.com/api/projects/project-name",
    credential=DefaultAzureCredential(),
)

models = project.inference.get_azure_openai_client(api_version="2024-10-21")
response = models.chat.completions.create(
    model="gpt-4o",
    messages=[
        {"role": "system", "content": "You are a helpful writing assistant"},
        {"role": "user", "content": "Write me a poem about flowers"},
    ],
)

print(response.choices[0].message.content)
package com.azure.ai.foundry.samples;

import com.azure.ai.foundry.samples.utils.ConfigLoader;
import com.azure.ai.projects.ProjectsClient;
import com.azure.ai.projects.ProjectsClientBuilder;
import com.azure.ai.projects.models.chat.ChatClient;
import com.azure.ai.projects.models.chat.ChatCompletion;
import com.azure.ai.projects.models.chat.ChatCompletionOptions;
import com.azure.ai.projects.models.chat.ChatMessage;
import com.azure.ai.projects.models.chat.ChatRole;
import com.azure.identity.DefaultAzureCredential;
import com.azure.identity.DefaultAzureCredentialBuilder;
import com.azure.ai.projects.models.chat.ChatCompletionResponse;


import java.util.Arrays;
import java.util.List;

/**
 * This sample demonstrates how to use the chat completion API with the Azure AI Foundry SDK.
 *
 * Chat completions allow you to have interactive, conversational interactions with AI models
 * by providing a list of messages and receiving AI-generated responses that maintain context
 * across the conversation.
 *
 * This sample shows:
 * 1. How to authenticate with Azure AI Foundry using DefaultAzureCredential
 * 2. How to create a chat client for a specific model deployment
 * 3. How to structure a conversation with system and user messages
 * 4. How to configure and send a chat completion request
 * 5. How to process and display the AI-generated response
 *
 * Prerequisites:
 * - An Azure account with access to Azure AI Foundry
 * - Azure CLI installed and logged in ('az login')
 * - Environment variables set in .env file (AZURE_ENDPOINT, AZURE_DEPLOYMENT)
 */
public class ChatCompletionSample {
    public static void main(String[] args) {
        // Load configuration values from the .env file
        // These include the service endpoint and the deployment name of the model to use
        String endpoint = ConfigLoader.getAzureEndpoint();
        String deploymentName = ConfigLoader.getAzureDeployment();

        // Get DefaultAzureCredential for authentication
        // This uses the most appropriate authentication method based on the environment
        // For local development, it will use your Azure CLI login credentials
        DefaultAzureCredential credential = ConfigLoader.getDefaultCredential();

        // Create a projects client to interact with Azure AI Foundry services
        // The client requires an authentication credential and an endpoint
        ProjectsClient client = new ProjectsClientBuilder()
            .credential(credential)
            .endpoint(endpoint)
            .buildClient();

        // Get a chat client for the specified model deployment
        // This client provides access to chat completion functionality
        ChatClient chatClient = client.getChatClient(deploymentName);

        // Create a list of chat messages to form the conversation
        // This includes a system message to set the assistant's behavior
        // and a user message containing the user's question or prompt
        List<ChatMessage> messages = Arrays.asList(
            new ChatMessage(ChatRole.SYSTEM, "You are a helpful assistant."),
            new ChatMessage(ChatRole.USER, "Tell me about Azure AI Foundry.")
        );

        // Configure chat completion options including the messages, temperature, and token limit
        // - Temperature controls randomness: lower values (like 0.2) give more focused responses,
        //   higher values (like 0.8) give more creative responses
        // - MaxTokens limits the length of the response
        ChatCompletionOptions options = new ChatCompletionOptions(messages)
            .setTemperature(0.7)  // Balanced between deterministic and creative
            .setMaxTokens(800);   // Limit response length

        System.out.println("Sending chat completion request...");

        // Send the request and get the AI-generated completion
        ChatCompletion completion = chatClient.getChatCompletion(options);

        // Display the response
        System.out.println("\nResponse from assistant:");
        System.out.println(completion.getChoices().get(0).getMessage().getContent());

        // Display usage statistics
        System.out.println("\nUsage Statistics:");
        System.out.println("Prompt Tokens: " + completion.getUsage().getPromptTokens());
        System.out.println("Completion Tokens: " + completion.getUsage().getCompletionTokens());
        System.out.println("Total Tokens: " + completion.getUsage().getTotalTokens());
    }
}
// Get the Azure AI endpoint and deployment name from environment variables
const endpoint = process.env.PROJECT_ENDPOINT;
const deployment = process.env.MODEL_DEPLOYMENT_NAME || 'gpt-4o';

// Create an Azure OpenAI Client
const project = new AIProjectClient(endpoint, new DefaultAzureCredential());
const client = await project.inference.azureOpenAI({
    // The API version should match the version of the Azure OpenAI resource
    apiVersion: "2024-12-01-preview"
});

// Create a chat completion
const chatCompletion = await client.chat.completions.create({
    model: deployment,
    messages: [
        { role: "system", content: "You are a helpful writing assistant" },
        { role: "user", content: "Write me a poem about flowers" },
    ],
});
console.log(`\n==================== 🌷 COMPLETIONS POEM ====================\n`);
console.log(chatCompletion.choices[0].message.content);
using Azure;
using Azure.Identity;
using Azure.AI.Projects;
using Azure.AI.Inference;

var projectEndpoint = new Uri(System.Environment.GetEnvironmentVariable("AZURE_AI_ENDPOINT"));
var modelDeploymentName = System.Environment.GetEnvironmentVariable("AZURE_AI_MODEL");
var credential = new DefaultAzureCredential();

AIProjectClient client = new AIProjectClient(projectEndpoint, credential);

ChatCompletionsClient chatClient = client.GetChatCompletionsClient();

var requestOptions = new ChatCompletionsOptions()
{
    Messages =
        {
            new ChatRequestSystemMessage("You are a helpful assistant."),
            new ChatRequestUserMessage("How many feet are in a mile?"),
        },
    Model = modelDeploymentName
};
Response<ChatCompletions> response = chatClient.Complete(requestOptions);
Console.WriteLine(response.Value.Content);
Ersetzen Sie YOUR-FOUNDRY-RESOURCE-NAME durch Ihre Werte:
curl --request POST --url 'https://YOUR-FOUNDRY-RESOURCE-NAME.services.ai.azure.com/openai/deployments/gpt-4o/chat/completions?api-version=2024-10-21' \
-h 'authorization: Bearer $AZURE_AI_AUTH_TOKEN' \
-h 'content-type: application/json' \
-d '{
        "messages": [
            {"role": "system",
            "content": "You are a helpful writing assistant"},
            {"role": "user",
            "content": "Write me a poem about flowers"}
        ],
        "model": "gpt-4o"
    }'
Chatten mit einem Agent
Agents verfügen über leistungsstarke Funktionen durch die Verwendung von Tools. Beginnen Sie, indem Sie mit einem Agent chatten.
Wenn Sie bereit sind, einen Agent zu testen, wird ein Standard-Agent für Sie erstellt. So chatten Sie mit diesem Agent:
- Wählen Sie im linken Bereich " Playgrounds" aus.
- Wählen Sie auf der Agents-Playgroundkarte"Los geht's" aus.
- Fügen Sie Anweisungen hinzu, z. B. "Sie sind ein hilfreicher Schreibassistent.".
- Beginnen Sie mit Ihrem Agenten zu chatten, z. B. "Schreiben Sie mir ein Gedicht über Blumen.".
Ersetzen Sie den endpoint in diesem Code durch Ihren Endpunkt:
from azure.ai.projects import AIProjectClient
from azure.identity import DefaultAzureCredential
from azure.ai.agents.models import ListSortOrder, FilePurpose

project = AIProjectClient(
    endpoint="https://your-foundry-resource-name.ai.azure.com/api/projects/project-name",
    credential=DefaultAzureCredential(),
)

agent = project.agents.create_agent(
    model="gpt-4o",
    name="my-agent",
    instructions="You are a helpful writing assistant")

thread = project.agents.threads.create()
message = project.agents.messages.create(
    thread_id=thread.id,
    role="user",
    content="Write me a poem about flowers")

run = project.agents.runs.create_and_process(thread_id=thread.id, agent_id=agent.id)
if run.status == "failed":
    # Check if you got "Rate limit is exceeded.", then you want to get more quota
    print(f"Run failed: {run.last_error}")

# Get messages from the thread
messages = project.agents.messages.list(thread_id=thread.id)

# Get the last message from the sender
messages = project.agents.messages.list(thread_id=thread.id, order=ListSortOrder.ASCENDING)
for message in messages:
    if message.run_id == run.id and message.text_messages:
        print(f"{message.role}: {message.text_messages[-1].text.value}")

# Delete the agent once done
project.agents.delete_agent(agent.id)
print("Deleted agent")
package com.azure.ai.foundry.samples;

import com.azure.ai.foundry.samples.utils.ConfigLoader;
import com.azure.ai.projects.ProjectsClient;
import com.azure.ai.projects.ProjectsClientBuilder;
import com.azure.ai.projects.models.agent.Agent;
import com.azure.ai.projects.models.agent.AgentClient;
import com.azure.ai.projects.models.agent.AgentMessage;
import com.azure.ai.projects.models.agent.AgentOptions;
import com.azure.ai.projects.models.agent.AgentRole;
import com.azure.ai.projects.models.agent.AgentRun;
import com.azure.ai.projects.models.agent.AgentRunStatus;
import com.azure.ai.projects.models.agent.AgentThread;
import com.azure.identity.DefaultAzureCredential;

import java.util.List;

/**
 * This sample demonstrates how to create and run an agent using the Azure AI Foundry SDK.
 *
 * Agents in Azure AI Foundry are specialized AI assistants that can be customized with
 * specific instructions and capabilities to perform particular tasks. They maintain conversation
 * history in threads and can be deployed for various use cases.
 *
 * This sample shows:
 * 1. How to authenticate with Azure AI Foundry using DefaultAzureCredential
 * 2. How to create an agent with specific instructions and capabilities
 * 3. How to create a thread for conversation with the agent
 * 4. How to send messages to the agent and run it
 * 5. How to wait for the agent to complete its execution
 * 6. How to retrieve and display the agent's response
 *
 * Prerequisites:
 * - An Azure account with access to Azure AI Foundry
 * - Azure CLI installed and logged in ('az login')
 * - Environment variables set in .env file (AZURE_ENDPOINT, AZURE_DEPLOYMENT)
 */
public class AgentSample {
    public static void main(String[] args) {
        // Load configuration values from the .env file
        // These include the service endpoint and the deployment name of the model to use
        String endpoint = ConfigLoader.getAzureEndpoint();
        String deploymentName = ConfigLoader.getAzureDeployment();

        // Get DefaultAzureCredential for authentication
        // This uses the most appropriate authentication method based on the environment
        // For local development, it will use your Azure CLI login credentials
        DefaultAzureCredential credential = ConfigLoader.getDefaultCredential();

        // Create a projects client to interact with Azure AI Foundry services
        // The client requires an authentication credential and an endpoint
        ProjectsClient client = new ProjectsClientBuilder()
            .credential(credential)
            .endpoint(endpoint)
            .buildClient();

        // Get an agent client, which provides operations for working with AI agents
        // This includes creating, configuring, and running agents
        AgentClient agentClient = client.getAgentClient();

        // Create a new agent with specialized capabilities and instructions
        // The agent is configured with a name, description, instructions, and underlying model
        System.out.println("Creating agent...");
        Agent agent = agentClient.createAgent(new AgentOptions()
            .setName("Research Assistant")                       // Descriptive name for the agent
            .setDescription("An agent that helps with research tasks")  // Brief description of the agent's purpose
            .setInstructions("You are a research assistant. Help users find information and summarize content.") // Detailed instructions for the agent's behavior
            .setModel(deploymentName));                          // The underlying AI model to power the agent

        System.out.println("Agent created: " + agent.getName() + " (ID: " + agent.getId() + ")");

        // Create a thread for the conversation with the agent
        // Threads maintain conversation history and state across multiple interactions
        System.out.println("Creating thread...");
        AgentThread thread = agentClient.createThread();
        System.out.println("Thread created: " + thread.getId());

        // Create a user message
        AgentMessage userMessage = new AgentMessage()
            .setRole(AgentRole.USER)
            .setContent("Explain what cloud computing is and list three benefits.");

        // Run the agent
        System.out.println("Running agent...");
        AgentRun run = agentClient.createRun(thread.getId(), agent.getId(), userMessage);
        System.out.println("Run created: " + run.getId());

        // Wait for the run to complete
        AgentRun completedRun = waitForRunCompletion(agentClient, thread.getId(), run.getId());
        System.out.println("Run completed with status: " + completedRun.getStatus());

        // Get messages from the thread
        List<AgentMessage> messages = agentClient.getMessages(thread.getId());

        // Display the assistant's response
        System.out.println("\nConversation:");
        for (AgentMessage message : messages) {
            System.out.println(message.getRole() + ": " + message.getContent());
        }
    }

    private static AgentRun waitForRunCompletion(AgentClient agentClient, String threadId, String runId) {
        AgentRun run = agentClient.getRun(threadId, runId);

        while (run.getStatus() == AgentRunStatus.QUEUED || run.getStatus() == AgentRunStatus.IN_PROGRESS) {
            try {
                System.out.println("Run status: " + run.getStatus() + " - waiting...");
                Thread.sleep(1000); // Wait for 1 second before checking again
                run = agentClient.getRun(threadId, runId);
            } catch (InterruptedException e) {
                Thread.currentThread().interrupt();
                throw new RuntimeException("Thread was interrupted", e);
            }
        }

        return run;
    }
}
const endpoint = process.env.PROJECT_ENDPOINT;
const deployment = process.env.MODEL_DEPLOYMENT_NAME || 'gpt-4o';
const client = new AIProjectClient(endpoint, new DefaultAzureCredential());

// Create an Agent
const agent = await client.agents.createAgent(deployment, {
    name: 'my-agent',
    instructions: 'You are a helpful agent'
});
console.log(`\n==================== 🕵️  POEM AGENT ====================`);

// Create a thread and message
const thread = await client.agents.threads.create();
const prompt = 'Write me a poem about flowers';
console.log(`\n---------------- 📝 User Prompt ---------------- \n${prompt}`);
await client.agents.messages.create(thread.id, 'user', prompt);

// Create run
let run = await client.agents.runs.create(thread.id, agent.id);

// Wait for run to complete
console.log(`\n---------------- 🚦 Run Status ----------------`);
while (['queued', 'in_progress', 'requires_action'].includes(run.status)) {
    // Avoid adding a lot of messages to the console
    await new Promise((resolve) => setTimeout(resolve, 1000));
    run = await client.agents.runs.get(thread.id, run.id);
    console.log(`Run status: ${run.status}`);
}

console.log('\n---------------- 📊 Token Usage ----------------');
console.table([run.usage]);

const messagesIterator = await client.agents.messages.list(thread.id);
const assistantMessage = await getAssistantMessage(messagesIterator);
console.log('\n---------------- 💬 Response ----------------');
printAssistantMessage(assistantMessage);

// Clean up
console.log(`\n---------------- 🧹 Clean Up Poem Agent ----------------`);
await client.agents.deleteAgent(agent.id);
console.log(`Deleted Agent, Agent ID: ${agent.id}`);
using Azure;
using Azure.Identity;
using Azure.AI.Agents.Persistent;

// Creating the Client for agents
var projectEndpoint = System.Environment.GetEnvironmentVariable("AZURE_AI_ENDPOINT");
var modelDeploymentName = System.Environment.GetEnvironmentVariable("AZURE_AI_MODEL");
PersistentAgentsClient client = new(projectEndpoint, new DefaultAzureCredential());

// Create an Agent with toolResources and process Agent run
PersistentAgent agent = client.Administration.CreateAgent(
        model: modelDeploymentName,
        name: "SDK Test Agent - Tutor",
        instructions: "You are a personal electronics tutor. Write and run code to answer questions.",
        tools: new List<ToolDefinition> { new CodeInterpreterToolDefinition() });

// Create thread for communication
PersistentAgentThread thread = client.Threads.CreateThread();

// Create message to thread
PersistentThreadMessage messageResponse = client.Messages.CreateMessage(
    thread.Id,
    MessageRole.User,
    "I need to solve the equation `3x + 11 = 14`. Can you help me?");

// Run the Agent
ThreadRun run = client.Runs.CreateRun(thread, agent);

// Wait for the run to complete
do
{
    Thread.Sleep(TimeSpan.FromMilliseconds(500));
    run = client.Runs.GetRun(thread.Id, run.Id);
}
while (run.Status == RunStatus.Queued
    || run.Status == RunStatus.InProgress);
Pageable<PersistentThreadMessage> messages = client.Messages.GetMessages(
    threadId: thread.Id,
    order: ListSortOrder.Ascending
);
// Print the messages in the thread
WriteMessages(messages);

// Delete the thread and agent after use
client.Threads.DeleteThread(thread.Id);
client.Administration.DeleteAgent(agent.Id);

// Temporary function to use a list of messages in the thread and write them to the console.
static void WriteMessages(IEnumerable<PersistentThreadMessage> messages)
{
    foreach (PersistentThreadMessage threadMessage in messages)
    {
        Console.Write($"{threadMessage.CreatedAt:yyyy-MM-dd HH:mm:ss} - {threadMessage.Role,10}: ");
        foreach (MessageContent contentItem in threadMessage.ContentItems)
        {
            if (contentItem is MessageTextContent textItem)
            {
                Console.Write(textItem.Text);
            }
            else if (contentItem is MessageImageFileContent imageFileItem)
            {
                Console.Write($"<image from ID: {imageFileItem.FileId}");
            }
            Console.WriteLine();
        }
    }
}
Ersetzen Sie YOUR-FOUNDRY-RESOURCE-NAME und YOUR-PROJECT-NAME durch Ihre Werte:
# Create agent
curl --request POST --url "https://YOUR-FOUNDRY-RESOURCE-NAME.services.ai.azure.com/api/projects/YOUR-PROJECT-NAME/assistants?api-version=v1" \
    -h "authorization: Bearer $AZURE_AI_AUTH_TOKEN" \
    -h "content-type: application/json" \
    -d '{
            "model": "gpt-4o",
            "name": "my-agent",
            "instructions": "You are a helpful writing assistant"
        }'
#Lets say agent ID created is asst_123456789. Use this to run the agent

# Create thread
curl --request POST --url 'https://YOUR-FOUNDRY-RESOURCE-NAME.services.ai.azure.com/api/projects/YOUR-PROJECT-NAME/threads?api-version=v1' \
    -h 'authorization: Bearer $AZURE_AI_AUTH_TOKEN' \
    -h 'content-type: application/json'

#Lets say thread ID created is thread_123456789. Use this in the next step

# Create message using thread ID
curl --request POST --url 'https://YOUR-FOUNDRY-RESOURCE-NAME.services.ai.azure.com/api/projects/YOUR-PROJECT-NAME/threads/thread_123456789/messages?api-version=v1' \
    -h 'authorization: Bearer $AZURE_AI_AUTH_TOKEN' \
    -h 'content-type: application/json' \
    -d '{
            "role": "user",
            "content": "Write me a poem about flowers"
        }'

# Run thread with the agent - use both agent id and thread id
curl --request POST --url 'https://YOUR-FOUNDRY-RESOURCE-NAME.services.ai.azure.com/api/projects/YOUR-PROJECT-NAME/threads/thread_123456789/runs?api-version=v1' \
    -h 'authorization: Bearer $AZURE_AI_AUTH_TOKEN' \
    -h 'content-type: application/json' \
    --data '{
        "assistant_id": "asst_123456789"
    }'

# List the messages in the thread using thread ID
curl --request GET --url 'https://YOUR-FOUNDRY-RESOURCE-NAME.services.ai.azure.com/api/projects/YOUR-PROJECT-NAME/threads/thread_123456789/messages?api-version=v1' \
    -h 'authorization: Bearer $AZURE_AI_AUTH_TOKEN' \
    -h 'content-type: application/json'

# Delete agent once done using agent id
curl --request DELETE --url 'https://YOUR-FOUNDRY-RESOURCE-NAME.services.ai.azure.com/api/projects/YOUR-PROJECT-NAME/assistants/asst_123456789?api-version=v1' \
    -h 'authorization: Bearer $AZURE_AI_AUTH_TOKEN' \
    -h 'content-type: application/json'
Hinzufügen von Dateien zum Agent
Nun fügen wir ein Dateisuchtool hinzu, das uns das Abrufen von Wissen ermöglicht.
- Scrollen Sie im Setupbereich Ihres Agents bei Bedarf nach unten, um Wissen zu finden.
- Wählen Sie Hinzufügen aus.
- Wählen Sie "Dateien " aus, um die Datei product_info_1.md hochzuladen.
- Wählen Sie unter "Dateien hinzufügen" die Option "Lokale Dateien auswählen" aus.
- Wählen Sie "Hochladen" und "Speichern" aus.
- Ändern Sie die Anweisungen Ihrer Agents, z. B. "Sie sind ein hilfreicher Assistent und können Informationen aus hochgeladenen Dateien durchsuchen".
- Stellen Sie eine Frage, z. B. "Hallo, welche Contoso-Produkte wissen Sie?"
- Um weitere Dateien hinzuzufügen, wählen Sie im AgentVectorStore die Option ... und dann "Verwalten" aus.
Ersetzen Sie den endpoint in diesem Code durch Ihren Endpunkt:
from azure.ai.projects import AIProjectClient
from azure.identity import DefaultAzureCredential
from azure.ai.agents.models import ListSortOrder, FileSearchTool

project = AIProjectClient(
    endpoint="https://your-foundry-resource-name.ai.azure.com/api/projects/project-name",
    credential=DefaultAzureCredential(),
)

# Upload file and create vector store
file = project.agents.files.upload(file_path="./product_info_1.md", purpose=FilePurpose.AGENTS)
vector_store = project.agents.vector_stores.create_and_poll(file_ids=[file.id], name="my_vectorstore")

# Create file search tool and agent
file_search = FileSearchTool(vector_store_ids=[vector_store.id])
agent = project.agents.create_agent(
    model="gpt-4o",
    name="my-assistant",
    instructions="You are a helpful assistant and can search information from uploaded files",
    tools=file_search.definitions,
    tool_resources=file_search.resources,
)

# Create thread and process user message
thread = project.agents.threads.create()
project.agents.messages.create(thread_id=thread.id, role="user", content="Hello, what Contoso products do you know?")
run = project.agents.runs.create_and_process(thread_id=thread.id, agent_id=agent.id)

# Handle run status
if run.status == "failed":
    print(f"Run failed: {run.last_error}")

# Print thread messages
messages = project.agents.messages.list(thread_id=thread.id, order=ListSortOrder.ASCENDING)
for message in messages:
    if message.run_id == run.id and message.text_messages:
        print(f"{message.role}: {message.text_messages[-1].text.value}")

# Cleanup resources
project.agents.vector_stores.delete(vector_store.id)
project.agents.files.delete(file_id=file.id)
project.agents.delete_agent(agent.id)
package com.azure.ai.foundry.samples;

import com.azure.ai.foundry.samples.utils.ConfigLoader;
import com.azure.ai.projects.ProjectsClient;
import com.azure.ai.projects.ProjectsClientBuilder;
import com.azure.ai.projects.models.agent.Agent;
import com.azure.ai.projects.models.agent.AgentClient;
import com.azure.ai.projects.models.agent.AgentMessage;
import com.azure.ai.projects.models.agent.AgentOptions;
import com.azure.ai.projects.models.agent.AgentRole;
import com.azure.ai.projects.models.agent.AgentRun;
import com.azure.ai.projects.models.agent.AgentRunStatus;
import com.azure.ai.projects.models.agent.AgentThread;
import com.azure.ai.projects.models.agent.FileTool;
import com.azure.ai.projects.models.file.File;
import com.azure.ai.projects.models.file.FileClient;
import com.azure.identity.DefaultAzureCredential;

import java.io.IOException;
import java.nio.file.Files;
import java.nio.file.Path;
import java.util.List;

/**
 * This sample demonstrates how to create an agent with file search capability using the Azure AI Foundry SDK.
 *
 * File search agents can analyze and extract information from documents, allowing users to ask
 * questions about the content of those documents. This extends the capabilities of regular agents
 * by giving them access to specific information contained in files.
 *
 * This sample shows:
 * 1. How to authenticate with Azure AI Foundry using DefaultAzureCredential
 * 2. How to create and upload a sample document
 * 3. How to create an agent with file search capabilities
 * 4. How to configure the agent with access to specific files
 * 5. How to run the agent and ask questions about the document content
 * 6. How to retrieve and display the agent's responses
 *
 * Use cases for file search agents include:
 * - Document analysis and summarization
 * - Question answering from technical documentation
 * - Data extraction from structured files
 * - Research assistance across multiple documents
 *
 * Prerequisites:
 * - An Azure account with access to Azure AI Foundry
 * - Azure CLI installed and logged in ('az login')
 * - Environment variables set in .env file (AZURE_ENDPOINT, AZURE_DEPLOYMENT)
 */
public class FileSearchAgentSample {
    public static void main(String[] args) {
        // Load configuration values from the .env file
        // These include the service endpoint and the deployment name of the model to use
        String endpoint = ConfigLoader.getAzureEndpoint();
        String deploymentName = ConfigLoader.getAzureDeployment();

        // Get DefaultAzureCredential for authentication
        // This uses the most appropriate authentication method based on the environment
        // For local development, it will use your Azure CLI login credentials
        DefaultAzureCredential credential = ConfigLoader.getDefaultCredential();

        // Create a projects client to interact with Azure AI Foundry services
        // The client requires an authentication credential and an endpoint
        ProjectsClient client = new ProjectsClientBuilder()
            .credential(credential)
            .endpoint(endpoint)
            .buildClient();

        try {
            // Create a sample document containing information about cloud computing
            // In a real application, you would use your own existing documents
            Path tempFile = createSampleDocument();

            // Get a file client to handle file operations
            // This is used to upload files that the agent will search through
            FileClient fileClient = client.getFileClient();

            // Upload the file to Azure AI Foundry
            // The uploaded file will be available for the agent to search and analyze
            System.out.println("Uploading file: " + tempFile);
            File uploadedFile = fileClient.uploadFile(tempFile.toString());
            System.out.println("File uploaded with ID: " + uploadedFile.getId());

            // Get an agent client
            AgentClient agentClient = client.getAgentClient();

            // Create an agent with file search capability
            System.out.println("Creating agent with file search capability...");
            Agent agent = agentClient.createAgent(new AgentOptions()
                .setName("Document Assistant")
                .setDescription("An agent that helps with document searching")
                .setInstructions("You are a document assistant. Help users find information in their documents.")
                .setModel(deploymentName)
                .addTool(new FileTool()
                    .addFile(uploadedFile.getId())));

            System.out.println("Agent created: " + agent.getName() + " (ID: " + agent.getId() + ")");

            // Create a thread for the conversation
            System.out.println("Creating thread...");
            AgentThread thread = agentClient.createThread();
            System.out.println("Thread created: " + thread.getId());

            // Create a user message
            AgentMessage userMessage = new AgentMessage()
                .setRole(AgentRole.USER)
                .setContent("Find and list the benefits of cloud computing from my document.");

            // Run the agent
            System.out.println("Running agent...");
            AgentRun run = agentClient.createRun(thread.getId(), agent.getId(), userMessage);
            System.out.println("Run created: " + run.getId());

            // Wait for the run to complete
            AgentRun completedRun = waitForRunCompletion(agentClient, thread.getId(), run.getId());
            System.out.println("Run completed with status: " + completedRun.getStatus());

            // Get messages from the thread
            List<AgentMessage> messages = agentClient.getMessages(thread.getId());

            // Display the assistant's response
            System.out.println("\nConversation:");
            for (AgentMessage message : messages) {
                System.out.println(message.getRole() + ": " + message.getContent());
            }

            // Clean up the temporary file
            Files.deleteIfExists(tempFile);

        } catch (IOException e) {
            System.err.println("Error working with files: " + e.getMessage());
            e.printStackTrace();
        }
    }

    private static Path createSampleDocument() throws IOException {
        String content = "# Cloud Computing Overview\n\n" +
                "Cloud computing is the delivery of computing services—including servers, storage, databases, networking, software, analytics, and intelligence—over the Internet ("the cloud") to offer faster innovation, flexible resources, and economies of scale.\n\n" +
                "## Benefits of Cloud Computing\n\n" +
                "1. **Cost Savings**: Cloud computing eliminates the capital expense of buying hardware and software and setting up and running on-site data centers.\n\n" +
                "2. **Scalability**: Cloud services can be scaled up or down based on demand, providing businesses with flexibility as their needs change.\n\n" +
                "3. **Performance**: The biggest cloud computing services run on a worldwide network of secure data centers, which are regularly upgraded to the latest generation of fast and efficient computing hardware.\n\n" +
                "4. **Reliability**: Cloud computing makes data backup, disaster recovery, and business continuity easier and less expensive because data can be mirrored at multiple redundant sites on the cloud provider's network.\n\n" +
                "5. **Security**: Many cloud providers offer a broad set of policies, technologies, and controls that strengthen your security posture overall.";

        Path tempFile = Files.createTempFile("cloud-computing-info-", ".md");
        Files.writeString(tempFile, content);
        return tempFile;
    }

    private static AgentRun waitForRunCompletion(AgentClient agentClient, String threadId, String runId) {
        AgentRun run = agentClient.getRun(threadId, runId);

        while (run.getStatus() == AgentRunStatus.QUEUED || run.getStatus() == AgentRunStatus.IN_PROGRESS) {
            try {
                System.out.println("Run status: " + run.getStatus() + " - waiting...");
                Thread.sleep(1000); // Wait for 1 second before checking again
                run = agentClient.getRun(threadId, runId);
            } catch (InterruptedException e) {
                Thread.currentThread().interrupt();
                throw new RuntimeException("Thread was interrupted", e);
            }
        }

        return run;
    }
}
// Upload a file named product_info_1.md
console.log(`\n==================== 🕵️  FILE AGENT ====================`);
const __dirname = path.dirname(fileURLToPath(import.meta.url));
const filePath = path.join(__dirname, '../data/product_info_1.md');
const fileStream = fs.createReadStream(filePath);
fileStream.on('data', (chunk) => {
    console.log(`Read ${chunk.length} bytes of data.`);
});
const file = await client.agents.files.upload(fileStream, 'assistants', {
    fileName: 'product_info_1.md'
});
console.log(`Uploaded file, ID: ${file.id}`);
const vectorStore = await client.agents.vectorStores.create({
    fileIds: [file.id],
    name: 'my_vectorstore'
});
console.log('\n---------------- 🗃️ Vector Store Info ----------------');
console.table([
    {
        'Vector Store ID': vectorStore.id,
        'Usage (bytes)': vectorStore.usageBytes,
        'File Count': vectorStore.fileCounts?.total ?? 'N/A'
    }
]);

// Create an Agent and a FileSearch tool
const fileSearchTool = ToolUtility.createFileSearchTool([vectorStore.id]);
const fileAgent = await client.agents.createAgent(deployment, {
    name: 'my-file-agent',
    instructions: 'You are a helpful assistant and can search information from uploaded files',
    tools: [fileSearchTool.definition],
    toolResources: fileSearchTool.resources,
});

// Create a thread and message
const fileSearchThread = await client.agents.threads.create({ toolResources: fileSearchTool.resources });
const filePrompt = 'What are the steps to setup the TrailMaster X4 Tent?';
console.log(`\n---------------- 📝 User Prompt ---------------- \n${filePrompt}`);
await client.agents.messages.create(fileSearchThread.id, 'user', filePrompt);

// Create run
let fileSearchRun = await client.agents.runs.create(fileSearchThread.id, fileAgent.id).stream();

for await (const eventMessage of fileSearchRun) {
    if (eventMessage.event === DoneEvent.Done) {
        console.log(`Run completed: ${eventMessage.data}`);
    }
    if (eventMessage.event === ErrorEvent.Error) {
        console.log(`An error occurred. ${eventMessage.data}`);
    }
}

const fileSearchMessagesIterator = await client.agents.messages.list(fileSearchThread.id);
const fileAssistantMessage = await getAssistantMessage(fileSearchMessagesIterator);
console.log(`\n---------------- 💬 Response ---------------- \n`);
printAssistantMessage(fileAssistantMessage);

// Clean up
console.log(`\n---------------- 🧹 Clean Up File Agent ----------------`);
client.agents.vectorStores.delete(vectorStore.id);
client.agents.files.delete(file.id);
client.agents.deleteAgent(fileAgent.id);
console.log(`Deleted VectorStore, File, and FileAgent. FileAgent ID: ${fileAgent.id}`);
using Azure;
using Azure.Identity;
using Azure.AI.Agents.Persistent;

// Creating the Client for agents and vector stores
var projectEndpoint = System.Environment.GetEnvironmentVariable("AZURE_AI_ENDPOINT");
var modelDeploymentName = System.Environment.GetEnvironmentVariable("AZURE_AI_MODEL");
PersistentAgentsClient client = new(projectEndpoint, new DefaultAzureCredential());

PersistentAgentFileInfo uploadedAgentFile = client.Files.UploadFile(
    filePath: "product_info_1.md",
    purpose: PersistentAgentFilePurpose.Agents);

// Create a vector store with the file and wait for it to be processed.
// If you do not specify a vector store, create_message will create a vector store with a default expiration policy of seven days after they were last active

Dictionary<string, string> fileIds = new()
{
    { uploadedAgentFile.Id, uploadedAgentFile.Filename }
};

PersistentAgentsVectorStore vectorStore = client.VectorStores.CreateVectorStore(
    name: "my_vector_store");

// Add file ID to vector store.
VectorStoreFile vctFile = client.VectorStores.CreateVectorStoreFile(
    vectorStoreId: vectorStore.Id,
    fileId: uploadedAgentFile.Id
);

Console.WriteLine($"Added file to vector store. The id file in the vector store is {vctFile.Id}.");

FileSearchToolResource fileSearchToolResource = new FileSearchToolResource();
fileSearchToolResource.VectorStoreIds.Add(vectorStore.Id);

// Create an Agent with toolResources and process Agent run
PersistentAgent agent = client.Administration.CreateAgent(
        model: modelDeploymentName,
        name: "SDK Test Agent - Retrieval",
        instructions: "You are a helpful agent that can help fetch data from files you know about.",
        tools: new List<ToolDefinition> { new FileSearchToolDefinition() },
        toolResources: new ToolResources() { FileSearch = fileSearchToolResource });

// Create thread for communication
PersistentAgentThread thread = client.Threads.CreateThread();

// Create message to thread
PersistentThreadMessage messageResponse = client.Messages.CreateMessage(
    thread.Id,
    MessageRole.User,
    "Can you give me information on how to mount the product?");

// Run the Agent
ThreadRun run = client.Runs.CreateRun(thread, agent);

// Wait for the run to complete
// This is a blocking call, so it will wait until the run is completed
do
{
    Thread.Sleep(TimeSpan.FromMilliseconds(500));
    run = client.Runs.GetRun(thread.Id, run.Id);
}
while (run.Status == RunStatus.Queued
    || run.Status == RunStatus.InProgress);

// Create a list of messages in the thread and write them to the console.
Pageable<PersistentThreadMessage> messages = client.Messages.GetMessages(
    threadId: thread.Id,
    order: ListSortOrder.Ascending
);
WriteMessages(messages, fileIds);

// Delete the thread and agent after use
client.VectorStores.DeleteVectorStore(vectorStore.Id);
client.Files.DeleteFile(uploadedAgentFile.Id);
client.Threads.DeleteThread(thread.Id);
client.Administration.DeleteAgent(agent.Id);

// Helper method to write messages to the console
static void WriteMessages(IEnumerable<PersistentThreadMessage> messages, Dictionary<string, string> fileIds)
{
    foreach (PersistentThreadMessage threadMessage in messages)
    {
        Console.Write($"{threadMessage.CreatedAt:yyyy-MM-dd HH:mm:ss} - {threadMessage.Role,10}: ");
        foreach (MessageContent contentItem in threadMessage.ContentItems)
        {
            if (contentItem is MessageTextContent textItem)
            {
                if (threadMessage.Role == MessageRole.Agent && textItem.Annotations.Count > 0)
                {
                    string strMessage = textItem.Text;
                    foreach (MessageTextAnnotation annotation in textItem.Annotations)
                    {
                        if (annotation is MessageTextFilePathAnnotation pathAnnotation)
                        {
                            strMessage = replaceReferences(fileIds, pathAnnotation.FileId, pathAnnotation.Text, strMessage);
                        }
                        else if (annotation is MessageTextFileCitationAnnotation citationAnnotation)
                        {
                            strMessage = replaceReferences(fileIds, citationAnnotation.FileId, citationAnnotation.Text, strMessage);
                        }
                    }
                    Console.Write(strMessage);
                }
                else
                {
                    Console.Write(textItem.Text);
                }
            }
            else if (contentItem is MessageImageFileContent imageFileItem)
            {
                Console.Write($"<image from ID: {imageFileItem.FileId}");
            }
            Console.WriteLine();
        }
    }
}

// Helper method to replace file references in the text
static string replaceReferences(Dictionary<string, string> fileIds, string fileID, string placeholder, string text)
{
    if (fileIds.TryGetValue(fileID, out string replacement))
        return text.Replace(placeholder, $" [{replacement}]");
    else
        return text.Replace(placeholder, $" [{fileID}]");
}
Ersetzen Sie YOUR-FOUNDRY-RESOURCE-NAME und YOUR-PROJECT-NAME durch Ihre Werte:
#Upload the file
curl --request POST --url 'https://YOUR-FOUNDRY-RESOURCE-NAME.services.ai.azure.com/api/projects/YOUR-PROJECT-NAME/files?api-version=v1' \
    -h 'authorization: Bearer $AZURE_AI_AUTH_TOKEN' \
    -f purpose="assistant" \
    -f file="@product_info_1.md" #File object (not file name) to be uploaded.
#Lets say file ID created is assistant-123456789. Use this in the next step

# create vector store
curl --request POST --url 'https://YOUR-FOUNDRY-RESOURCE-NAME.services.ai.azure.com/api/projects/YOUR-PROJECT-NAME/vector_stores?api-version=v1' \
-h 'authorization: Bearer $AZURE_AI_AUTH_TOKEN' \
-h 'content-type: application/json' \
-d '{
        "name": "my_vectorstore",
        "file_ids": ["assistant-123456789"]
    }'
#Lets say Vector Store ID created is vs_123456789. Use this in the next step

# Create Agent for File Search
curl --request POST --url 'https://YOUR-FOUNDRY-RESOURCE-NAME.services.ai.azure.com/api/projects/YOUR-PROJECT-NAME/assistants?api-version=v1' \
    -h 'authorization: Bearer $AZURE_AI_AUTH_TOKEN' \
    -h 'content-type: application/json' \
    -d '{
        "model": "gpt-4o",
        "name": "my-assistant",
        "instructions": "You are a helpful assistant and can search information from uploaded files",
        "tools": [{"type": "file_search"}],
        "tool_resources": {"file_search": {"vector_store_ids": ["vs_123456789"]}}
    }'
#Lets say agent ID created is asst_123456789. Use this to run the agent

# Create thread
curl --request POST --url 'https://YOUR-FOUNDRY-RESOURCE-NAME.services.ai.azure.com/api/projects/YOUR-PROJECT-NAME/threads?api-version=v1' \
    -h 'authorization: Bearer $AZURE_AI_AUTH_TOKEN' \
    -h 'content-type: application/json'
#Lets say thread ID created is thread_123456789. Use this in the next step

# Create message using thread ID
curl --request POST --url 'https://YOUR-FOUNDRY-RESOURCE-NAME.services.ai.azure.com/api/projects/YOUR-PROJECT-NAME/threads/thread_123456789/messages?api-version=v1' \
    -h 'authorization: Bearer $AZURE_AI_AUTH_TOKEN' \
    -h 'content-type: application/json' \
    -d '{
            "role": "user",
            "content": "Hello, what Contoso products do you know?"
        }'

# Run thread with the agent - use both agent id and thread id
curl --request POST --url 'https://YOUR-FOUNDRY-RESOURCE-NAME.services.ai.azure.com/api/projects/YOUR-PROJECT-NAME/threads/thread_123456789/runs?api-version=v1' \
    -h 'authorization: Bearer $AZURE_AI_AUTH_TOKEN' \
    -h 'content-type: application/json' \
    --data '{
        "assistant_id": "asst_123456789"
    }'

# List the messages in the thread using thread ID
curl --request GET --url 'https://YOUR-FOUNDRY-RESOURCE-NAME.services.ai.azure.com/api/projects/YOUR-PROJECT-NAME/threads/thread_123456789/messages?api-version=v1' \
    -h 'authorization: Bearer $AZURE_AI_AUTH_TOKEN' \
    -h 'content-type: application/json'

# Delete agent once done using agent id
curl --request DELETE --url 'https://YOUR-FOUNDRY-RESOURCE-NAME.services.ai.azure.com/api/projects/YOUR-PROJECT-NAME/assistants/asst_123456789?api-version=v1' \
    -h 'authorization: Bearer $AZURE_AI_AUTH_TOKEN' \
    -h 'content-type: application/json'
Bereinigen von Ressourcen
Wenn Sie sie nicht mehr benötigen, löschen Sie die dem Projekt zugeordnete Ressourcengruppe.
Wählen Sie im Azure AI Foundry-Portal ihren Projektnamen in der oberen rechten Ecke aus. Wählen Sie dann den Link für die Ressourcengruppe aus, um sie im Azure-Portal zu öffnen. Wählen Sie die Ressourcengruppe und dann "Löschen" aus. Vergewissern Sie sich, dass Sie die Ressourcengruppe löschen möchten.
Verwandte Inhalte
Übersicht über die Azure AI Foundry-Clientbibliothek
